

 29Likes
 LinkBack URL
 About LinkBacks
Forming .257 Roberts Ackley Improved cases from 8x57 brass
Background
Recently I found that I was down to my last ten or so loaded rounds for the hunting rifle chambered in .257 Improved, not enough for over the summer, so it would soon be time for a reloading session. I also recalled that in amongst the spent cases there was now the odd split neck, and hoped that when I came to look through them I would only lose maybe half-a-dozen and the rest I could run through the annealer and all would be well.
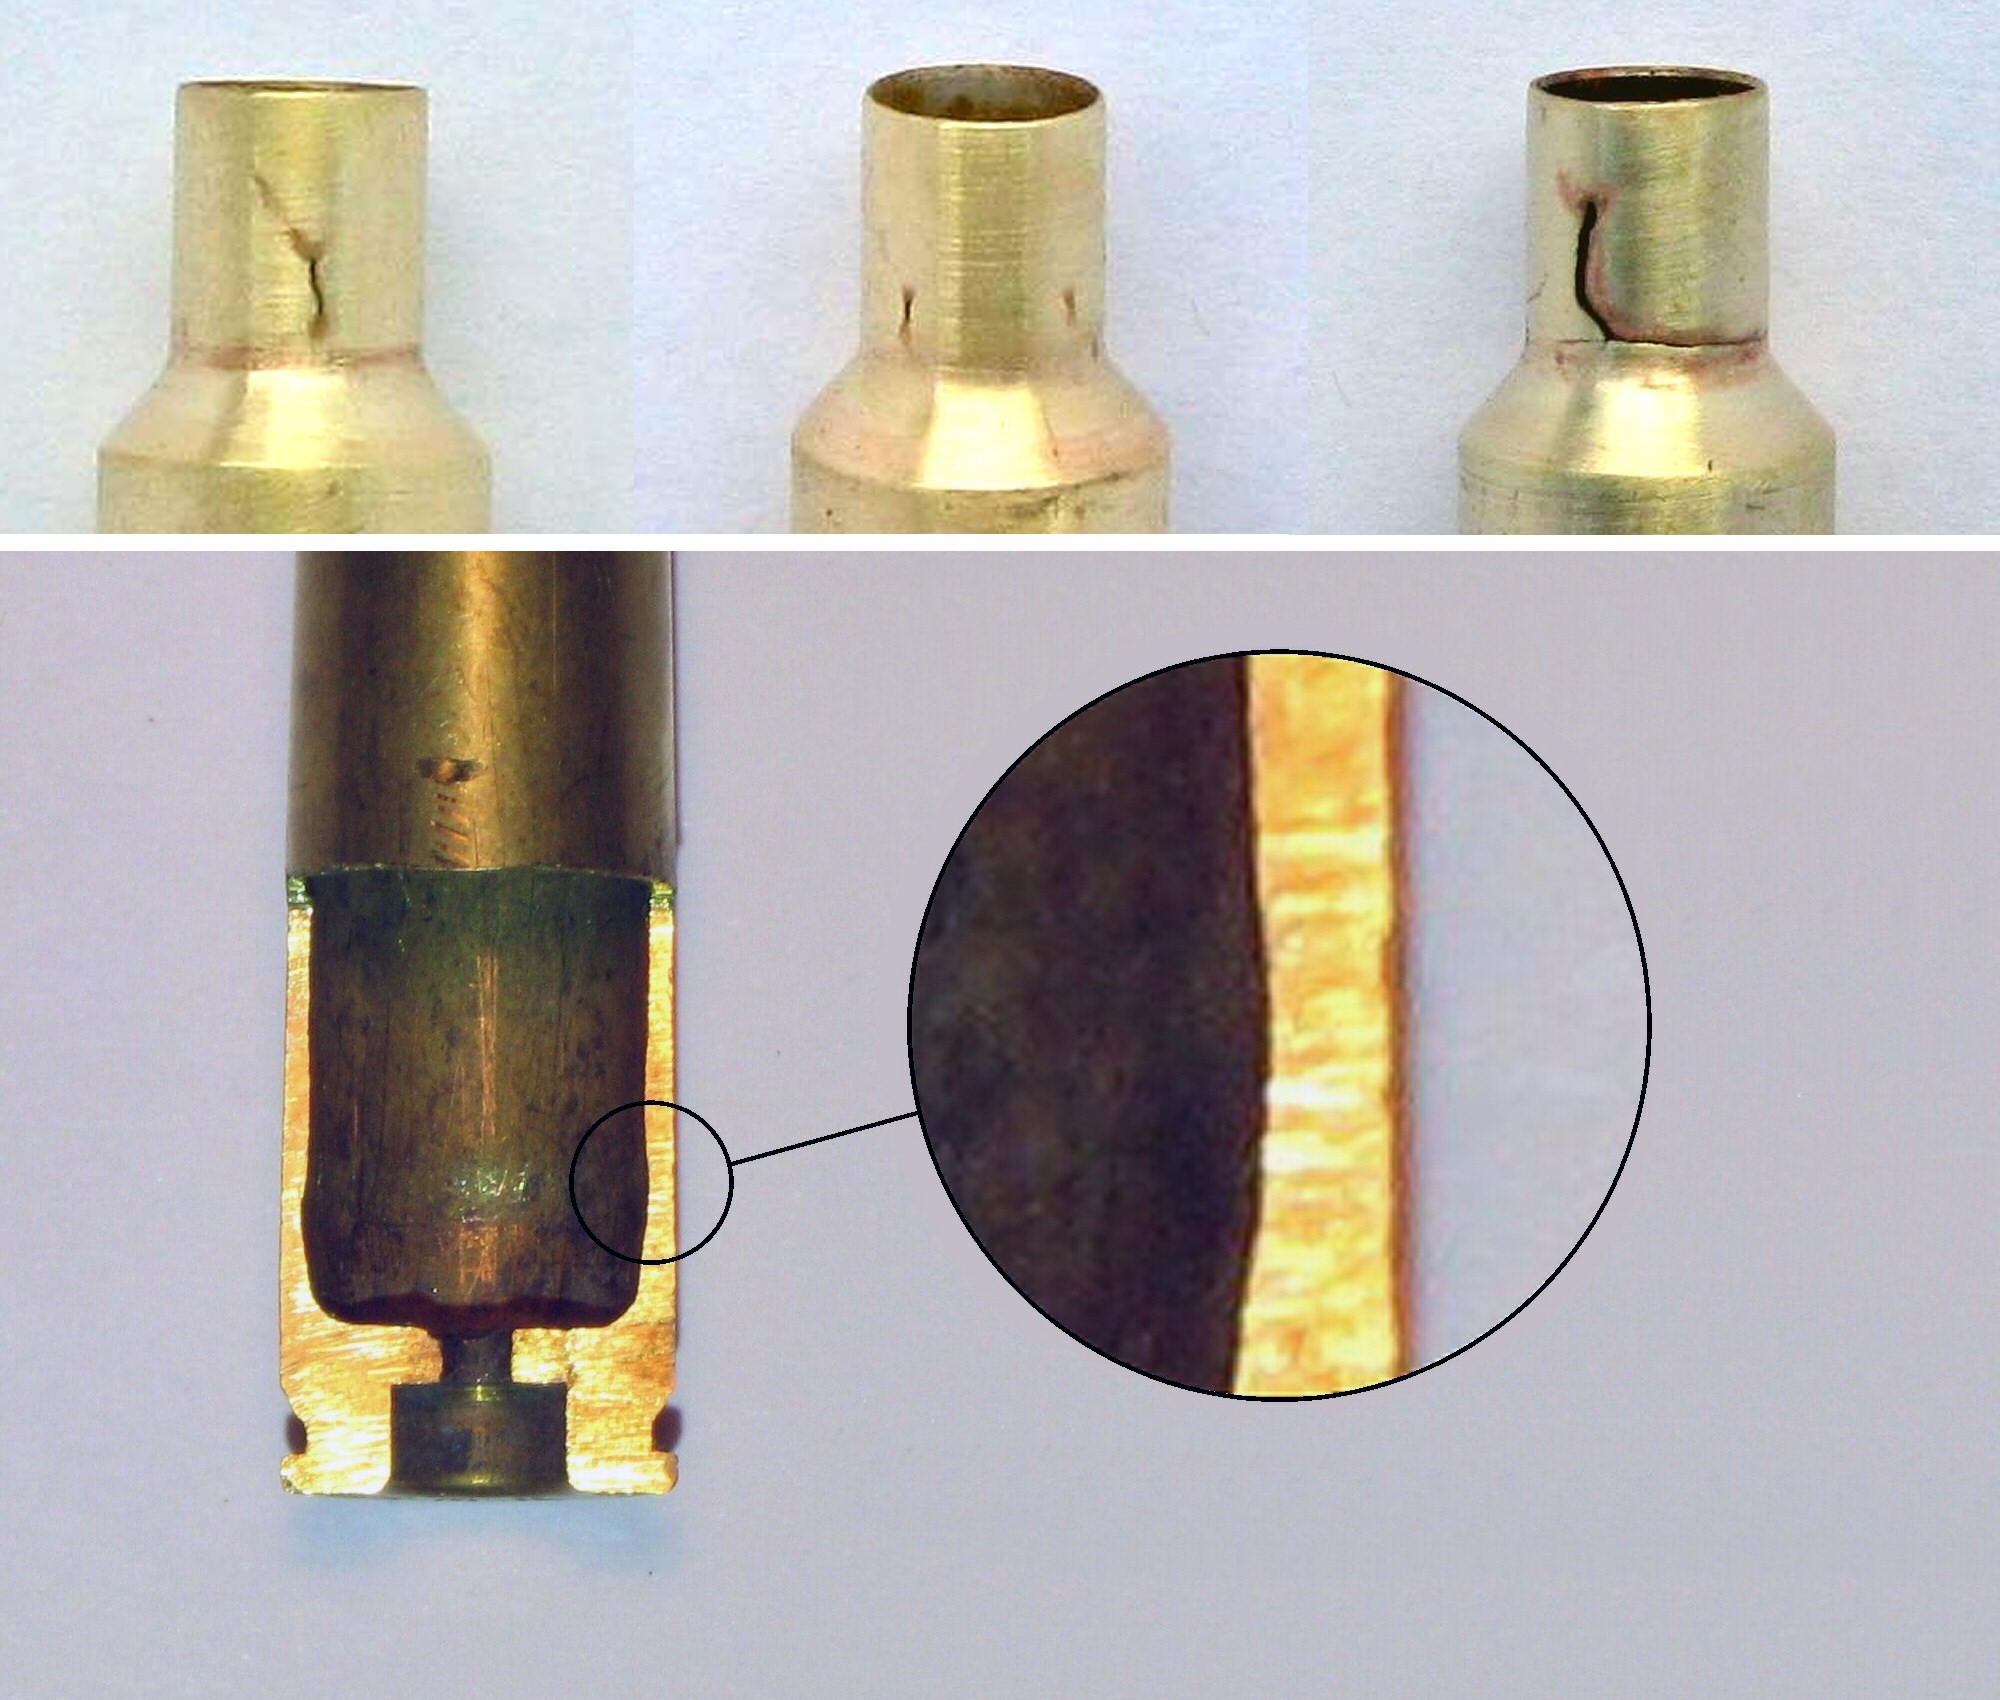
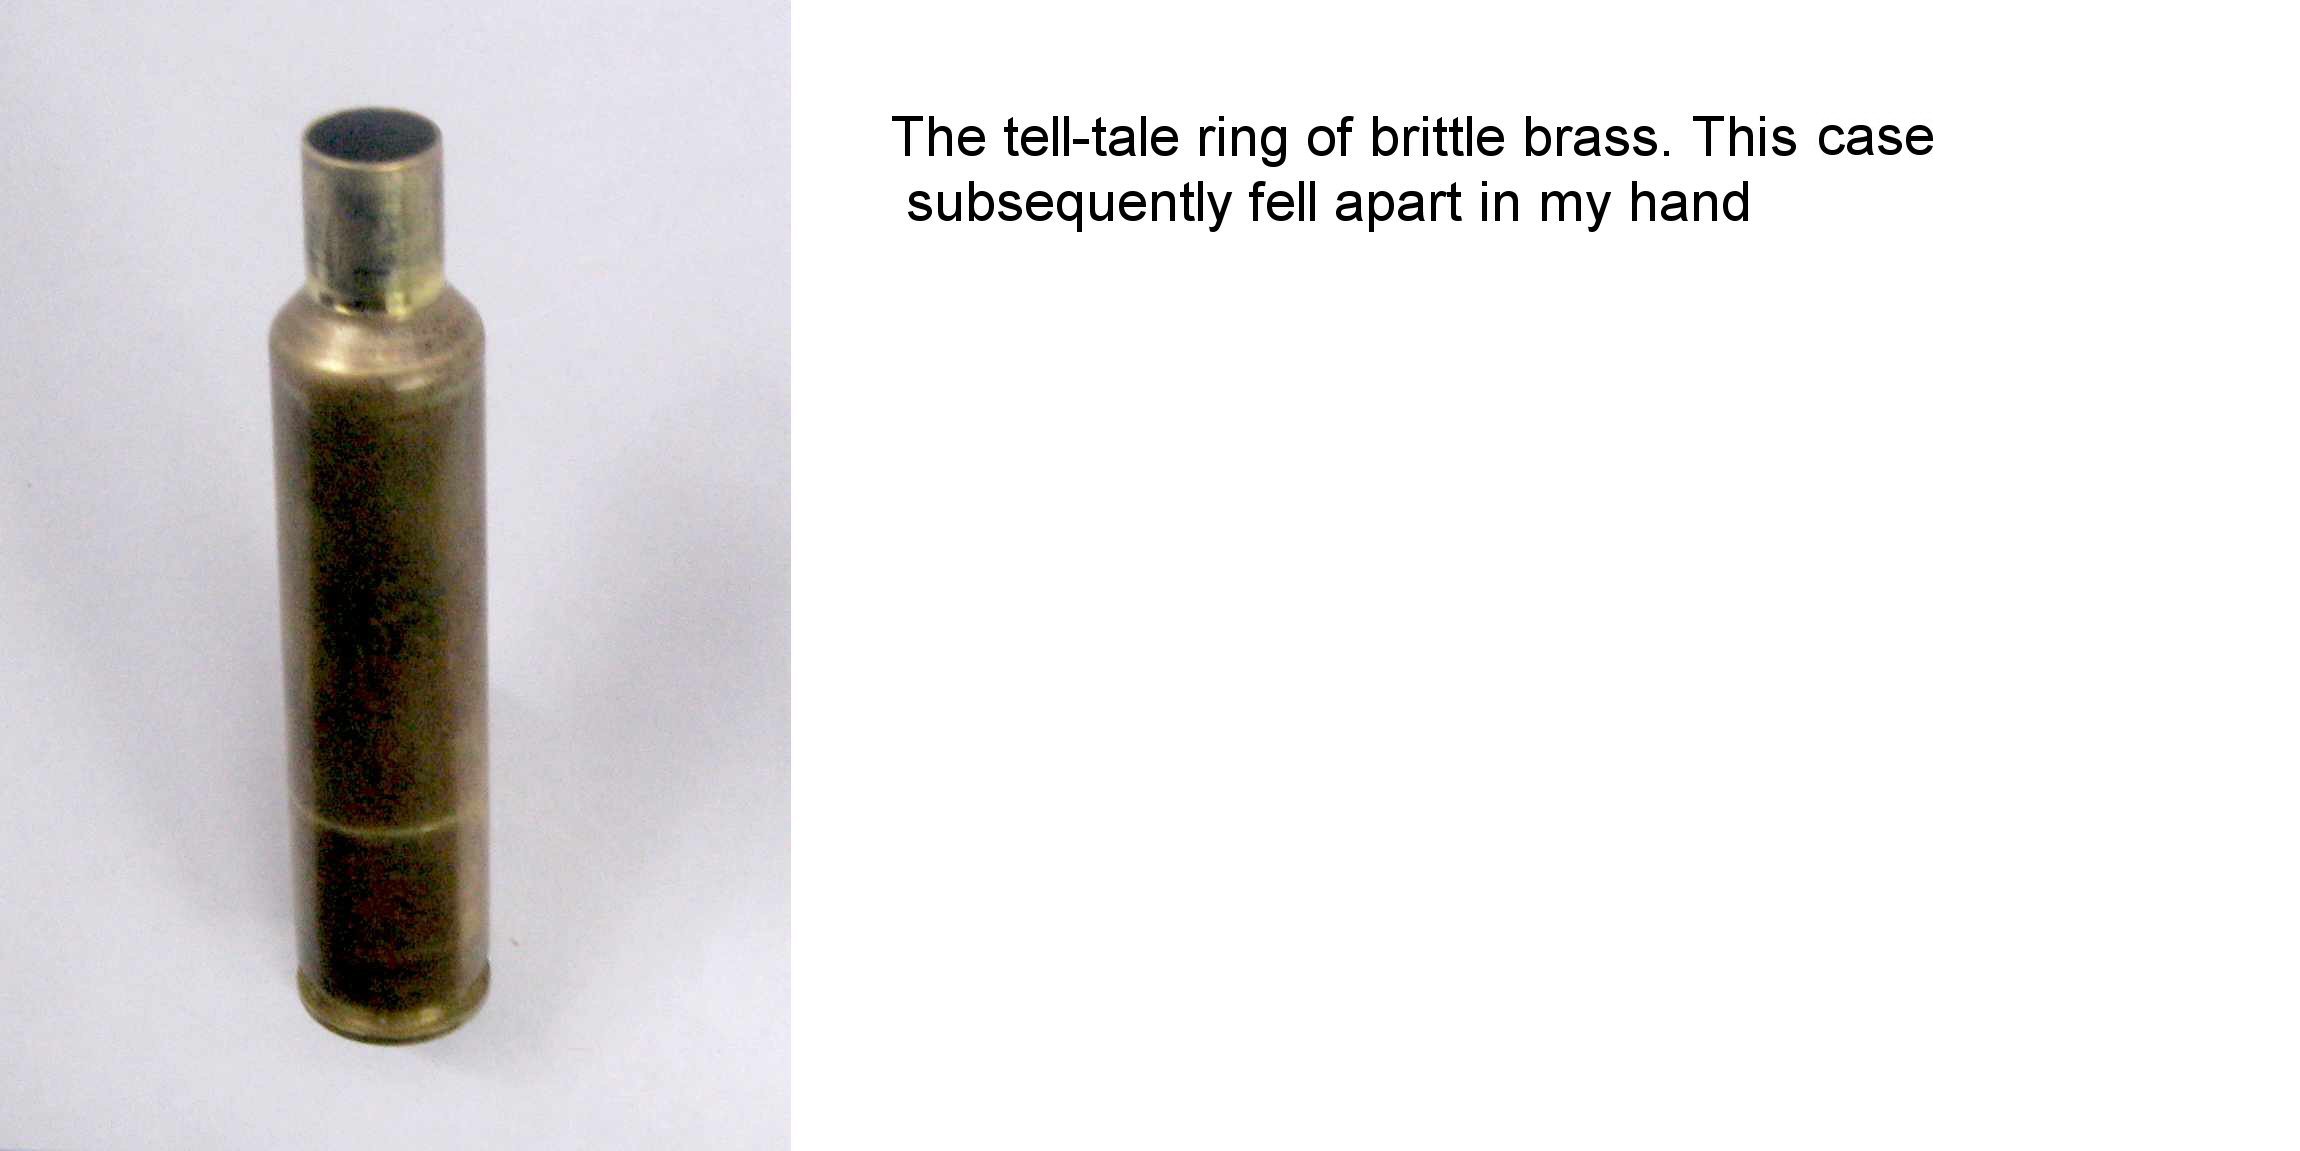
Instead, on inspection, the attrition rate from splitting was over one-half Id clearly left things too long but worse; many of the remaining cases were showing signs of thinning in the brass above the head, identified by feel for the indent in the interior wall. I sectioned a case to have a closer look, and sure enough, the walls were down by a quarter from normal thickness in the usual place. Theyd last another loading, but now was the time to start looking for replacement brass.
That said, I had used this set of cases for a long time. Originally fire formed from five boxes of .257 Roberts Winchester +P 117gr RN factory ammo purchased for a sharp price from Viv Collings as slow moving stock; all these years later and I wasnt hopeful of easily finding more of the same or unloaded brass for that matter. After calls to the usual places and then a look through some U.S. forum threads on the availability problems over there, this concern turned out to be realised.
Selecting a starting case
So while .257 Roberts brass now appears to be quite difficult to find, those that reload for this round will know that it can be made by necking up or down from the other cases that also derive from the 57mm Mauser case. This would most commonly be done by expanding 6mm Remington brass a cartridge that has retained only marginally better availability here in NZ or by necking down 7x57. There shouldnt be much of a problem finding 7mm Mauser brass.
This approach comes up from time-to-time on most of the forums where reloading discussions have a place, but seldom do I see any specifics on how to go about it. For reloaders here who are well versed in turning one type of brass into another, such a conversion must seem trivial. But there will also be owners of rifles chambered from amongst this group of hard-to-find cartridges 6mm Remington, .257 Roberts, .257AI who are occasional reloaders, and who might appreciate more of a step-by-step description of how to go about making some fresh cases from brass that is still readily available.
Another reason for not dismissing the fine detail as unnecessary is that there is the potential for things to go wrong when firing home-modified brass that should not be underestimated. Here is a recent article from NZ Guns that emphasises this:
https://nzguns.co.nz/guns/converting-brass/
When possible I have a preference for brass from the blue boxes. Looking through the Lapua range for possible donor cases, the closest candidate was the 8x57is (the rimless Mauser round) since Lapua dont make 7x57 brass. In these times of shortage, Belmont Ammunition still held stock of 8x57 Lapua brass.
What follows then is a detailed description of the steps I used to form this particular brass down to something approximating .257 Roberts, at which point it was loaded and fire formed to the finished shape in the improved chamber. Most of these steps could also be used to make standard .257 Roberts or 6mm Remington. Even if necking down from 7x57 there might be something useful to be found here perhaps on setting the headspace for fire forming.
Step 1. Reduce the neck diameter to .284 via .308
The 8mm cases cannot just be run through the .257 Improved FL (full length) die though otherwise this post would be a lot shorter than it is! With the improved design being wider across the shoulder, the case walls are not supported in such a die. The force required to compress the neck diameter down by so much in one go will collapse the case walls. It may however be possible to run the 8mm cases directly through a standard .257 Roberts die where the case walls are supported, but I havent tried this, nor do I recommend this as a shortcut. The reason being is and as was seen in the cases here that the thickening of the brass in the necks from reducing the diameter will be distributed more evenly if the necking-down is carried out in steps.
Conventional dies for any cartridges with the appropriate intermediate neck diameters may be used as long as these can be set up in the press to size the whole neck without also reducing the dimensions of the case body or shoulder angle. So dies for shorter cases and with at least the same shoulder angle become likely candidates as they can simply be backed off in the press. In selecting these intermediate dies it also helps to avoid using dies for cases with particularly steep shoulder angles; a shallower shoulder understandably seems to better centre the necks to commence the sizing process and retain concentricity. The idea was also to use common dies that were either already on hand or could perhaps be borrowed, rather than buying in a specialty forming die from overseas that might only be used once or twice.
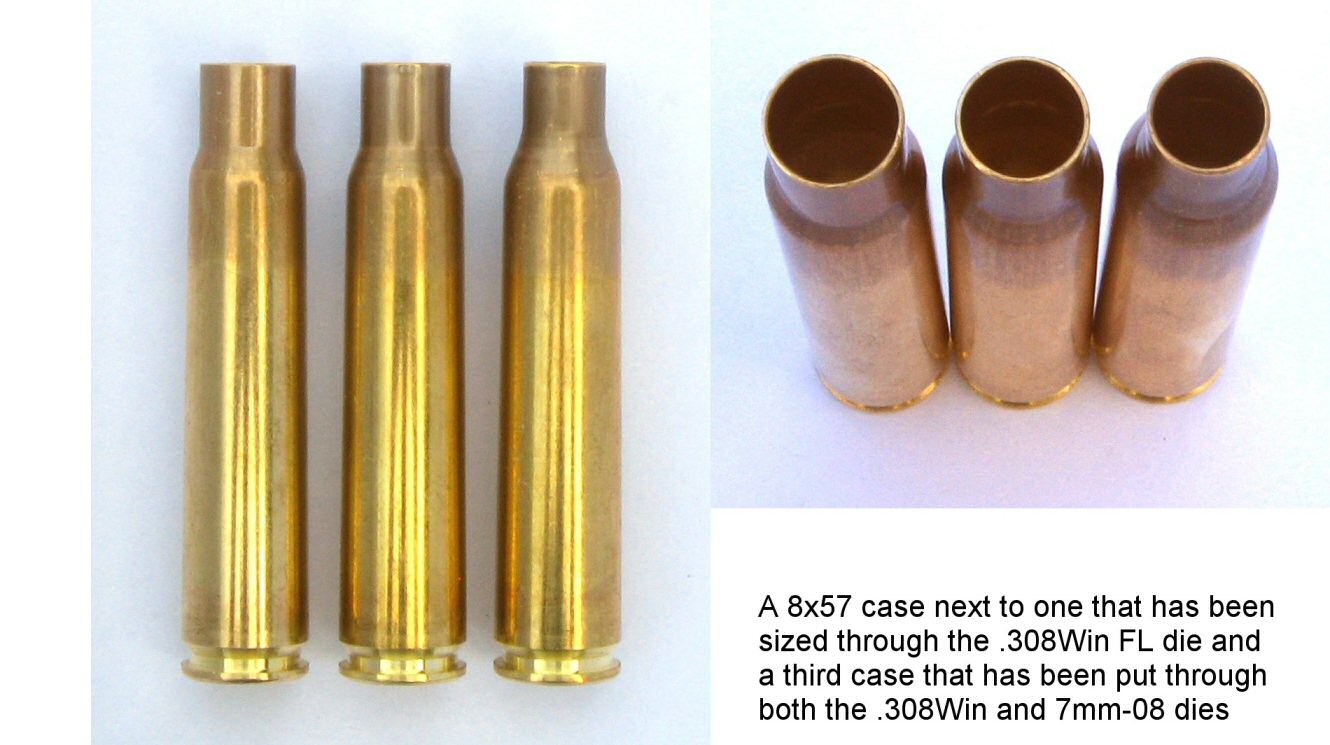
It just so happens that dies for two of our most common cartridges are perfect. I started out then by running the cases through .308 Winchester and 7mm-08 Remington full-length dies (both kindly loaned to me by @Brian), and with the expander buttons removed. The bottoms of the dies were backed off the shell holder to fully size the necks while only just running down onto the existing shoulders. For this the outsides of the cases were lubed with Imperial Sizing Wax.
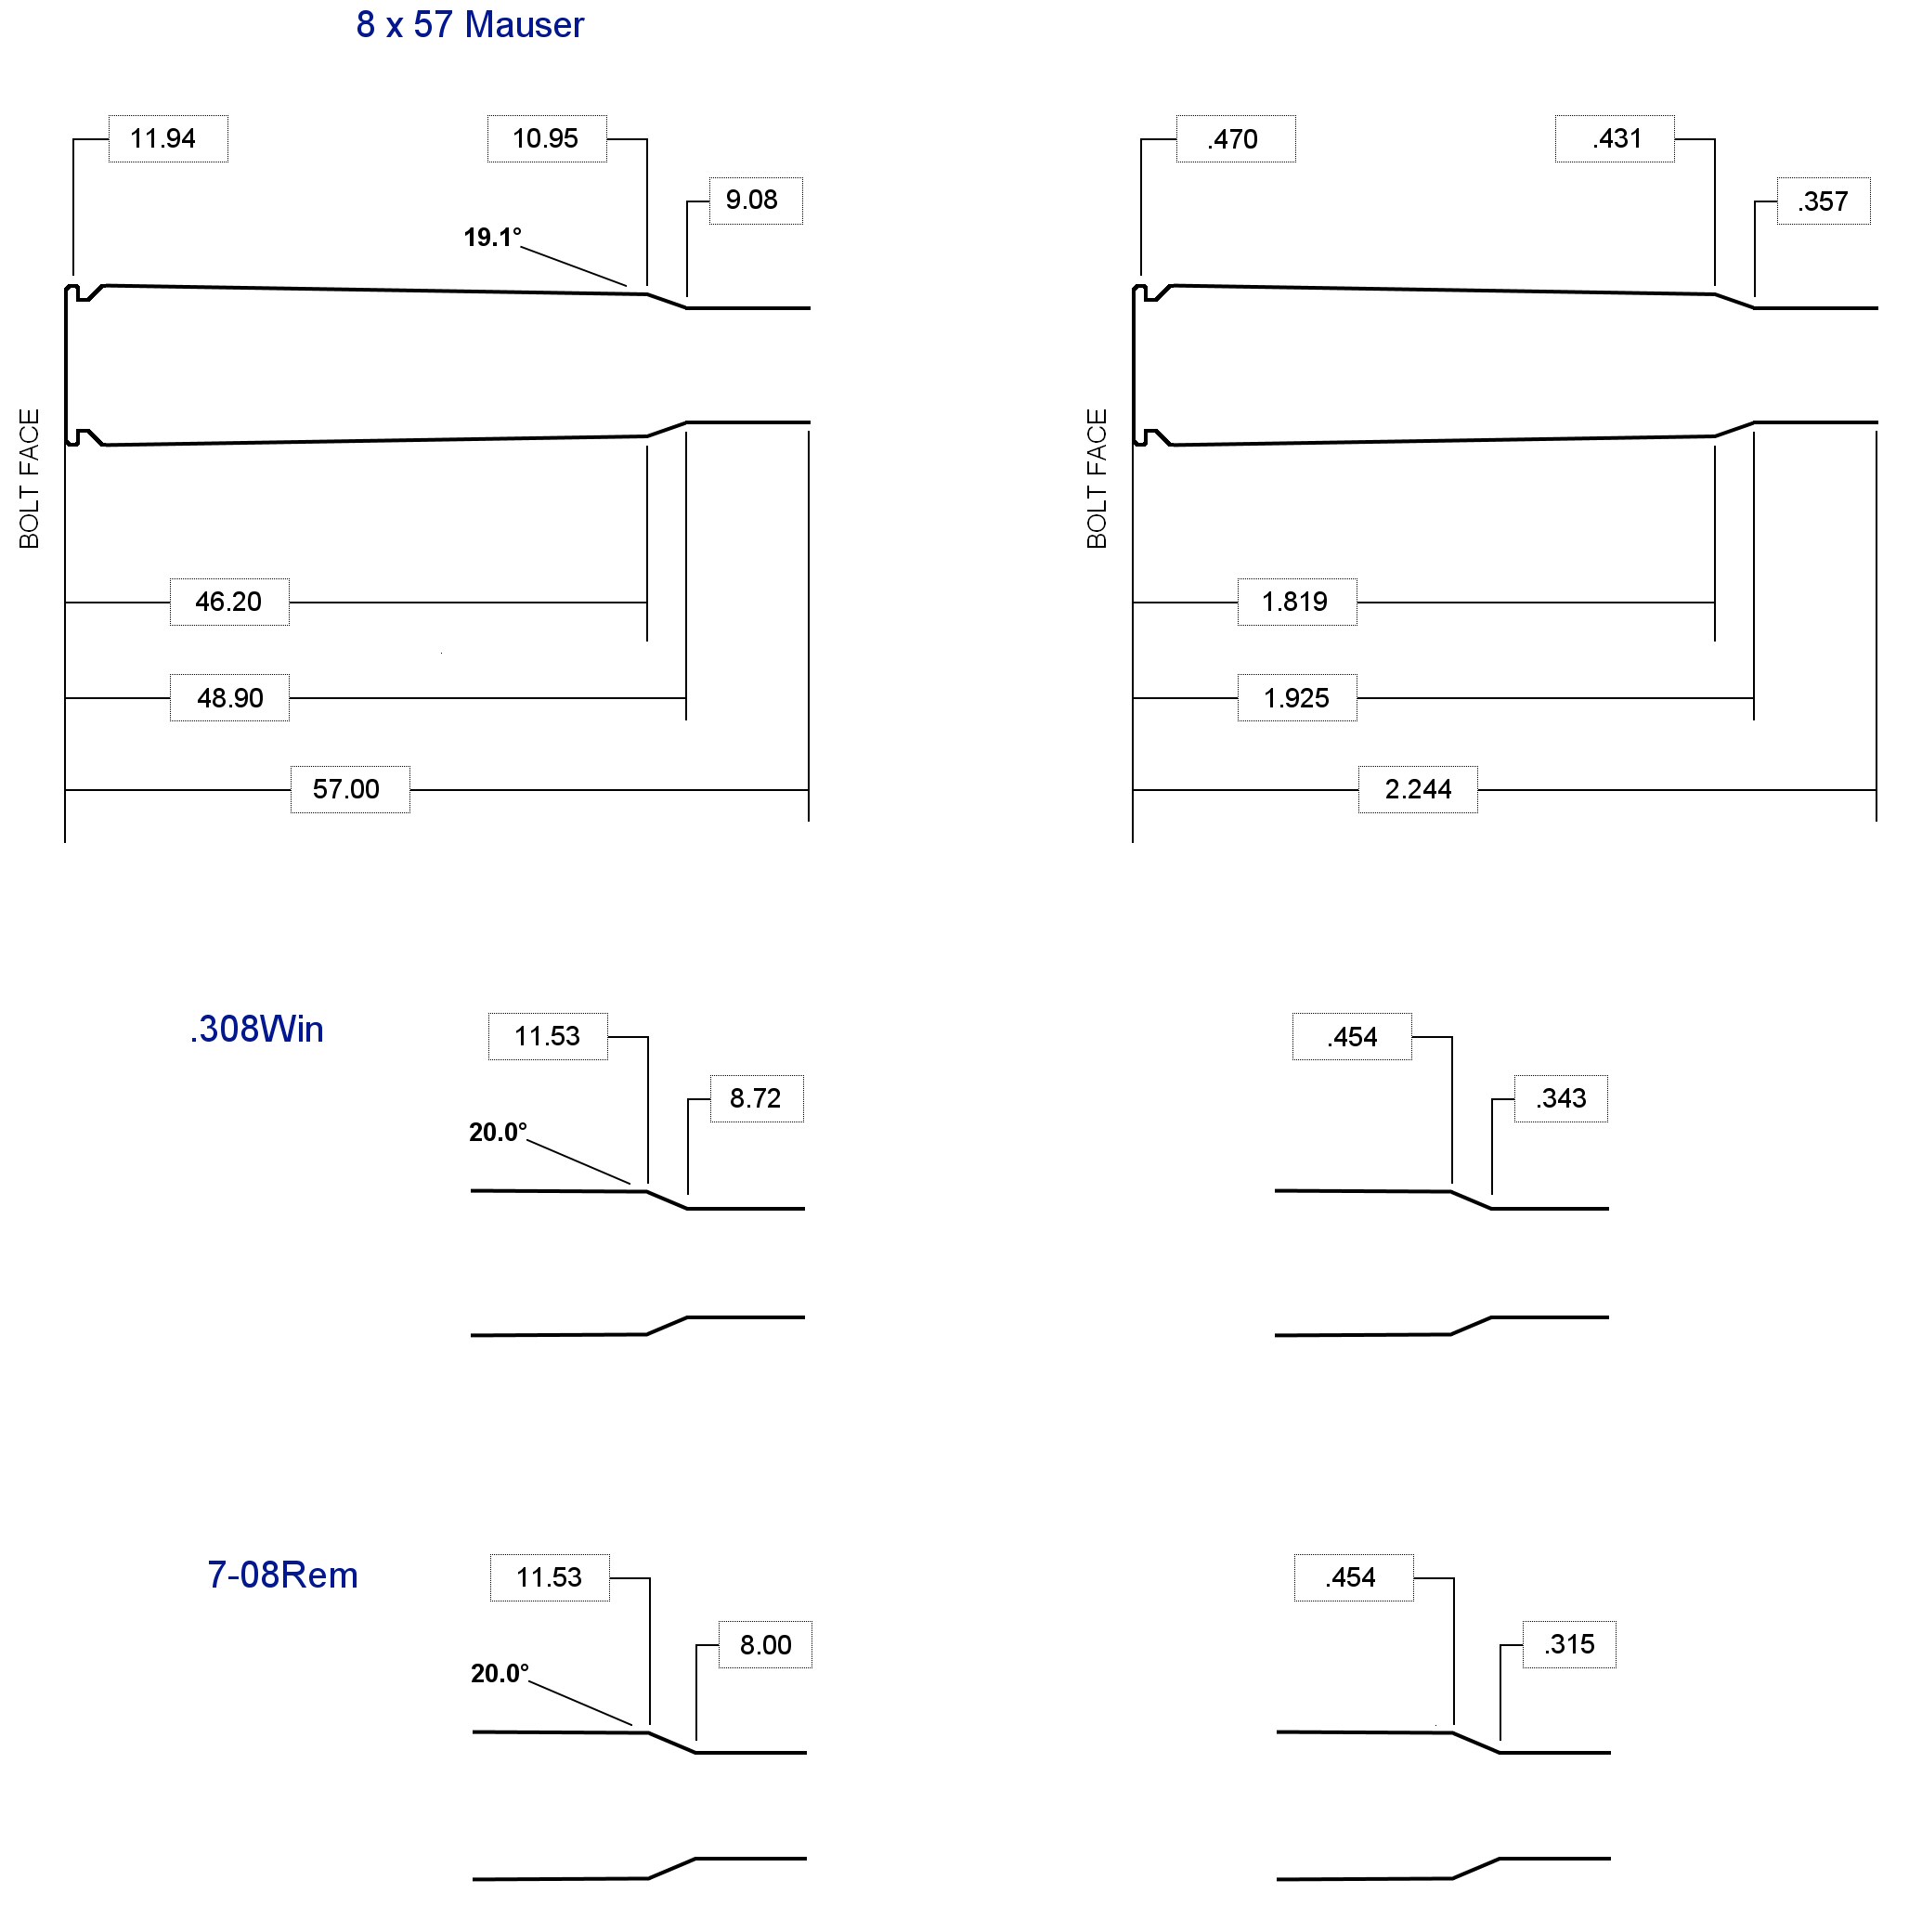
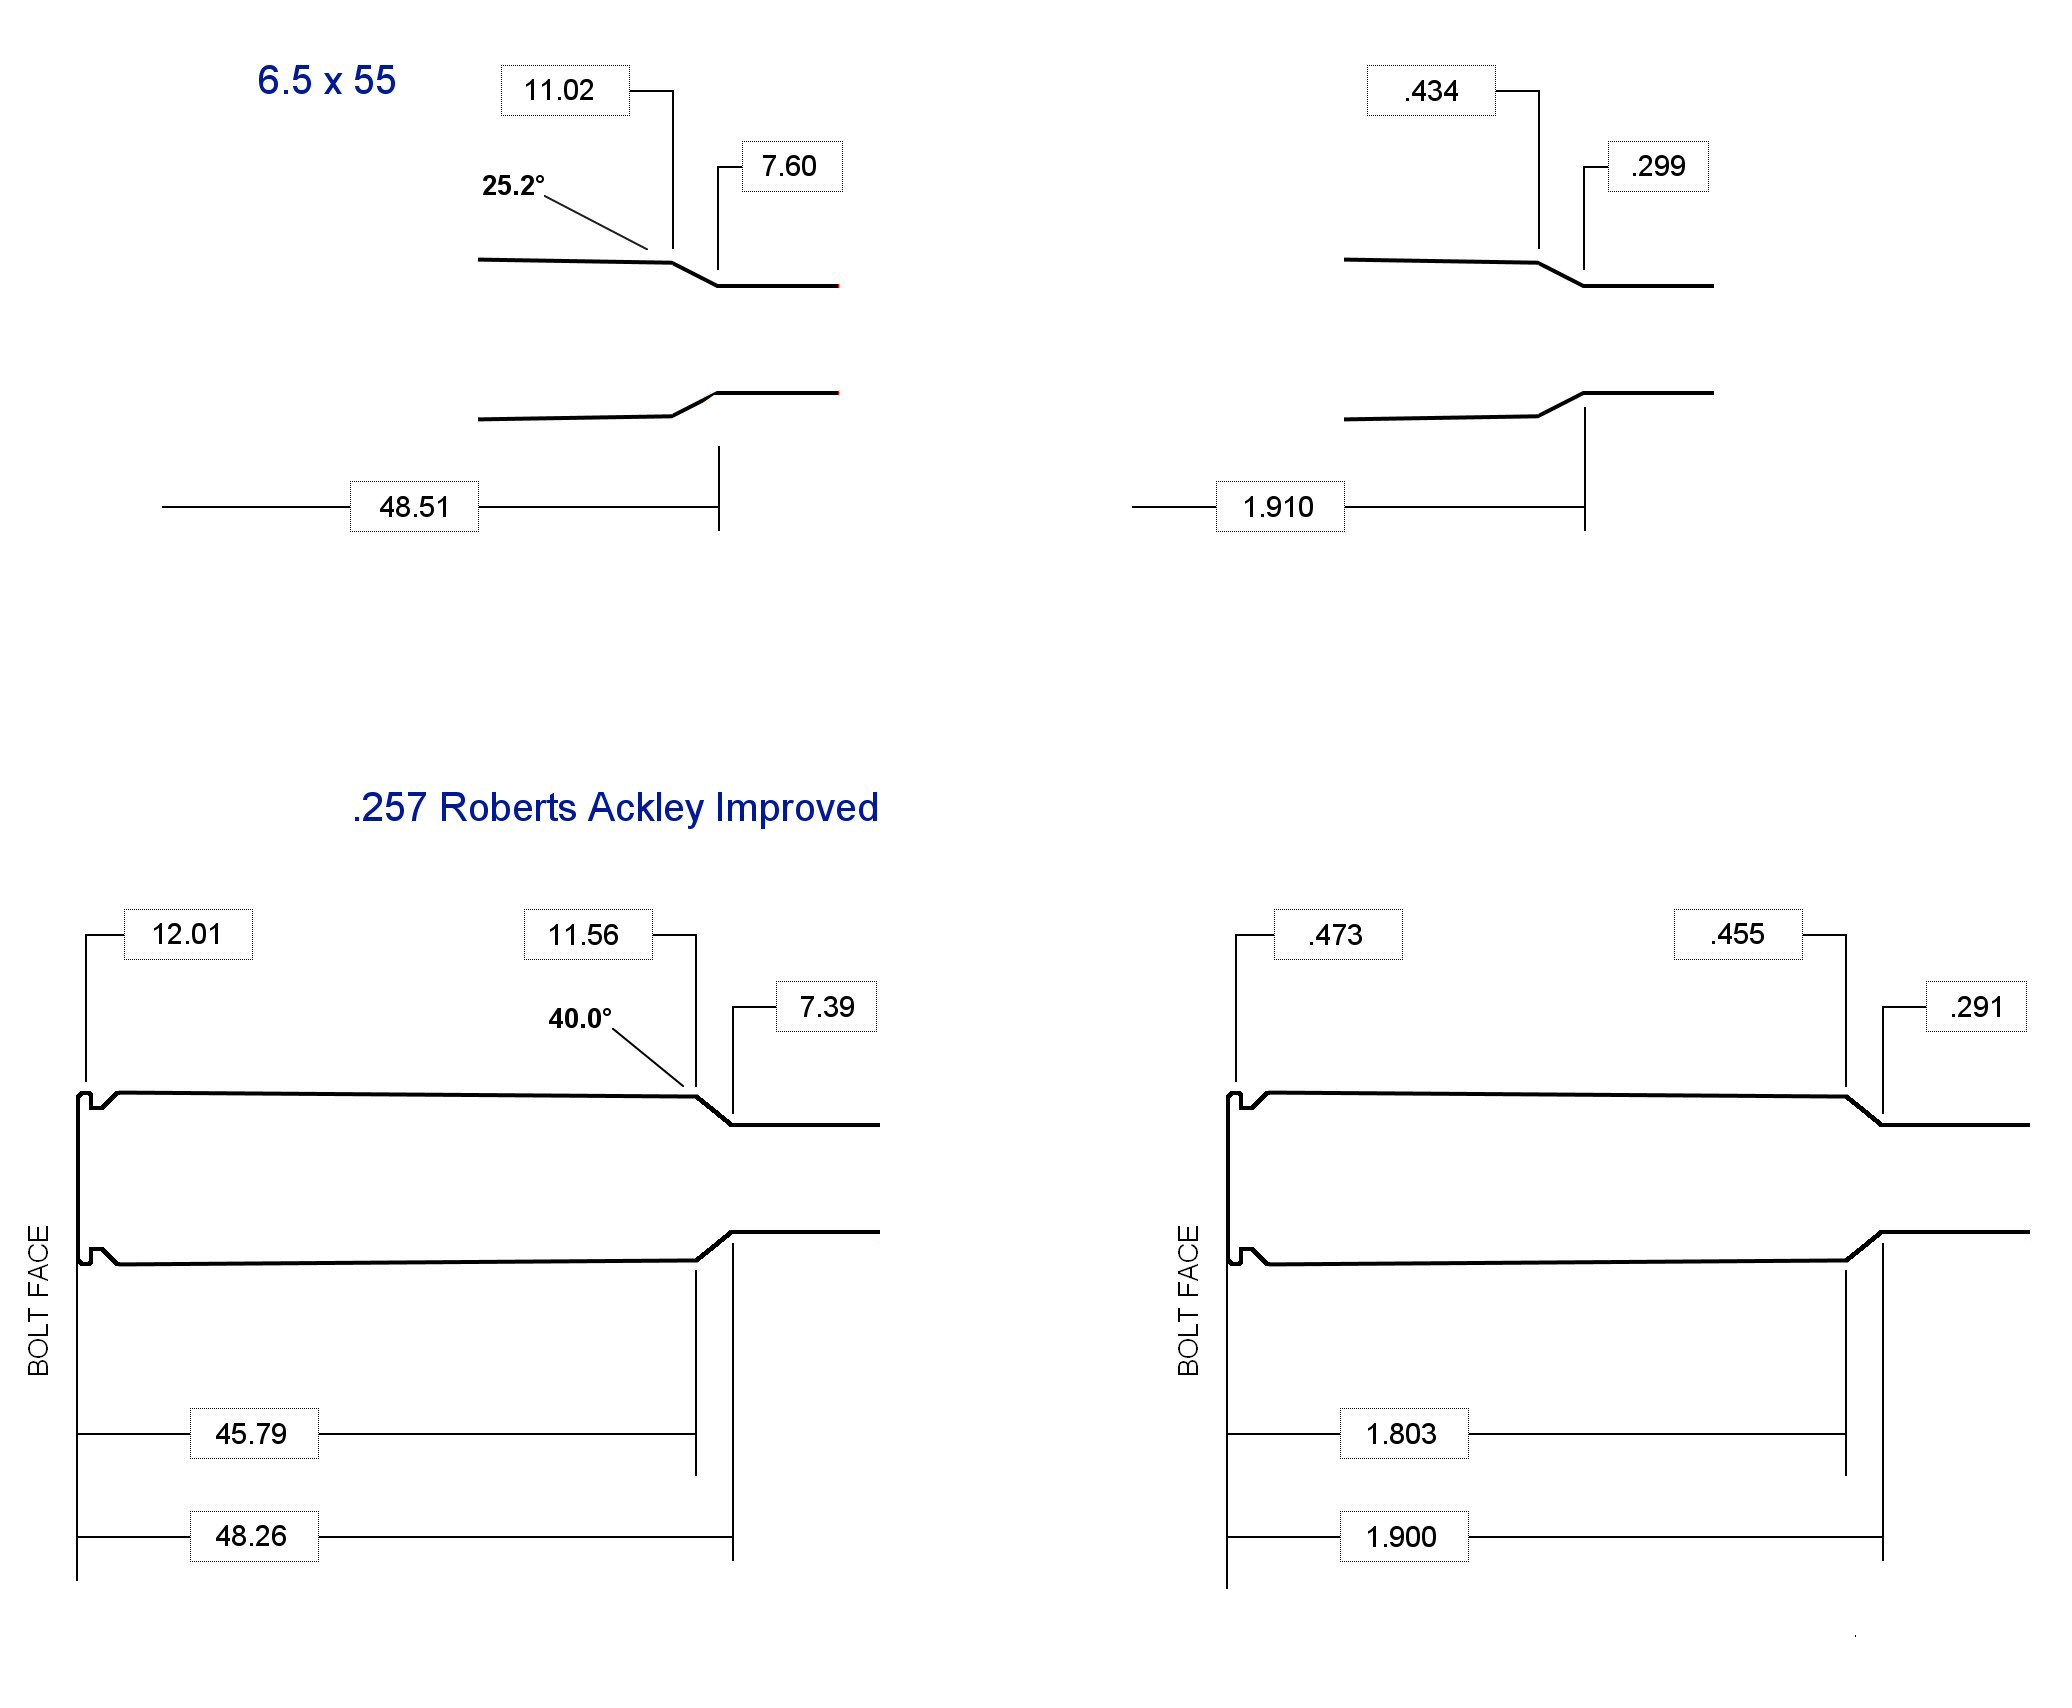
Below is a diagram of the 8mm Mauser CIP case dimensions in both metric (left) and imperial units (right), along with the neck and shoulder dimensions for the .308 and 7mm-08.
The starting outside neck diameter on the 8mm Lapua brass as received being sized ready to load was somewhat smaller than that given above at 8.87mm (0.349). The neck thickness started out at 0.36mm (0.014). Measured case length was 56.7mm.
The full-length .308 and 7mm-08 dies without the expanders fitted took the neck ODs down to a measured 8.36mm (0.329) and 7.67mm (0.302) respectively.
With reference to the above drawing, dies based off the .308 case do not support the case walls either, however the walls had sufficient strength to support the smaller step-wise reductions in neck diameter. The aim was that the existing shoulder should be moved back only slightly if at all, while the neck-shoulder junction moves forward as the base of the neck is converted into new shoulder from reducing the neck diameter. It would only be in the next sizing step that the shoulder would be pushed back to precisely set the separation between the case head and the neck-shoulder junction, giving the headspace for fire forming.
At this point I had something approximating a 7x57 case but with the shoulder pushed forward.
Step 2. Final sizing of cases for fire forming to .257AI
Ideally the cases would now be sized down further to .257 Roberts dimensions and that could then be fire formed. If a conventional full-length die is used for this that contacts the cases right into the neck-shoulder junction then the cases will also be ready for neck turning.
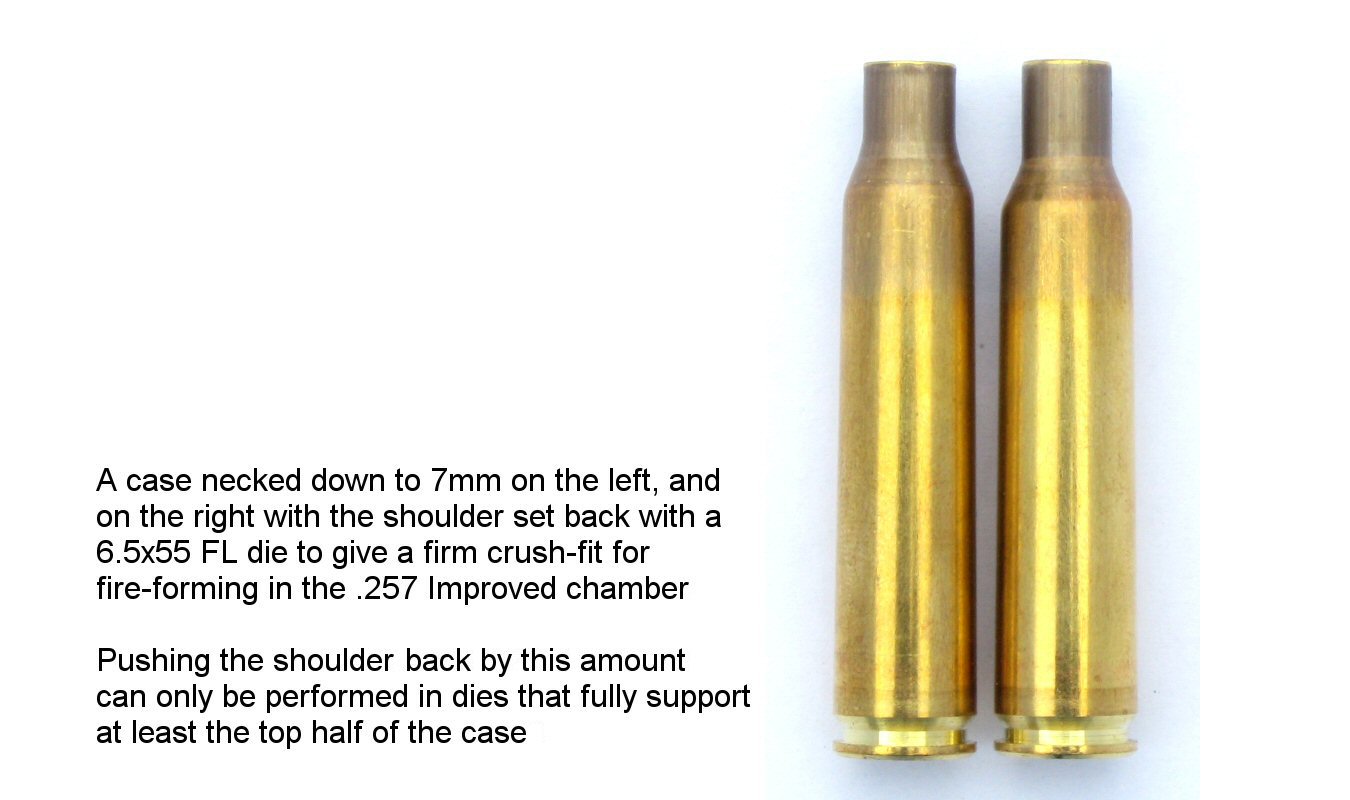
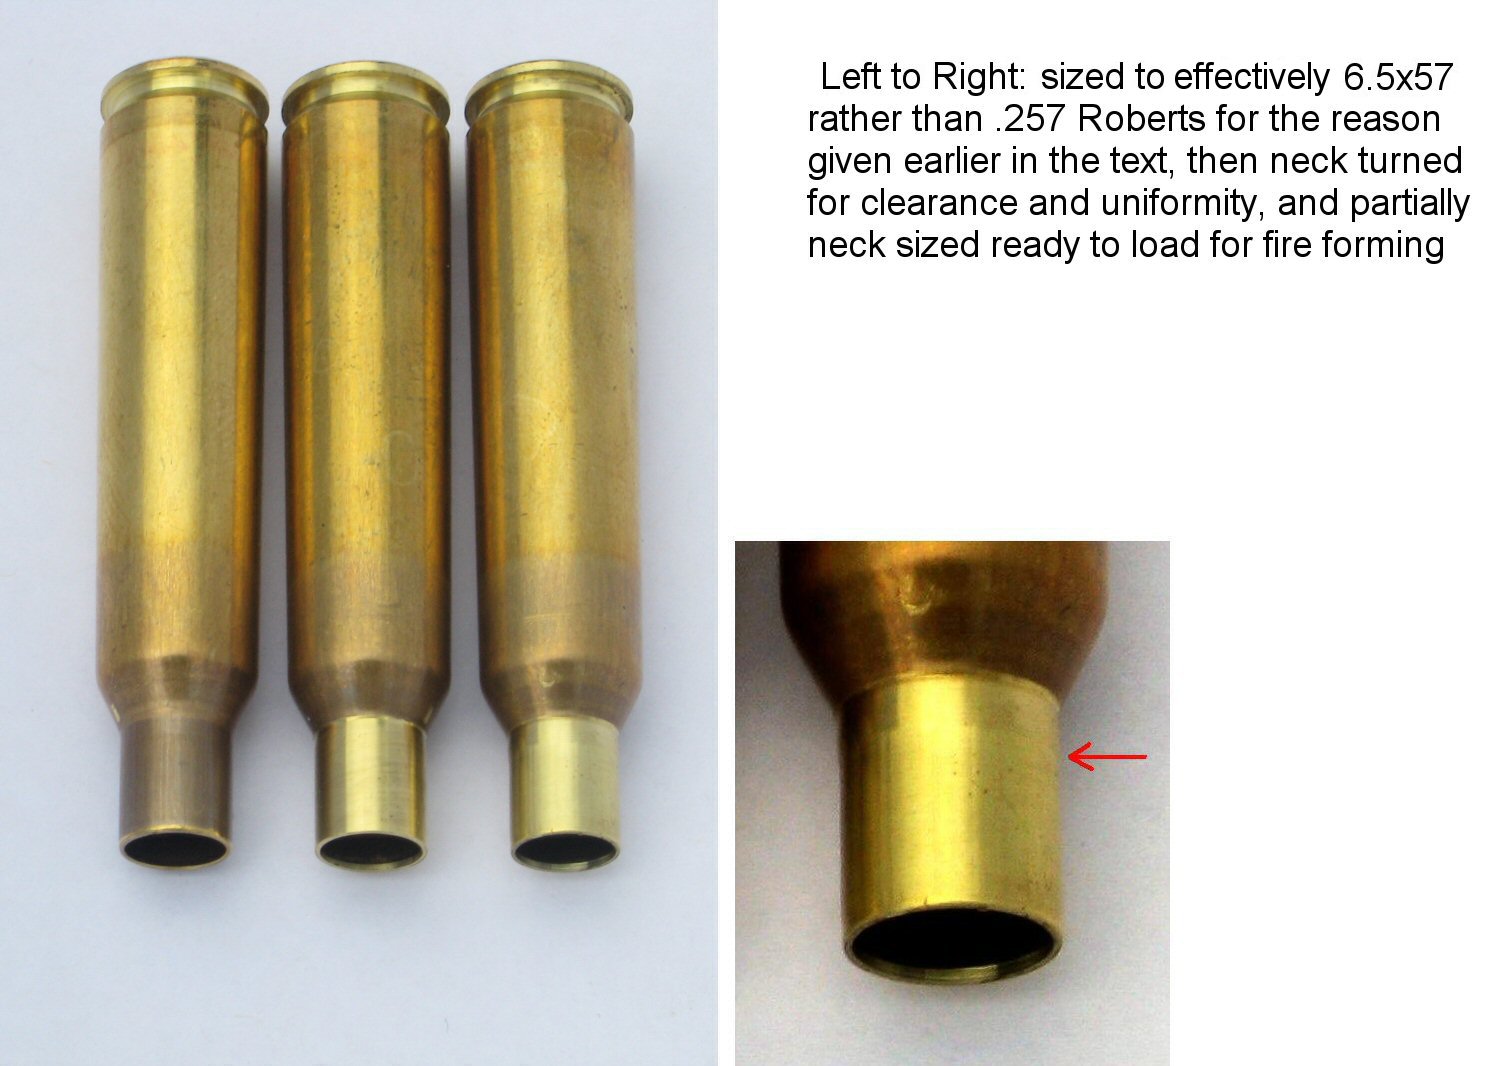
I had a small technical difficulty at this point, as I dont own a standard .257 Roberts die set. I also dont have an expander or neck turning mandrel in 25-cal, but I do have these for 6.5mm. So instead I took the cases down to what was effectively 6.5x57 by running them through a backed-off 6.5x55 Scandinavian FL die (kindly loaned to me by @2post).
In setting up an appropriate headspace for fire forming, the shoulders were pushed back by close on 2mm (0.080).
The expander button was left in place and sizing wax was used on the inside of the necks for this. The overall case length was now 57.2mm.
Below is a comparison of the CIP dimensions for the 6.5x55 and those of my .257 Improved reamer.
Notes on headspacing for fire forming
While I have added a headspacing dimension of 1.910 above to indicate a 0.010 crush-fit at the neck-shoulder junction when chambering cases for fire forming, in practice I just experimented with this figure by feel. My personal preference is to set up the headspace for fire forming so that I almost have to hammer the bolts closed on the parent cases in my 98 Mausers. This degree of crush-fit is set by incrementally lowering the die in the press, usually in 0.1mm (0.004) steps, and testing a sized case or two in the chamber. I want to avoid any stretching in the brass on firing that thins the case walls, and that at the extremity would mean the cases blowing apart. There is no downside that I am aware of to this degree of interference fit on the cases other than the difficulty in closing the bolt. I can also be certain then that the resistance felt is caused by compression between the chamber on the case shoulder or the case-shoulder junction and the bolt face on the case head, and not by some lesser unintended contact, either between the case walls and the chamber, or the jamming of a thickened neck into a chamber that is slightly too tight. Detouring via 6.5mm created this latter issue by the way that deserves mention.
When firing factory ammunition in an improved chamber there is no immediate control of this and you take what comes. Barrels are chambered to be 0.004 under-length on the parent round, or at least I seem to recall reading somewhere that this was the figure Parker Ackley recommended.
Making standard cases
Just as an aside, if wanting to make regular .257 Roberts cases then the brass would now be run through a .257 Roberts full-length die. If 6mm Remington cases were being made, I would be inclined to put the brass through something like a 6.5x55 FL die before the 6mm, to again split the necking-down process with an intermediate step. The 6.5x55 is actually a good choice as it meets the requirements of both reducing the case neck diameter while not compressing the body at any point to less than the final 6mm Remington specification, and is also common enough that many reloaders will already have a set of dies.
For both these cartridges I would propose that the dies for this final sizing could be adjusted height-wise in the press as one would for bumping shoulders back; lowered just enough so that the bolt can close with little or no feel on sized cases that have been chambered in the rifle. Alternatively a degree of crush fit could be left and the cases formed to the exact chamber dimensions with the first firing.
Step 3. Turning the Necks
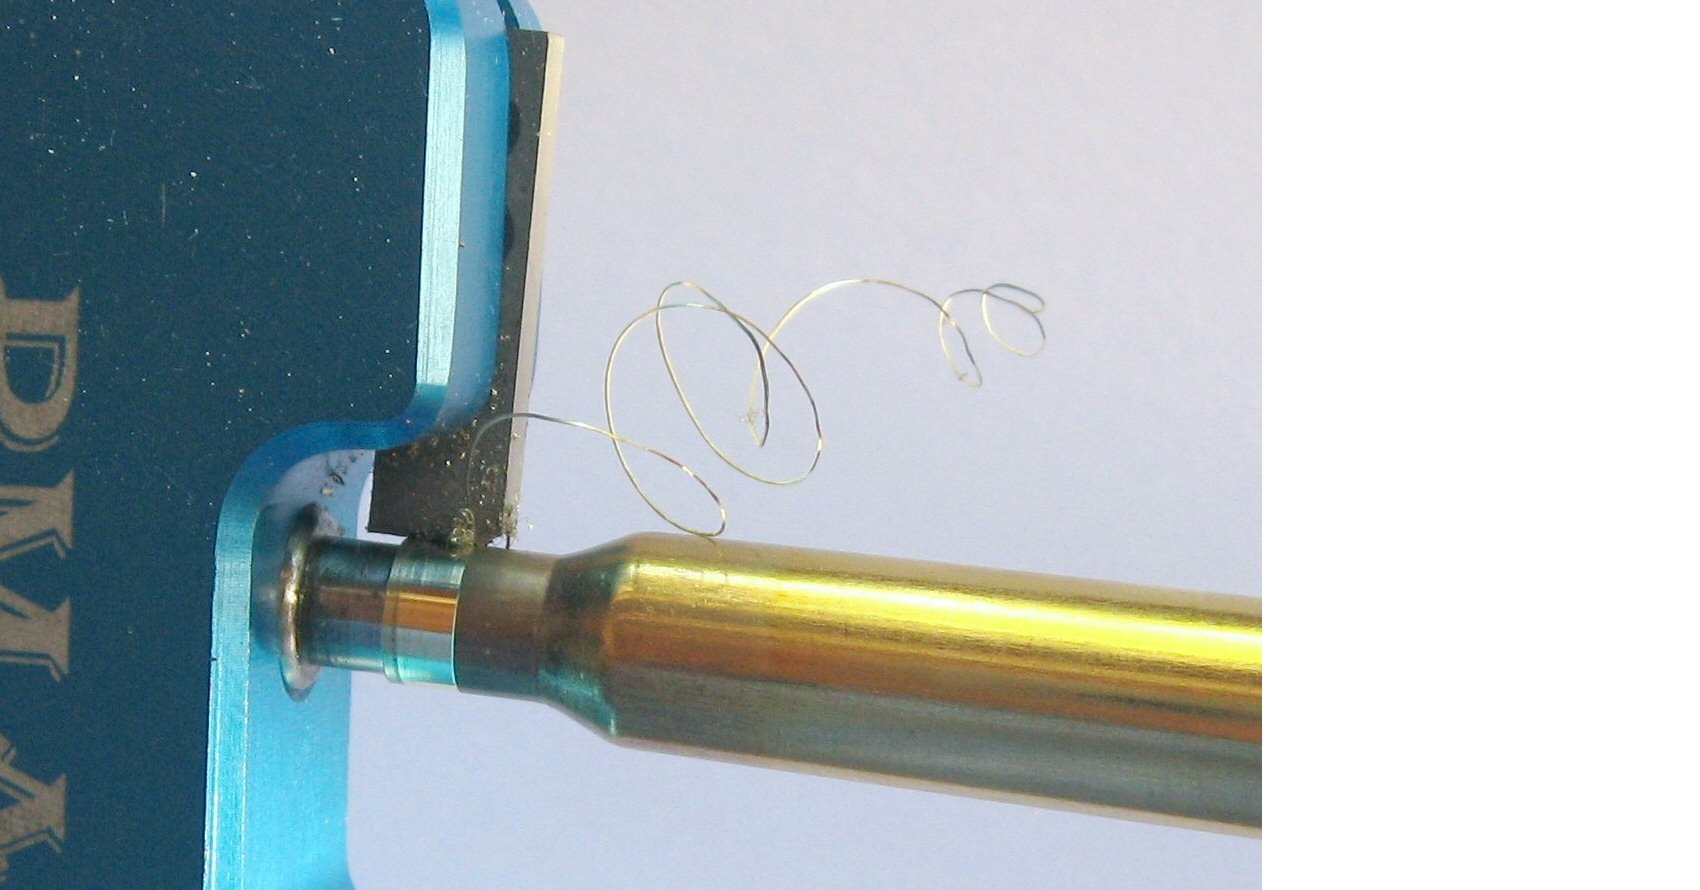
At this point the outside diameter of the necks left by the 6.5mm expander were measured at 7.48-7.50mm (0.294-0.295 with an ID of 0.261-0.262) since the neck walls had thickened to 0.0165. If the necks were being taken down further to make 6mm Remington brass then a thickness over 0.017 could be expected. These would now need to be turned down for two reasons; to uniform the thickness of the brass around the necks, and to give the desired bullet release clearance for the chamber. If a reamer drawing is not available then the chamber neck dimension may be estimated by adding 0.0005-0.001 to the neck OD of previously fired cases.
The cases were then all trimmed back to a uniform 56.7mm in preparation for turning. Necks were chamfered, and then run through a 6.5mm expansion mandrel to achieve a snug fit to the turning spindle. I then took the neck thickness down to 0.0150 with the turning tool.
While this neck turning was performed at 6.5mm through necessity, no additional thickening of the necks was expected or was measured from the further small reduction from .264 to the final .257 neck diameter. Obviously adjust the neck turning setting to suit your particular needs and chamber dimensions if making cases in this way. Neck turning at the end-use calibre would always be preferable if the tools were available.
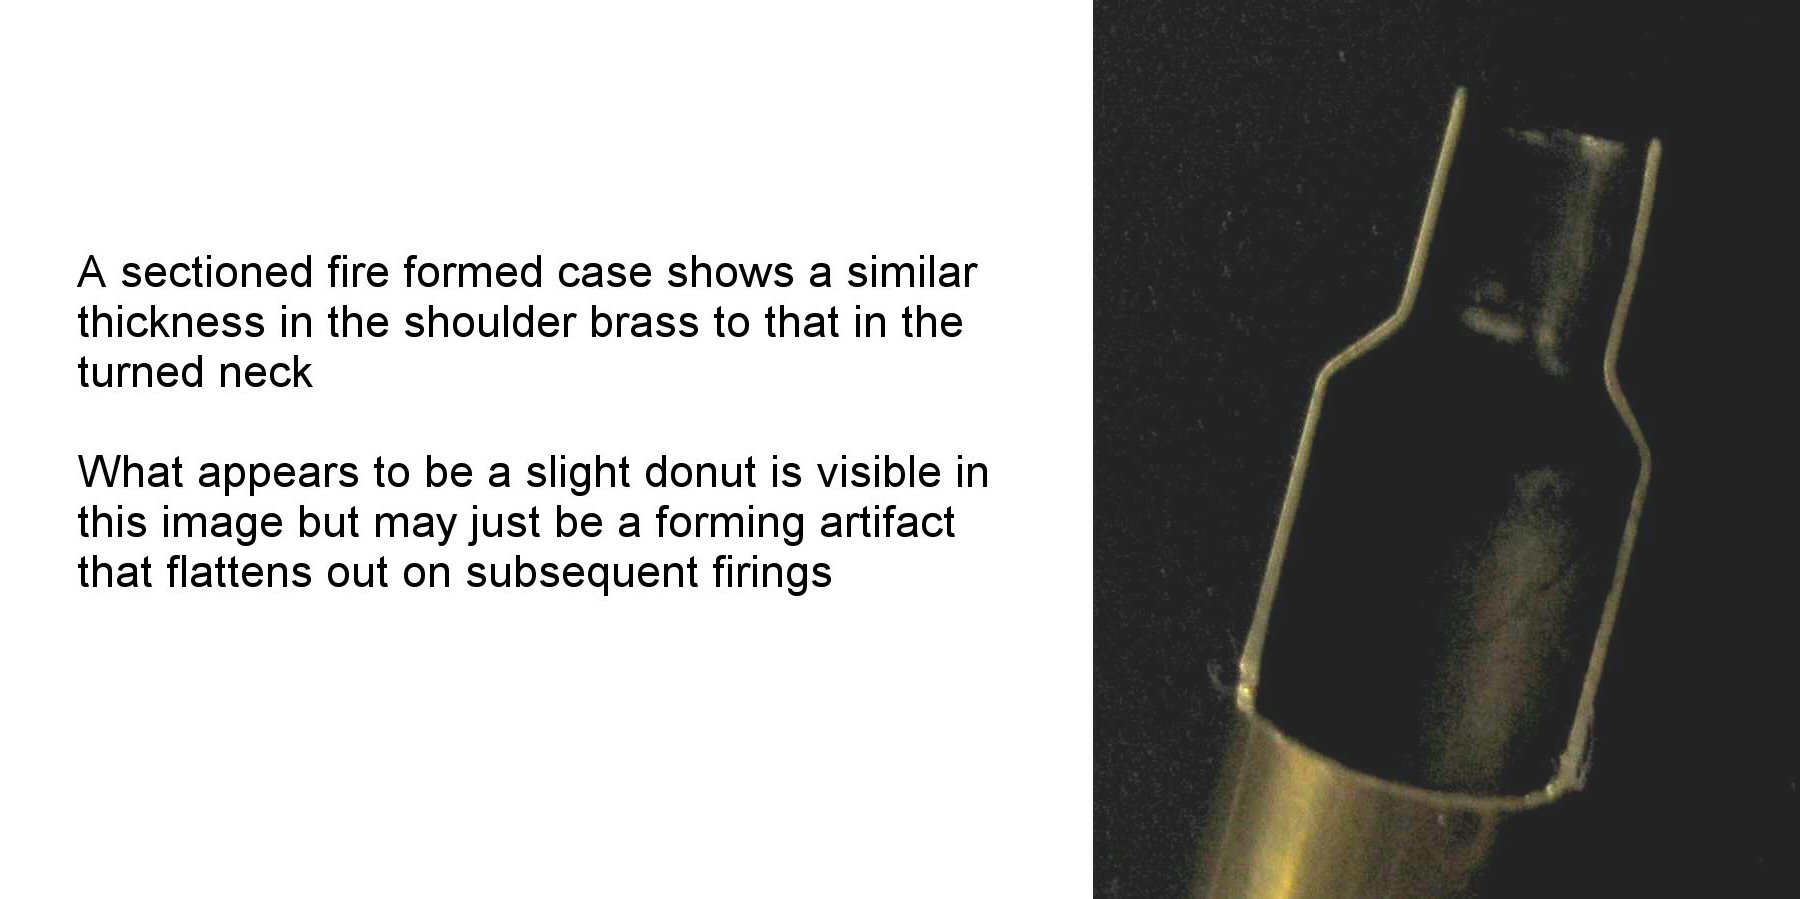
At the same time as thinning out the necks, a cutter with an appropriately angled chamfer could also be run into the shoulders to thin these to something similar to the neck thickness and so perhaps reduce the likelihood of developing the dreaded donut. As it turned out, the finished shoulder thickness in early trial cases that I sectioned were already the same as the necks at a measured 0.015, and so for the subsequent main batch of cases the cutter was adjusted to only thin the necks to the shoulder junction and no further.
If it was decided to run the cutter into the neck, it does need to be remembered that anything taken off the shoulders at this stage will impact the degree of crush-fit in the headspacing as set previously with the final FL sizing die. The set-up of that die and the neck turning tool need to be balanced to achieve both the desired shoulder thickness below the necks and the desired headspacing.
Step 4. Loading and fire forming the cases
The case necks were then sized to hold .25-cal bullets for fire forming. The .257AI full-length sizing die was used for this. I only sized three-quarters of the length of the necks as shown in the image below. This leaves the neck-shoulder junction untouched and so the headspace previously set up by the 6.5x55 die unchanged.
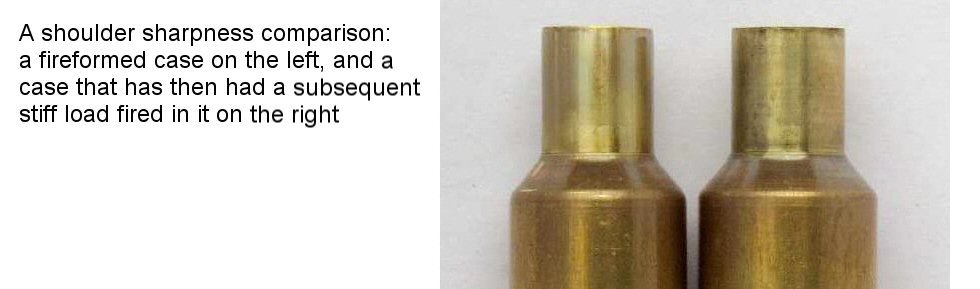
For fire forming I stuffed the cases full with Reloader-25 behind 85gr bullets, for no other reason than that I had this powder and the bullets going spare. I also lightly lube the cases with Imperial Sizing Wax. As Ive mentioned before on this site, I dont subscribe to the claim that doing so significantly increases rearward force on the bolt. Using QuickLOAD to estimate what the peak pressure might have been from the recorded muzzle velocity, I thought perhaps 40kPSI. The shoulders nevertheless ended up pretty sharp, certainly more than Id seen from pictures where the cream-of-wheat method had been used. Put another way, I didnt expect any capacity increase on subsequent firings I would have happily use these cases as they were for any load development.
With reference to the earlier reamer drawing, a final loaded diameter of 0.287 (0.257 + 2x 0.015) gave 0.004 firing clearance in my .257AI chamber. After fire forming this was re-measured and hadnt changed. Also noted was that the case length had been reduced by 0.2mm to 56.5mm from the fire forming.
Step 5. Annealing the cases
I should mention that the cases were not annealed prior to fire forming. When I had trialled annealing before fire forming I ran into trouble, possibly because I had made the necks and shoulders a little too soft. Although the cases were still dimensioned to give what seemed to be an adequate crush fit when chambered, clearly the headspacing either wasnt or did not remain intact, as the cases stretched on firing almost to the point of head separation, making them fit only for the scrap bin. Perhaps the impact of the firing pin was sufficient to deform the brass. The headspacing is after all, set only by the limited contact area at the head-shoulder junction.
As it turned out, un-annealed cases survived the additional process of fire forming quite happily, and with the close attention that had been given to the headspacing, there was no indication of any case wall thinning either. I do think it is probably best to then anneal before further use as the brass will have by this stage been worked somewhat from new in forming to the improved and smaller calibre shape.
After annealing the fired .257 improved cases all gave a little bit of feel on returning them to the chamber and closing the bolt, so they were run through the .257AI full-length (or body die) and this was adjusted down as many of us do when setting up our dies to just have the bolt drop easily on the sized cases.
Case capacity
The last thing to do before trying out the new cases was to measure and compare case capacities. The original cases being replaced made from the Winchester+P brass, when full-length sized and trimmed to 56.5mm, had accepted 61.5gr of water to level with the case mouths, 57.3gr to the top of the shoulders. The capacity of the new Lapua cases was less: 60.6gr and 56.4gr respectively under the same conditions. Range time subsequently found that the powder charge would need to be backed off by the 0.9gr difference to return my pet hunting load to the same muzzle velocity as before. QuickLOAD predicts that peak chamber pressure would have been 3000PSI greater had I stuck with my original charge weight. So really just a reminder to check the case capacity of any new brass. It would be annoying to unintentionally loosen the primer pockets for cases youd just spent so much time carefully preparing.
Follow-up: A visit to the range
Accuracy-wise as rifle for hunting, I dont really require much from the .257. I seldom take shots out beyond 200 metres, which is the distance at which I zero this rifle. The choice of Lapua brass was really around case longevity. I had hoped that if I tweaked the load for the same MV then the rifle would shoot much the same as it had before. I certainly didnt have any intention of going back to working up loads or checking on how the consistency of the new cases or lack of would impact accuracy. I just loaded up some rounds for the bush, checked the zero with a single clean cold-bore shot, and then tucked the rifle and ammo back in the safes.
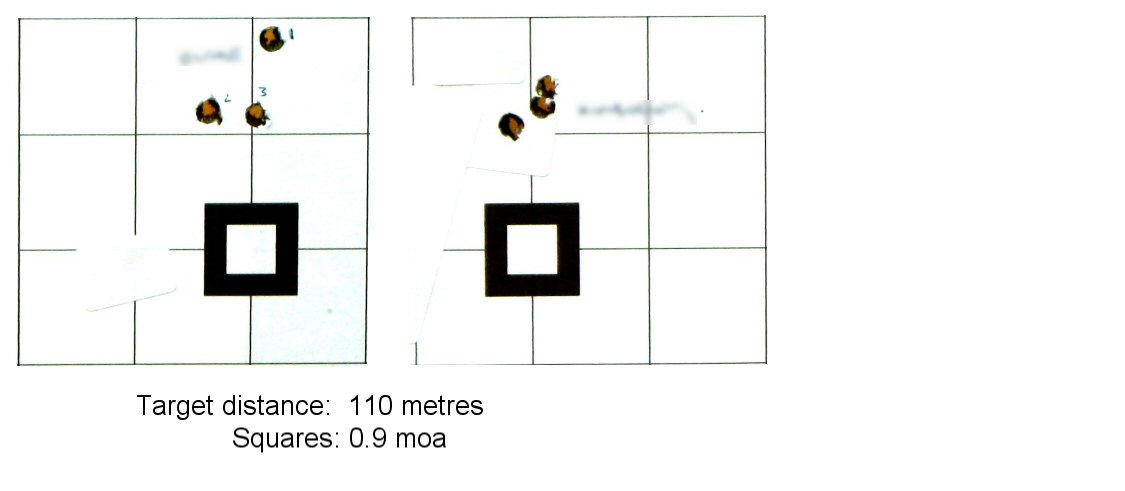
My Nephew though had mentioned that he and his partner would like the opportunity to fire a centrefire rifle what would be a first-time experience for both of them. So yesterday evening we took the .257 up to the Kaitoke range. They fired off three shots each. While some of you know that Im not an advocate of 3-shot groups (putting it mildly), they both did very well. You wouldnt expect to be able to use the first 3 shots fired by anyone new to a rifle of any kind as a means of gauging the consistency of a load, and Im not proposing we do that here, but I would say that from what I saw, the signs are promising that the new brass is up to scratch. A couple of readings were then taken using the Labradar as an after thought 3fps apart.
Thanks also to forum member @.308 who gave me half a dozen 8mm cases for the initial testing.
Welcome guest, is this your first visit? Create Account now to join.
Welcome to the NZ Hunting and Shooting Forums.
Search Forums


User Tag List
+ Reply to Thread
Results 1 to 15 of 16
-
23-01-2021, 05:02 PM #1Member


- Join Date
- May 2012
- Location
- Porirua
- Posts
- 974
Forming .257 Roberts Ackley Improved cases from 8x57 brass
-
-
23-01-2021, 06:00 PM #2Mushroom juice ! Hic !

- Join Date
- Jun 2012
- Location
- Above the Hutt
- Posts
- 6,872
@Puffin, can you talk a bit more about that "ring / brittle brass". I am seeing that in some of my GGG 223 brass.
Micky Duck likes this.Viva la Howa ! R.I.P. Toby | Black rifles matter... | #illegitimate_ute
-
23-01-2021, 07:01 PM #3Member

- Join Date
- Apr 2015
- Location
- Geraldine
- Posts
- 22,684
AWESOME post..thankyou for taking time to type it out in such detail.....havent had to go through such large changes before myself....have made 30/06 from 270 and vice versa...also some 25/06 from 270 to get mate started....
definately interested as well in the brittle ring forming.
-
23-01-2021, 07:08 PM #4Member

- Join Date
- Oct 2015
- Location
- Canterbury, home of the big Rakaia Red Stag
- Posts
- 4,278
-
23-01-2021, 07:21 PM #5Member


- Join Date
- Nov 2018
- Location
- wellington
- Posts
- 1,190
Well done, great write up.
Cursed be the ground for our sake. Both thorns and thistles it shall bring forth for us. For out of the ground we were taken, for the dust we are... and to the dust we shall return.
-
23-01-2021, 07:30 PM #6Member
- Join Date
- Jan 2018
- Location
- Christchurch
- Posts
- 664
Excellent writeup, thanks @Puffin! I find this sort of subject fascinating.
As an aside I went to the range this morning with the owner of the 257 Roberts Ruger No1 I was looking for brass for recently. It is the 20" International version (full wooded with quarter rib and open sights). We fired a box of Superformance ammo he had found for it - was a lively little beast!
-
23-01-2021, 07:40 PM #7Member
- Join Date
- Apr 2012
- Location
- Kingcountry
- Posts
- 4,627
Great writeup, was my favorite 40 years ago along with the standard Roberts. Used a fair bit of 7x57 brass but never 8mm. Think I have a few loaded standard cases some where if of any use. Could pull them.
-
23-01-2021, 11:16 PM #8Member
- Join Date
- May 2012
- Location
- Porirua
- Posts
- 974
Thanks Guys for the comments.
I PMed ebf on the head separation issue. There is information on this online; identification , causes, prevention, probably better to refer to what is already out there I think. @tetawa, thank for the offer, but the 96 new Lapua cases I now have will likely see me out.tetawa likes this.
-
25-01-2021, 10:10 PM #9Member
- Join Date
- Jun 2019
- Location
- Tasman
- Posts
- 506
I don’t even have a .257 but I really enjoyed reading that - thanks.
-
01-02-2021, 10:17 PM #10Member
- Join Date
- May 2018
- Location
- Porirua
- Posts
- 1,310
“@Puffin, could you please summerise the steps for making the new cases please ? “ there’s a lot to take in.
Remember the 7 Ps; Pryor Preparation Prevents Piss Poor Performance.
-
01-02-2021, 10:56 PM #11Member

- Join Date
- Dec 2011
- Location
- dunedin
- Posts
- 1,314
Very interesting ,a bit of work involved think I wouldn't have the patience.
Sent from my Nokia 7 plus using TapatalkPuffin likes this.
-
02-02-2021, 04:43 PM #12Member
- Join Date
- Feb 2021
- Location
- Vallejo
- Posts
- 1
Just what I needed to see. Just gathered all the components to start making 257 ai brass, and ended up with wrinkled shoulders, so back to the computer.
Looks like I need to go to some dies that will support the cases while I am necking down.
Mo money, Mo money. Puffin likes this.
-
16-02-2021, 04:28 PM #13Member
- Join Date
- May 2012
- Location
- Porirua
- Posts
- 974
Sorry about the delay, and yes the write-up was a bit long and probably would have been better served with a contents listing: Originally Posted by 2post

1. Source quality brass in 8x57
2. Neck down to .308 ( .308Win die)
3. Neck down to .284 ( 7mm-08 die)
4. Full- length size to .257 (.257 Roberts die) including setting the shoulder position for subsequent safe fire forming
5. Trim case necks back to a safe case length
6. Turn thickened necks for concentricity and safe chamber clearance
7. Load then fire form to the final shape in the improved chamber using parent case loading data
8. Anneal
9. Full length size in .257AI die and measure the internal case capacity
10. Load development as required to re-optimize any loads from the previous brass
11. Have complete newbie shoot 0.4moa group to indicate that the new cases are capable
-
16-02-2021, 06:50 PM #14Member
- Join Date
- Oct 2018
- Location
- NI
- Posts
- 287
Awesome post, really good read.
I also enjoy converting 30-06 and 270 to 8x57 and run them through my 8mm mausers and by-standers giving weird looks when they see the cases and their original headstamps. Had people asking where can they find a 270 K98. Puffin likes this.
-
16-02-2021, 07:51 PM #15Member
- Join Date
- Jul 2014
- Location
- BOP
- Posts
- 3,916
A lot of work but you get to use something you have made, good information for anyone looking at making there own brass.
Puffin likes this.


 Reply With Quote
Similar Threads
-
.223 Ackley Improved
By johnd in forum Reloading and BallisticsReplies: 31Last Post: 26-09-2018, 11:55 AM -
270 Winchester Ackley Improved.
By pete88 in forum Firearms, Optics and AccessoriesReplies: 7Last Post: 08-08-2016, 09:54 PM -
.222 Rem Mag Ackley Improved.
By highcountry in forum Reloading and BallisticsReplies: 6Last Post: 04-07-2012, 10:09 PM
Tags for this Thread
 Posting Permissions
- You may not post new threads
- You may not post replies
- You may not post attachments
- You may not edit your posts
Welcome to NZ Hunting and Shooting Forums! We see you're new here, or arn't logged in. Create an account, and Login for full access including our FREE BUY and SELL section Register NOW!!
All times are GMT +13. The time now is 09:24 PM.

Bookmarks