

 9Likes
 LinkBack URL
 About LinkBacks
Review: Model B Neck Turning Tool and accessories from PMA Tool
For a review of the PMA neck turning tool I was unsure what to include. If writing for forum members familiar with the process of neck turning then just the technical details and overall impression could be presented without any information on how to use the tool or why it might be set up in a particular way this could all be assumed knowledge. But then these readers would likely already have neck turning equipment, and since Im not sure why you would want more than one turning tool (I might be wrong here) the review would only serve to identify how the PMA differs from their existing gear. I seem to have ended up with a bit of a general how to article on neck turning while also describing setting the PMA tool up and using it, along with details and measurements that will hopefully be of interest to the more dedicated handloaders here.
A reason for turning case necks
There is no option other than to turn if the chamber dimensions at the neck will not allow for the required expansion of the case on firing with the particular brass to be used. This might be the situation where the chamber neck is too tight relative to available brass by design, and turning is an intended requirement to be able to load for that rifle. Necks can also thicken unevenly or beyond chamber dimensions when the brass has been formed from larger calibres, or through the movement of brass from the shoulders on repeated firing. The requirement is for safe and consistent release of the bullet. Total clearance may vary from one-thousandth of an inch upward depending on the rifles purpose.
This was not my own particular reason for wanting to turn down case necks. The 6.5x47 here is chambered using a no-turn reamer, and since loaded brass when new measured a little over 0.290 across the neck, and with the chamber cut to 0.2945, there was already over two thou clearance all around.
Part of load development though may involve experimenting with neck tension. A method is then needed to vary the sizing of the neck and to be able to achieve this with some consistency. If neck tension is adjusted by directly presetting the internal dimension of the neck, such as with a collet die or conventional expander ball, then the uniformity of the neck wall thickness across all the cases is not critical (though not unimportant). If on the other hand a bushing die is used to set the internal dimensions by compressing the outside of the necks then this very much relies on known and consistent neck wall thicknesses.
After 6-8 firings I was finding that the variations in neck wall thickness that had developed in the 6.5x47 cases were starting to make sizing with bushings unusable unless the brass was sorted into groups. This had become more of a problem when recently I had wanted to only lightly grip the bullets to experiment with so-called soft seating. With a 0.289 bushing I was now getting a mix of results, some cases with the expected hold, and then some with none at all. I could either ditch the brass and start again (new Lapua brass starts out with reasonably consistent necks) or restore the necks to a common thickness with a neck turning tool. Since the primer pockets were holding up well I opted to purchase a purpose built tool. I estimated that a twelve thou neck thickness would clean them all up and I would have to live with the resulting extra expansion on firing.
Equipment options
From past threads here it looks like NZHS forum members who neck turn use gear from K&M, 21st Century, Forster, possibly some Sinclair and Hornady. Pumpkin and PMA I havent seen mentioned before. Designs are commonly hand-held. In some cases the manufacturers also offer lathe-like fixtures into which the tool can be secured to better maintain case-tool alignment. Either the cases can be rotated onto the tool by hand with a crank, or spun in a chuck-like shell holder fitted to an electric screwdriver, drill, or proprietary motorised driver. The Forster design differs in that it is an adapter for their case trimmer.
PMA Tool neck turners
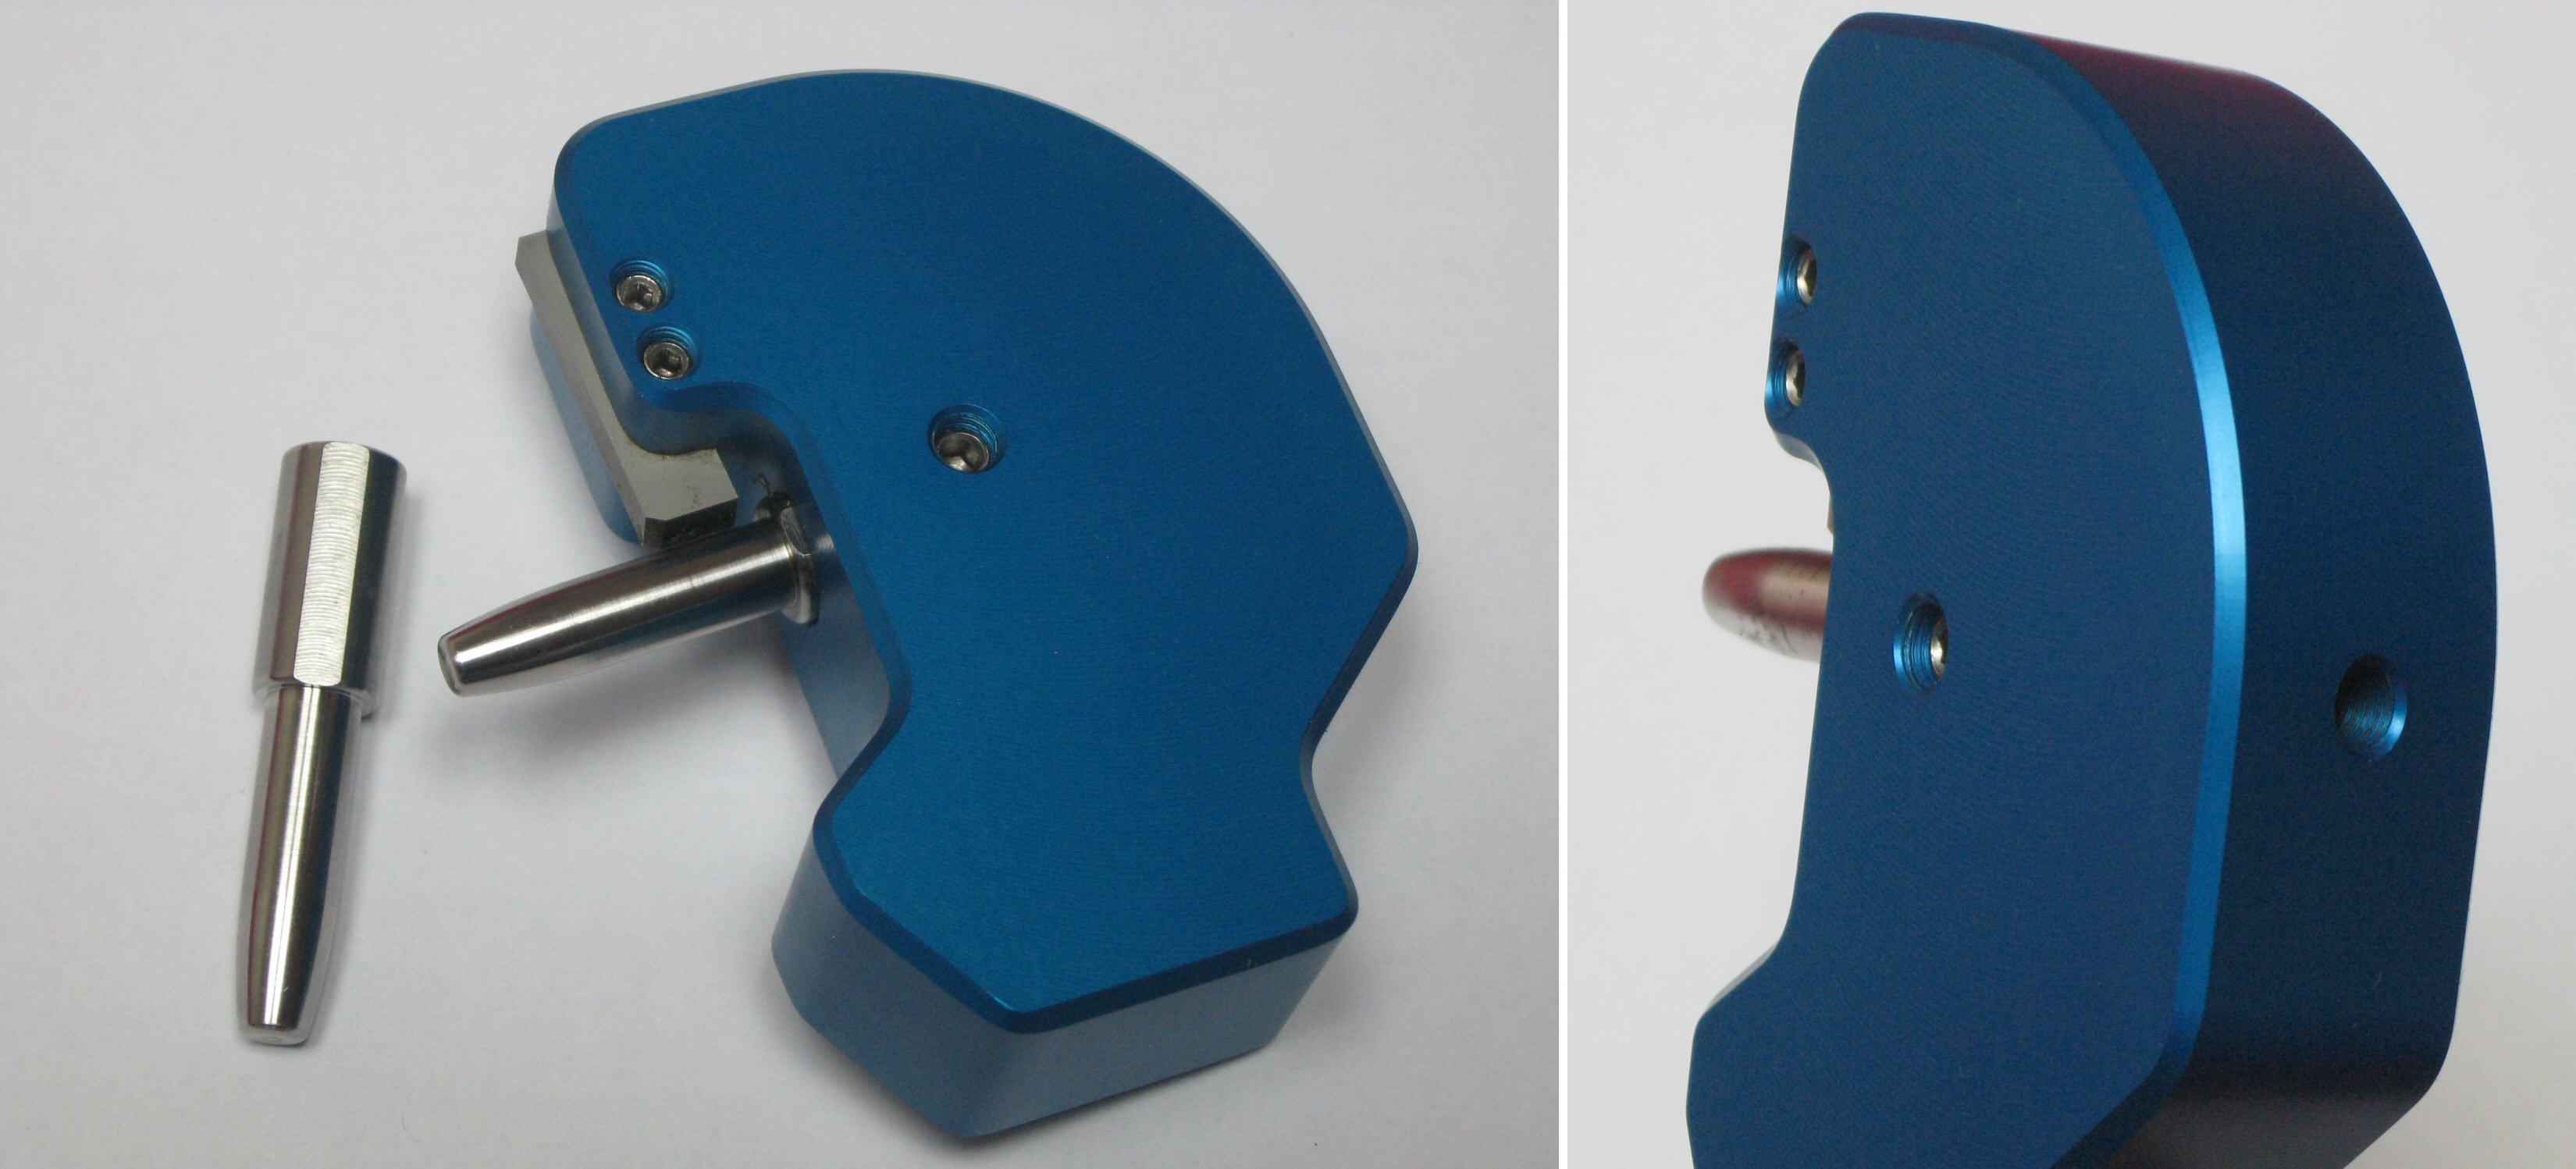
PMA Tool make reloading tools and shooting accessories and offer two neck turners: the Models A and B. Both are conventional hand-held designs where cases are slid onto an arbor/mandrel that has been ground for calibre while a carbide cutting bit is clamped to one side by a clearance that will determine the eventual thickness of the necks. The cases are spun on the mandrel while slowly feeding the case necks into the gap between mandrel and cutter, the excess brass being trimmed away. The bodies of both tools have the same blue anodised finish and use the same cutters and mandrels. Although I cant confirm this - not having a model A on hand - it looks very much like the bodies of both start out as the same 76mm x 50mm blank machined from billet.
Neck Turning Equipment - Page 1 - PMA Tool
From the PMA Tool site it can be seen that the Model A is the original design featuring a dial adjustment for the cutting depth that unlike competing products moves the mandrel position relative to a cutter that is fixed rather than the other way around. With the cutting depth being able to be quickly returned to previously used settings, this tool might be suitable for a handloader who turns necks across a number of different batches of brass. For US$130 the model A is supplied with a carbide cutter, but mandrels need to be purchased separately.
The Model B
The Model B is more conventional in that it has a fixed position for the mandrel on which the case neck is rotated and the required case neck thickness is set by the cutter position, again carbide being supplied as standard. It is also around half the price of the Model A at US$70. The Model B is aimed at use where the cutting depth does not need to be regularly changed. The cutter runs in a machined slot and is held in place by two hex socket set screws. Cutting depth can be changed by temporarily loosening these off and re-setting the gap between cutter and mandrel using a feeler gauge. For the price the Model B is also supplied with a 17-4 stainless steel mandrel of a diameter/calibre of your choice making it something of a bargain I thought. The cutter is factory-preset to the cutting depth requested at the time of placing an order. The mandrel can be upgrade to carbide as part of the tool purchase for US$40. Stainless mandrels for additional calibres are US$10 each, carbide US$55, and can apparently be used interchangeably with Sinclair items (or K&M with an adapter).
Elsewhere online both of these handheld tools from PMA had received glowing reports so I thought Id give one a try. I ordered the Model B with a 6.5mm mandrel and I bought a second mandrel in 7mm. Spare carbide cutters are US$20. From the photos youll see that the cutters from PMA are profiled for shoulder angle so there is no issue with getting right into the neck-shoulder junction. To allow for this cutters are available ground with every conceivable shoulder angle. I ordered a 30° for the 6.5x47 cases as part of the Model B purchase and then an additional 40° for my Ackley brass. PMA in their literature point to the benefit of being able to use these appropriately profiled cutters to thin the shoulders to the same thickness as the necks and so perhaps reduce the likelihood of donuts forming.
Case prep prior to turning
Preparing cases for neck turning begins with sizing of the entire length of the neck. As bushing dies tend not to size right down to the neck-shoulder junction, I had purchased a standard RCBS 2-piece set for this. I then trimmed all the necks so the cases had the same overall length. This is an important step as we will see later. While putting cases through the full length sizing die gives an appropriate diameter to securely hold bullets, the neck diameter then needs to be expanded for an ideal snug fit to the tool. Quoting from the turning instructions supplied by PMA: Mandrel fit is crucial to consistent neck turning If the fit is too tight, turning case necks will be very difficult and will generate a lot of heat. If the fit is too loose your brass will wobble on the mandrel. Both instances are detrimental to uniform and concentric neck wall thickness.
PMAs expander accessories
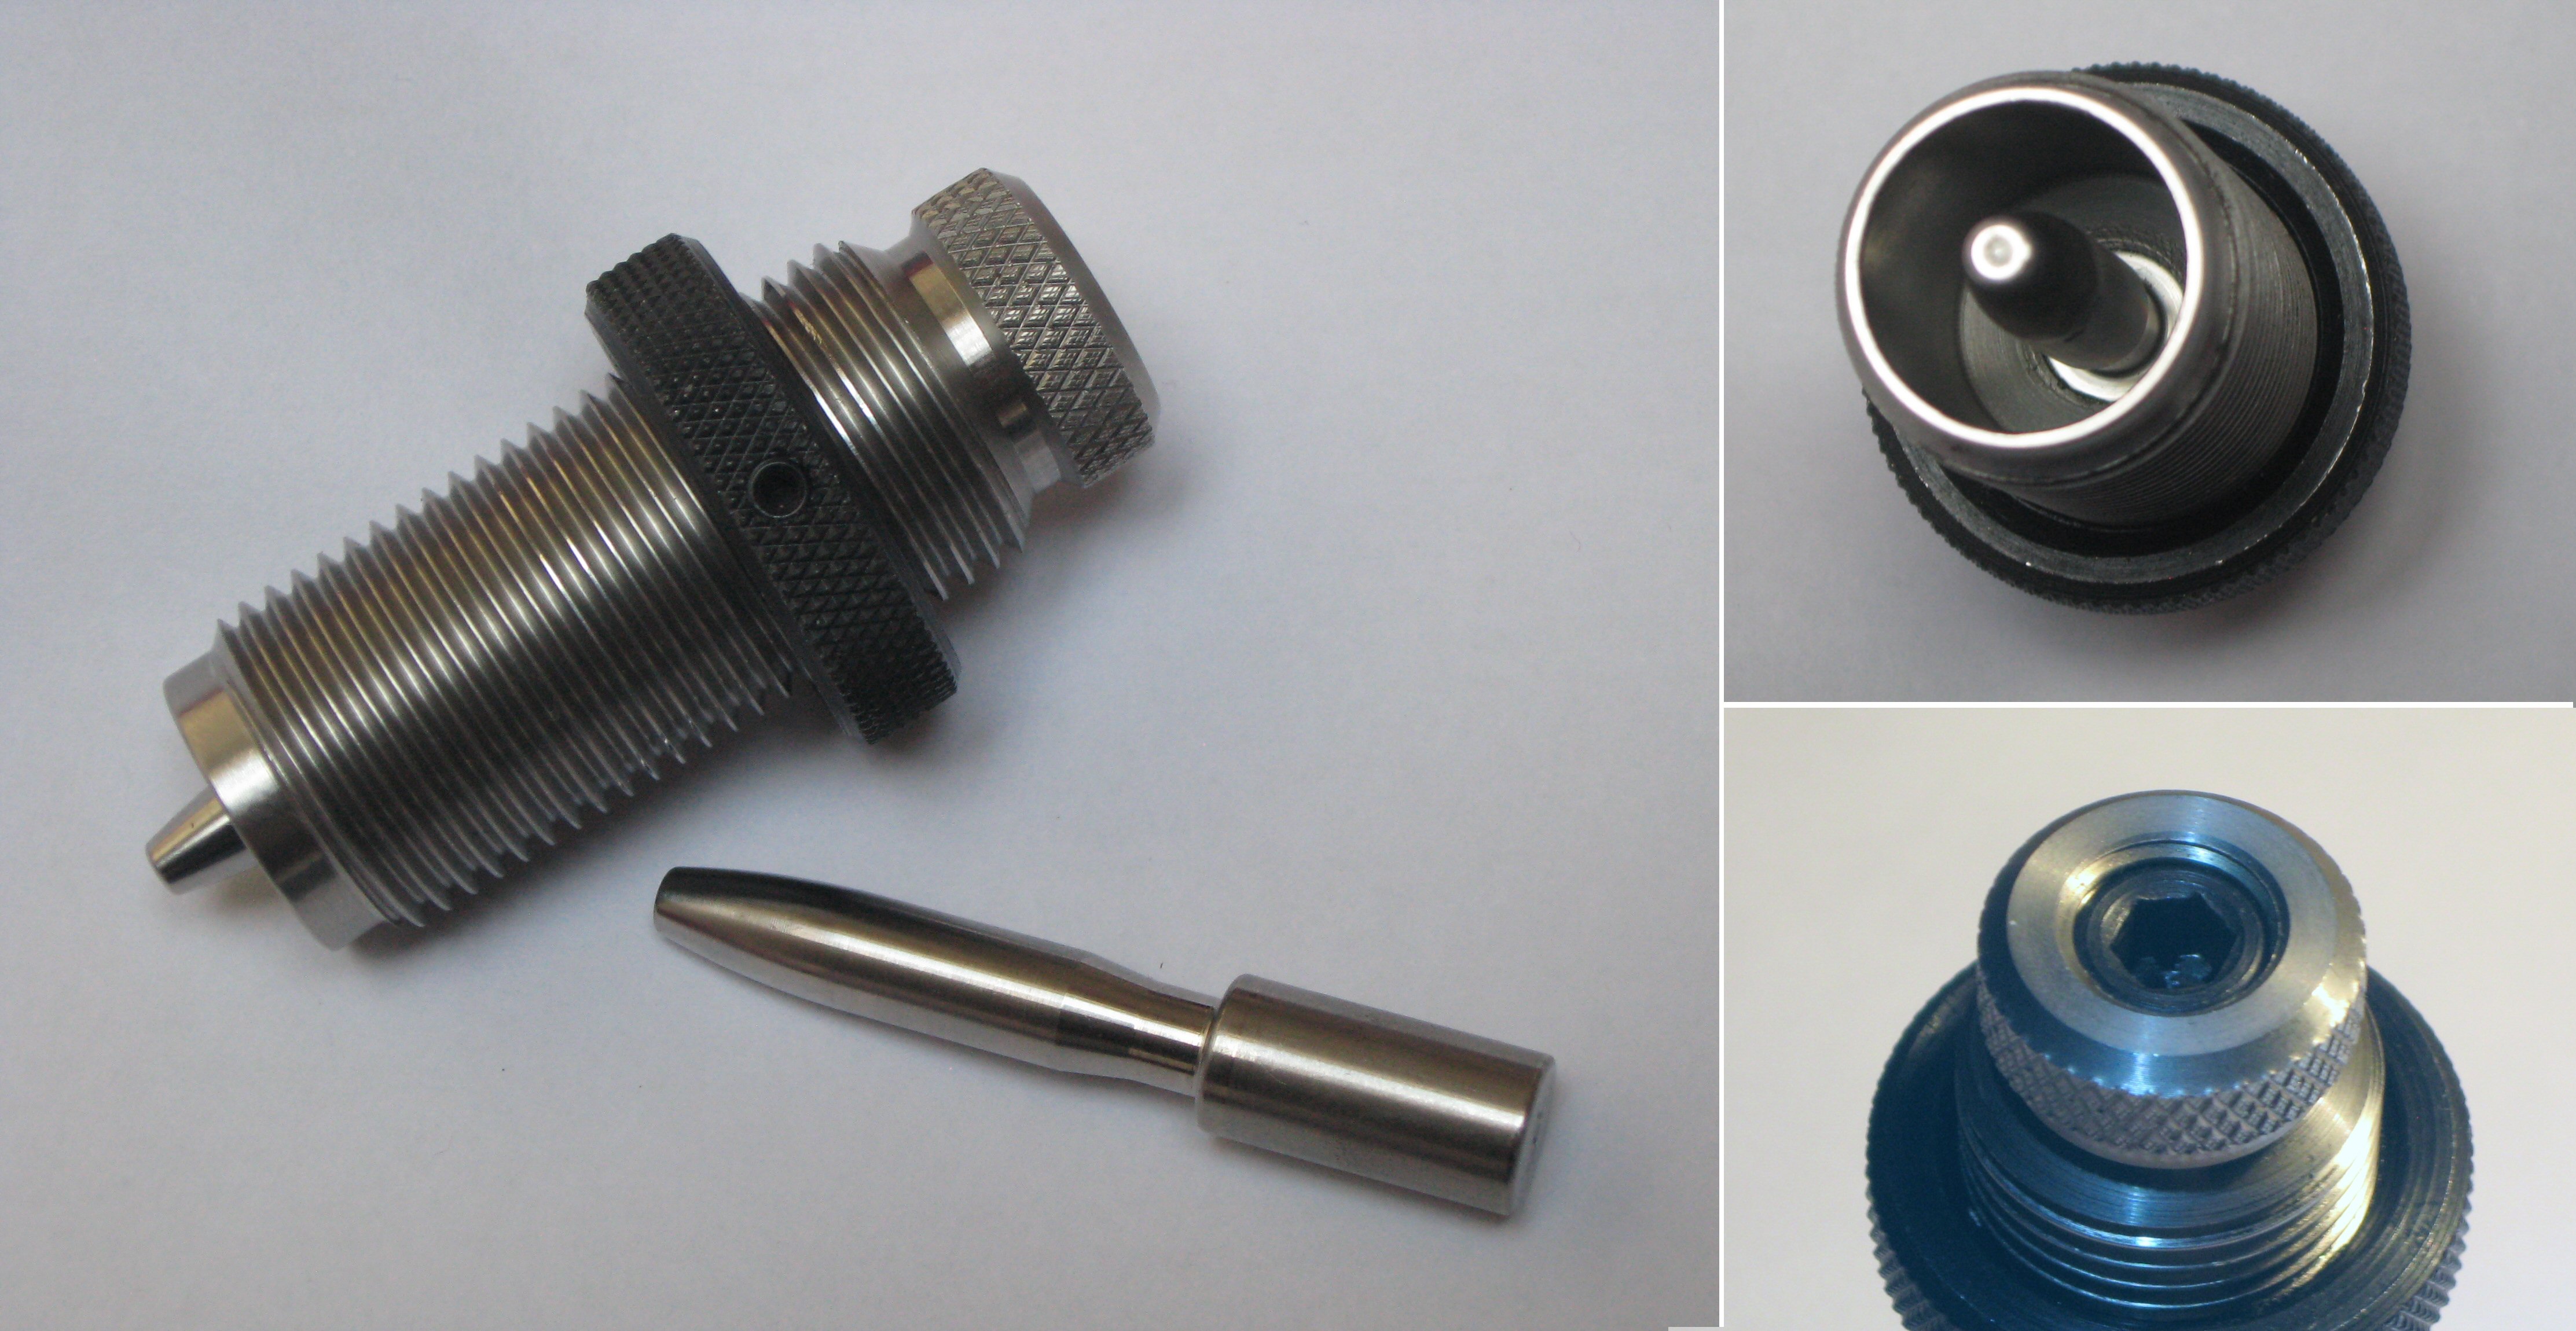
I purchased PMA Tools Expander Die Body along with a 6.5mm Expander Mandrel (not to be confused with the neck turning mandrel). The same die body is used for all case designs and is solely to hold the expander securely and concentric in a 7/8-14 thread. Expanders for different calibres have drop-in interchangeability, held in place by a 7/32 hex grub screw. The expanders are tapered for ease of running the necks across in both directions. I tried using Imperial Sizing wax for this process but found WD-40 type oil gave smoother results.
The expanding mandrel for 6.5mm measured 0.2627 being 0.0011 larger in diameter than the turning tool mandrel at 0.2616, a difference that is intended to allow for both some spring back in the brass while still leaving a small remaining amount of tension when running on the tool mandrel. I also bought in an additional 7mm expanding mandrel (pictured). This measured 0.2830, while the matching 7mm turning mandrel measured 0.2821, a difference of 0.0009 for the same reasons.
Driver and case holder for power-assisted turning
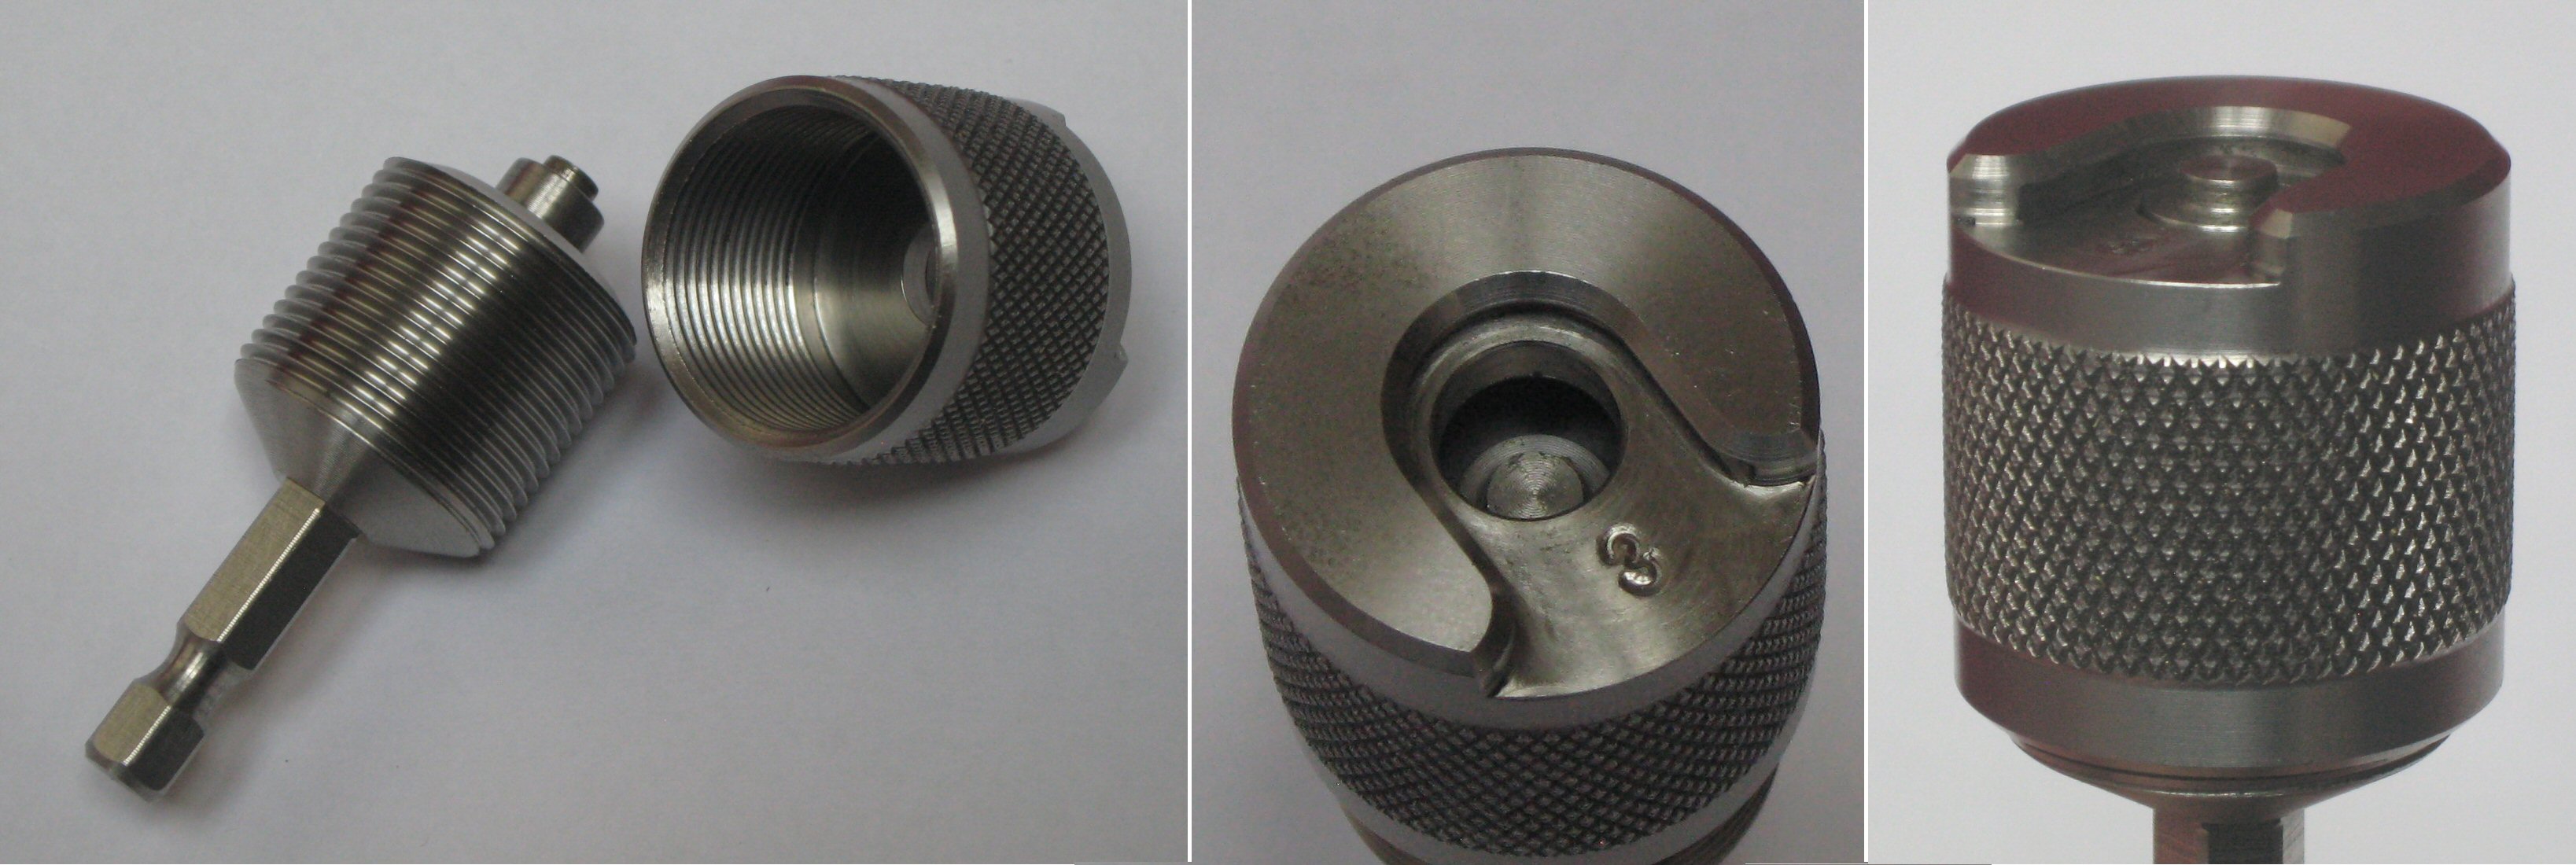
Once expanded the cases necks are ready to turn and I went with the power tool approach. The case holders and drivers supplied by PMA appear most similar to what I have seen online for the Sinclair and 21stCentury equivalent components. The various case holder options available are sized for case heads in the same way as reloading press shell holders - I just needed the #3 / .308 for all the brass I was thinking about turning.
The threaded driver is run up the centre of the holder until it engages the case at the top of its travel and locks it in place. Two drivers are available, one each for use with cases with either large or small primer pockets. Alignment with the pockets ensures the cases when clamped are held concentric to the ¼ hex shaft. I cant tell you what options PMA have for rotating cases by hand as I never for one moment entertained the idea of going down that path!
Adjusting the mandrel for shoulder-cutter engagement
The larger diameter section of the turning tool mandrels serve not just as a common size across all calibres for mounting these into the tool body, but the abutment acts as an end stop when feeding the case necks onto the mandrel. During installation the mandrel is free to slide within its recess in the tool body and can be positioned relative to the cutter blade with the aid of a hex grub screw accessible from the rear of the tool, so controlling the amount of brass that can be taken from the case shoulders.
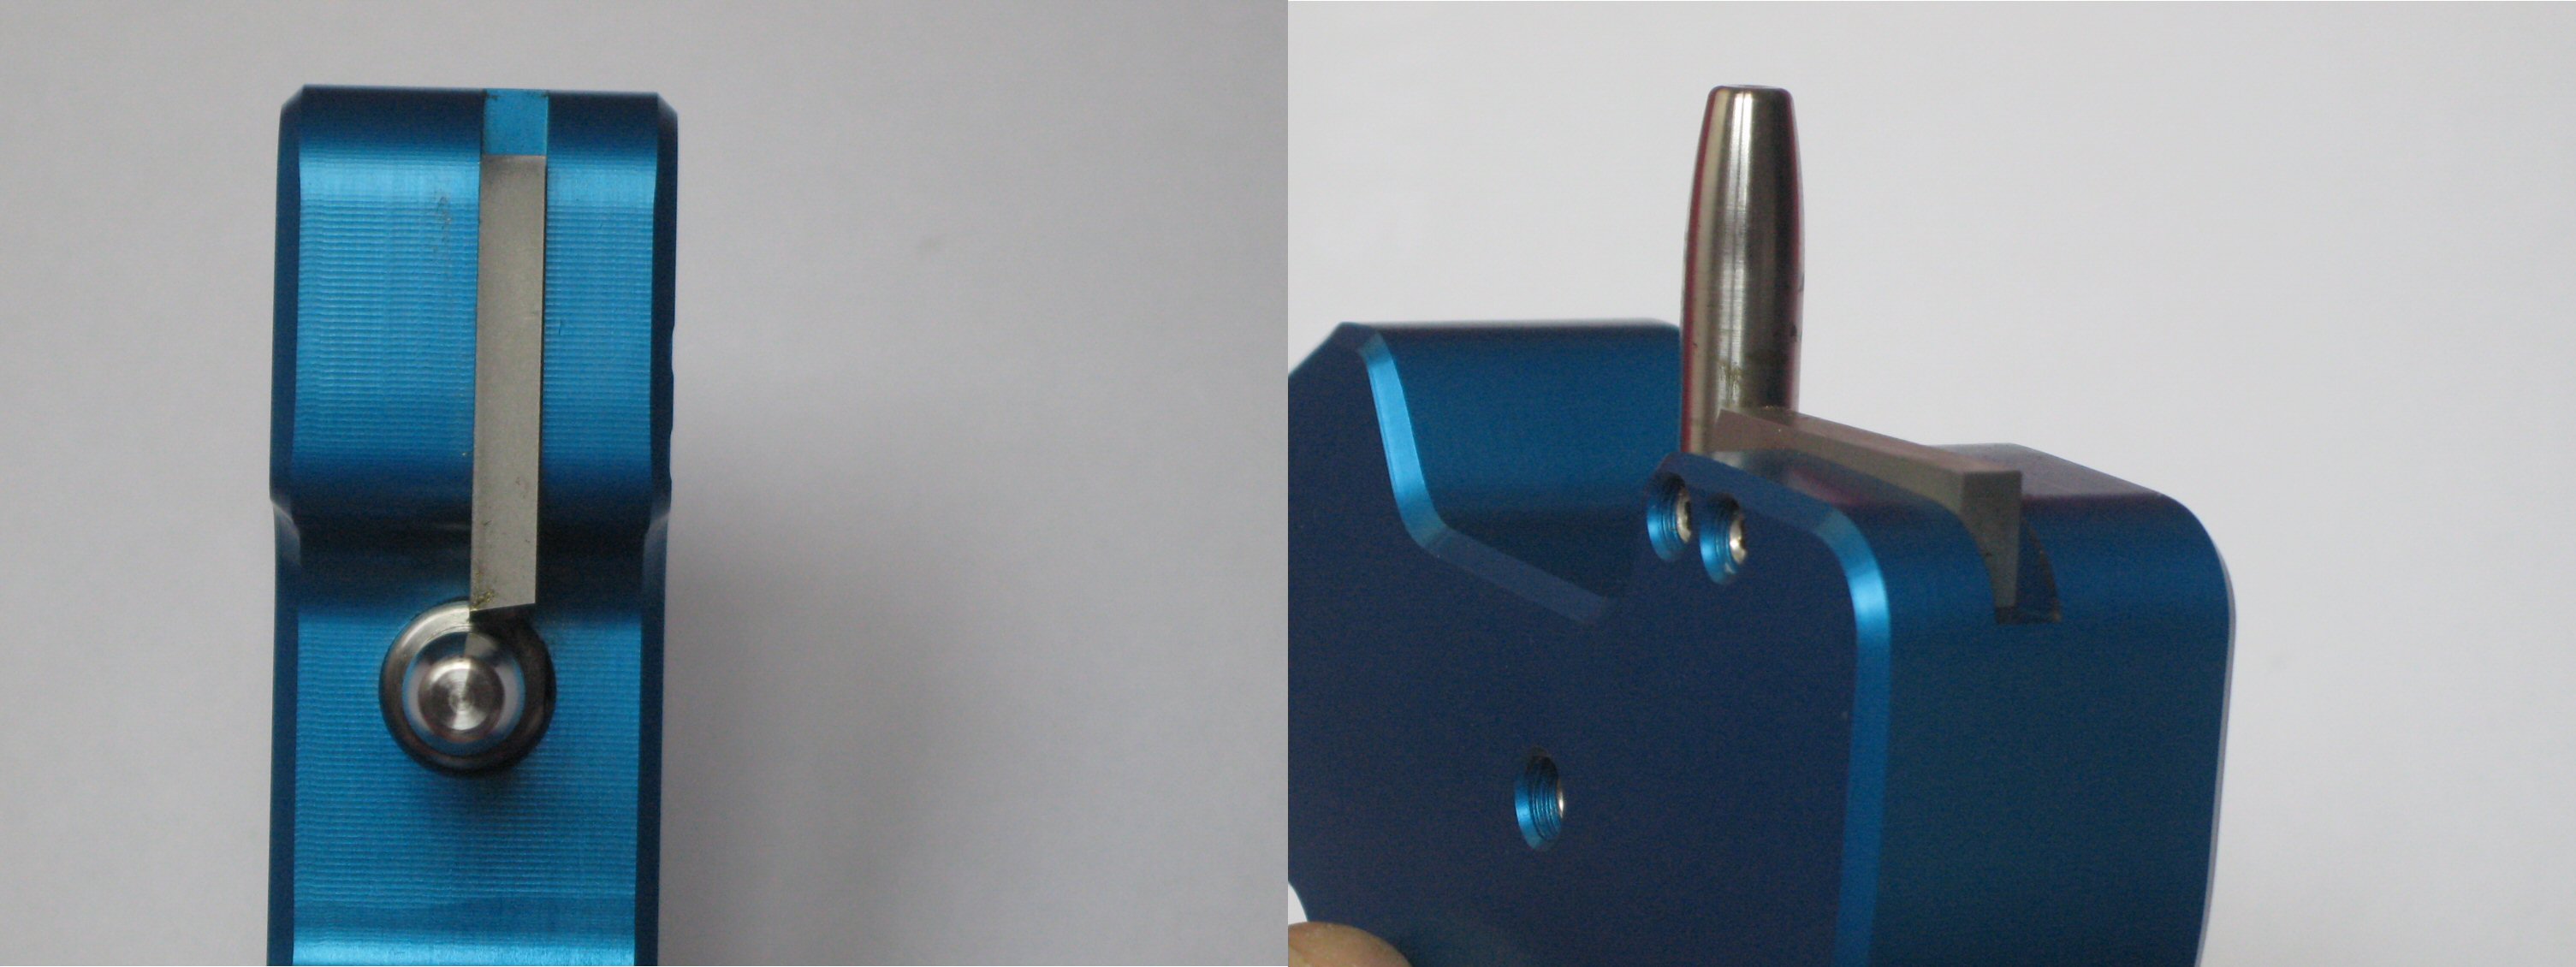
Once in position a second set screw secures the mandrel using a machined flat in the usual way. This value of this adjustment is of course reliant on the ends of the necks all being the same distance from the shoulders the reason for trimming all the cases early on as part of the prep. I think this is fairly well illustrated in the photo below on the right.
The mandrel cant be completely removed without first withdrawing the cutter, but swapping out the mandrel for one of a different calibre will always require that the cutter position is recalibrated anyway.
Time to turn some case necks
The actual turning process doesnt really need any description; easy on, and then slower off seems to be the approach. Rotational rate for powered turning it typically within a 50-200 rpm range. I lubricated the stainless mandrel with sizing wax and had no issues with it getting hot. It felt slightly warm to the touch after repeat operation. For my use I would say the carbide mandrel upgrade doesnt appear to be necessary.
Pat Reagin of PMA Tool demonstrates the use of the Model B here:
https://www.youtube.com/watch?v=AEjUuEcXH0Q
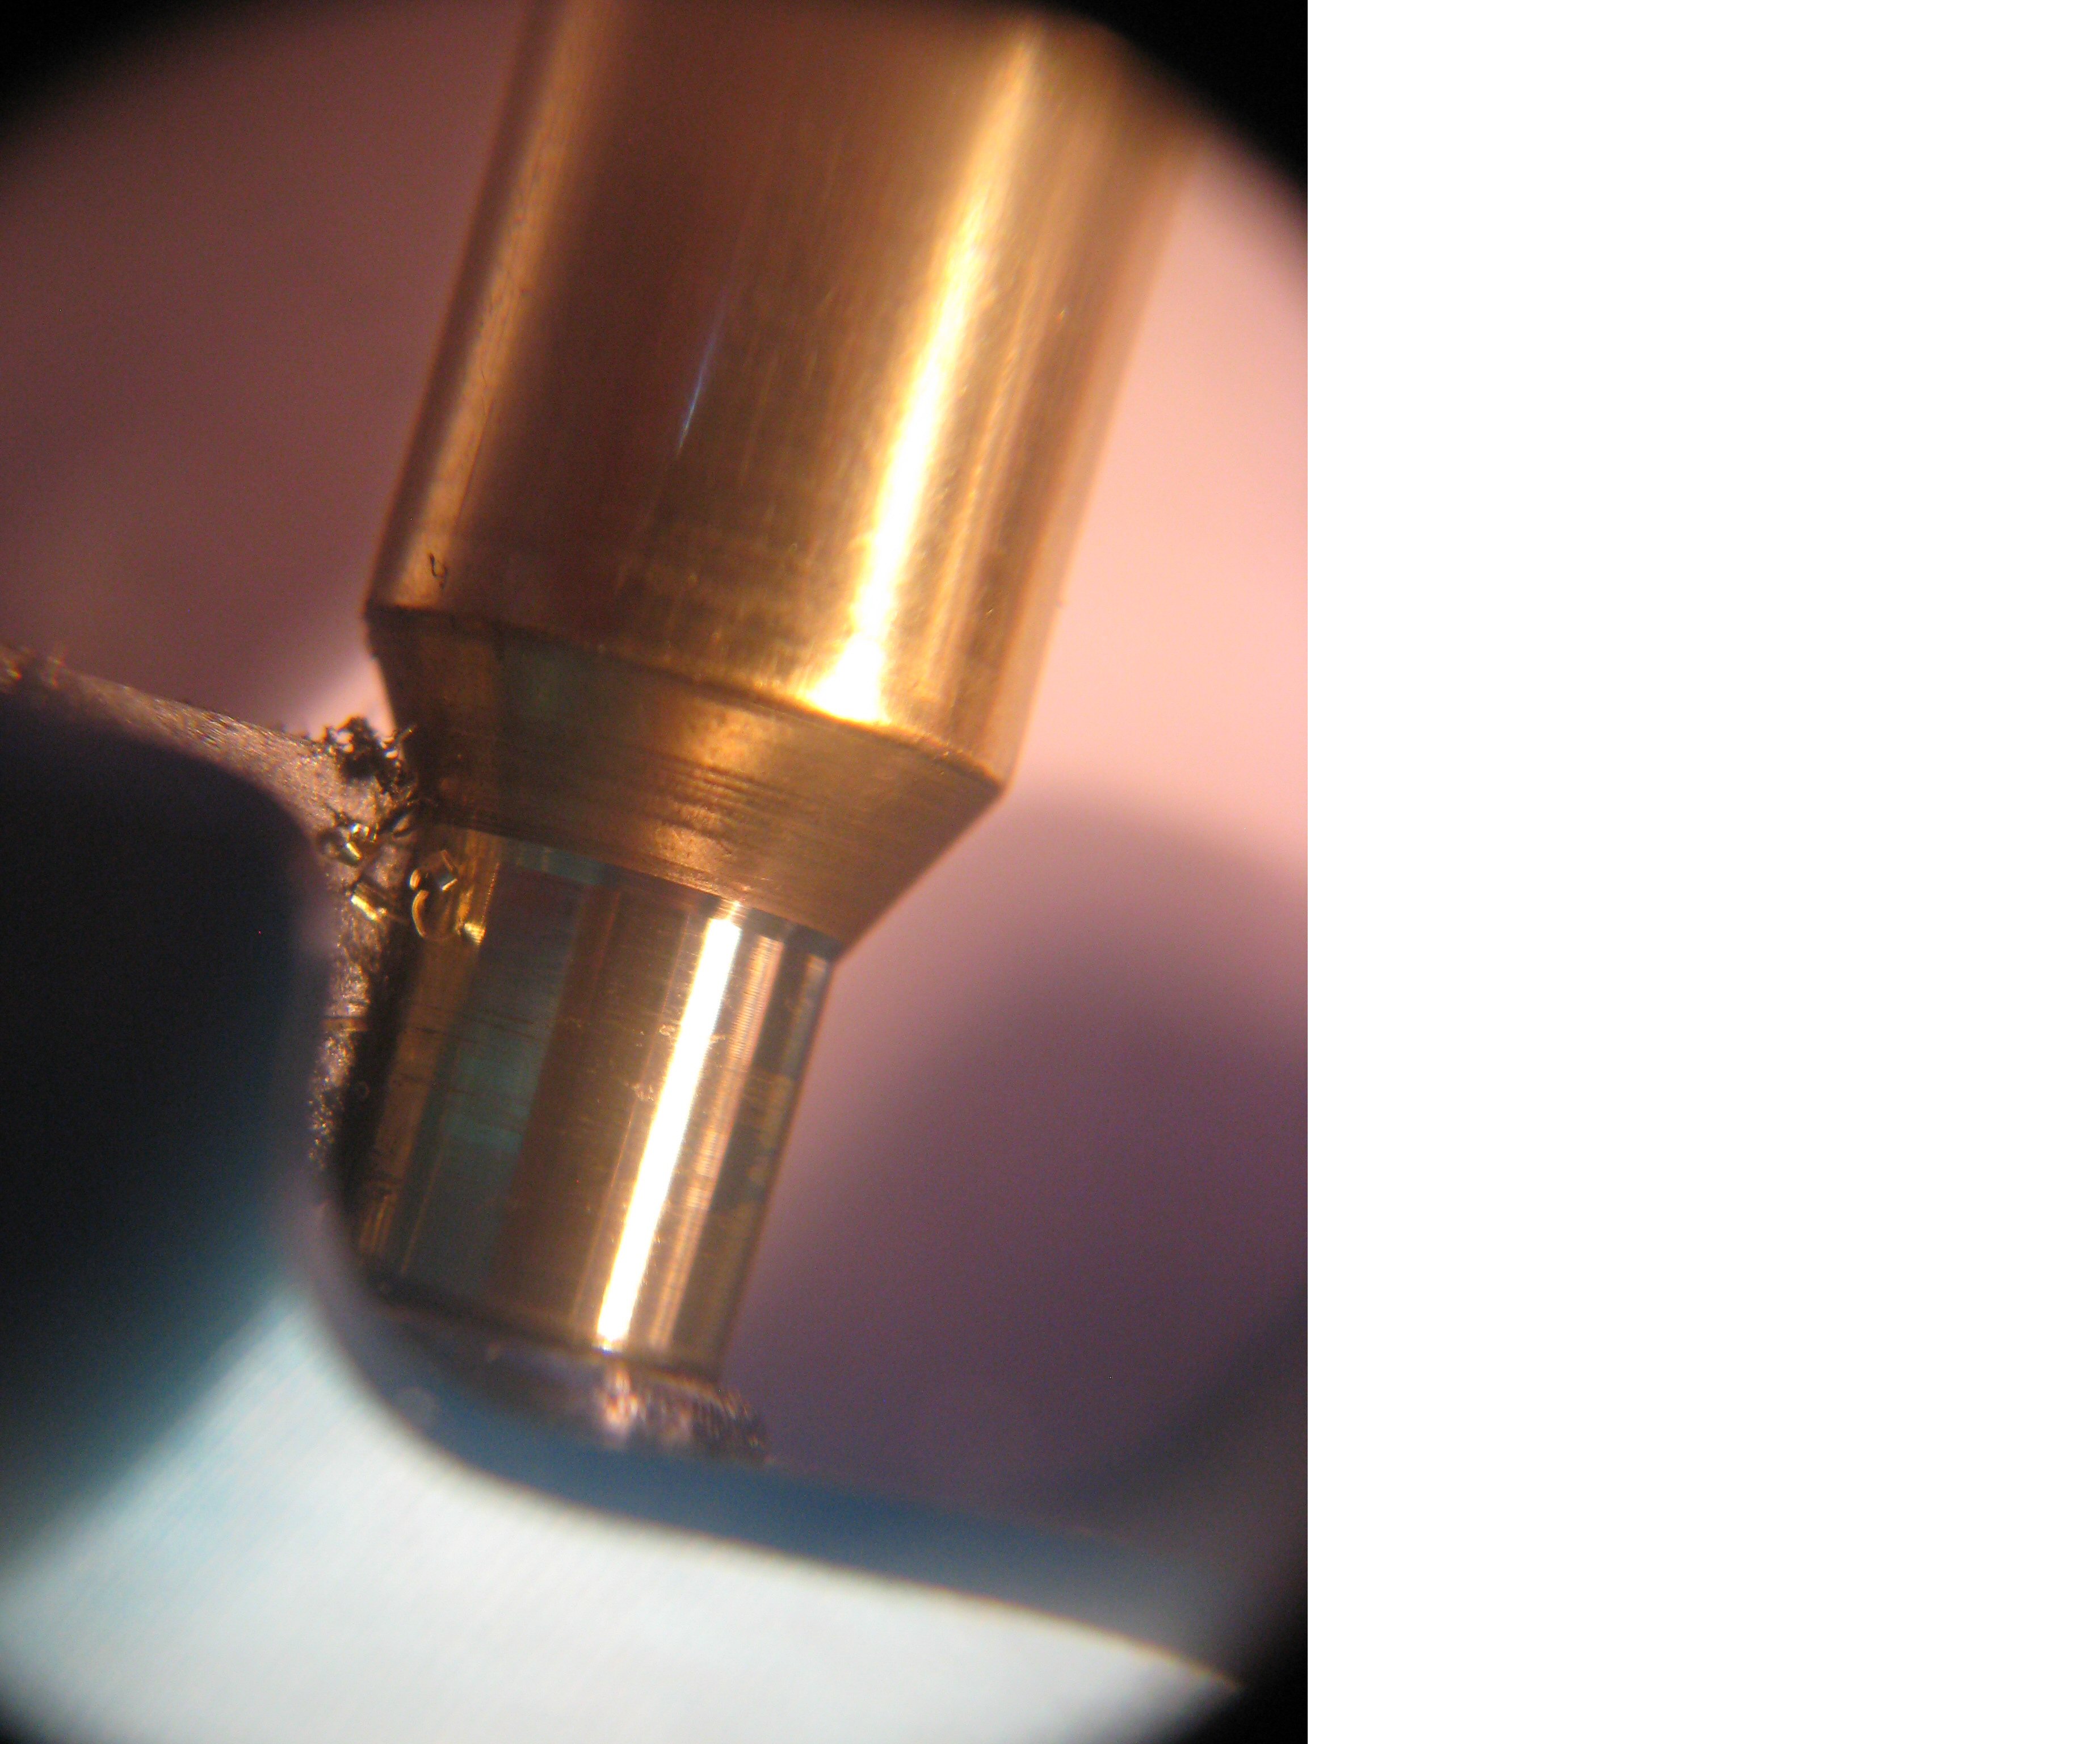
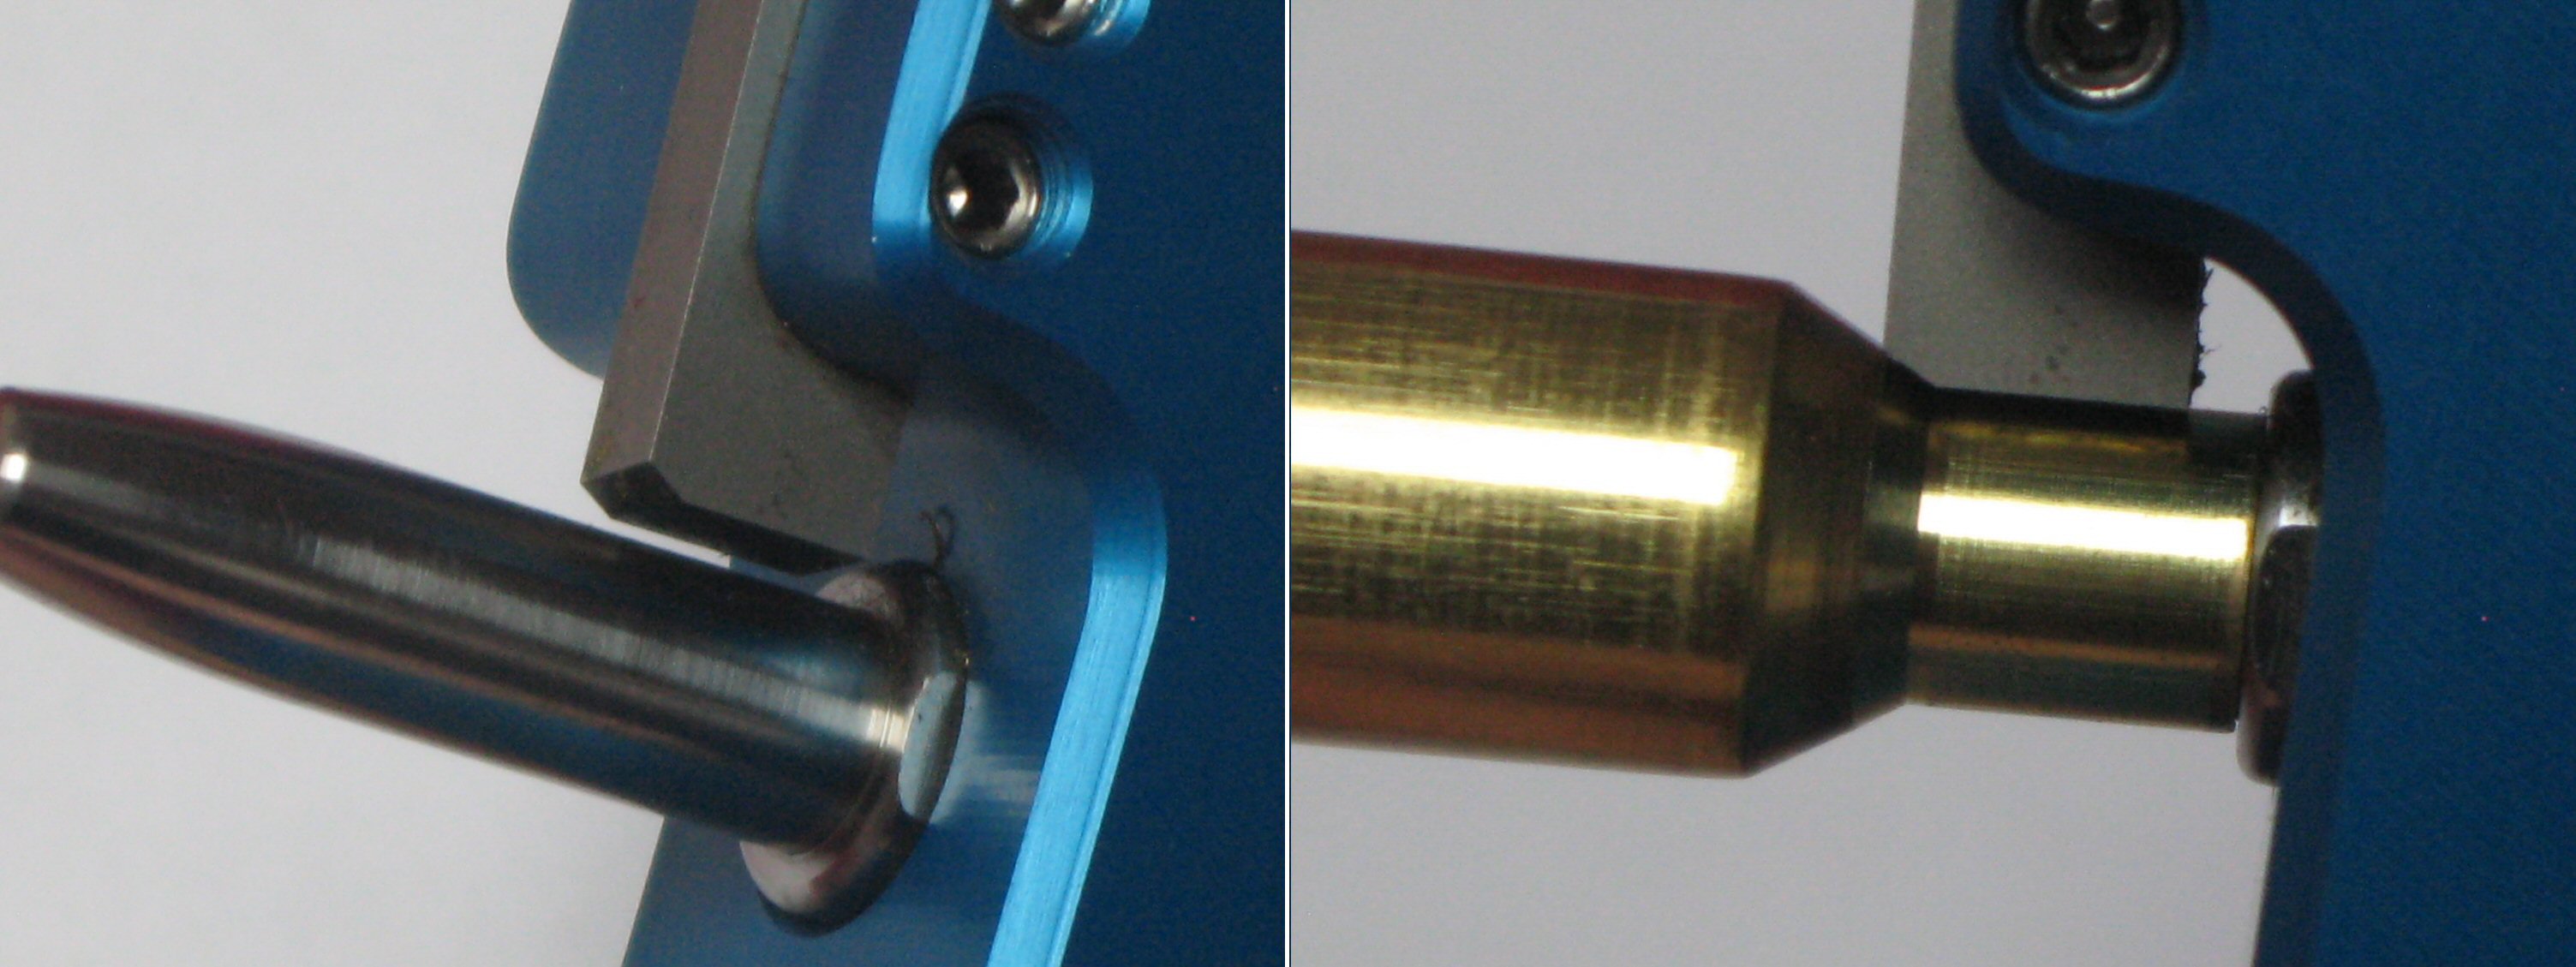
What was a surprise was how thick the necks of my cases were (or had become) just above the shoulder junction. This could be either from repeat firing where brass moves from the shoulder or by metal moving down the neck from using bushings. I suspect a bit of both. The cutter could be run along the neck removing the small but steady amount of brass to be expected from what was a relatively skim cut, but then on approaching the base of the neck the cutter would really get to work. This was all on the neck itself, and before the 30 degree face of the cutter had begun to contact the shoulder. I think the close up photo shows this quite well. Hopefully this means that the expander had successfully pushed any donuts to the outside and they were now being removed. If you are not neck turning then maybe here is a case for setting dies to only size 80% of the neck and leave this region out at chamber dimensions and hopefully clear of the bullets.
Crunch time: assessing accuracy and consistency
As mentioned earlier, Model B tools are delivered with a preset cutting depth. I had requested the cutter to provide a 0.012 neck wall thickness. The gap between the cutter and the mandrel was checked with a feeler gauge which confirmed the approximate setting.
To check to what thickness the tool would actually cut the necks and with what consistency, I turned, expanded, and then re-sized a sample batch of 20 cases with a Redding competition neck sizing die fitted with an apparently undersized 0.288 nitride bushing (used number up), and seated Berger 140gr Hunting VLDs. The bullets measured between 0.2639 and 0.2640 in diameter. Any pressure ring at the boattail junction was seated down below the shoulder-neck junction.
As with the other measurements made, loaded diameters were taken with two Mitutoyo micrometers each with a reading precision of ±1 micron and taken at multiple points around the circumference looking for maximum and minimum values for each case. The bullet diameters were then docked to leave the combined wall thickness for an average of 0.0244, so the end result for the neck walls were therefore only very slightly thicker than the target 0.012 setting. PMA guarantee this factory setting to ±0.0005 so no complaints there.
As far as consistency went, the variation in the loaded neck diameter across this sample batch after accounting for bullet variation - that is two neck thicknesses - was typically within ±0.0001.There was the odd case that fell outside this range for variation in the combined wall thickness, but always within ±0.0002, so that is within ±0.0001 for actual neck thickness.
Re-calibrating the cutter gap?
Although the Model B can be adjusted for cutting depth, the intention of this design is clearly for the reloader to set it up and then leave it be. The more expensive Model A tool is designed for accurate adjustment from a reference setting if that is what is required. Whether the Model B can be returned precisely enough to a given setting would depend on just what that level of required precision is needed.
Once all the cases in my main shooting batch had been processed I felt a bit of experimentation was in order
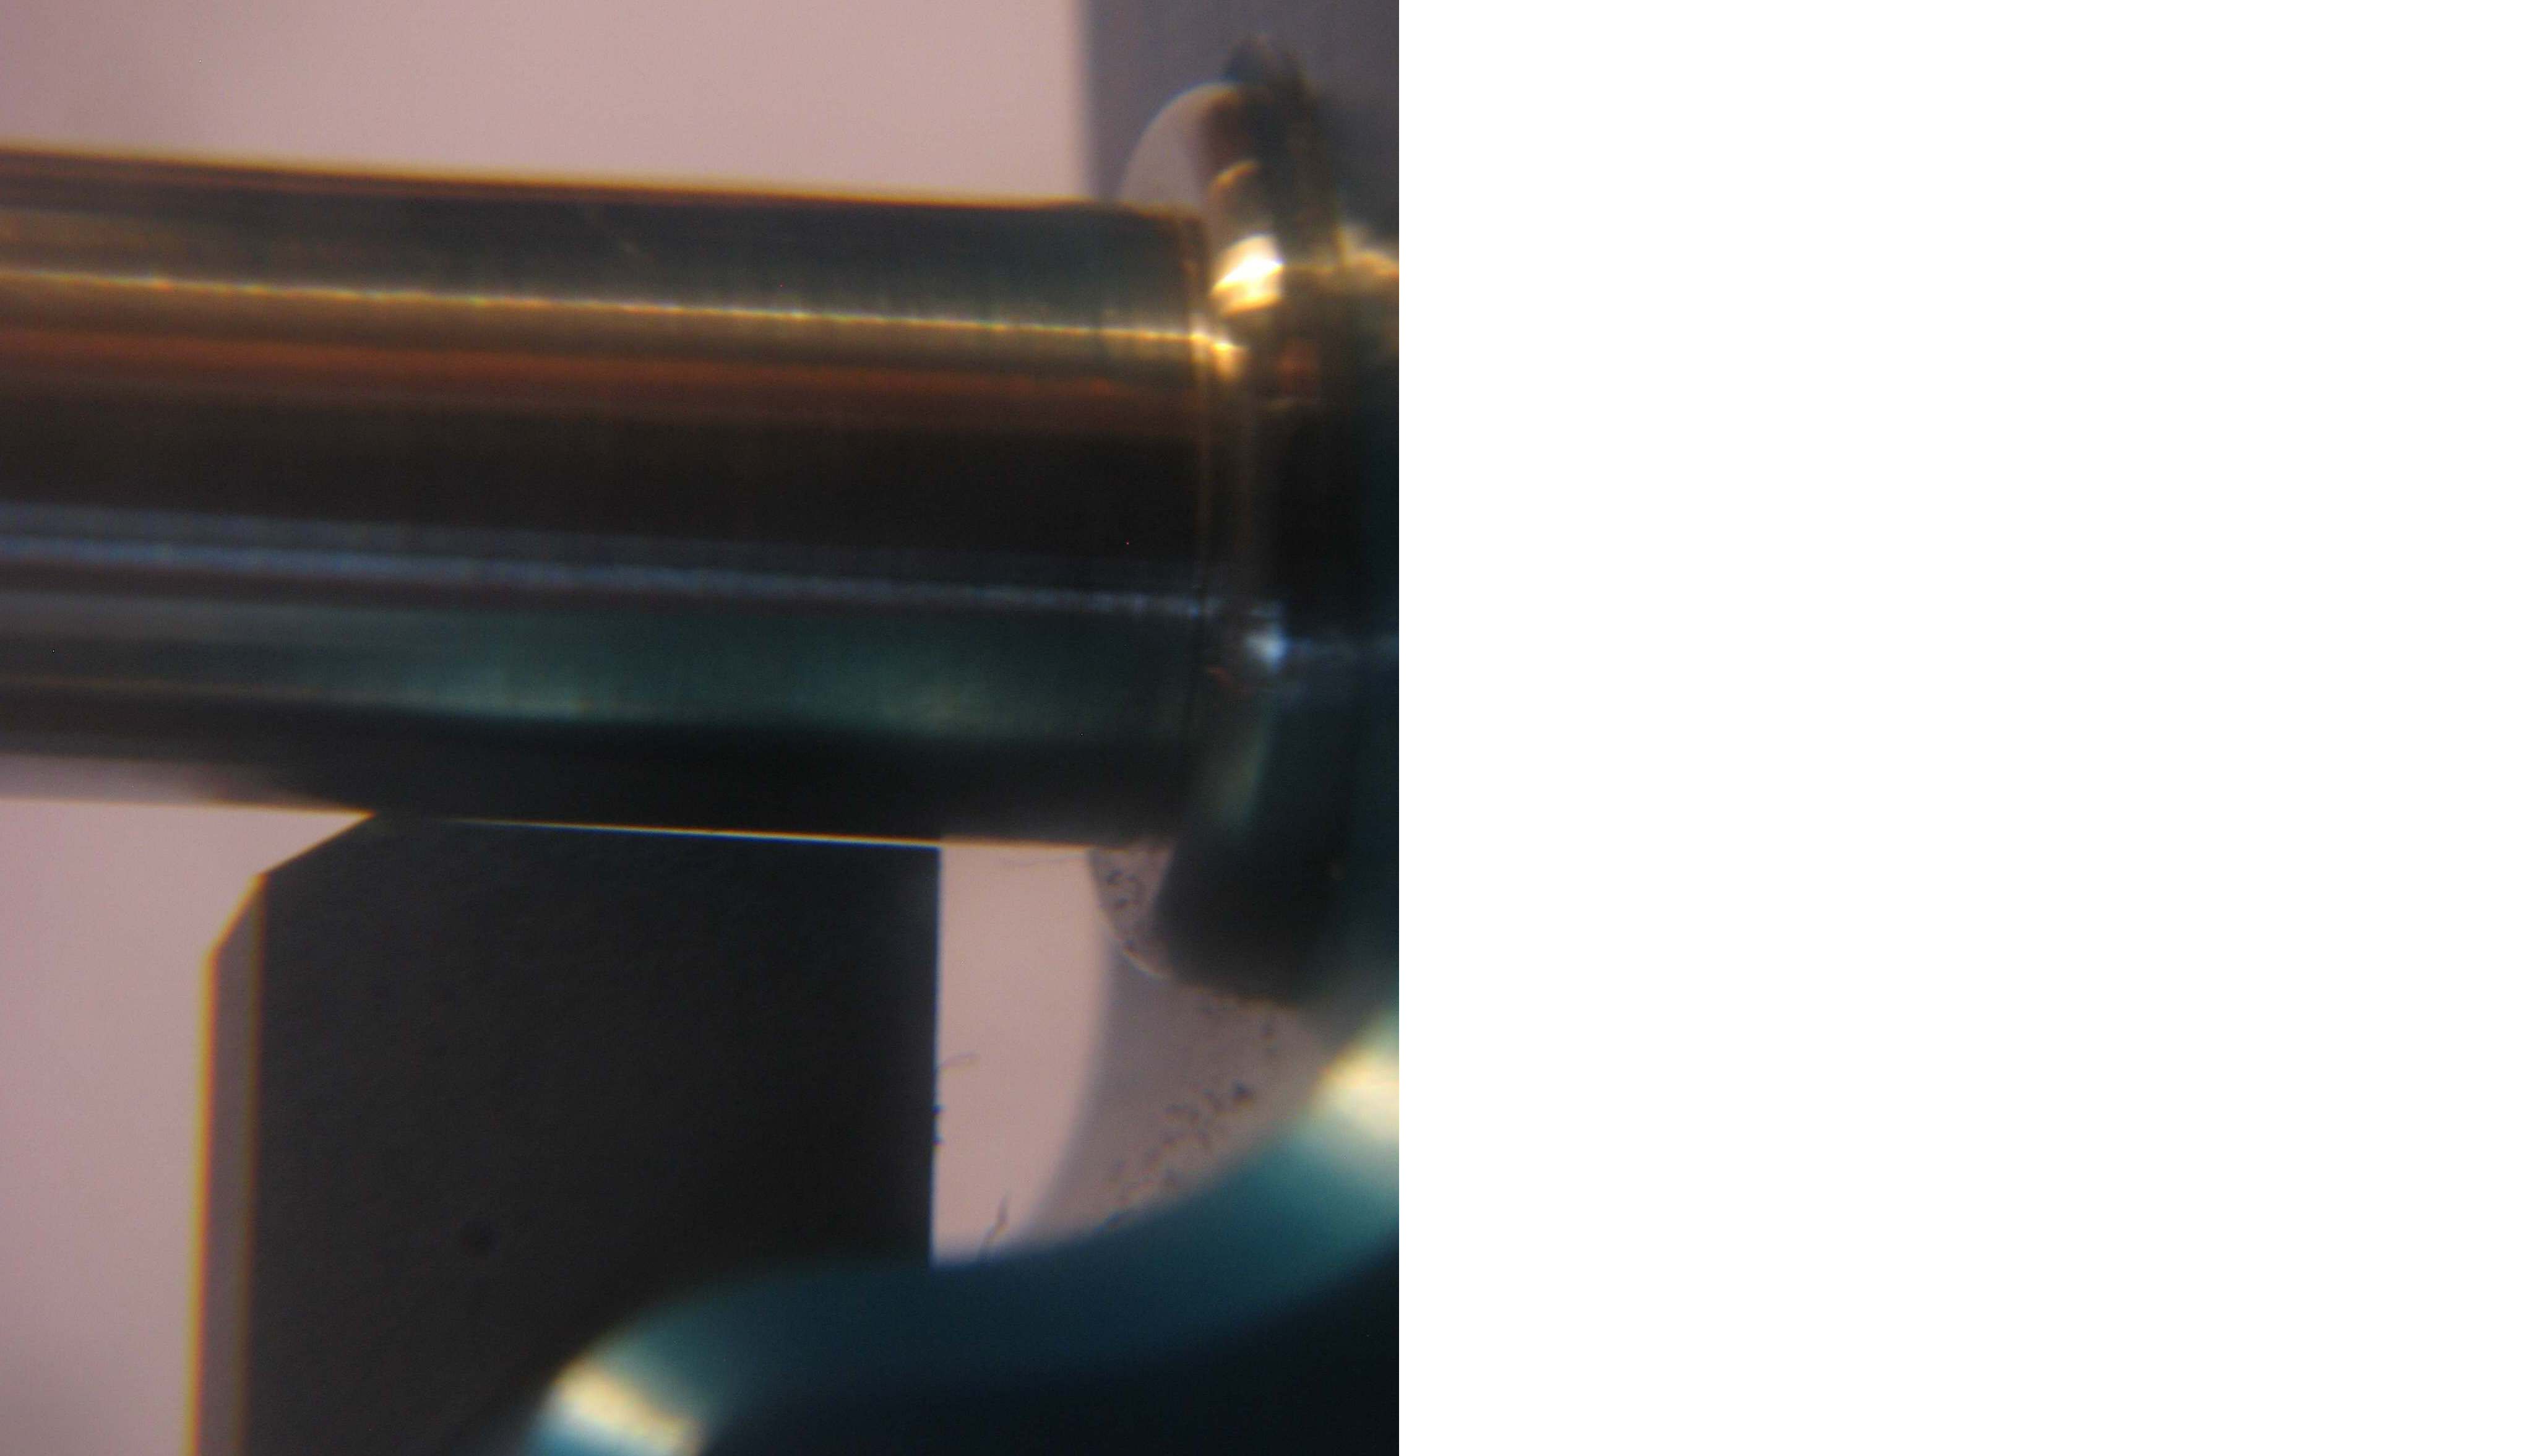
Firstly the cutter was loosened off and the opportunity taken to run it up against the mandrel to check the side clearance (pictured). This was estimated at 1° - which I imagine is a carefully considered choice by PMA.
A 0.012 feeler gauge was then used to reset the cutter-mandrel gap, and to the same feel I thought as when initially checking the tools factory setting. A few spare cases (from a segregated weight-sorted batch) were then turned, the same bullet type fitted as before, loaded diameters measured, and then bullet diameters docked. The measurements varied between 0.0238 - 0.0240, so half this per side gave 0.0119 - 0.0120, only very slightly down on the original result.
So can the Model B be returned with sufficient precision to a previous setting by feeler gauge so that cases turned with either could be treated as the same and batches mixed? My thoughts are that this may depend on what amount of neck tension is subsequently going to be applied to the turned cases, and how this is going to be applied. Bear with me here
If after neck turning cases are being sized from the inside surface of the neck by expander button or collet die then a couple of ten-thousandths of an inch variation is neither here nor there.
Neither do I think this would have a noticeable effect on cases being sized with bushings 2-3 thou under loaded diameter; the intended applied tension on the bullets being so much greater than any variation in to which this spread in neck wall thickness would translate.
If on the other hand the plan was to subsequently size all the cases with the bare minimum amount of tension to hold bullets for say soft seating then the requirement for case-to-case consistency would be that much greater, and it would be easier to turn the entire batch before making any adjustment to the cutter position.
Summary
While Im not in a position to make comparisons with competing products, I wouldnt have gone to the trouble of writing up a review like this unless I was impressed with this equipment from PMA. Having used the tool along with the accessories and tried to quantified the tools performance, there isnt anything that I can think of that I dont like about it. Swapping cases in and out of the case holder & driver was easy, the tool felt nice in the hand, fit & finish is exemplary, and the carbide cutter produced a smooth result. The PMA gear just exudes quality. Call me odd, but I found turning the cases quite enjoyable, watching the brass peeling off. I had no trouble turning all 165 cases in the batch in one sitting at about a case per minute.
The end result was a pleasing sameness in feel between cases when seating the VLDs, which was what I was after (I dont own a seating force gauge sorry). Hopefully this all translates into an accuracy improvement, this being the desired end game, though if this fails to eventuate it would be no reflection on the PMA gear, rather an indication of the influence of consistent neck tension in ammunition through my particular rifle.
PMA Tool is based in Fort Wayne, Indiana. PMA tool products can be purchased directly. The website is easy to navigate. Email queries were answered promptly and with the information requested. I dont know what the freighting costs to NZ would be, but this may be the one bit of bad news attached to owning this equipment. I was fortunate in that my wife bought the gear back as luggage following a recent US visit. All the components I purchased came to NZ$300.
Welcome guest, is this your first visit? Create Account now to join.
Welcome to the NZ Hunting and Shooting Forums.
Search Forums


User Tag List
+ Reply to Thread
Results 1 to 8 of 8
-
09-06-2018, 03:33 PM #1Member


- Join Date
- May 2012
- Location
- Porirua
- Posts
- 974
Review: Model B Neck Turning Tool from PMA Tool
-
-
09-06-2018, 04:35 PM #2Member

- Join Date
- Feb 2015
- Location
- Rabbitvegas
- Posts
- 2,605
great review mate, thanks for taking the time and effort to write it all up.
-
09-06-2018, 07:08 PM #3Fulla
- Join Date
- May 2012
- Location
- Cni
- Posts
- 1,660
Great effort in the review, I'm just lacking focus to read right now. But great detail I'm sure others will be thankful for the effort.
I use a different brand I forget now, a popular blue one, there's a bit of an art or experience needed to work them.
-
09-06-2018, 07:13 PM #4Terminator Products

- Join Date
- Dec 2011
- Location
- Nelson
- Posts
- 6,523
I got two of them but haven't used them yet, I have 5 or 6 modified Hornady ones & some Forster ones permanently set up.
Their case holders are fantastic
I have a bit of their other benchrest associated stuff, very nice.Overkill is underated !!!
http://terminatorproducts.co.nz/
http://www.youtube.com/user/Terminat...?feature=guide
-
09-06-2018, 08:14 PM #5Member

- Join Date
- Mar 2012
- Location
- Christchurch
- Posts
- 1,330
Very thorough review; thankyou. I use a Marquart turning tool (I believe it was the first of this type of tool), a K&M and several Simplex (same as Marquart, and available from Australia at a lower price, and postage). I use several turning tools because, apart from the K&M, the tools are very difficult to reset to a particular setting. I tried Imperial Sizing Die wax and auto transmission oil on the mandrel. I found the Imperial wax to produce the least problems with brass smearing onto the mandrel. If the brass is too tight on the mandrel it does tend to smear which means taking out the mandrel, cleaning the brass off with wire wool and resetting the tool which is very tiresome. I found the more difficult parts of the process to be re-setting the blade to a pre-determined setting, and getting the diameter of the brass to fit the mandrel. If the brass has been shot a few times and then some has been annealed and some not, the resulting thickness of brass after turning of the two different lots will be different in thickness, so it is best to keep the brass in separate lots.
-
09-06-2018, 11:14 PM #6Member
- Join Date
- Oct 2016
- Location
- Auckland
- Posts
- 593
Thanks Tim for all the thought and time that went into the review. Resetting these trimmers to a previous cut depth is almost impossible and like others I have ended up with different tools for each calibre. Expensive yes but I haven't found a way around it. I am now looking to get one for the 338 as I have a big variance in force required to seat bullets, this seems to be causing vertical stringing and big velocity deviation. After this review my next tool is going to be blue.
-
11-06-2018, 10:12 AM #7Member
- Join Date
- Jan 2018
- Location
- Christchurch
- Posts
- 664
That has to be the best explanation of the hows and whys of neck-turning that I've read so far! Thank you for taking the time to post this up.
As a newly returned member of the shooting community these sorts of write-ups are utterly invaluable when trying to decide if this is something I need to consider for the future as I get to multiple firings on my brass. Currently I have a factory Howa that I stiffened and bedded the stock on. I also chose to load my own with Lapua brass right from the start to see what I could wring out of budget options despite having champagne tastes/interests...
The other pressing question I have yet to answer is how critical is it to anneal after every firing? Everything I have read suggests that it is if absolute consistency is the goal. I've also seen a multitude of methods and machinery to achieve this. If money is no issue them there are superb automated machines available. But when money is an issue and technical know-how to build one isn't readily available, what are the better options? I don't mean to derail your thread, but it got the thought process going again.
Might be a good question for my first post in this section!
-
11-06-2018, 02:15 PM #8Member
- Join Date
- Oct 2016
- Location
- Auckland
- Posts
- 593
Hi @Steelisreal. I believe that it is crucial to anneal brass after every firing. I use a guy on Trademe who has an AMP machine. $25 for the first 100 cases is money well worth spending.


 Reply With Quote
Similar Threads
-
Leatherman Wave Multi tool and adapter review
By Shelley in forum Gear and EquipmentReplies: 2Last Post: 23-09-2014, 04:51 PM
Tags for this Thread
 Posting Permissions
- You may not post new threads
- You may not post replies
- You may not post attachments
- You may not edit your posts
Welcome to NZ Hunting and Shooting Forums! We see you're new here, or arn't logged in. Create an account, and Login for full access including our FREE BUY and SELL section Register NOW!!
All times are GMT +13. The time now is 01:01 PM.

Bookmarks