

 46Likes
 LinkBack URL
 About LinkBacks
Hey guys looking for advice on what to do with this.
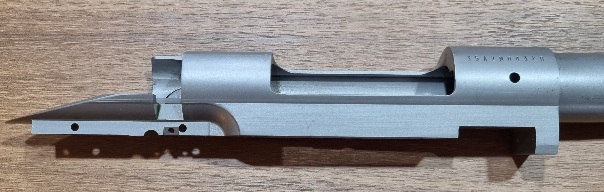
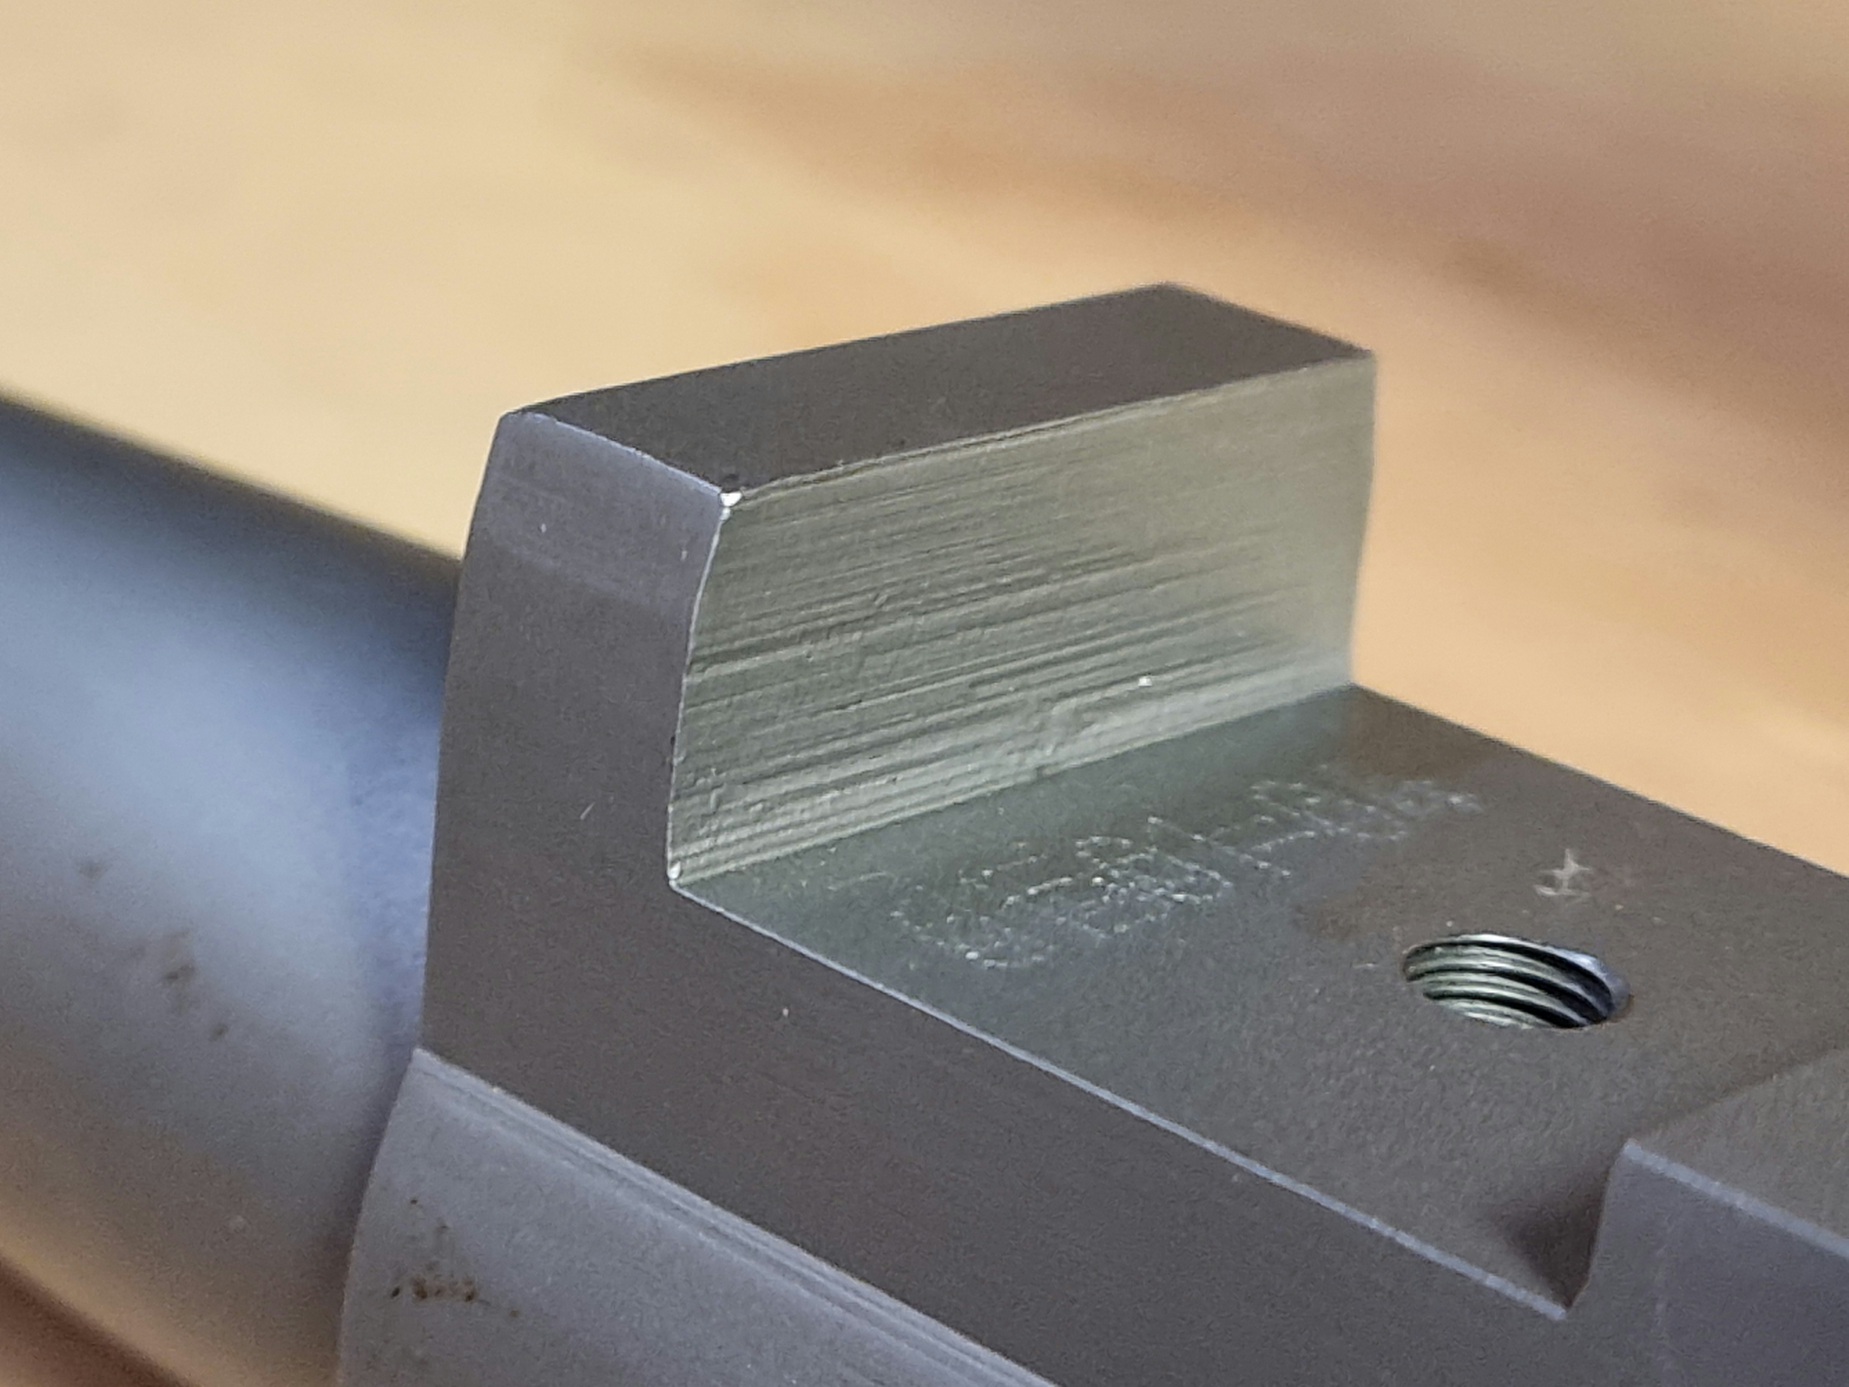
Was looking to do my first bedding job on my M70 and found the recoil lug looks like this.
Figuring it will be pretty hard to get it out if at all after bedding.
Was thinking about getting it milled square and clean.
Welcome guest, is this your first visit? Create Account now to join.
Welcome to the NZ Hunting and Shooting Forums.
Search Forums


User Tag List
+ Reply to Thread
Results 1 to 15 of 35
Thread: Dodgy recoil lug
-
09-02-2022, 08:51 PM #1Member


- Join Date
- May 2018
- Location
- Ngaruawahia
- Posts
- 1,167
Dodgy recoil lug
-
-
09-02-2022, 09:06 PM #2Banned
- Join Date
- Mar 2015
- Location
- North Canterbury
- Posts
- 5,462
Just smooth up the lug face with a file and it will be fine. I would go with two thicknesses of insulation tape on the forward face of the recoil lug and same on forward face of the rear lug. The tape will prevent a mechanical lock occurring. Tape the bottom and sides of the recoil lug with a narrow strip of tape so that after bedding the lug has clearance under it. Nathan Fosters rifle bedding tutorials are excellent as are his bedding products. (He provides Carnuba wax as a release agent which works perfectly, but his vids need updated as these show the use of shoe polish)
-
09-02-2022, 09:07 PM #3Member

- Join Date
- Apr 2015
- Location
- Geraldine
- Posts
- 22,632
no problem there...one layer of insulation tape and it is cancelled out.plenty of release agent...kiwi liquid boot polish and powdered graphite extra if you scared.
-
09-02-2022, 09:16 PM #4Gone but not forgotten
- Join Date
- Apr 2017
- Location
- Hamilton
- Posts
- 4,129
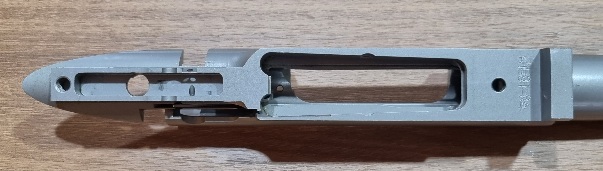
From the photo that looks like the rear of the lug, in which case you don't want to tape it, or you will have a gap between the lug and the bedding, allowing movement under recoil. Only the front, sides and bottom should be taped Originally Posted by Micky Duck
 Finnwolf likes this.
-
09-02-2022, 09:31 PM #5Member
- Join Date
- May 2018
- Location
- Ngaruawahia
- Posts
- 1,167
Yep it's the rear of the lug so tape is not an option.
Have studied all Nathan's tuturials and a file had definitely crossed my my mind so will give it a go.Micky Duck and CBH Australia like this.
-
09-02-2022, 10:17 PM #6Banned
- Join Date
- Mar 2015
- Location
- North Canterbury
- Posts
- 5,462
Are you doing a full length bedding job or just front and rear ? Originally Posted by Bobba
Please post a photo of the full action.
-
10-02-2022, 08:20 PM #7Member
- Join Date
- May 2018
- Location
- Ngaruawahia
- Posts
- 1,167
@Moa Hunter
Haven't decided yet on full bedding or front and rear. Was going to do some more study then play with plasticine to see how it's going to look while still clearing safety etc.
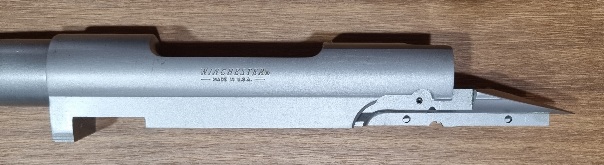
Here's some pics of the action.
 Micky Duck likes this.
-
10-02-2022, 10:06 PM #8Member
- Join Date
- Nov 2014
- Location
- Central Otago
- Posts
- 2,221
Yes, file it with a very slight forward taper and polish the surface with wet & dry backed by the file. Breaking the sharp edges also helps. Bed from the front edge of the mag well to about 50mm up the barrel, and from the rear of the bolt stop slot back. Take care to fill the holes and trigger slot with putty or plasticine. A plastic shim cut from a plastic ice cream lid and put under the mag well will give a nice clearance off the stock but still be close enough for all parts to line up nicely.
-
11-02-2022, 08:03 AM #9Banned
- Join Date
- Mar 2015
- Location
- North Canterbury
- Posts
- 5,462
@Bobba , If it was mine I would do the full length bed using Nathans kit. It is all stripped and clean and begging for a full bed. I have done two in the last two weeks never having done the full length bed before. Your winchester has nothing that will cause a mechanical lock like the BSA Hunter I did last. It takes a lot of prep but is very satisfying when you see the result.
rossi.45 likes this.
-
11-02-2022, 04:56 PM #10Member
- Join Date
- May 2018
- Location
- Ngaruawahia
- Posts
- 1,167
Thanks for the input guys. Ordered bedding kit today and will keep you updated on progress.
-
11-02-2022, 05:48 PM #11Banned
- Join Date
- Mar 2015
- Location
- North Canterbury
- Posts
- 5,462
Great news. Nathans plasticine makes the blocking and damming easy. The drinking straws and threaded rod ( bolts with heads cut off) are a real key for when the metal work is lowered into the stock - the drinking straws sit up and keep the compound from running down the action screw holes and then they slide down with the metalwork through the holes in the stock when it is lowered. If you look at his vid on bedding the lee enfield there is some really good info that compliments the step by step vids. Originally Posted by Bobba
PS I just used bolts that were a near enough fit that would finger tight screw into the action - no need for the correct thread
-
11-02-2022, 07:27 PM #12Member
- Join Date
- Jun 2013
- Location
- Middle Earth
- Posts
- 4,058
If you are scared to use the file , we could mill it for you since you are almost down the road from us.
-
11-02-2022, 08:58 PM #13Member
- Join Date
- Apr 2015
- Location
- Geraldine
- Posts
- 22,632
my model 70,and funnily enough the zastava both used the same bolts.....which were brass coated,allen key headed ones out of a BBQ frame,they were perfect match for the thread.
Moa Hunter and Bobba like this.
-
12-02-2022, 09:09 AM #14Member
- Join Date
- May 2018
- Location
- Ngaruawahia
- Posts
- 1,167
Thanks for the offer Friwi. I used to be pretty good with a file before I became an office chair warmer. Will give it a go and take you up on that if I make a meal of it. Originally Posted by Friwi
-
12-02-2022, 09:13 AM #15Member
- Join Date
- May 2018
- Location
- Ngaruawahia
- Posts
- 1,167
Yep thay raises the next issue. Quick measure and some googlefoo says the threads are 1/4 UNEF (32 TPI). Originally Posted by Micky Duck
Will have a dig around and see if I can find something to work. Trade tools have a die nut if all else fails.Micky Duck likes this.


 Reply With Quote
Similar Threads
-
Dodgy gun lock for security
By timattalon in forum Firearm SafetyReplies: 8Last Post: 13-06-2020, 04:14 PM -
dodgy pm
By rambo rem700 in forum Questions, Comments, Suggestions, Testing.Replies: 14Last Post: 24-02-2016, 09:40 PM
Tags for this Thread
 Posting Permissions
- You may not post new threads
- You may not post replies
- You may not post attachments
- You may not edit your posts
Welcome to NZ Hunting and Shooting Forums! We see you're new here, or arn't logged in. Create an account, and Login for full access including our FREE BUY and SELL section Register NOW!!
All times are GMT +13. The time now is 07:30 PM.

Bookmarks