


 LinkBack URL
 About LinkBacks
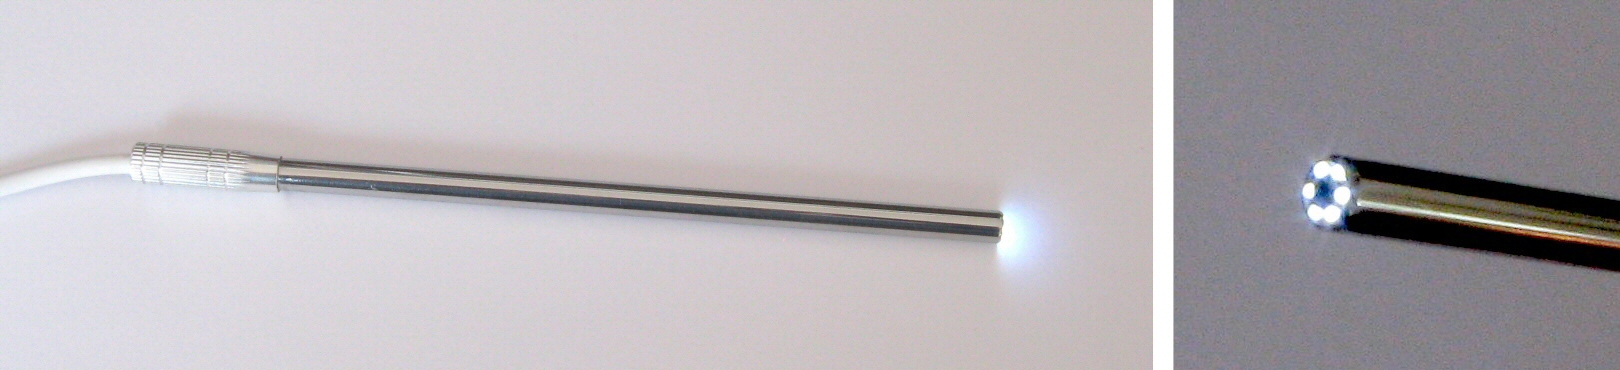
USB camera endoscopes are now common enough for around $20 online with the 5.5mm diameter required for fitting most bore sizes. The problem remains the relatively long focal length settings on these, often around 4cm. For this reason Ive again sat on my wings on this one and not purchased any until now, maybe checking once every 6 months or so to see if anything more suitable would turned up. When I came across one that advertising a 1.5cm focal length and 60° viewing angle I thought that it sounded a bit more promising.
https://www.aliexpress.com/snapshot/...Id=32905146083
All the details are there. If you cant be bothered then here are some pics.
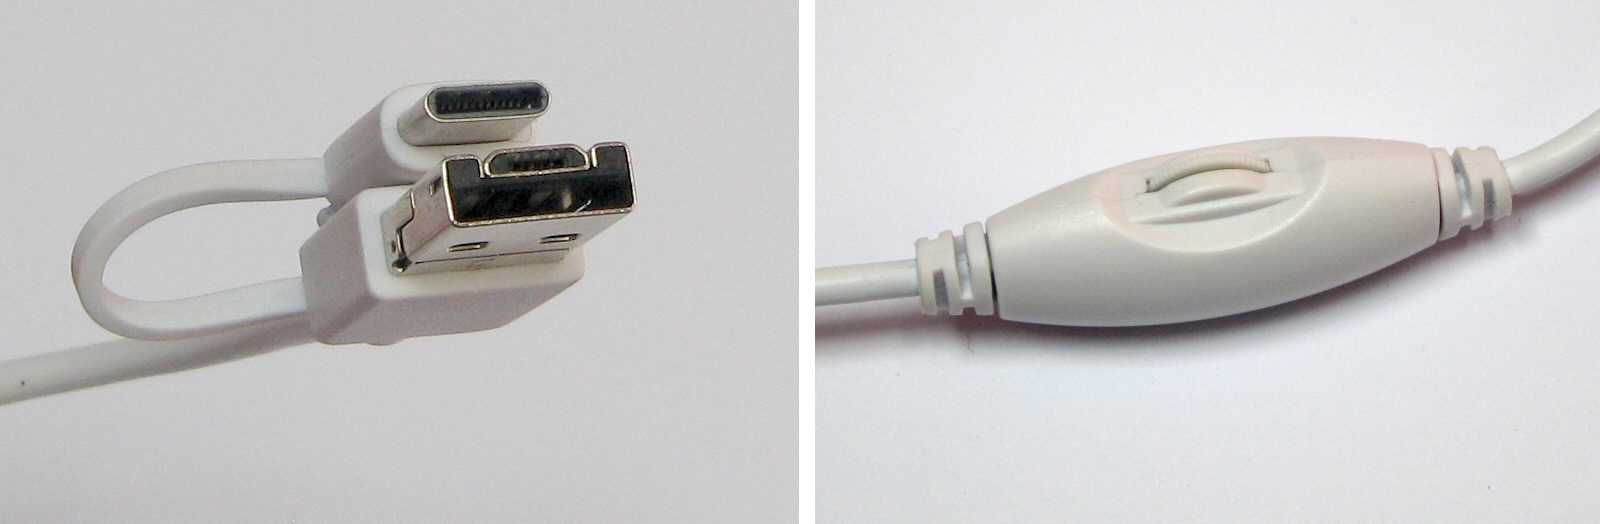
The lens must be smaller than the 0.21 detector size because there is room for six LEDs around the outside. Android or PC compatible. I used NCH Softwares Debut video capture. Connector options and the LED brightness control shown below. As supplied the cable end diameter allows the entire endoscope to be fed into a 7mm barrel, otherwise for smaller bores the view is limited to reaching in 130mm from each end.
I measured the usable focal length: 12-16mm would be my assessment.
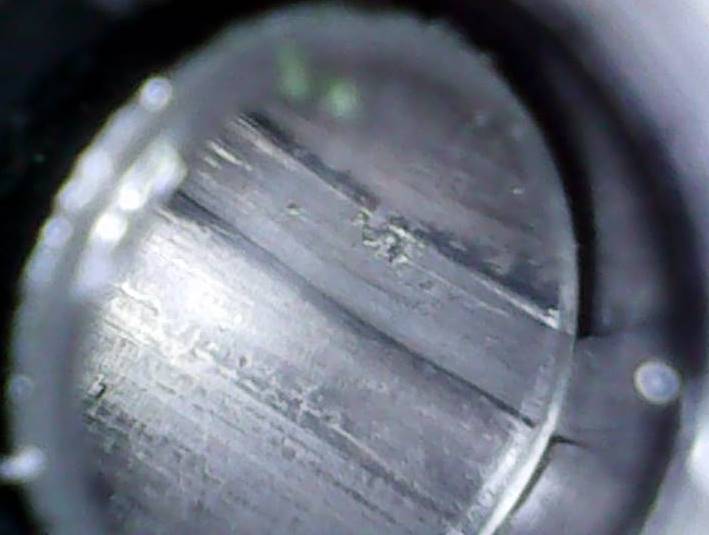
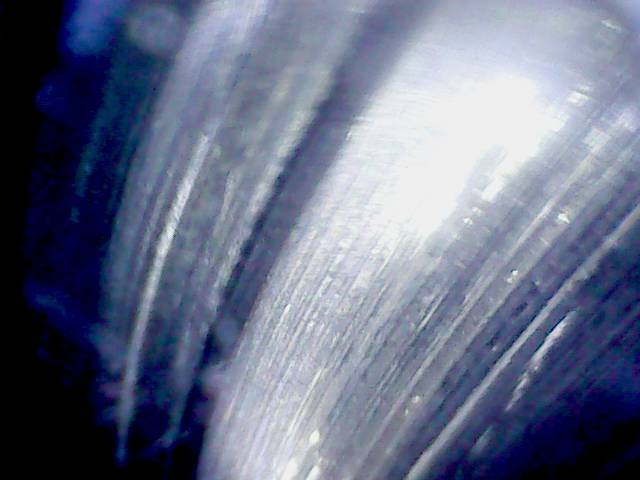
Here are some pictures. First up Ackleys 40° shoulder approaches. Not really that interesting.
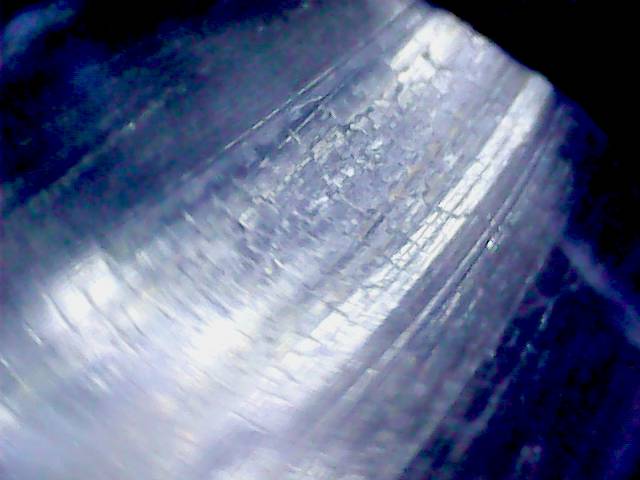
Here is some fire cracking in a True-Flite barrel chambered in 280AI after 1200 rounds. I set the LED intensity to highlight the lands. Also visible is some copper smearing in places.
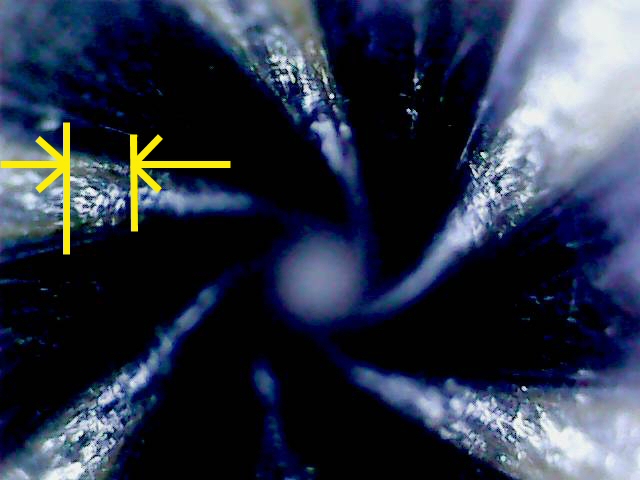
Only the portion indicated is well focused within the distance range previously given.
The problem remains that looking at rifling axially, at an acute angle, and focused some distance away - even if this is only 14mm - is simple not as good as if viewed at right angles close up to the surface as with a Hawkeye.
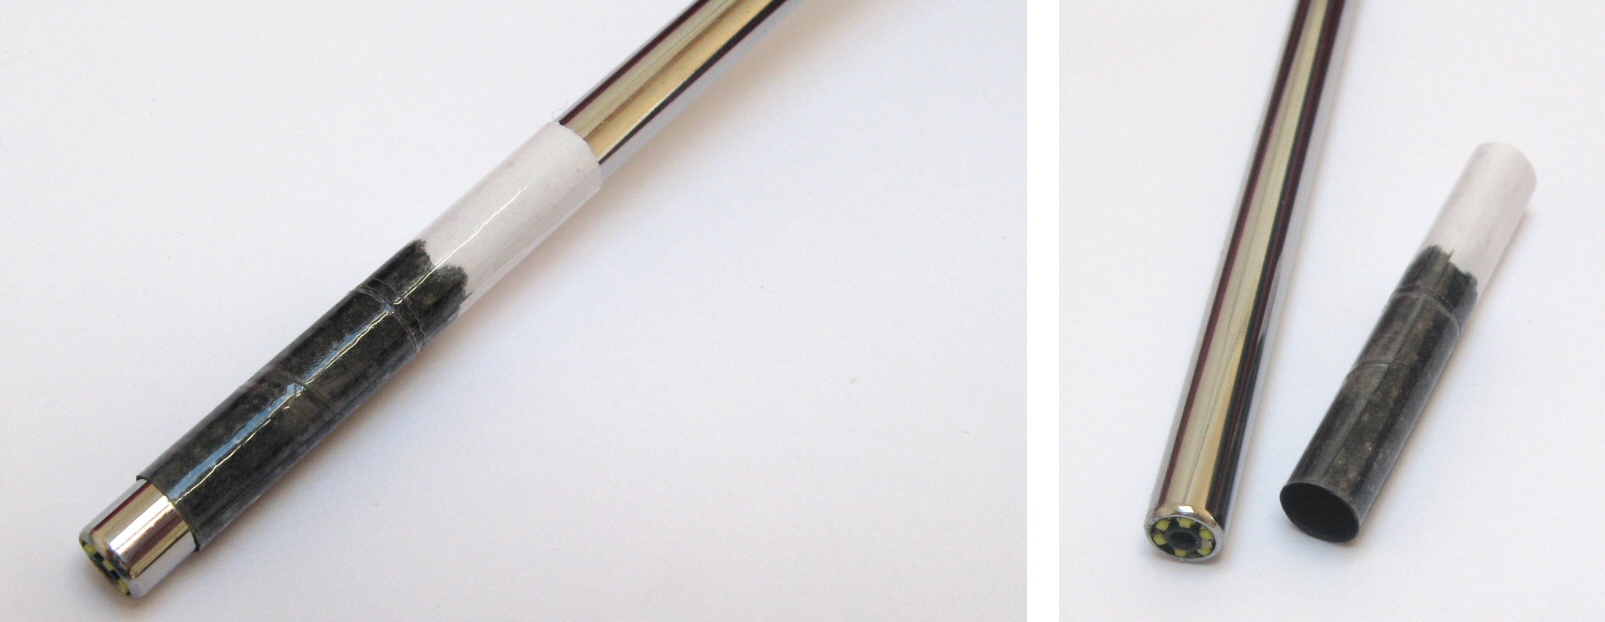
Some of these endoscopes are supplied with right angle mirror accessories, but not this one (only some plastic ear pickers). It may be possible to get versions with a mirror. The diameter of the plastic sleeve of any adapter would need to be checked to see what limitations it places on calibre fit. So this time around it had to be a DIY add-on.
First up I needed a source of mirror on a plastic substrate so it could easily be shaped to size. What is required is a tiny elliptical mirror, 5.5-6mm across and 1.4 times this in length so it looks like a circle when tipped back at 45°. This could be made a bit bigger if only large calibre barrels were to be inspected. I had some spare reflectors leftover from Mini Maglite LED upgrades. Although the surface was a little concave this didnt seem to impact the end result much. With plastic the mirror is a surface finish and easily scratched. I covered the surface with Sellotape while the piece was being shaped in the same way that many plastics have protective sheets applied.
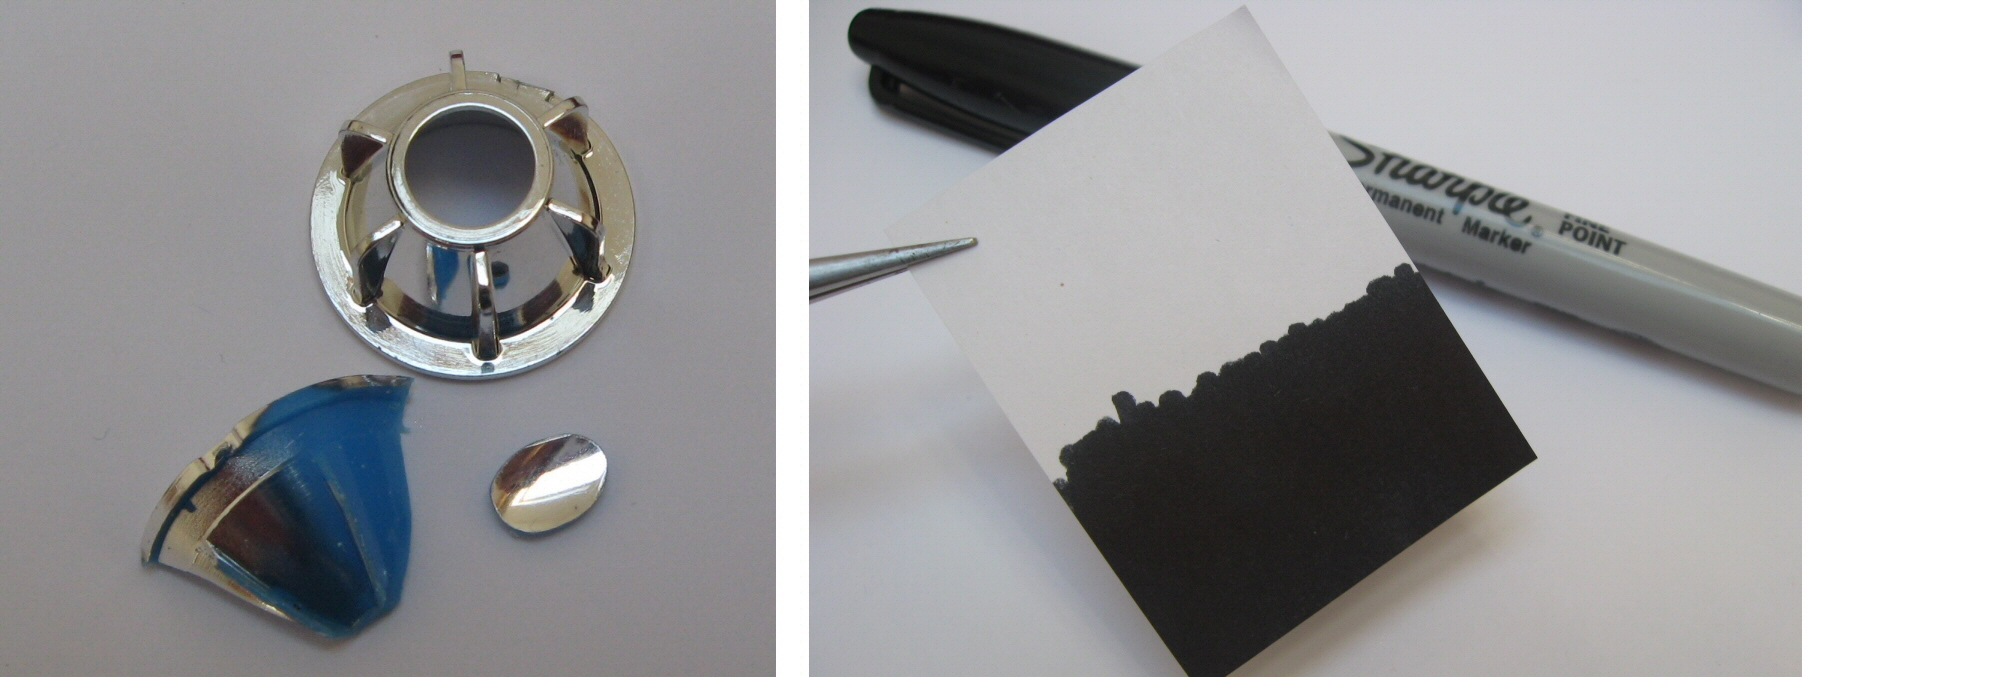
If you can find a tight fitting (5.5mm) black soda straw to mount the mirror then use that otherwise one can be easily made from paper. I blackened one end to reduce flaring from the LEDs.
The paper was tightly rolled onto the endoscope tube and layered with Sellotape over the top. It needs to be able to slide while still being a snug fit.
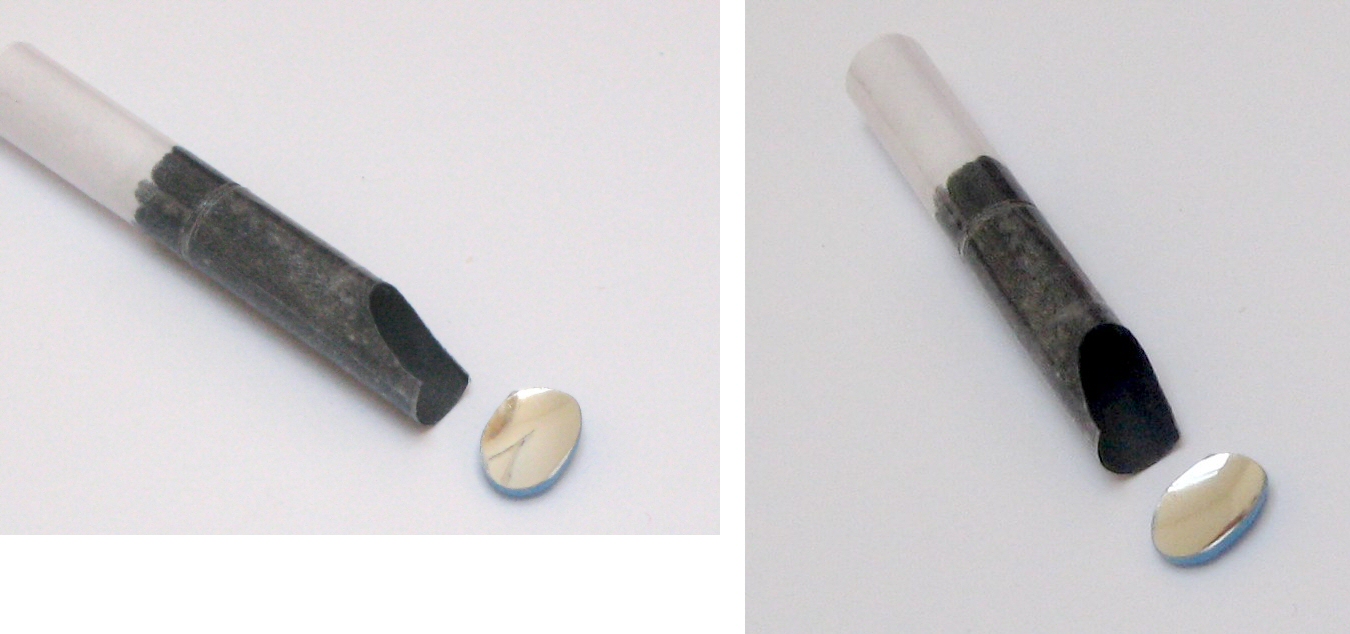
A viewing slot in cut at the end as shown. The mirror is first mounted with superglue.

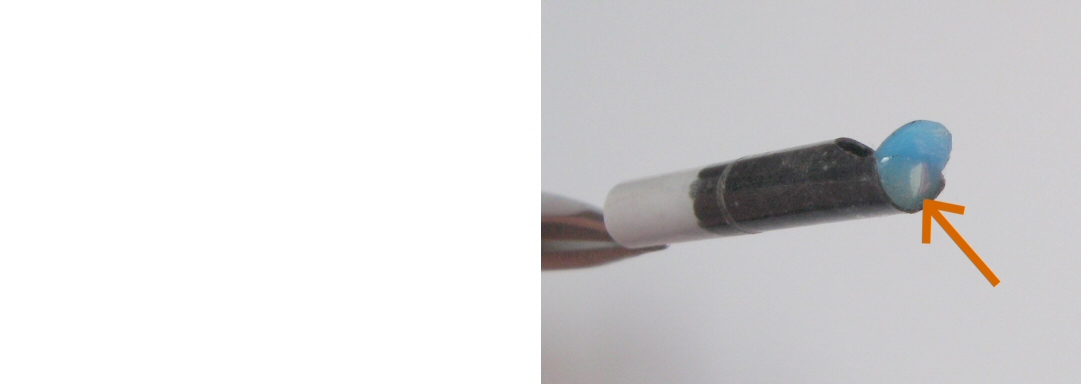
The angle can be set up by looking at the video of the mirror as seen through the camera, or checking that the light from the LEDs reflects at right angles as shown above. The glue should be applied sparingly with a pin end. Getting glue on the mirror surface is fatal, and probably the same can be said of the endoscope.
I made the bond a bit more secure by back-filling with 5-minute epoxy, arrowed in the above. The protective tape is removed from the surface as a last step.
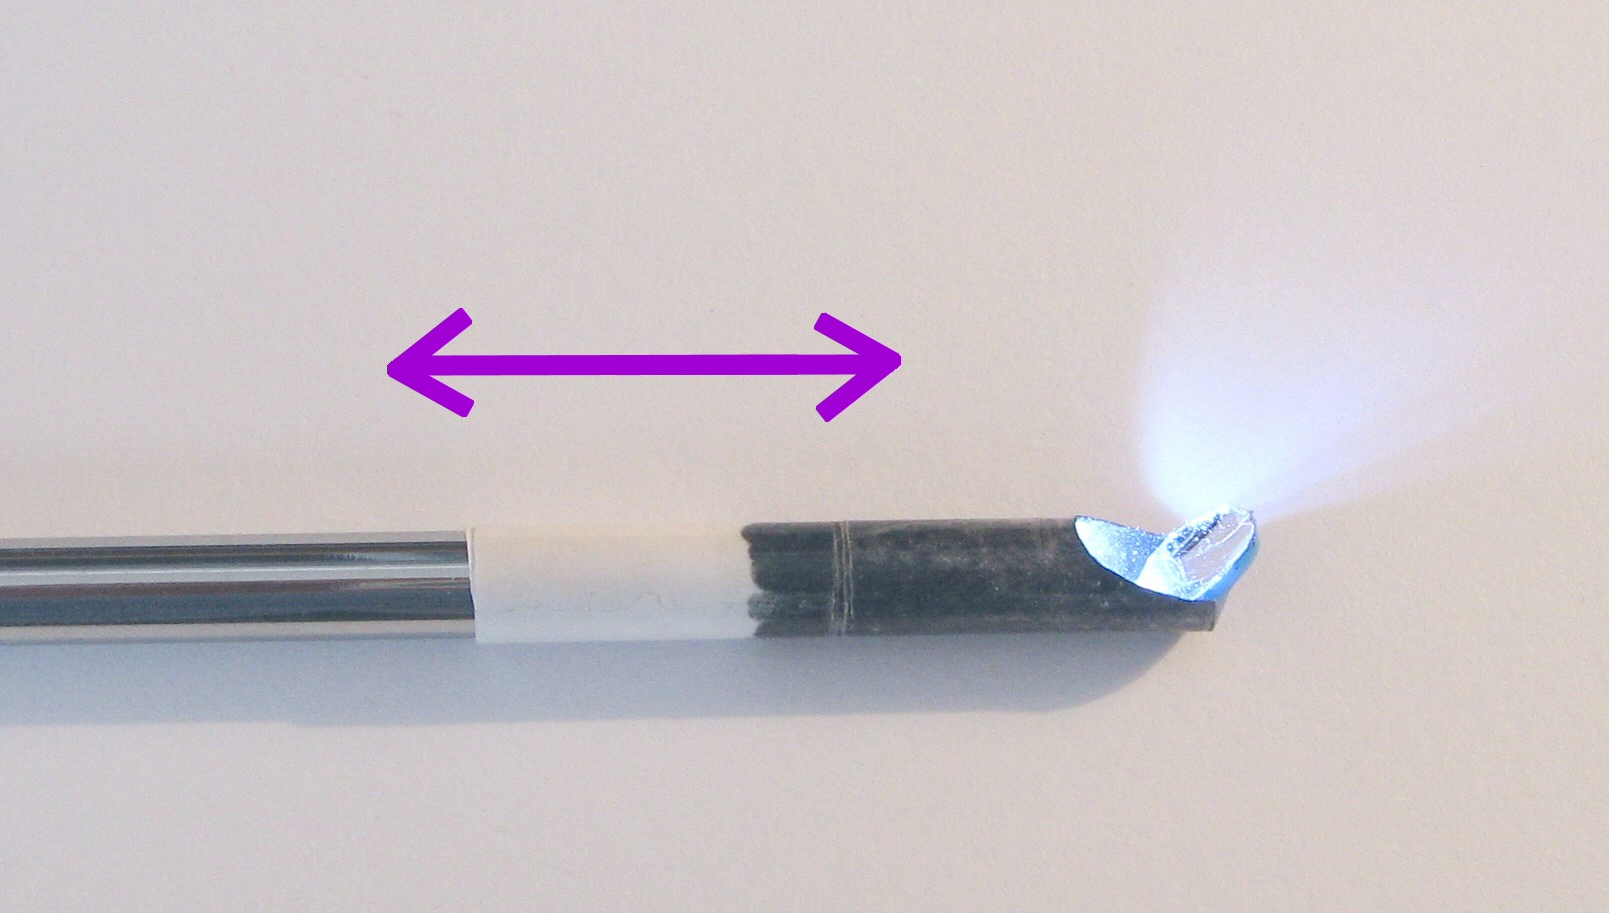
Focusing is now achieved by sliding the lens tube along the endoscope for a combined path length of 14mm between the surface to be inspected and the lens. The Borescope is then good to go.
Here is a bit of a gallery to help form opinions on the original title question. I have to say I did appreciate the large screen view and not having to squint into an eyepiece.
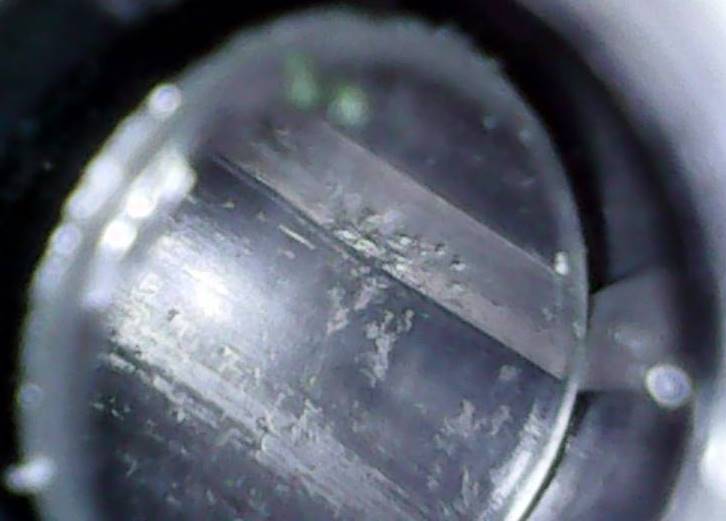
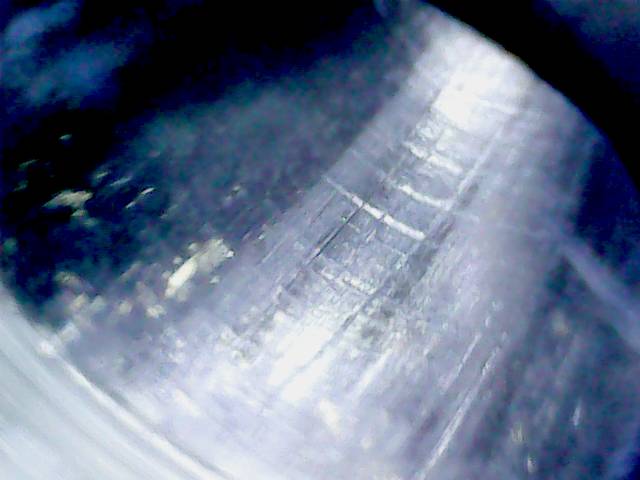
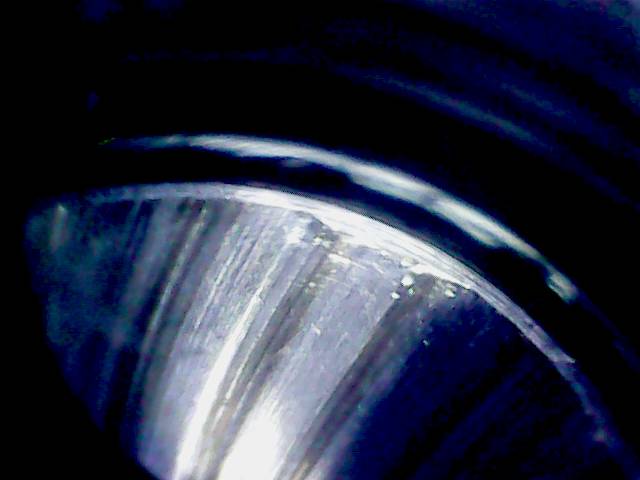
Below is the same 280AI as previously, showing the neck-to-freebore transition.
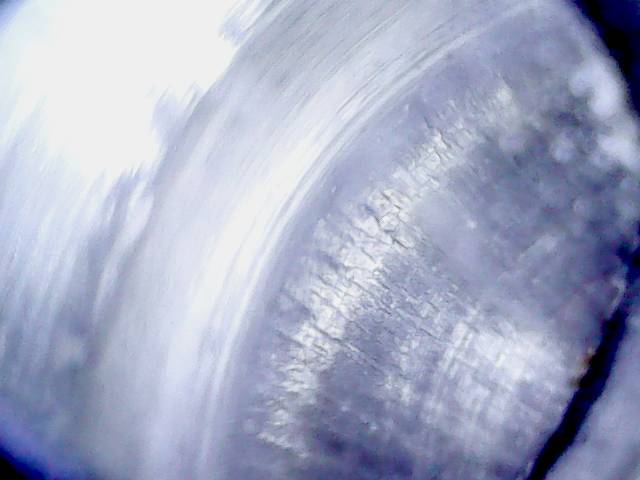
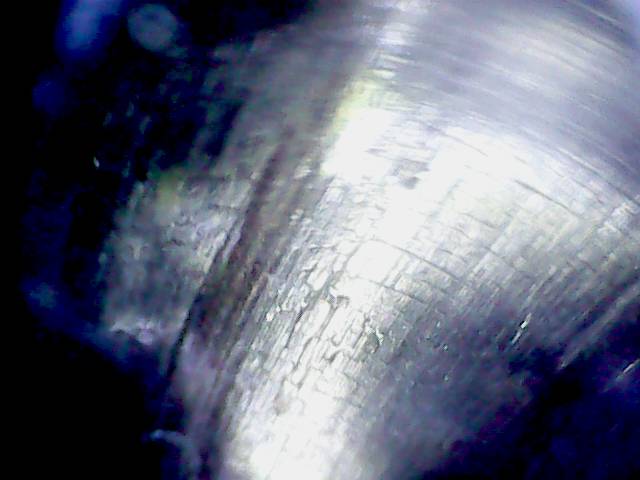
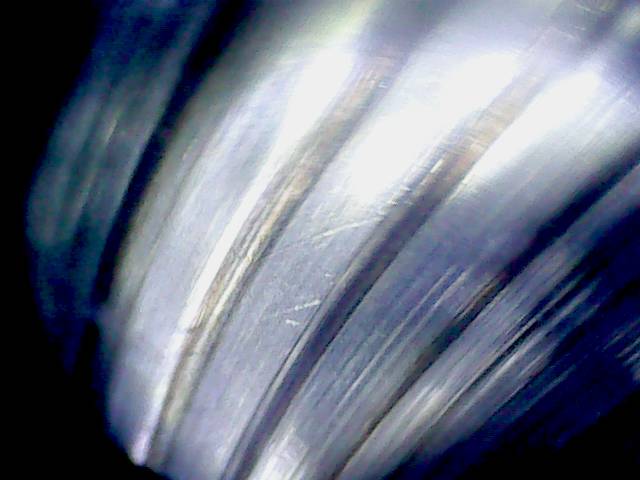
This next one is 75mm up from the chamber showing fire cracking on the top surface of the lands.
This is the groove surface about 100mm up from the chamber.
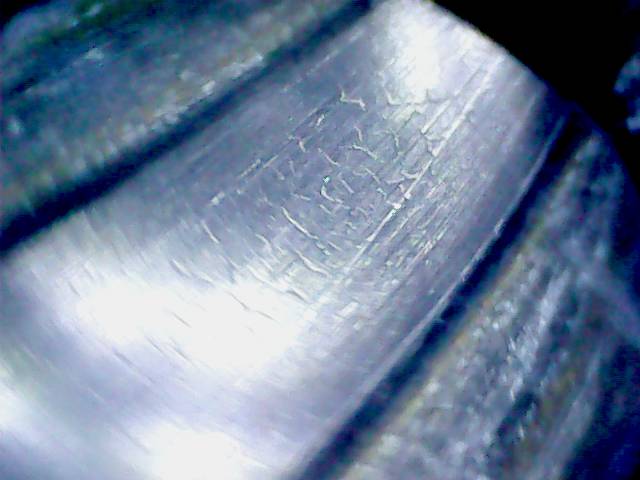
A different barrel this time, a Bartlein 5R chambered in 6.5x47. This shows some slight chambering marks in the freebore still there after 1500 rounds.
Below, slight deterioration in the leade. Maybe time to set it back in another 500 ?
100mm further up the barrel and it still appears mint. That is the edge of one of the 5R lands mid-image.
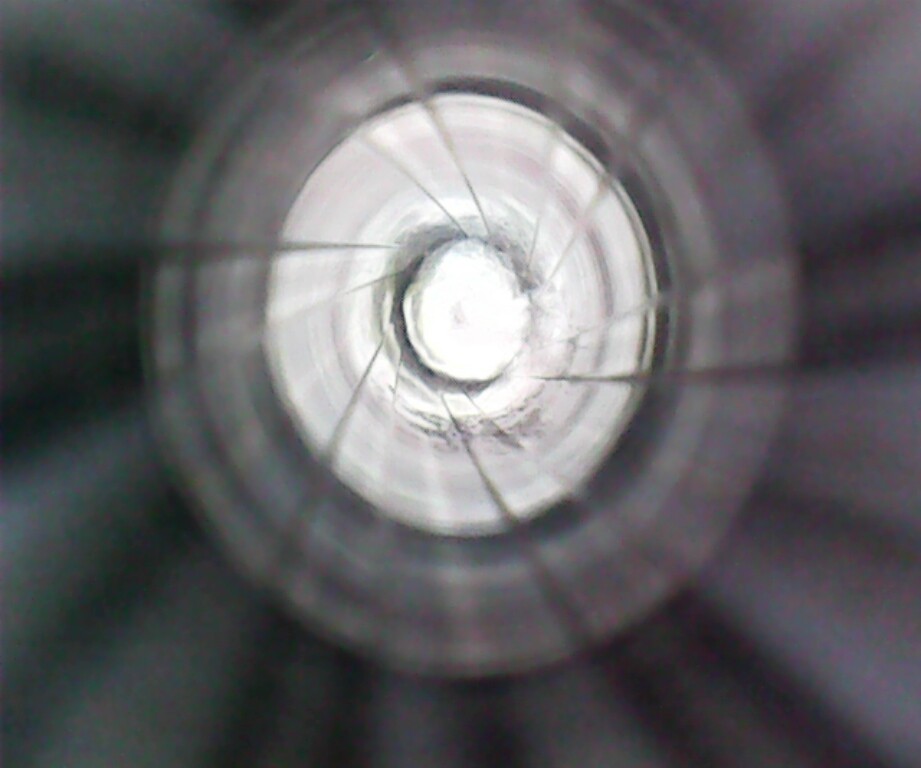
The Bartlein 5R rifling profile at the muzzle...
...and just down inside the muzzle end showing some light fouling on the edges of the lands. Easy to pick this up - copper and carbon - a perfect tool for getting that cleaning regime fine-tuned.
This last one is a Krieger 5R blank in .284" - silky smooth, and a nice clean edge on the lands right there.

Welcome guest, is this your first visit? Create Account now to join.
Welcome to the NZ Hunting and Shooting Forums.
Search Forums


User Tag List
+ Reply to Thread
Results 1 to 15 of 15
 20Likes
Thread: USB Borescope - now as good as a Hawkeye ?
-
15-11-2018, 07:13 PM #1Member


- Join Date
- May 2012
- Location
- Porirua
- Posts
- 974
USB Borescope - now as good as a Hawkeye ?
-
-
15-11-2018, 07:34 PM #2Member
- Join Date
- May 2012
- Location
- Porirua
- Posts
- 974
This is the correct link to the part:
https://www.aliexpress.com/item/3-In...4-22bf70aae580r87mm likes this.
-
15-11-2018, 08:35 PM #3Member
- Join Date
- Mar 2016
- Location
- Arrowtown
- Posts
- 1,342
Nice work @Puffin
The still photos are good but from experience I know how stills generally don't do justice to the overall vision you get when looking at live video... so the true results are probably great bang for your buck.
Magnification looks good and there is good lighting too.Puffin likes this.
-
15-11-2018, 09:13 PM #4Member

- Join Date
- Sep 2016
- Location
- Waikato
- Posts
- 417
Well done, I like that a lot. I think I'll be placing an order in the near future...
-
15-11-2018, 09:18 PM #5Gone but not forgotten
- Join Date
- Apr 2017
- Location
- Hamilton
- Posts
- 4,129
Those images are a huge improvement on what I got from the one I bought early last year. The unit came with an angled mirror but it didn't work, probably too close to focus. It was good enough to confirm a dark area in my 223 barrel was pitting though.
-
15-11-2018, 09:52 PM #6Member
- Join Date
- May 2012
- Location
- Porirua
- Posts
- 974
That was likely the reason, yes Originally Posted by Cigar

 The effectiveness hinges on the focal distance, and in the past 4-5cm seemed to be the predominant distance, so when used without the mirror then the part of the barrel that is in focus is just too far away for good resolution and at too acute an angle. Then with the right angle fitting, the mirror needs to be placed most of that 4cm distance away from the lens = less illumination and at that distance the mirror is a small % of the overall image size, so same result.
If anyone on here finds a model with an even shorter focal distance, like 8-10mm please would you let us all know ?
Exactly right. To say I was pleasantly surprised was an understatement; big O for Awesome. Originally Posted by planenutz
Last edited by Puffin; 15-11-2018 at 09:58 PM.
planenutz likes this.
-
16-11-2018, 05:26 PM #7Member
- Join Date
- Jul 2012
- Location
- Tauranga
- Posts
- 2,462
Really like the "mod" with the mirror.
Mine came with the mirror but by the time you put the holder on you are up at 6.5 mm already. good for seeing how well the copper is doing though.
-
17-11-2018, 10:06 PM #8Member
- Join Date
- Dec 2011
- Location
- tauranga
- Posts
- 191
i bought the lyman, and am quite impressed with it
-
18-11-2018, 07:57 AM #9Member
- Join Date
- Sep 2016
- Location
- Waikato
- Posts
- 417
I see 4 orders have been placed from NZ in the last few days, obviously a few forum members now have one of the Aliexpress ones inbound.
-
18-11-2018, 05:43 PM #10Member
- Join Date
- May 2018
- Location
- Porirua
- Posts
- 1,310
I’m looking forward to you bringing it around so we can see what the old 8mm06 looks like inside.
Remember the 7 Ps; Pryor Preparation Prevents Piss Poor Performance.
-
26-12-2018, 04:19 PM #11Member
- Join Date
- May 2012
- Location
- Porirua
- Posts
- 974
Any pics yet from the guys who put in orders for these in November ?
-
27-12-2018, 09:24 PM #12Member
- Join Date
- Sep 2016
- Location
- Waikato
- Posts
- 417
I've scoped 4 rifles since I got mine, just as good an image as you said. I'll see if I can post some photos tomorrow, though I think your 90 degree mirror might be a step up from mine. Thanks again for the heads up on these.
-
28-12-2018, 09:15 AM #13Member

- Join Date
- May 2017
- Location
- NZ Mainland (Dunedin)
- Posts
- 5,478
A 5 mm diameter flat/convex lens LOCA glued to the end of the endoscope will shorten the focal length. Not sure where one might scrounge one from though. The date window glass from a Rolex Oyster might work.
An itch ... is ... a desire to scratch
-
28-12-2018, 12:02 PM #14Member
- Join Date
- Nov 2014
- Location
- Central Otago
- Posts
- 2,225
Unless you are actually manufacturing barrels, a bore scope is a waste of money and about as useful as a concrete parachute. As a gunsmith I have never had use for one. All critical barrel problems can be observed with the naked eye viewing from either end (knowing what you are actually seeing also helps). The proper test is how they shoot. If they don't shoot well then you look for causes. The most common problem is damage near the muzzle which can be cured by a shorten and recrown. A borescope only lets you see imagined problems in great detail, a bit like having a complete knowledge of sausage manufacture. They taste better when you don't know!
-
28-12-2018, 01:16 PM #15Member
- Join Date
- Sep 2016
- Location
- Waikato
- Posts
- 417
Here's a couple of pictures from my .270
As for the usefulness, Gundoc puts together a reasonable argument and why I personally couldn't justify the cost of a real Lyman or Hawkeye. But for $20, why not? If nothing else, it's interesting to see what the condition of the barrel is in greater detail than possible looking from either end - that's worth $20 to me. Throw in some fringe benefits of checking the effectiveness of your cleaning regimen, eliminating possibilities for a poor shooting rifle, or having a look at the barrel condition on secondhand rifles before purchase. Where the bullets go on the target is obviously the important thing, but that's not always a test that's available.


 Reply With Quote
Similar Threads
-
Cheap chinese borescope
By johnd in forum Gear and EquipmentReplies: 9Last Post: 26-10-2018, 05:57 PM -
$17 borescope
By kimjon in forum Firearms, Optics and AccessoriesReplies: 14Last Post: 01-01-2017, 05:25 PM -
Borescope video
By mikee in forum Firearms, Optics and AccessoriesReplies: 2Last Post: 01-03-2014, 09:33 AM -
Cheap borescope
By 7mmsaum in forum Firearms, Optics and AccessoriesReplies: 1Last Post: 31-08-2013, 03:57 PM -
Coll borescope comparision video
By PerazziSC3 in forum Reloading and BallisticsReplies: 3Last Post: 09-08-2013, 08:30 AM
Tags for this Thread
 Posting Permissions
- You may not post new threads
- You may not post replies
- You may not post attachments
- You may not edit your posts
Welcome to NZ Hunting and Shooting Forums! We see you're new here, or arn't logged in. Create an account, and Login for full access including our FREE BUY and SELL section Register NOW!!
All times are GMT +13. The time now is 04:50 PM.


Bookmarks