

 99Likes
 LinkBack URL
 About LinkBacks
Theres been a number of threads on this in the past, but I thought Id put together a build along on how I made mine.
Building a composite stock is something Ive wanted to do for a while, and finally bit the bullet so to speak and got stuck into the project. I love the micro BSA .222 Hunter actions, and as most know they can be a bit fragile through the wrist. I have two of them, a good mate has two, and his son has two of them as well, so putting time into making the mould for one of these stocks looked worthwhile.
Overall its not a super difficult project, but it really does require a penchant for attention to detail. Youll also want to be patient, as youll put a heap of man hours into it. I think I put close to 100hours into the mould alone, but once thats done things get quicker from there.
So with that said, lets get into it!
Welcome guest, is this your first visit? Create Account now to join.
Welcome to the NZ Hunting and Shooting Forums.
Search Forums


User Tag List
+ Reply to Thread
Results 1 to 15 of 38
-
29-05-2021, 10:06 PM #1Member

- Join Date
- Aug 2019
- Location
- Manawatu
- Posts
- 837
Build yourself a fibreglass stock
-
-
29-05-2021, 10:24 PM #2Member
- Join Date
- Aug 2019
- Location
- Manawatu
- Posts
- 837
Step One
Prep the stock
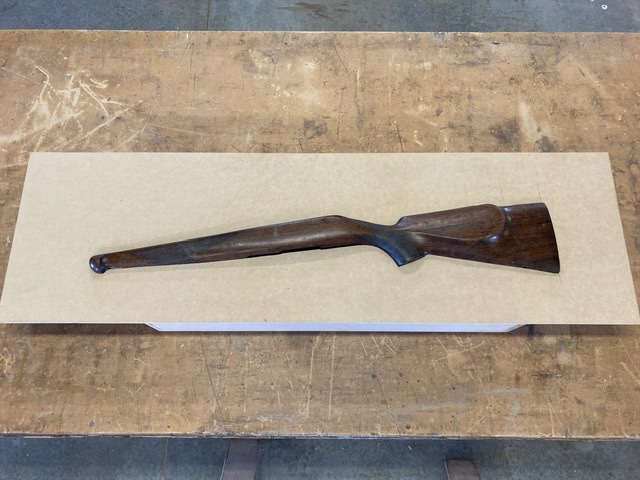
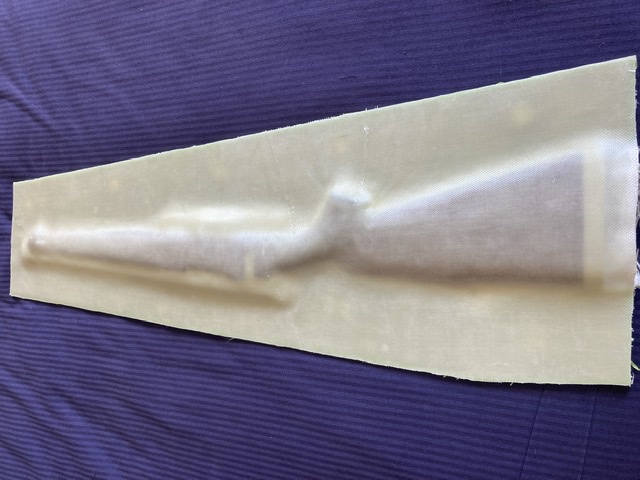
Make sure you are happy with the stock finish, as any defects will be represented in the fibreglass copy. I spent some time steaming out dents, and giving the stock a refinish (London oil style) I filled the pores of the wood as much as possible, and got it down to a 0000 steel wool finish.
Step two
Build parting board
The mould was going to be vertically split, so a parting board needed to be made. I used 4mm MDF for this, and spent a good deal of time cutting and shaping it with a minimal gap around the periphery of the stock.
I built a box for the parting board to sit on, that also cradled the stock, so that the parting board and stock were held together in the correct position. The top of the parting board needs to run down the stock centreline. This is a good time to take some time and really have a think about how the mould halves will fit together, and whether your stock will be ‘trapped’ in the mould. Cheek pieces are a classic place for this.... in the next photo, you’ll see what I had to do to make sure the mould break line was in the centre of curvature of the top line of the stock.
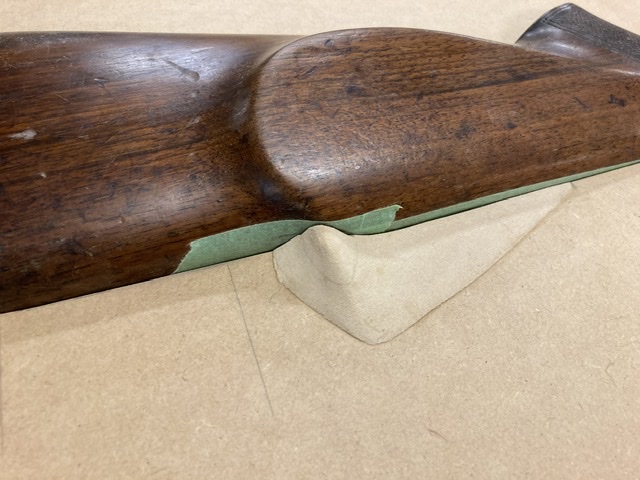
Next, paint the parting board (top only) and get it to smooth a surface as possible. I used what I had left in the garage (metallic silver) and wouldn’t recommend it. It seemed to bleed out colour after it was polished with 1000 grit wet and dry, but worked ok in the end.
Step three
Fill inletting with plasticine
Once the parting board looks good, fill the gap between the stock and the board with plasticine. You want to make sure the transition is perfect, as that makes sure the split line of the mould is neat and square. Also fill the inletting with plasticine. It takes quite a bit, and a bit of time smoothing it out to look good.
Then make sure you create plasticine mould alignment pyramids every 3-4” around the stock. They are used to ensure alignment between the two mould halves.Last edited by Hunter_Nick; 29-05-2021 at 10:35 PM.
-
29-05-2021, 10:42 PM #3Member
- Join Date
- Aug 2019
- Location
- Manawatu
- Posts
- 837
Step four
Create the first mould half
A good layer of release wax is required now. Use as per the manufacturer instructions, I used 4 coats. Then a a good layer of heavy hold hairspray and you’re good to go
I used West System resin and hardener mixed with 406 silica filler to make a type of gel coat. This was brushed on all over the stock and parting board, creating a decent radius in all the sharp edges. This is critical to ensure there aren’t any voids in these areas, as the glass won’t conform to the sharp angles.
Once that has tacked off (is sticky to touch but doesn’t transfer to your finger/glove) use 6 layers of 200gsm plain weave fibreglass to cover the first half. Make sure you work all the air bubbles out with a stiff brush and or a roller. You’ll probably have to make cuts in the cloth to get it to conform to the stock shape (especially around the pistol grip) but you’ll work it out. Just be sure to make cuts of subsequent layers in slightly different places so the laminate remains strong.
Last edited by Hunter_Nick; 29-05-2021 at 10:48 PM.
-
29-05-2021, 10:57 PM #4Member


- Join Date
- Feb 2015
- Location
- Rangitikei
- Posts
- 501
Following.
Hunter_Nick likes this.
-
29-05-2021, 10:59 PM #5Member
- Join Date
- Aug 2019
- Location
- Manawatu
- Posts
- 837
Step five
Remove parting board
Once the first side has set (24 hours) gently remove the parting board leaving the stock in place attached to the first mould half. With any luck it will pop off easily.
Step six
Prep second half
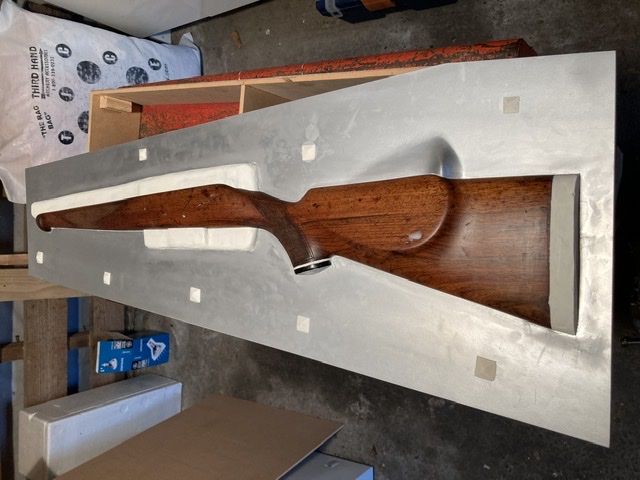
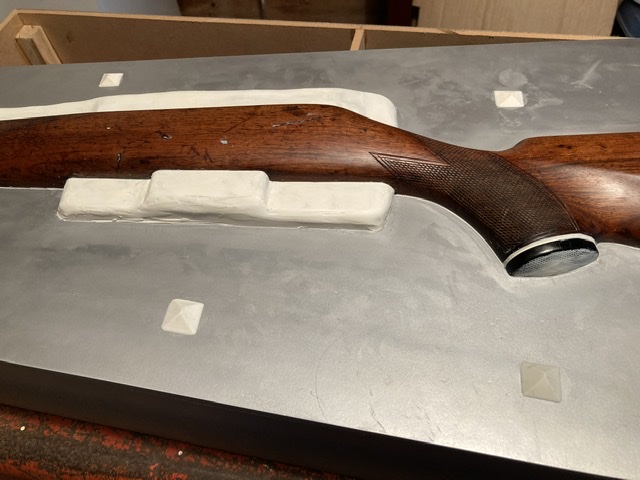
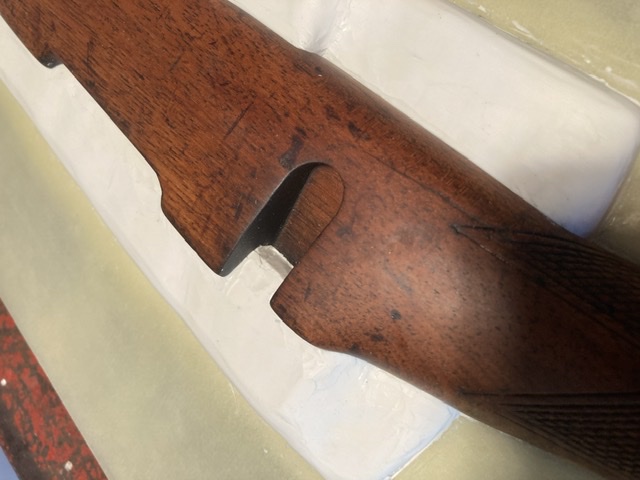
Just like on the first half, now fill the inletting with plasticine. Also remove the plasticine out of the alignment pyramids, and clean them out nicely with a cotton bud or something like that. Pay attention to how you fill the bolt handle recess..... that one can be tricky depending on the stock/action design
Then repeat the release wax and hairspray schedule on the second side. Then apply the resin silica mix, then 6 layers of fibreglass as per the first side. Looking good!
-
29-05-2021, 11:06 PM #6Member
- Join Date
- Aug 2019
- Location
- Manawatu
- Posts
- 837
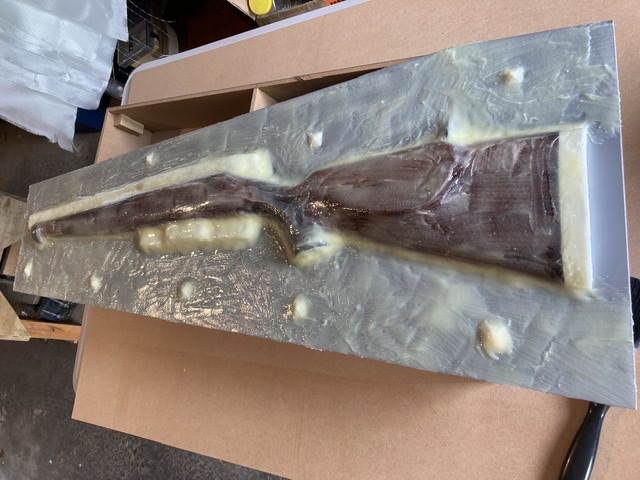
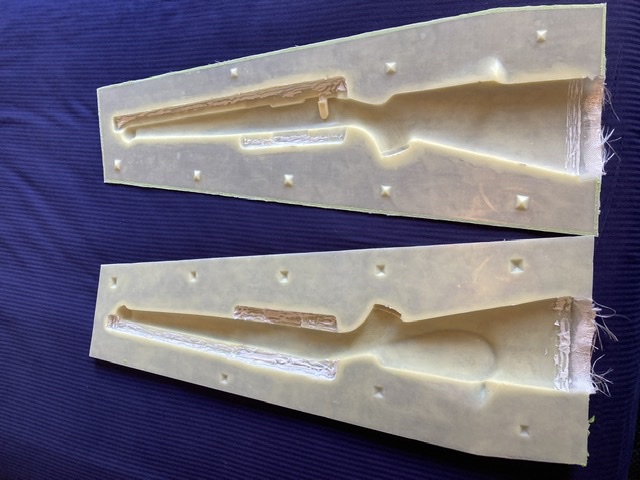
The moment of truth!!!!!
Splitting the mould
After another 24 hours, you are now ready for one of the most exciting parts! Very gently start to pry the two halves of the mould apart. I find a little bit of warm water between then helps, as the hairspray is water soluble. Take your time, and be gentle with it. Work slowly around all the edges and it will come apart.
Time to inspect your work, and see how it came out. I was well happy with mine, even the checkering came out perfect.
-
30-05-2021, 01:40 AM #7Member
- Join Date
- Mar 2012
- Location
- Naracoorte South Australia/From South Canterbury
- Posts
- 382
Want to build me one for my BSA too?
 Hunter_Nick likes this.
-
30-05-2021, 09:28 AM #8Caretaker

- Join Date
- May 2012
- Location
- Rolleston, Canterbury
- Posts
- 4,867
Nicely done!!
chainsaw and timattalon like this.
-
31-05-2021, 05:13 PM #9Member
- Join Date
- Aug 2019
- Location
- Manawatu
- Posts
- 837
Step seven
Prep the mould
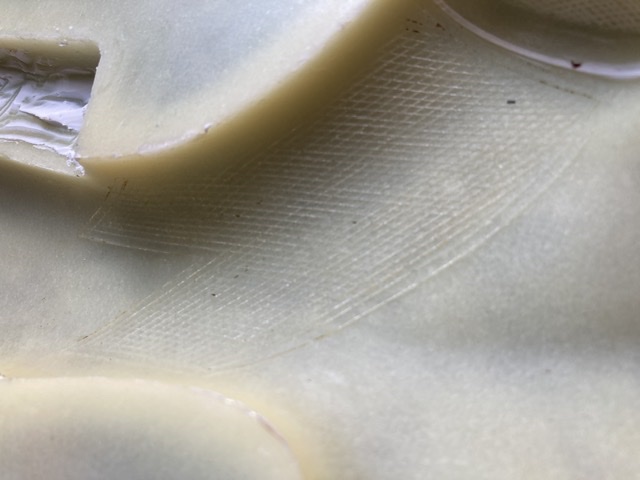
Because I’m pretty OCD, I got some 1500grit wet and dry and polished up the inside mould surfaces. There was slight grain patterns left from the original, so I cut that back perfectly smooth to ensure an A1 finish straight out of the mould.
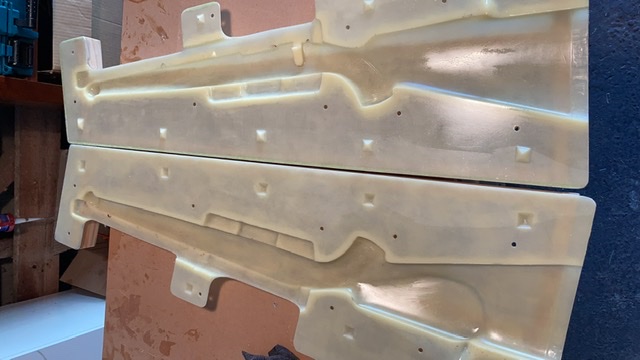
Next I stiffened up the mould halves with some pine stringers. Probably not necessary, but I wanted to make sure the mould wouldn’t warp at all. After that I opened up the area above the barrel channel so that glass strips could be laid in there when the two halves of the stock are joined together.
Then I used 10x M6 bolts and wing nuts evenly spread around the edges to hold it all together.

-
31-05-2021, 05:54 PM #10Member

- Join Date
- Apr 2015
- Location
- Geraldine
- Posts
- 22,687
very clever wee womble you are..... most impressed. and you have order for a finished stock already....yip will pay you for your time very quickly.
-
31-05-2021, 06:00 PM #11Member
- Join Date
- Jun 2015
- Location
- christchurch
- Posts
- 17,213
i for one am seriously bloody impressed !
Micky Duck likes this.
-
31-05-2021, 10:34 PM #12Member
- Join Date
- May 2018
- Location
- Porirua
- Posts
- 1,310
I love these inspirational threads, I’m looking forward to the next part. ��
Remember the 7 Ps; Pryor Preparation Prevents Piss Poor Performance.
-
31-05-2021, 10:42 PM #13Member
- Join Date
- Aug 2019
- Location
- Manawatu
- Posts
- 837
Thanks for the kind words guys. I leaned quite heavily on others that had been before me, and am very grateful for their help.
Paying it forward, I’m more than happy to pass on what I learned to anyone that wants to give it a go themselves.Logan H likes this.
-
31-05-2021, 10:59 PM #14Member
- Join Date
- Aug 2019
- Location
- Manawatu
- Posts
- 837
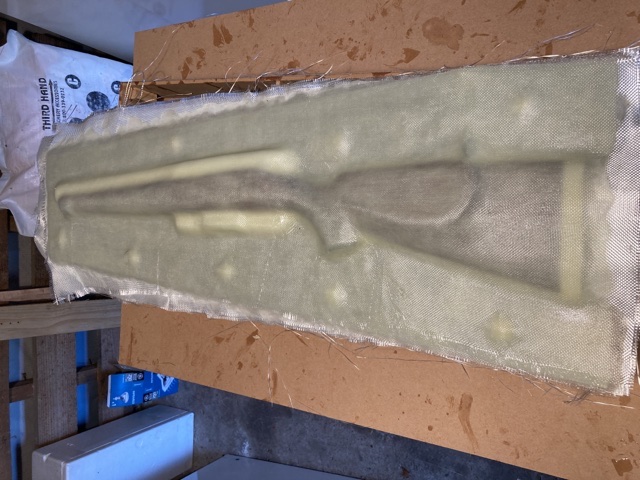
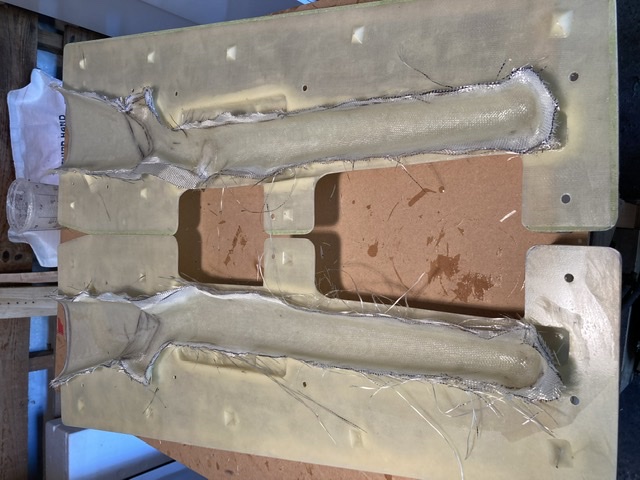
Step eight
The good sh*t!!
Right lads, time to really roll up the sleeves and get serious! It’s time to build a stock.
Mould prep is slightly different at this stage, still the same 4 coats of release wax, but this time we will put on a layer of PVA release agent. This makes for a slick release and also a good surface finish. In between coats of wax, start cutting out the layers of cloth that will make up the stock halves. For the first one I built, I used 4 layers of 200gsm plain weave cloth. I did each layer in two sections, forend and buttstock, with about a 10-15mm overlap in the grip area somewhere. I also used (from memory) 3 extra layers through the pistol grip area. There is a couple of key points to note here:
1. Make sure you stagger the overlaps in slightly different places, so there isn’t a large build up of glass thickness in one place.
2. Change the orientation of the cloth between layers, so that the stress is carried through the cloth in all directions. In other words lay some layers with the weave at 0/90deg and some at 45/45deg.
Once the release agent is dry, then it’s time to once again apply a good thick ‘gel coat’ of thickened resin to each mould surface. Make sure and create a wide radius in the bottom of the grip cap and around the top lines of the stock next to the barrel channel. Basically anywhere there is a tight bend that the glass will struggle to conform to. I did this as much ‘diy’ as possible, so there is no vacuum bag gear involved. Your stock will be a bit heavier with this method, but I wanted to keep things simple.
Wait for the gel coat to tack-off, then get stuck in to the lay up. Again, pay particular attention to the corners, and be sure to work out all the air bubbles. After an hour or so of work, you should see something like this;
-
01-06-2021, 08:00 PM #15Member
- Join Date
- Aug 2019
- Location
- Manawatu
- Posts
- 837
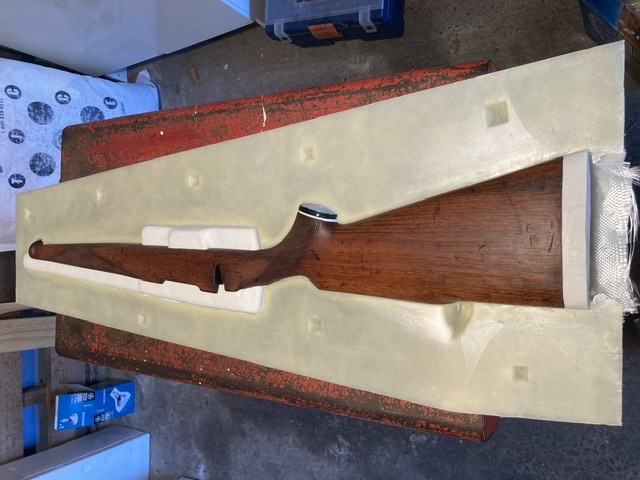
Step nine
Trimming and joining the halves
Right, now that the two halves have been layed-up, it’s time for a bit of waiting..... What you are waiting for is for the resin in the laminate to harden enough that you can cleanly and easily trim the laminate flush with the joining surfaces of the moulds. For the resin and hardener that I was using (West 105 resin with 206 slow hardener) it worked out at 2 hours post laminating was about right. You’ll know it’s too early because the resin will leave gummy deposits on your blade, and you’re too late when your blade won’t cut it reasonably easily. A good sharp Stanley knife is sufficient.
With that done, make up a thickened resin glue mix (I used west 403 filler) and apply to the freshly cut edges where the stock halves will join together. Now, bolt the two mould parts together nice and tight. Once that is completed, I layed two layers of glass cloth over the join from the inside. About 50mm wide is plenty. The forend is easy, buttstock more difficult, and the pistol grip really bloody fiddly. I made up a tool to help smooth the glass out inside the stock, which was basically a coat hanger bent to the appropriate shape with a loop on the end.
Once that’s all done, have a bit of a cleanup and crack a cold one, you deserve it! The best bit comes the next day......Ranal and Micky Duck like this.


 Reply With Quote
Similar Threads
-
Shotgun Stock CNC Build
By Skirch in forum Projects and Home BuildsReplies: 23Last Post: 30-04-2021, 07:36 AM -
Wooden stock build
By Remmodel7 in forum Projects and Home BuildsReplies: 3Last Post: 03-03-2020, 09:57 PM
Tags for this Thread
 Posting Permissions
- You may not post new threads
- You may not post replies
- You may not post attachments
- You may not edit your posts
Welcome to NZ Hunting and Shooting Forums! We see you're new here, or arn't logged in. Create an account, and Login for full access including our FREE BUY and SELL section Register NOW!!
All times are GMT +13. The time now is 03:31 PM.

Bookmarks