

 82Likes
 LinkBack URL
 About LinkBacks
The alternative title "A rough bastard learns about composite materials"
Background:
I've been thinking about making a CF stock for a couple of years. Reading books on fiberglass boat building and reading technical manuals on carbon fibre filled in many hours in the evening.
12 months ago I made a fibreglass stock from a plug of my own design, inspired by the good work of @Robojaz
For want of a better option I went about trying to fit it onto a JW15. That was a disaster, ended up heavier than the factory wooden stock with loads of pock marks and voids. They say you learn from mistakes so I must have learnt lots.
-----------------------------
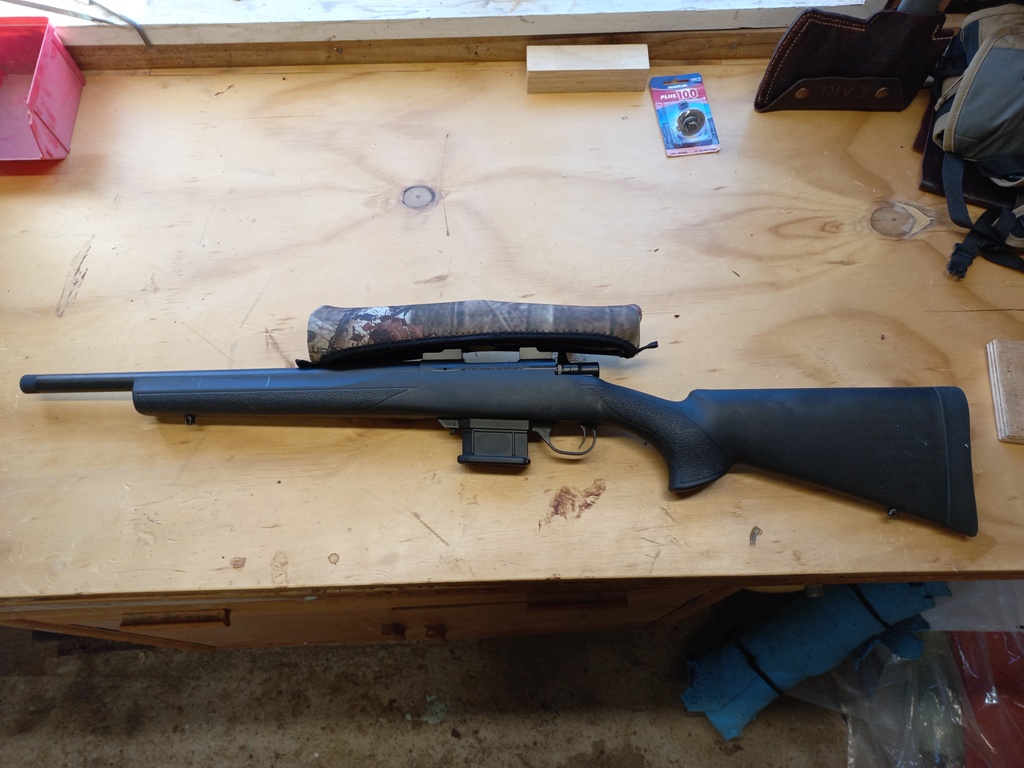
The Howa Mini.
The factory stock has been described as a "fat heifer of a thing"
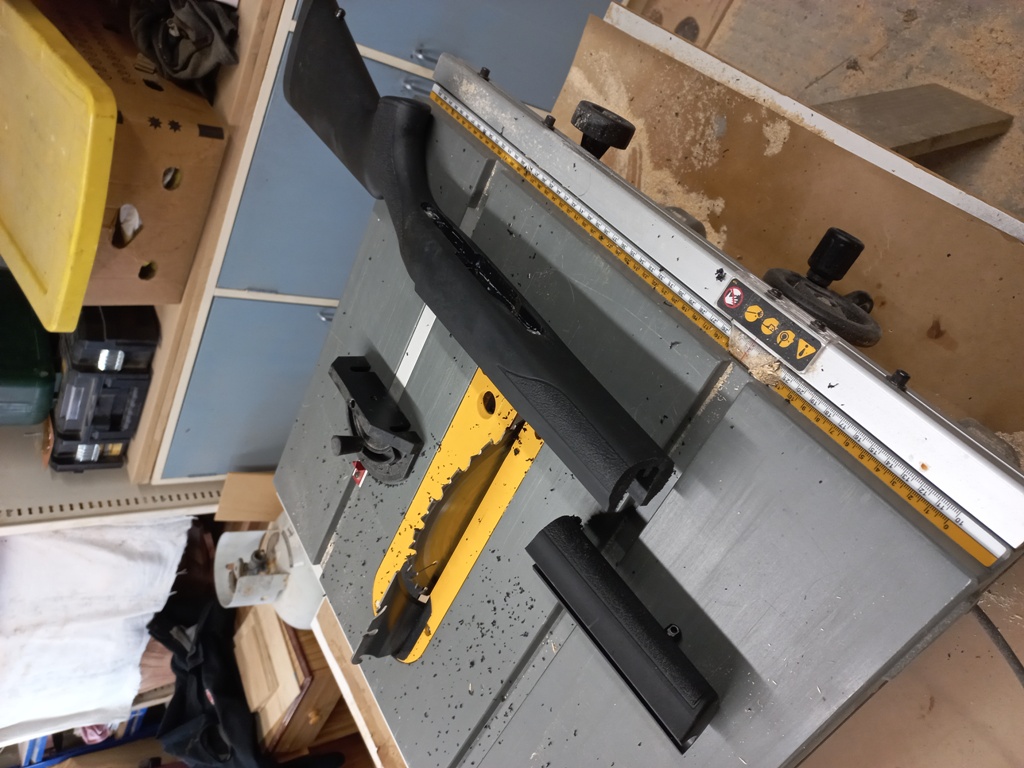
Like a few others have done I took to it with power tools and edited the shape.
Factory shape
Chop chop
Not being a savage from Southland, I glued the factory foreend back on.
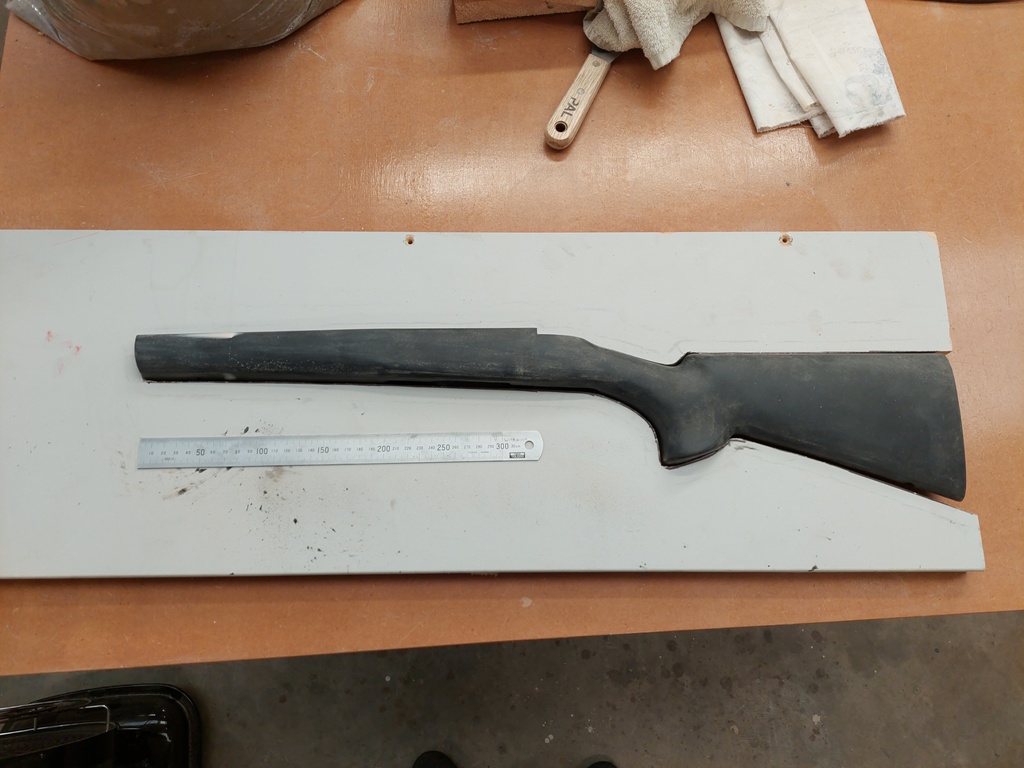
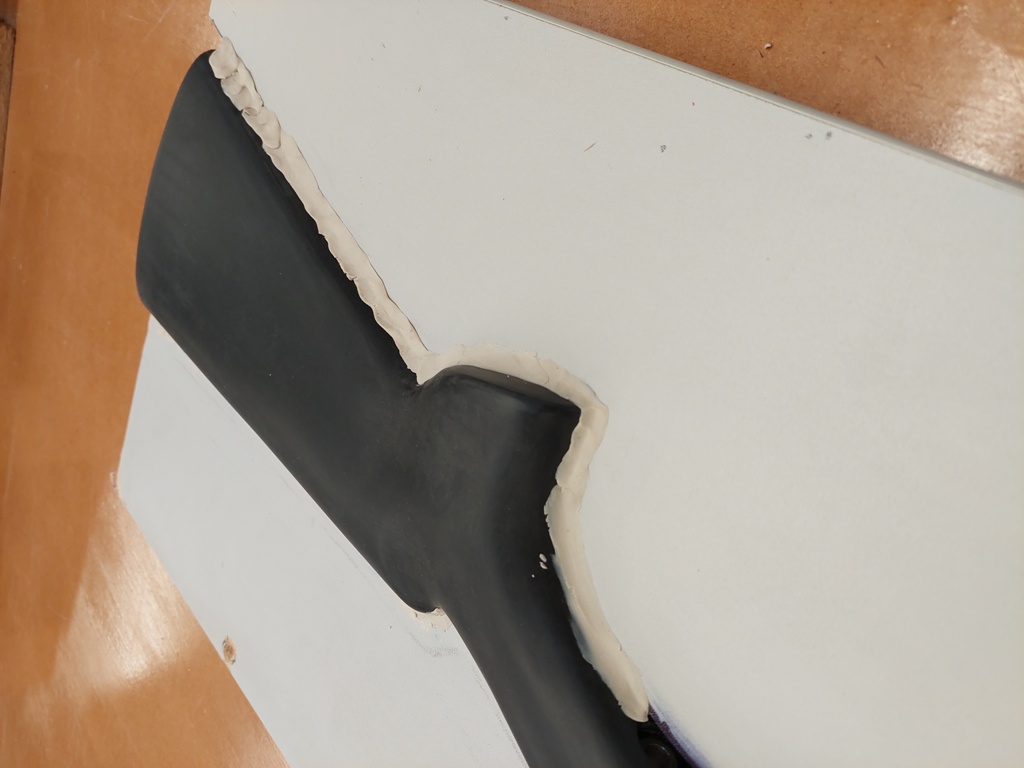
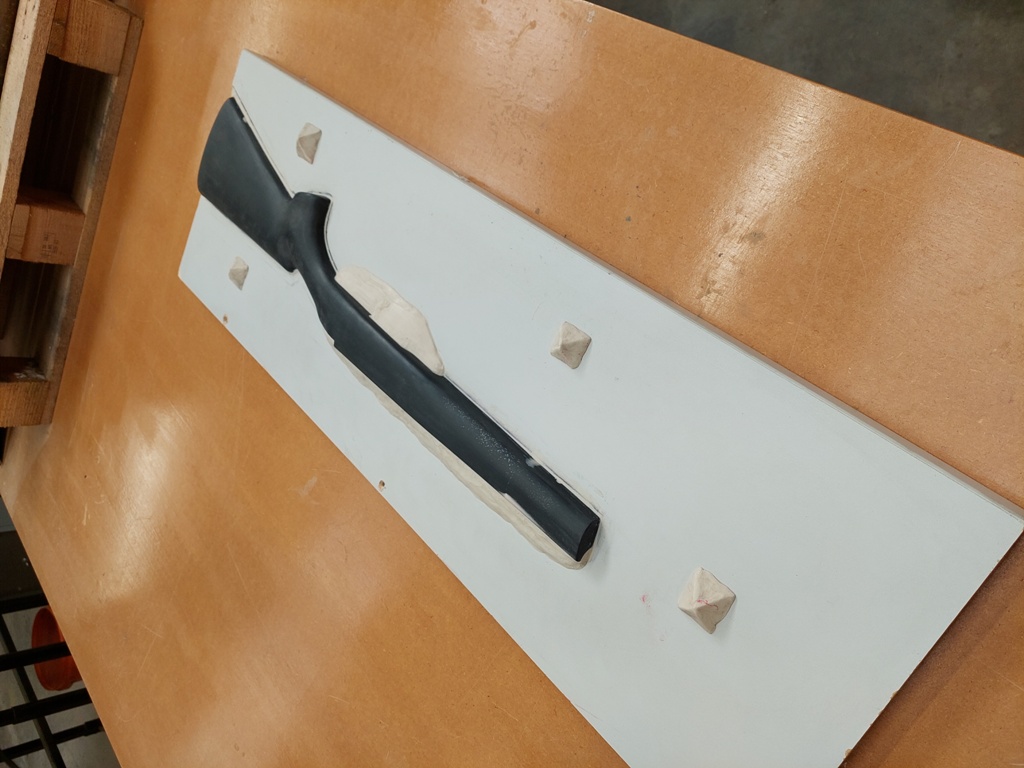
Then went about making a mould. Cut the shape out of your parting board (melamine in this case, it was free)
Plug up all the edges with modelling clay. Doing this takes about 2 hours more then you would expect.
After reshaping
The wee pyramids are so the second half of the mould has something to locate onto.
Then the plug and parting board get waxed up to help prevent being glued together.
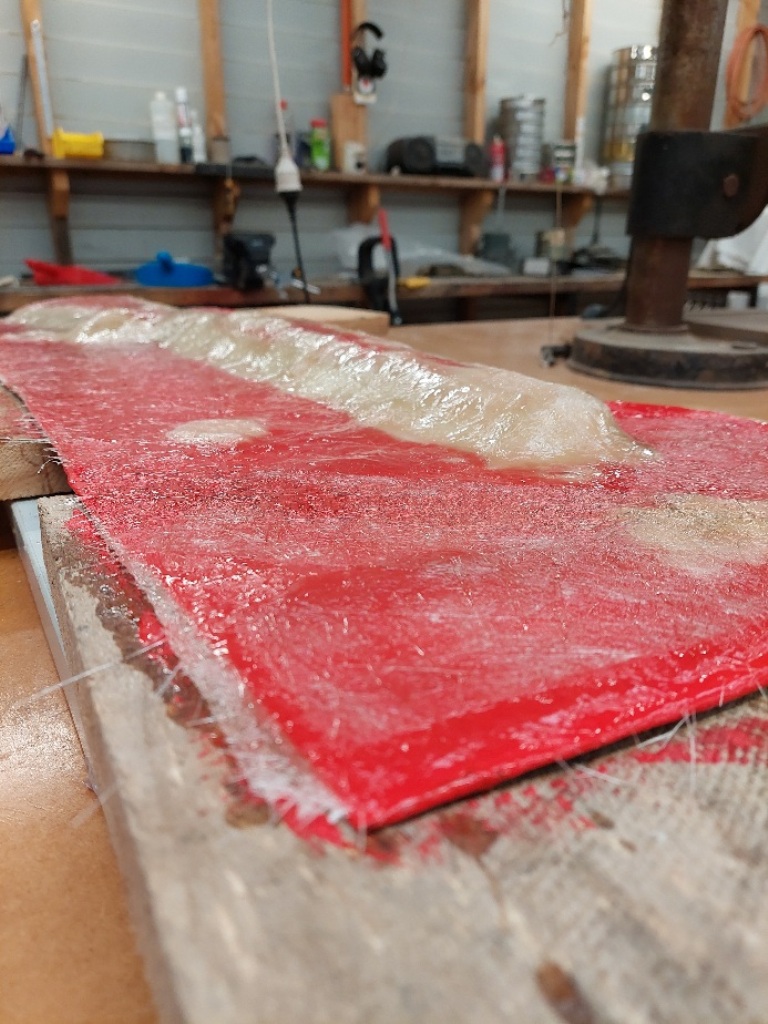
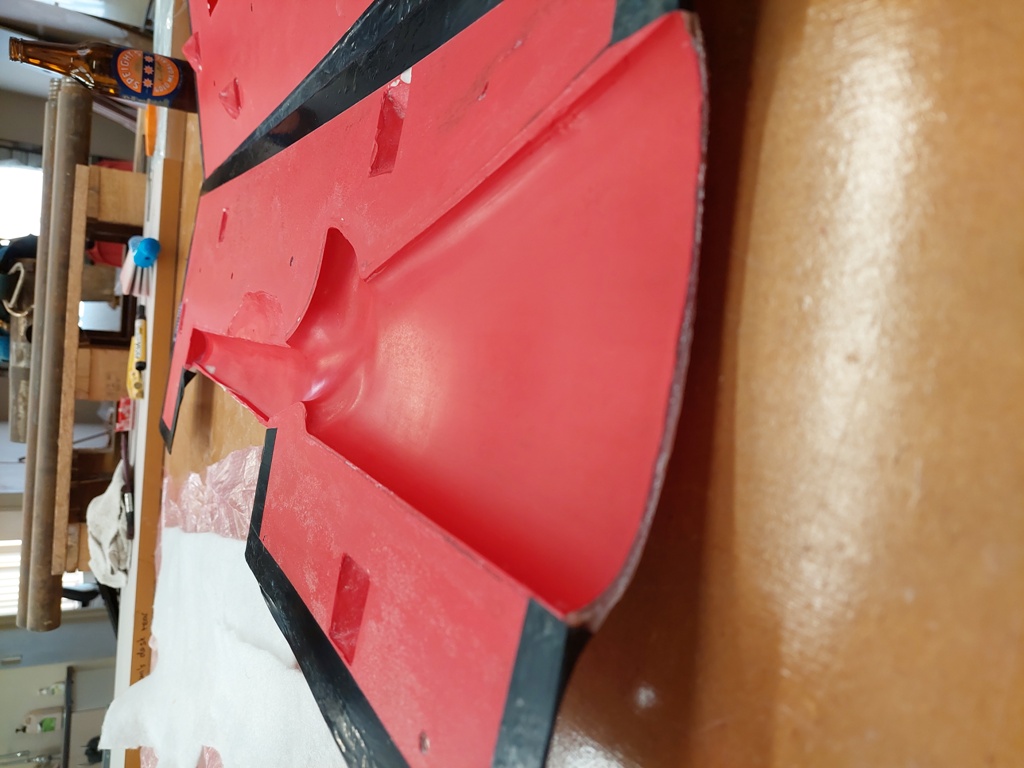
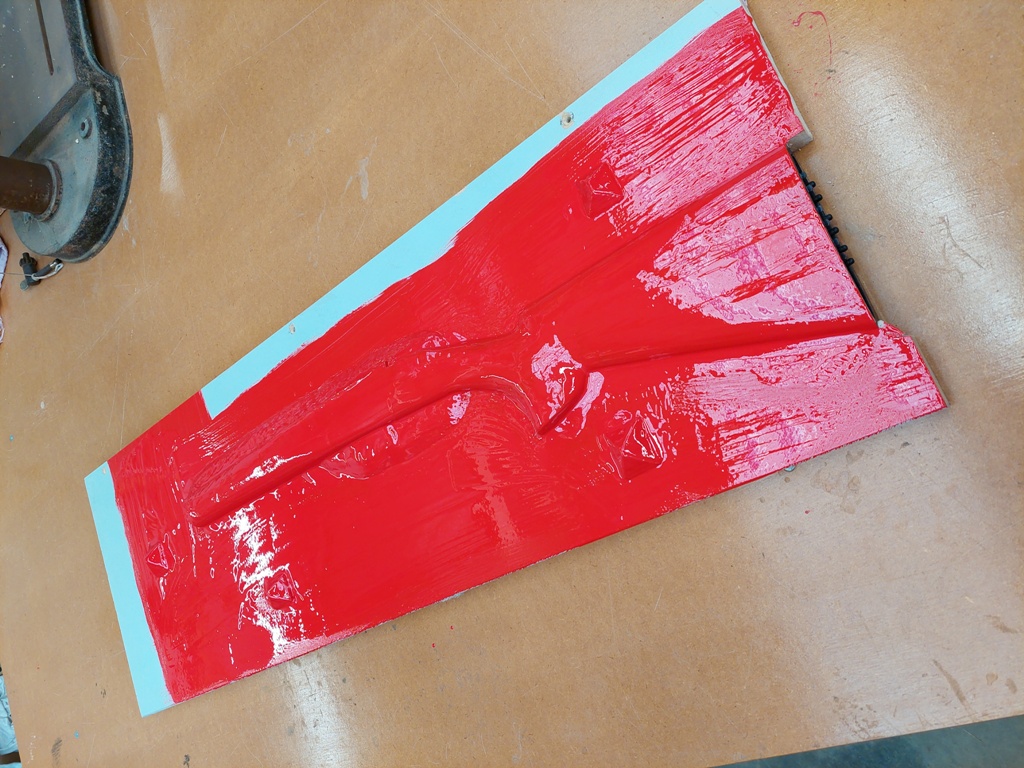
Cover the thing with a tooling gelcoat. The gelcoat I got came in a lovely shade of red.
Any abrupt edges I filled with a thickened resin. This is because fibreglass really hates going around sharp corners. I wanted the edges to be as neat and defined as possible.
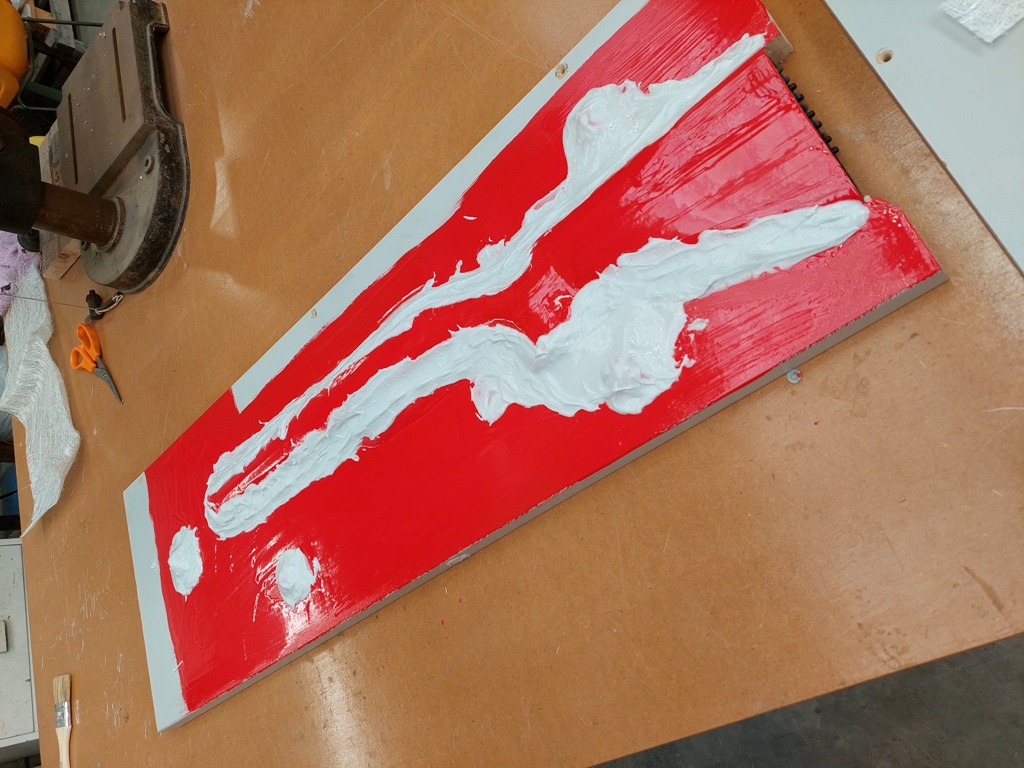
When that's got to a nice tacky stage the layup of chopped strand mat could commence!
I only used about 4 layers of chopped mat in total. Lots of poking with the brush to get things together nice and firm. At this point I'm not worried at all about weight so used plenty of resin. From experience having a resin rich coat on top makes it much nicer to handle the mould without getting jabbed by any tiny bits of glass poking out.
Do one side, leave for 24hrs, pull the parting board off, apply another 6 coats of mould wax, tooling gelcoat, thickened resin, more chopped strand mat.
By this point you realise making mould's sucks. You also know it's the most important step really. Any fcuk ups here are really hard to fix later on...
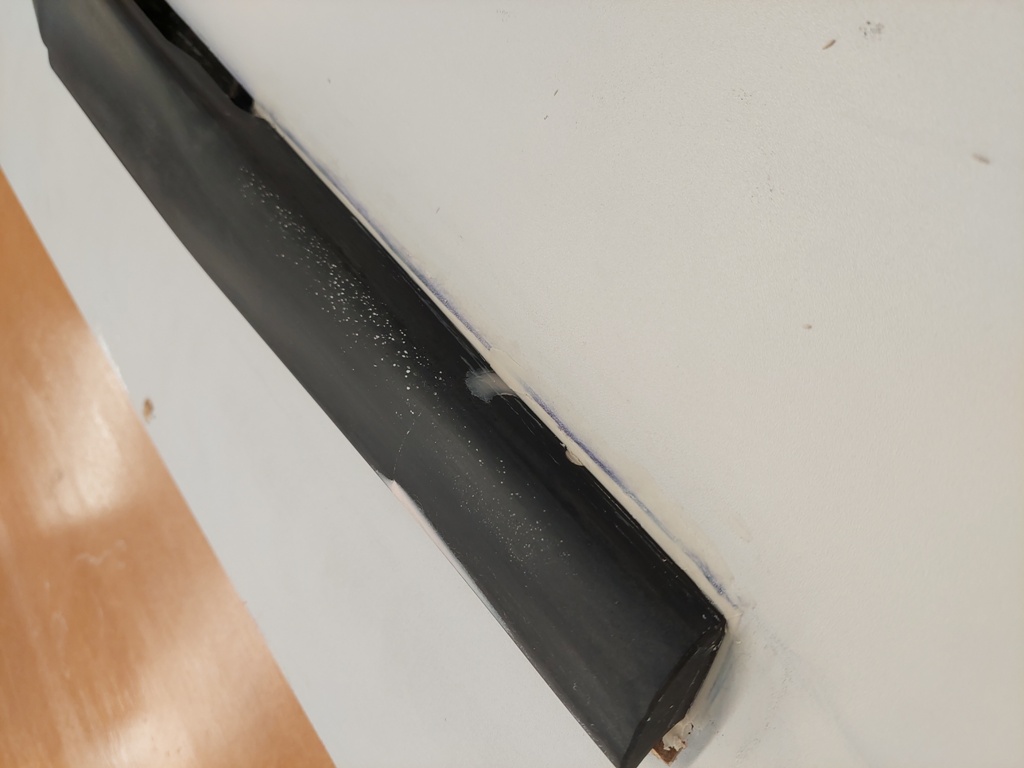
Eventually you end up with a stock encased in fibreglass.
Welcome guest, is this your first visit? Create Account now to join.
Welcome to the NZ Hunting and Shooting Forums.
Search Forums


User Tag List
+ Reply to Thread
Results 1 to 15 of 33
-
01-09-2021, 12:08 AM #1Rocks in his pockets


- Join Date
- Jun 2019
- Location
- Central Otago
- Posts
- 1,423
Howa Mini action - Carbon Stock Project
Last edited by Joe_90; 01-09-2021 at 12:14 AM.
Every machine is a smoke machine,
If you use it wrong enough.
-
-
01-09-2021, 12:19 AM #2Rocks in his pockets
- Join Date
- Jun 2019
- Location
- Central Otago
- Posts
- 1,423
I managed to get the 2 halves apart with the use of some ice block sticks. Basically just slide/knock them in like wee wedges.
It's quite a relief when the mould finally cracks open without breaking anything!
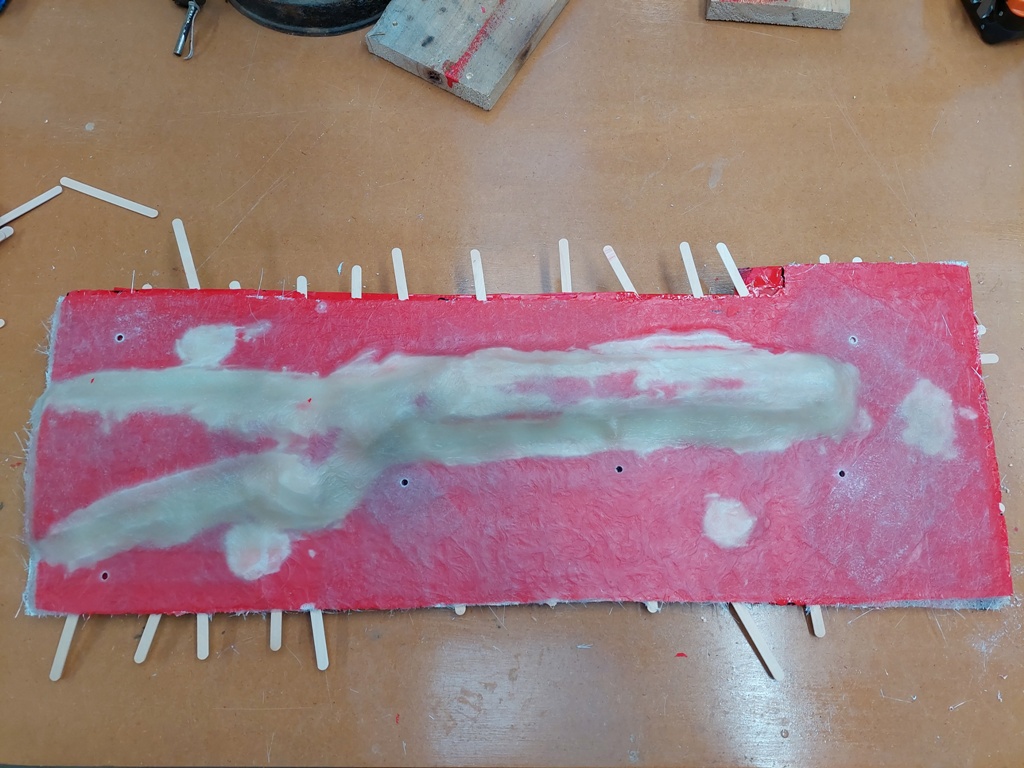
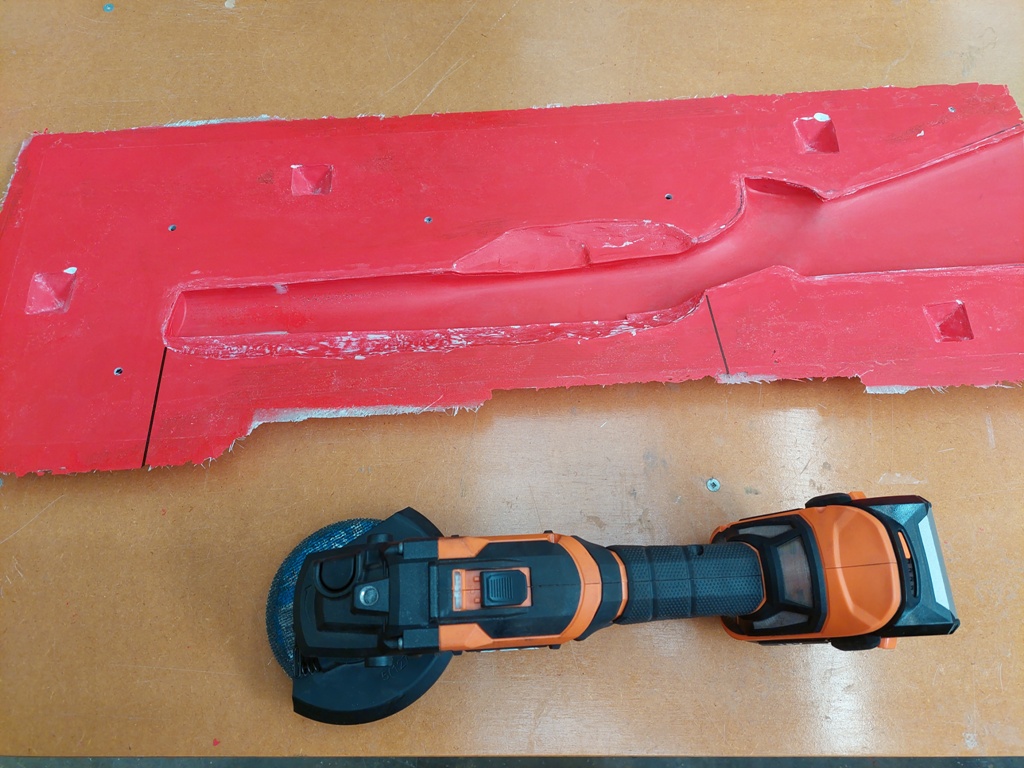
With the nice new mould I then took to it with the cutting disk on the grinder. This was to square up the edges and expose the action area. The exposed action area idea of mould making I got from @stug
Mould got cleaned up with hot soapy water then another 6 coats of release wax to each side before letting it sit overnight.
 Every machine is a smoke machine,
If you use it wrong enough.
-
01-09-2021, 12:27 AM #3Rocks in his pockets
- Join Date
- Jun 2019
- Location
- Central Otago
- Posts
- 1,423
It's now carbon time!
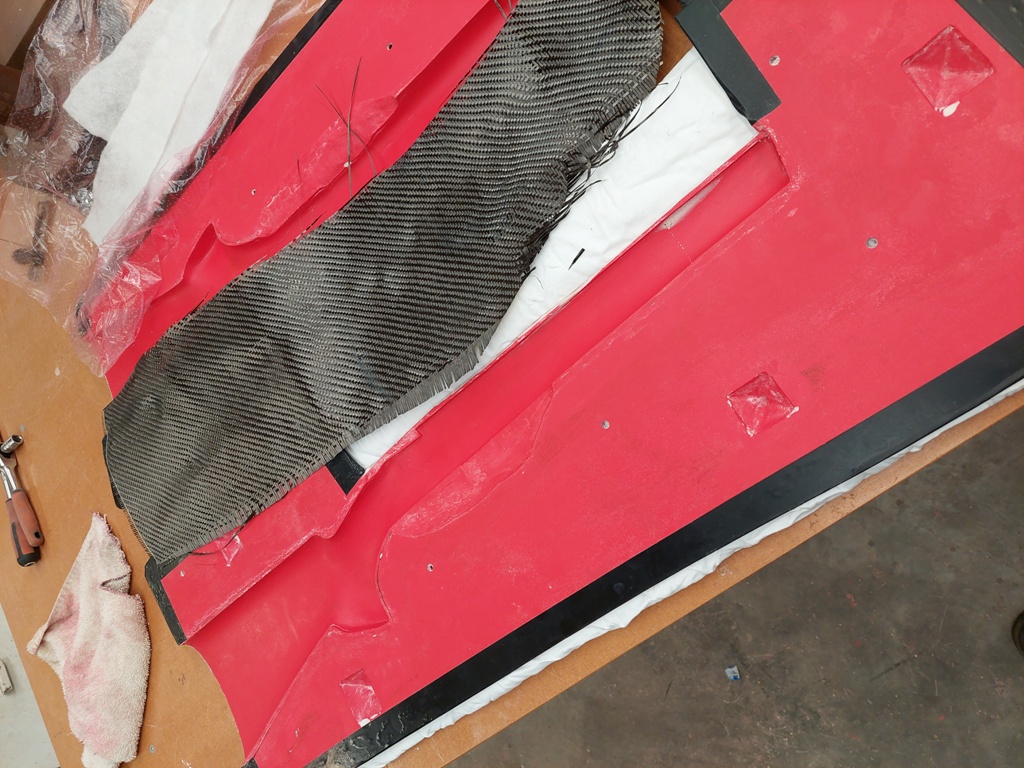
I was given a can of spray adhesive from the local carbon fibre chap when I was having a beer with him and asking silly questions.
This made life bit easier with getting the carbon cloth in all the wee corners.
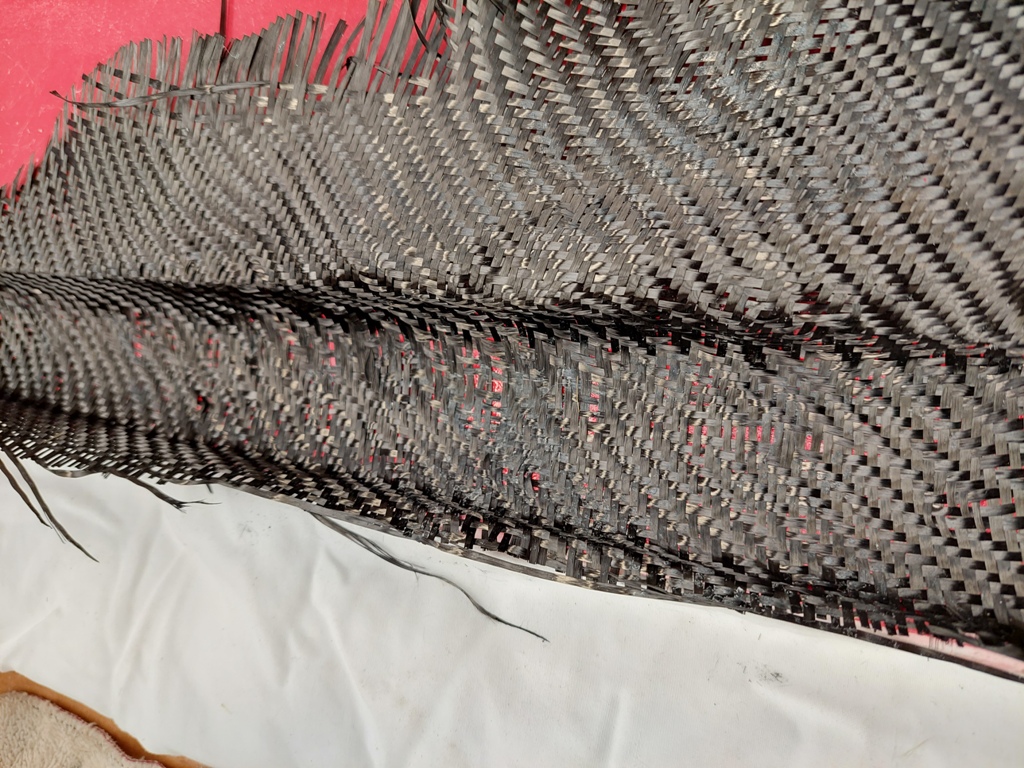
I was a bit rough at some point with the cloth and loosened the weave up on some areas. Oops.
I put in 2 layers of carbon cloth for the body and 4 layers around the grip/wrist area.
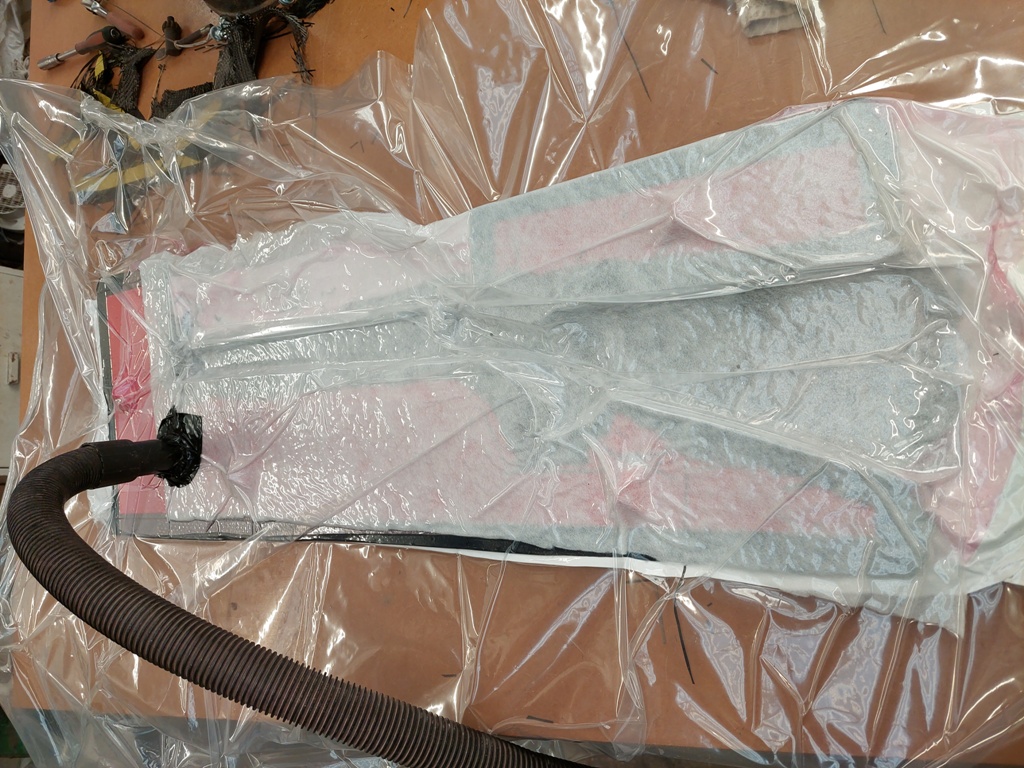
As I don't have a proper vacuum pump I used a big clothes storage bag. Layer of peel ply over the carbon, bleeder fabric then bagged up the whole mould.
This is the point I'll leave you waiting for the next instalment.Every machine is a smoke machine,
If you use it wrong enough.
-
01-09-2021, 02:08 AM #4Member

- Join Date
- Oct 2012
- Location
- Auckland
- Posts
- 148
Looks like a great project, waiting in anticipation for the rest of the build.
-
01-09-2021, 08:34 AM #5Caretaker

- Join Date
- May 2012
- Location
- Rolleston, Canterbury
- Posts
- 4,865
Looks bloody good. When I was making mine I did 4 layers of 200gsm carbon fibre and another 3 layers through the pistol grip area.
-
01-09-2021, 12:03 PM #6Member

- Join Date
- Dec 2015
- Location
- Auckland
- Posts
- 484
Awesome work, what is your plan for joining the two halves together? Are you going to do any fill in the buttstock/forend areas to reduce to hollow sound?
-
01-09-2021, 02:49 PM #7Member
- Join Date
- Feb 2017
- Location
- Jafa land
- Posts
- 5,327
best thing would be to glue a hip flask in the butt stock, fill to the brim of the spirit of your choosing and enjoy. just need to make sure you finish it all so it doesn't slosh! Originally Posted by SixtyTen

-
01-09-2021, 05:42 PM #8Rocks in his pockets
- Join Date
- Jun 2019
- Location
- Central Otago
- Posts
- 1,423
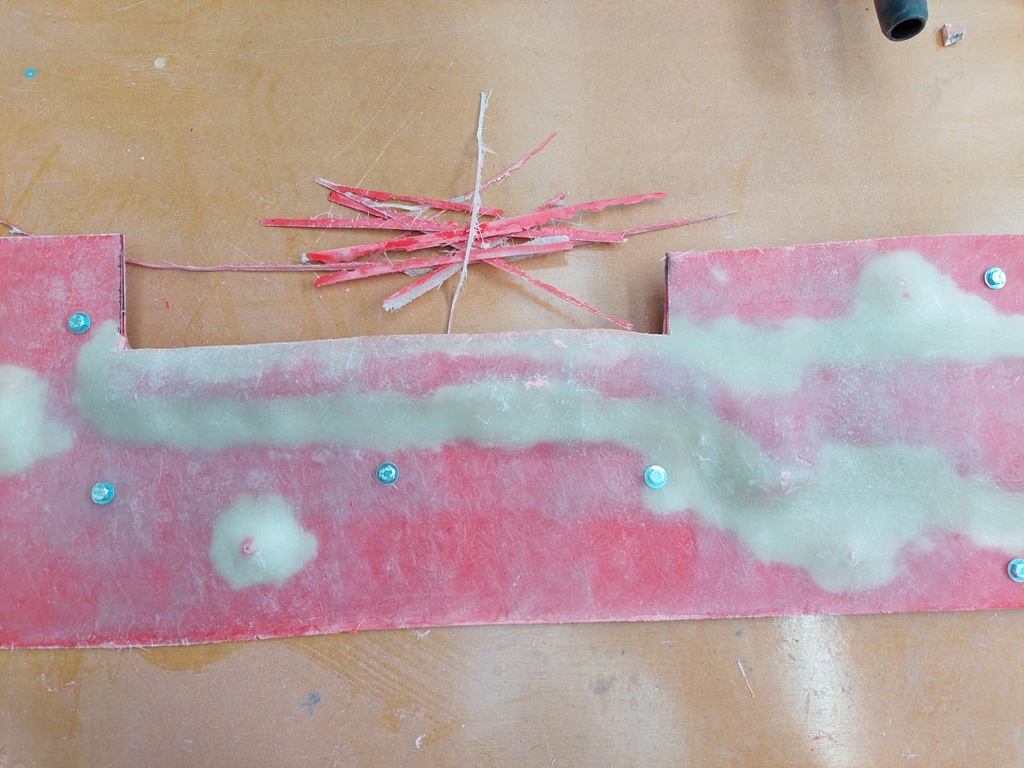
The 2 halves of the mould are bolted together and then 2 layers of cloth laid over the join. I think I've cocked up here but will see what happens. Originally Posted by SixtyTen
I'll fill the hollow shell with spray can expanding foam. I know there are better products to use that will make a nice chemical bond with the epoxy.
In this case I'm relying on it being encased and having a mechanical bond inside the stock. From my first attempt I found filling the hollow areas with foam makes a world of difference.Every machine is a smoke machine,
If you use it wrong enough.
-
01-09-2021, 06:44 PM #9Caretaker
- Join Date
- May 2012
- Location
- Rolleston, Canterbury
- Posts
- 4,865
I used Sika boom expanding foam to fill the butt and fore-end. It has no structural value just sound deadening. Run a bit of water around inside the butt or fore-end first then tip/shake it all out. The water prevents secondary expansion of the foam.
-
01-09-2021, 07:17 PM #10Member
- Join Date
- Dec 2015
- Location
- Auckland
- Posts
- 484
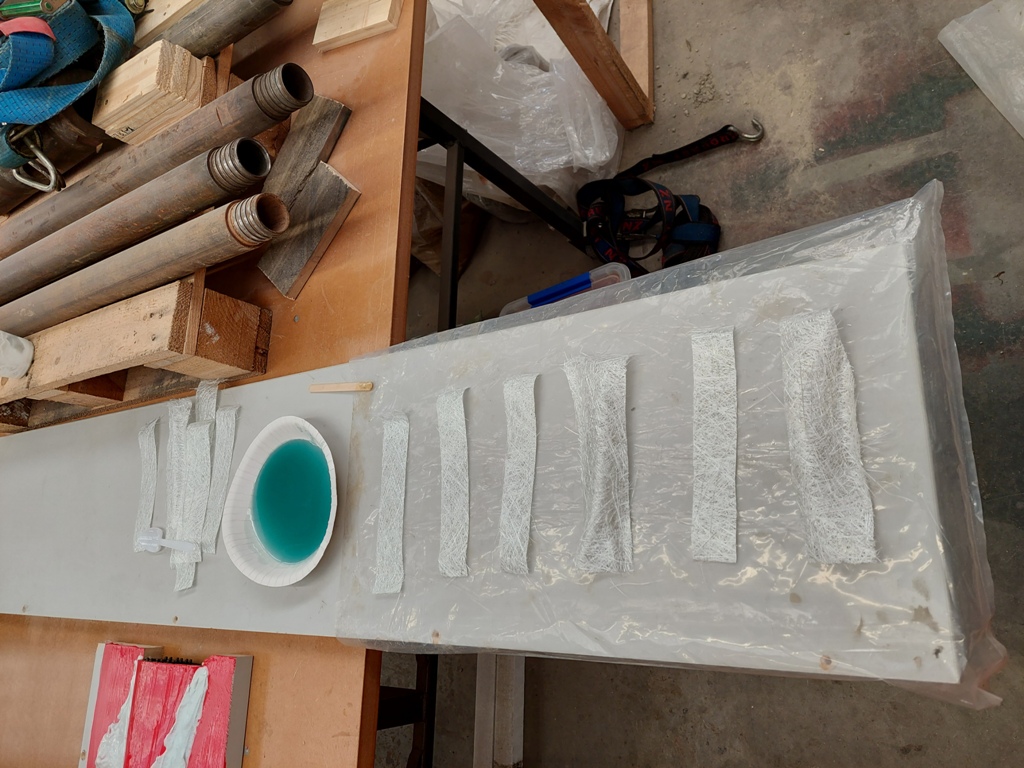
A good method for laminating complicated shapes and to keep the carbon weave from getting all messed up is to get some 3m painters plastic, lay that down on a flat table and tape it out so there are no wrinkles. You then lay your cloth on that, mix up your resin and use a squeegee to spread the resin over the cloth and allow it to soak in. You can then squeegee the excess off so the cloth is not saturated. You then put another layer of 3m plastic over this and now you can use your patterns to mark out (on the plastic) the bits of fiber you need and cut them out with scissors. You then peel one side of the plastic off, lay your fiber in the mold in mostly the right place, remove the second layer of plastic and use a paintbrush (the cheap chip brushes are perfect for this) to tamp the fiber into place. Rinse and repeat until all your layers are in, then peelply, release film and breather and your into your bag.
Its a very good way of doing complex wet laminates. Kind of similar to prepreg lamination in that you can control all your overlap distances and patch sizes quite carefully.
If you want to get really fancy, you can weigh the fiber that you plan to use, divide that by the fiber to resin ratio you are shooting for and add 10% for peelply. You then only mix and use exactly that much resin for the job. You can get as low as 26-28% resin this way, which is comparable to pre-preg. Gives for a lighter and stronger product so long as you get complete wet-out, which can be challenging depending on the resin type and ratio you are trying to achieve.Joe_90 likes this.
-
01-09-2021, 11:03 PM #11Rocks in his pockets
- Join Date
- Jun 2019
- Location
- Central Otago
- Posts
- 1,423
Thats really good to know thank you! For the first layer in I used the spray adhesive, the theory being it would be easier to get the cloth into shape. Originally Posted by SixtyTen
The subsequent layers I laid in sections with pre wetting the cloth similar to how you described. I cut the rough shape before putting resin on to soak in,Scott Cowan likes this.Every machine is a smoke machine,
If you use it wrong enough.
-
02-09-2021, 01:34 PM #12Member

- Join Date
- Feb 2015
- Location
- Rabbitvegas
- Posts
- 2,605
Ahhh, finally I get to see the stock coming to life, that's a fairly involved project @Joe.......... Might be finished next time we catch up....don't eat all the bloody chocolate biscuits either next time.

-
02-09-2021, 06:07 PM #13Member

- Join Date
- Dec 2011
- Location
- Wellington
- Posts
- 2,419
farken primo!
-
02-09-2021, 06:19 PM #14Member
- Join Date
- Dec 2011
- Location
- NI
- Posts
- 11,917
You could do that. Originally Posted by ANTSMAN
-
02-09-2021, 07:41 PM #15Unapologetic gun slut

- Join Date
- May 2018
- Location
- Oxford, North Canterbury
- Posts
- 8,539
I could eat all the chocolate biscuits Originally Posted by Tahr
 veitnamcam likes this.#DANNYCENT


 Reply With Quote
Similar Threads
-
Carbon fibre stock options for Howa Mini Action
By noboots in forum Firearms, Optics and AccessoriesReplies: 54Last Post: 05-04-2021, 10:35 PM -
Project Howa mini carbon chassis
By Remmodel7 in forum Projects and Home BuildsReplies: 35Last Post: 03-11-2020, 09:21 AM -
After market Stock for Howa Mini Action?
By GWH in forum Firearms, Optics and AccessoriesReplies: 32Last Post: 10-10-2019, 08:36 PM
Tags for this Thread
 Posting Permissions
- You may not post new threads
- You may not post replies
- You may not post attachments
- You may not edit your posts
Welcome to NZ Hunting and Shooting Forums! We see you're new here, or arn't logged in. Create an account, and Login for full access including our FREE BUY and SELL section Register NOW!!
All times are GMT +13. The time now is 03:27 PM.

Bookmarks