

 19Likes
 LinkBack URL
 About LinkBacks
So I should have taken some "during" photos but hey hind sight is a bitch.
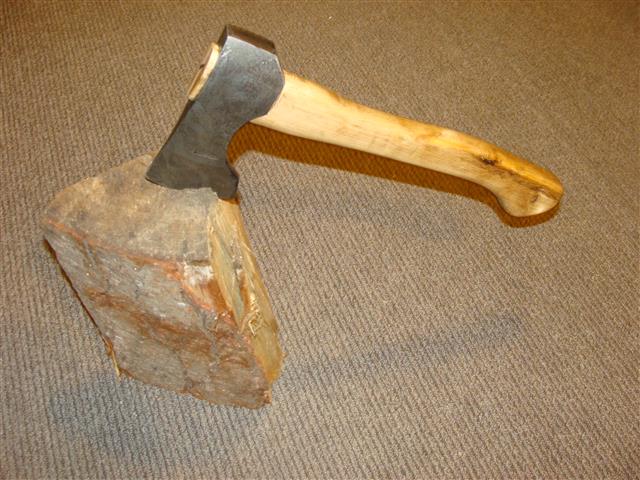
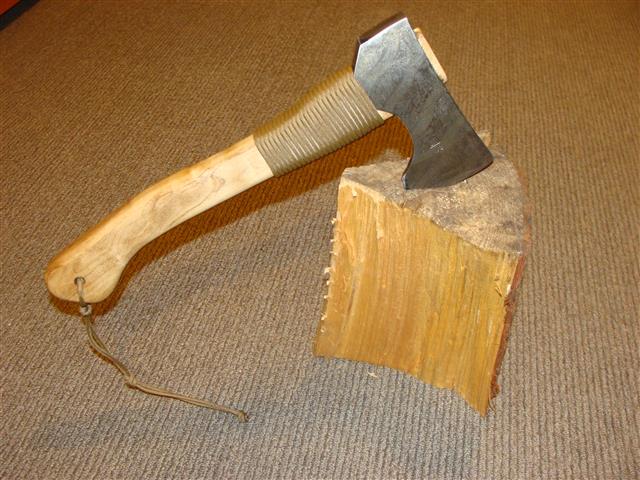
I came across a downed tree crossing a track in Rangataua forest a few months back and lopped off a few branches for a rainy day project. I love wood especially native so any chance to magpie some for later use, I take it. Any way I have had a couple of Swedish tomahawk heads sitting in a box for to many years and decided to give them a new lease of life.
First I needed to tackle the years of rust build up with an overnight vinegar bath, followed by a wire brush on the end of a power drill. Man did that all make them come out looking shinny and finally rust free. I got out the old Vivid and started to draw the new head design, partly to reduce some weight and to make it a tad easier to are with. I took my time with a cutting disk on the angel grinder so as to not heat the head up to much, then got the file out and slowly made good progress to which I finished it all off with a orbital sander. Then worked the edge with the file and belt sander till I got a good edge and then finished it on a stone.
So now I had a very shinny and "rust prone" piece of equipment. I decided to have a go at applying a patterned patina to an ok result, then finished it of with a few wipes of vinegar to patina the entire surface of the head.
Now it needed a handle.
With a rasp and chisel in hand I slowly worked the piece of timber (trying to follow the natural curves and bends) down to an acceptable shape that resembled a "off the shelf" handle. Out came the orbital sander again to even out the surface left with the rasp. With the wedge in I then cut off the excess at the head and left just enough sticking out (more of a personal preference) finished off with a metal wedge on an angle.
4 coats of Linseed oil and she was looking rather sleek and ready for action. I have messed up a few of my store bought axe handles in the past by over reaching on the downward action causing damage to the shaft, so decided to put a few turns of para-cord to assist in preventing this in the future. All finished off with a small lanyard to assist with retention in the cold.
So happy enough with the result and coming in at just over 900g. Now to get the other one finished.

Welcome guest, is this your first visit? Create Account now to join.
Welcome to the NZ Hunting and Shooting Forums.
Search Forums


User Tag List
+ Reply to Thread
Results 1 to 15 of 19
Thread: Weekend Tomahawk Build
-
03-11-2015, 10:24 PM #1Member


- Join Date
- Feb 2012
- Location
- Palmerston North
- Posts
- 421
Weekend Tomahawk Build
"Professionals are predictable but the world is full of dangerous amateurs"
-
-
03-11-2015, 10:54 PM #2Member
- Join Date
- Apr 2015
- Location
- Dunedin
- Posts
- 380
Man that is a real nice bit of kit! Awesome job!
-
04-11-2015, 10:59 AM #3Member
- Join Date
- Feb 2012
- Location
- Palmerston North
- Posts
- 421
Cheers mate. I must go back to that downed tree so that I can actually identify what it was, seems bloody solid.
"Professionals are predictable but the world is full of dangerous amateurs"
-
04-11-2015, 11:08 AM #4Member

- Join Date
- Aug 2013
- Location
- Central NI
- Posts
- 5,060
Very nice. Any spare heads?
Sent from my iPhone using TapatalkDan M
-
04-11-2015, 11:34 AM #5Member
- Join Date
- Feb 2012
- Location
- Palmerston North
- Posts
- 421
Sorry mate, only got one other that I am planning on customizing for my eldest boy.
Check out trade me, you can get an old beat up head for around $10-15 and then the options are endles with a cutting disk and file. There is one on there at the moment AXE HEAD 160MM LONG | Trade Me not sure what metal it is but a bargin at that price...Danny likes this."Professionals are predictable but the world is full of dangerous amateurs"
-
04-11-2015, 02:41 PM #6Member
- Join Date
- Dec 2011
- Location
- Wellington
- Posts
- 459
Yeah I'd be interested in knowing what the wood was - I'm still mid project trying to get hold of a handle. Originally Posted by Shooter

Where did you get the metal wedge from? Oh, and how long did you dry out the wood for before cutting to shape?
Nice job btw!!!
-
04-11-2015, 03:07 PM #7Member
- Join Date
- Feb 2012
- Location
- Palmerston North
- Posts
- 421
I have a few smaller branches left over so will take a photo with bark on and see if someone here knows what it is.
I normally just use a bit of metal that I cut off the axe head but recently found a 2 pack of metal wedges at Mitre10 Mega that are made for the purpose ($4.50 from memory)
The timber has been drying slowly in the carport for the past 3 months. I have herd that you can shape them when they are wet and seal the ends to prevent splitting but have not tried it myself.Last edited by Shooter; 04-11-2015 at 03:10 PM. Reason: Spelling
thejavelin likes this."Professionals are predictable but the world is full of dangerous amateurs"
-
04-11-2015, 04:30 PM #8Member

- Join Date
- Nov 2014
- Location
- W-BOP
- Posts
- 6,469
Sleek!
-
04-11-2015, 09:03 PM #9Member
- Join Date
- Aug 2013
- Location
- Central NI
- Posts
- 5,060
Was just being cheeky... Well done

Sent from my iPhone using TapatalkShooter likes this.Dan M
-
05-11-2015, 06:05 AM #10Member
- Join Date
- Mar 2012
- Location
- Palmy North
- Posts
- 264
Nice man.
Shooter likes this.
-
05-11-2015, 06:18 AM #11OPCz

- Join Date
- Jun 2012
- Location
- Nor West of Auckland on the true right of the Kaipara River
- Posts
- 33,650
Yes. Very nice indeed.
It takes 43 muscle's to frown and 17 to smile, but only 3 for proper trigger pull.
What more do we need? If we are above ground and breathing the rest is up to us!
Rule 1: Treat every firearm as loaded
Rule 2: Always point firearms in a safe direction
Rule 3: Load a firearm only when ready to fire
Rule 4: Identify your target beyond all doubt
Rule 5: Check your firing zone
Rule 6: Store firearms and ammunition safely
Rule 7: Avoid alcohol and drugs when handling firearms
-
05-11-2015, 08:58 AM #12Member
- Join Date
- Dec 2011
- Location
- Wellington
- Posts
- 459
Cheers - will go grab some. Originally Posted by Shooter
Ha that axe head that you had a link for earlier closed for just under $5 - looks like I have another project
-
05-11-2015, 09:19 AM #13Member
- Join Date
- Feb 2012
- Location
- Palmerston North
- Posts
- 421
Good shit mate, that thing will clean up well and the pitting will give it a ton of character! Look forward to the pics.
Give us a bell if you get stuck on any part."Professionals are predictable but the world is full of dangerous amateurs"
-
05-11-2015, 10:27 AM #14Member
- Join Date
- Dec 2011
- Location
- Wellington
- Posts
- 459
Yeah, looking forward to it, will just wack it with the wirebrush on the drill get it all back to shiny, but leave the pitting. Will do the old lemon juice/vinegar patina trick after ensuring its all rust cleared. Originally Posted by Shooter
Probably will grind back the poll to smooth.
Will go on the lookout for some wood this weekend, now got 2 heads that need handles!
@
-
05-11-2015, 11:24 AM #15Member
- Join Date
- Feb 2012
- Location
- Palmerston North
- Posts
- 421
I find with a pited head like the one you just purchaced that a night in a layer of white vinigar will make easy work of removing all rust elements when using the wire brush.
Better to have spare heads then none at all "Professionals are predictable but the world is full of dangerous amateurs"


 Reply With Quote
Similar Threads
-
30-223 build
By kimjon in forum Projects and Home BuildsReplies: 30Last Post: 29-04-2018, 02:31 PM -
Forum surfcasting weekend Matata - labour weekend
By hunter308 in forum FishingReplies: 5Last Post: 28-07-2014, 11:36 PM -
closing weekend this weekend
By Nathan F in forum Game Bird HuntingReplies: 13Last Post: 28-07-2013, 08:55 PM -
what to build
By Smiddy in forum Firearms, Optics and AccessoriesReplies: 9Last Post: 07-03-2013, 09:05 PM -
What to build with a Rem 700 SA
By Kiwi Greg in forum Reloading and BallisticsReplies: 59Last Post: 09-03-2012, 06:23 PM
Tags for this Thread
 Posting Permissions
- You may not post new threads
- You may not post replies
- You may not post attachments
- You may not edit your posts
Welcome to NZ Hunting and Shooting Forums! We see you're new here, or arn't logged in. Create an account, and Login for full access including our FREE BUY and SELL section Register NOW!!
All times are GMT +13. The time now is 02:50 PM.

Bookmarks