

 35Likes
 LinkBack URL
 About LinkBacks
I know there is a navigation thread already going but some requested me to copy and paste these notes. I hope they are of help to a few of you guys. Grab a map and compass and give a few of the methods a go, they are a lot simpler than they seem on paper [or on a screen I guess]. Try them out in small doses - get to know 1-2 techniques then learn another couple, you'll soon pick them up as long as you actually try them out rather than just read about them..
Low Tech Navigation
What follows is an introduction into backcountry navigation from the pre GPS days. I have detailed the techniques I have used for years and hope they may be useful to some of you guys. There are other methods that get you to the same answers, so some others might wish to add their tips and techniques. You will not learn to navigate by reading these notes alone, only with practice will you become familiar with the techniques.
It worries me that this old school navigation is dying out and people are relying solely on GPS units. I recognise that GPS’s offer far more accuracy than the map and compass combo and are able to maintain that accuracy in darkness, mist, and amidst featureless terrain. I just think for safety’s sake you should have the knowledge and equipment [ideally a map and compass, but at the very least a map] to navigate if the technology lets you down. After all batteries go flat and gear can be lost or damaged.
Map and compass navigation is much easier when you have a view of your surroundings it gets a lot more hit and miss under thick forest cover and or in rolling country lacking distinct identifiable features. Navigating in forested lower country is therefore much more difficult.
The Topo Map
Maps are the basis of navigation they contain a wealth of information. I won’t go into much detail here –my advice is to pick one up and familiarise yourself with the key and compare the map representations to the actual landscape. Regular use gives you a greater understanding of how to interpret them.
Topo maps are a depiction of the landscape, using contour lines they portray the valleys and ridges. The maps are printed with shading, as though the landscape is lit from the North West, giving the impression of depth that illustrates the undulations.
The orange contour lines link, at 20m vertical intervals, all points of a given height above sea level. Therefore the greater distance between each line the gentler the slope, when the lines converge to form an orange smudge this is steep country.
• The best tip with a map is to keep it in your pocket not your pack – that way you can refer to it regularly
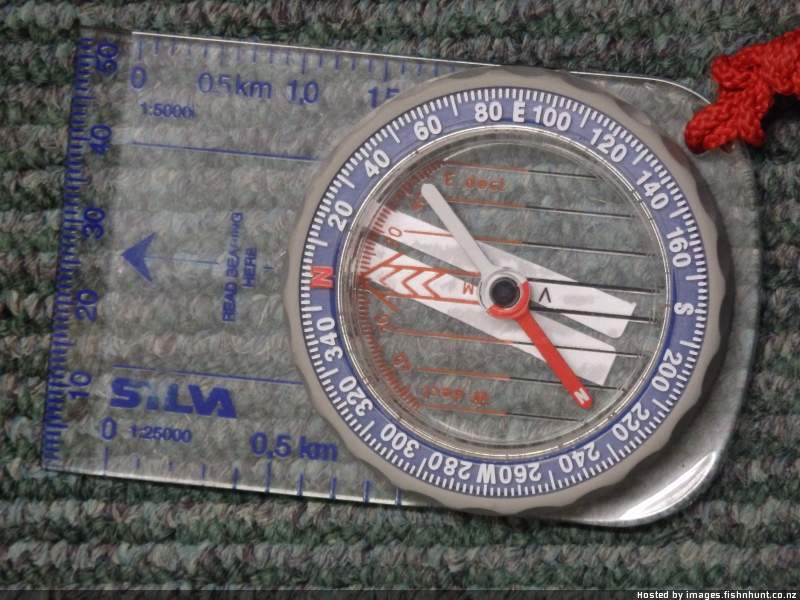
The Compass
North
The first thing to get straight is -What is and where is north?
True North is the bearing to the North Pole, the axis of the earth’s rotation.
Grid North is indicated by the vertical Grid Lines on the Map. For all practical purposes it is the same as True North as Grid Lines on our Topo Maps run towards, if not precisely to, True North.
Magnetic North is where the compass needle points to, the earth’s magnetic field which is located in northern Canada. If things weren’t complicated enough with three different North’s we also need to get our head around the fact that Magnetic North is mobile rather than in a fixed location.
Magnetic Variation
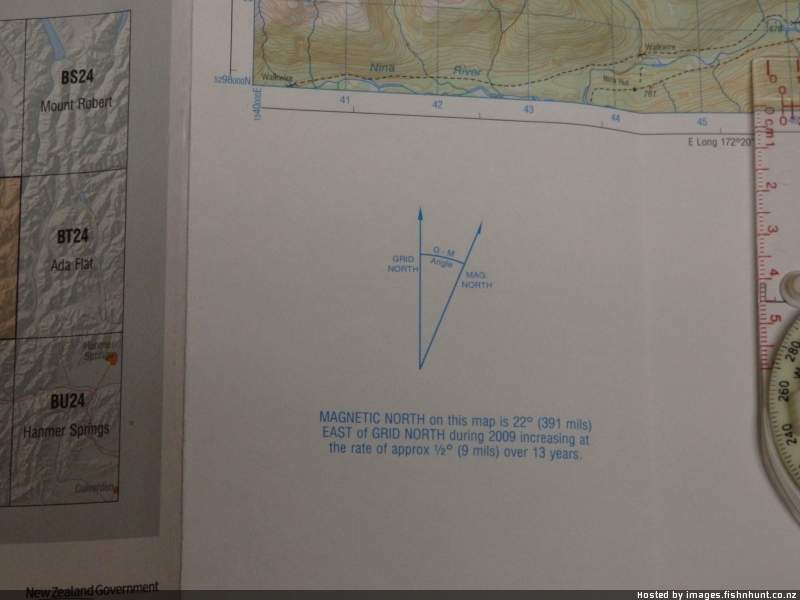
Really we only need to bother ourselves with the Grid North of our maps and Magnetic North that the compass needle indicates. Every Topo Map has Grid North and the Magnetic variation depicted on the bottom left hand corner, along with its projected movement.
In NZ currently Magnetic North lies between 18 and 24 degrees east of Grid North and here in Canterbury the variation is about 23 deg.
Grid Bearings or Magnetic Bearings
Under my system all bearings are Grid Bearings ie they are a measurement of the angle from Grid North.
When I use my compass to take a bearing in the field I ensure the Mag Needle points to the local Mag Variation [ie 23Degress in Canterbury] rather than to the North Point [0 degrees] on the Compass Dial.
To make life easier for myself I have marked the bottom of my compass with a strip of sticky paper at 22 and 24 degrees east of Grid North, so I can quickly locate the angle to Magnetic North and then park the magnetic needle over it.
Other techniques are based on your ensuring that when you take a bearing you place the Mag Needle over the North Point. These are magnetic bearings ie you are calculating the angle of your required bearing from Magnetic North.
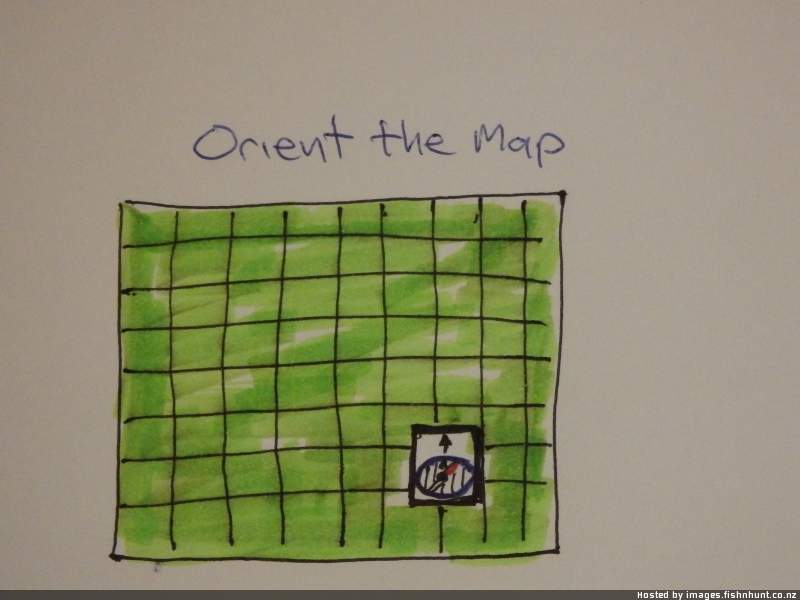
Orient/Set the Map
To best read the map, align it with the features on the ground either by eye or, more accurately, using the compass. This assists you to relate the landscape you see around you to what is depicted the map.
-Set the compass to North [0deg] on the index line.
-Place the compass on the map with the Orienteering Lines running parallel to the maps vertical grid lines [known as eastings], ensuring the Orienteering Arrow points to the top of the map.
Turn the map with the compass in place until the Magnetic Needle points to the Magnetic Variation [23deg in Canterbury]
Overview of route and topography
Review your intended route at the road end, as this is usually the last point where you are absolutely certain of your location. The plotting of the journey starts here so all your forthcoming navigating is based from this known point.
Assess the route you intend to take, look at the features of the landscape and relate them to the map. Be mindful of any potential sources of navigational errors eg forks in the valley, converging tracks, ridges or spurs leading off from one another.
Ticking Off Features
[A method of keeping track of your progress by gaining a series of check points.]
-Locate your position on the map, then review the next portion of your intended route.
-On the map look for prominent features that can act as check points. These are features that are both obvious on the ground and locatable on the map, therefore offering the ability to accurately confirm your location
-The distance between check points should not be too long- ideally less than 2 km. The rationale is that if you go astray you will be able to pick it up sooner and correct yourself. If you only pull out the map after 4hrs walking you may have more of a job figuring out where you are or where you went wrong.
-Once your position at the ‘check point’ is confirmed review the next leg, nominating the next check point.
–When walking up a major valley sidestreams make handy ‘check points’. Just be aware not every stream is marked on the map. What is a fairly obvious stream at your feet might only be a minor gully on the map [seen as a series of dents in the contour lines]. Likewise recent rain, or lack there of, will influence what appears to be a significant stream and what doesn’t.
Feature Types
Orienteerers use landscape features as navigational aids and classify them as follows...
Linear Features
Elongated features such as ridges, watercourses, bush edges, roads, paths, fencelines etc. Linear features can act as ‘Hand Rails’ or ‘Collecting Features’ which are a bonus to navigation.
Hand Rail a linear feature that can be followed on a leg [or portion there of] of your journey. Eg following a river up valley to the hut, or following a ridgeline to a scree on which you intent to descend to the valley bottom.
Collecting Feature a linear feature beyond your intended destination which acts as a boundary [you know if you reach it you have overshot your goal]. Eg you find yourself at the side stream up valley from the hut and so realise that you have to backtrack to the hut.
Spot or Point Features
Precise points such as -peaks, buildings etc or the intersection of two linear features.
Area Features
Large features that are not as sharply defined as spot or linear features- eg contour features like a broad col, or changes in slope angle or aspect.
Location Awareness [Map Contact]
As you are walking the legs between ‘check points’ have your map handy [eg in a pocket] so you can regularly check it en route. Do the surrounding features and land forms match what is depicted on the map?
If things do not tally then stop and consider your position. It is likely that you have come adrift somewhere between your current position and your last confirmed ‘Check Point’.
Review the intervening leg on the map and visually for any possible cause of your confusion. Eg a wrong turning such as a fork in the valley or a spur branching of from the ridge.
If so retrace your steps to the point you diverged from your route or perhaps to the last ‘Check Point’.
If you are confused as to your location, use your compass to find your position by taking bearings to any Spot Features that are also depicted on the map.
Distance Travelled
Timing method
You can estimate distance travelled by time you’ve taken and this is of help in finding your location. You will need to have an awareness of your average speed in various conditions eg tramping along a good track is much faster than carefully stalking through untracked bush.
For me I generally travel along tracks around 3km/h. This is my relaxed pace that also takes into account short stops [grab a drink, snap a photo or checkout sign], but not extended lunch stops etc which must be omitted from the travel time factor. If I’m on good track but rushing it ie to get to the car before dark I might reach lightning speeds of 4-5km/h.
Likewise you can calculate your ascent or descent rates.
Average elevation gain is around 300m per hour and average elevation loss at a rate of 600m per hour.
Example... You’ve been walking for an hour and a half up an unfamiliar valley. Estimating your speed to be 3km/h, you will be around 4.5k’s up the valley. Plot that estimate on the map and then look at the surrounding features to confirm your location.
Personal pacing
Another method of estimating distance travelled is by counting paces. It’s fairly accurate over shorter distances with an average variation of +/- 5 paces over 100m. As with the Time method above seek to confirm progress with the identification of surrounding features as able.
To use the method you need to know the length of your pace or, more practically, how many paces you take to cover 100m. I spent some time in the Territorials and the Army method of establishing your personal pacing over 100m was to have you walk the length of a rugby field a number of times and then work out your average pacing. If you do undertake this exercise remember walk in a relaxed unrushed manner, perhaps wearing your pack. A ‘pace’ is the length of stride of one leg- so you elect one foot, let’s say the left one, and count off one pace each time it hits the ground. You will probably find it takes around 60 paces to cover 100m.
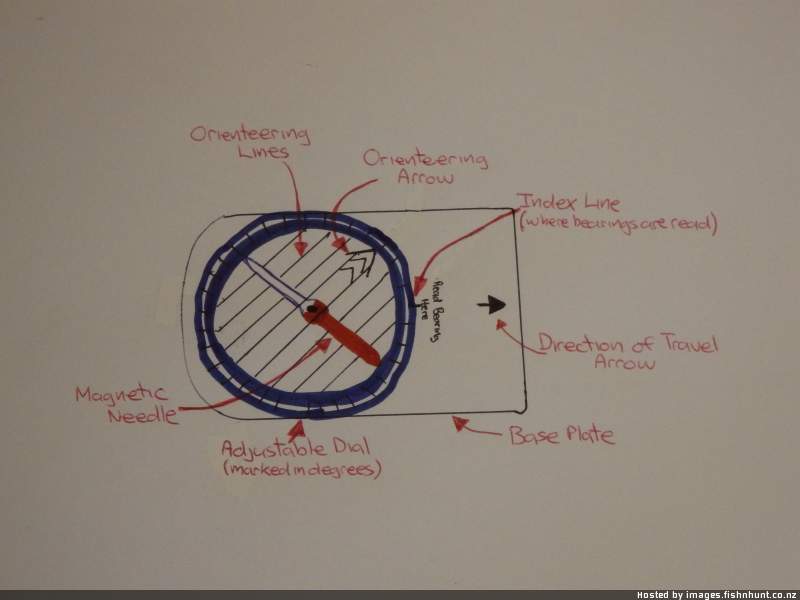
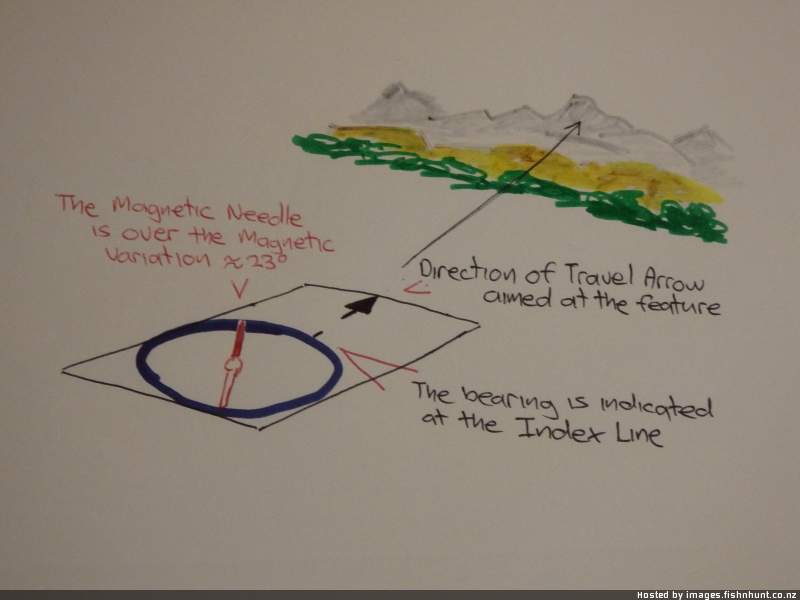
Compass Work
Take a bearing to a ground feature-Point the Direction of Travel Arrow at the feature.
-Twist the dial until the Magnetic Needle points to the Magnetic Variation [23 deg in Canterbury].
-Read the bearing at the index line - this is a Grid Bearing.
[If you use the technique where you align the Magnetic Needle to North [O deg], this is known as a Magnetic bearing.]
Plot the bearing on to a map
*In this exercise you are using the compass as a protractor to measure an angle or ‘bearing’ from Grid North so the ignore the Magnetic Needle.
-Place the compass on the map with the Direction of Travel Arrow pointing to the feature.
-Pivot the compass from this feature until the compass’s Orienteering Lines run parallel to the maps vertical Grid Lines, ensuring the Orienteering Arrow points to the top [North] of the map.
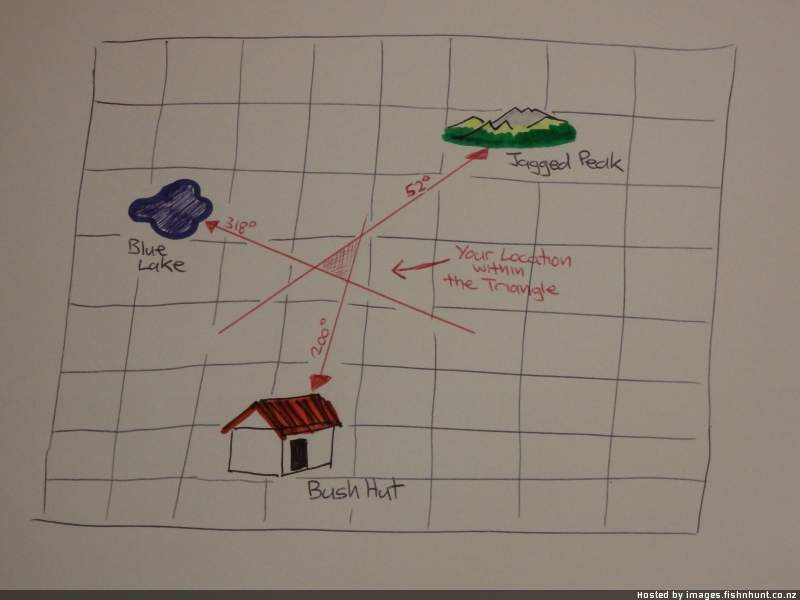
Plot your location on a map
Repeat the above once or twice more to ascertain your location at the intersection of the plotted bearings.
Ideally use three widely spread bearings [Triangulation]
-the plotted bearings will form a triangle within which you are located.
Two plotted bearings [Resection or Intersection] place you at, or near, where the bearings meet.
This map and compass method is only likely to be accurate to within a couple of hundred metres [compared to around 20m with a GPS]. Once you have plotted your bearings to find your general location on the map, see if you can narrow it down by comparing the ground features around you to those on the map.
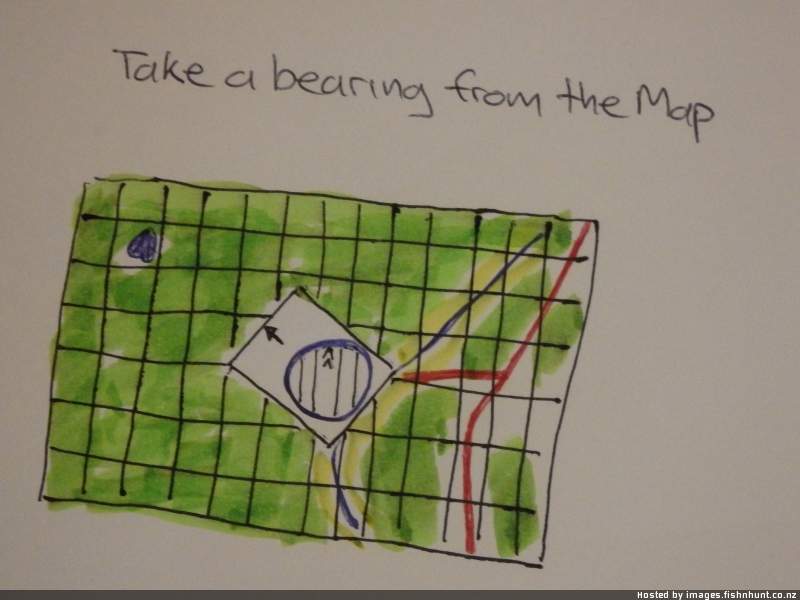
Map bearings
Useful in low visibility eg heavy bush, fog, whiteout, darkness or featureless terrain. It enables you to follow a bearing to a feature that you cannot actually see.
Taking a Map Bearing
*This process ignores the Magnetic Needle and the Map does not have to be oriented. The compass is only utilised as a protractor to plot the angle or ‘bearing’ to the feature.
-Place the compass on the map with the base plate running from your location to the objective, ensuring the Direction of Travel Arrow points towards the objective.
-Turn the compass dial so the Orienteering Lines run parallel to the maps Grid Lines, ensuring the Orienteering Arrow is pointing to the top [N] of the map.
–Read the bearing from the compass's Index Line
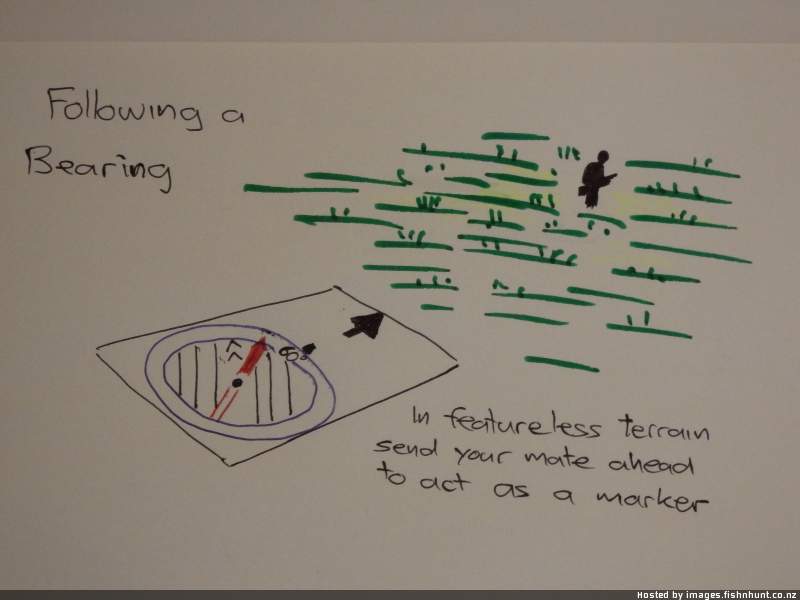
Following a bearing
-Using one of the above methods set your compass to the required bearing.
–Hold the compass waist high in front of you.
–Turn your whole body, clutching the compass in place, until the Magnetic Needle points to the Magnetic Variation [23 deg in Canterbury].
– Follow the Direction of Travel Arrow to walk the required bearing.
Constantly watching your compass as you walk, to stay on the bearing is a very awkward way to travel. More efficient is to find an object that lies on the required bearing and then walk to it.
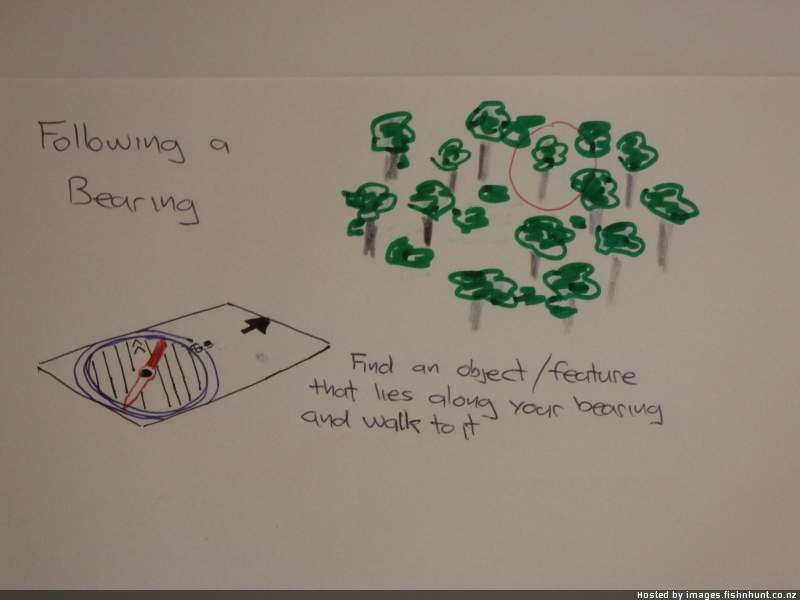
In open country you might find a suitable feature hundreds of meters ahead, in heavy bush you might nominate a specific tree, that might be only 20m ahead, to walk to. Once you get to the nominated feature find another object along the bearing and repeat.
In the absence of identifiable features along your bearing you can send your hunting mate ahead as far as practical and then direct them left or right until they are directly on the bearing. They stop at that point and you walk to them and repeat. This can be a handy technique on open tops in cloud or at night.
For all the above techniques you have the option of not walking directly along the bearing. So as long as you end up at the nominated feature you can divert off the direct line to follow an easier route.
Obstacles
– Find a feature on the bearing on the other side of the obstacle and walk to it.
Or – Mark your position, where you are blocked by the obstacle eg wind fall. Then work around it until you return to opposite your marked position.
Or – Send your mate to Scout around the obstacle, direct them on to the original bearing and then walk to them.
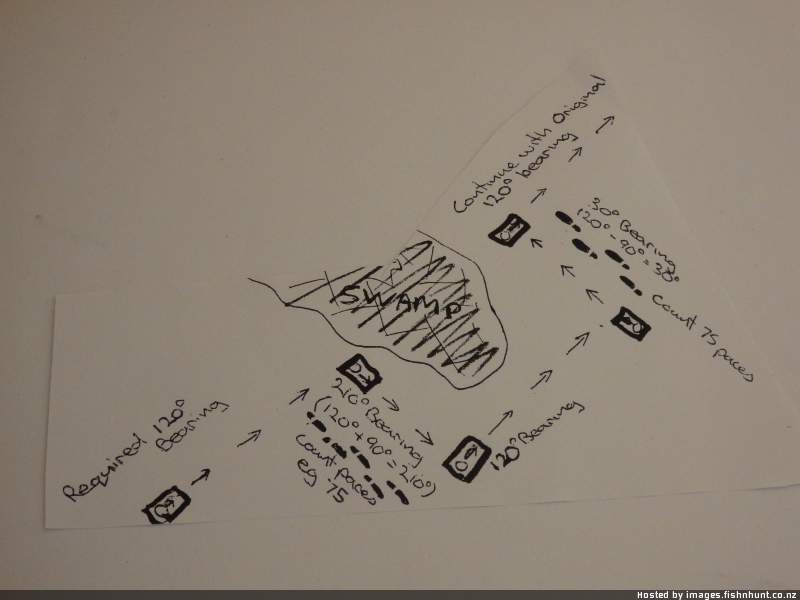
Or -Box around obstacles by turning 90 deg to your bearing and count your paces as you follow it.
-Once at the end of the obstacle return to your original bearing until the depth of the obstacle is cleared.
-Then turn 90 deg back towards your original line of march and follow this new bearing the same number of paces as you counted on the outward leg.
Welcome guest, is this your first visit? Create Account now to join.
Welcome to the NZ Hunting and Shooting Forums.
Search Forums


User Tag List
+ Reply to Thread
Results 1 to 15 of 28
Thread: Map and compass techniques
Hybrid View
-
08-09-2015, 04:12 PM #1Member

- Join Date
- Sep 2013
- Location
- Christchurch
- Posts
- 87
Map and compass techniques
Last edited by footsore; 08-09-2015 at 04:21 PM.
-
08-09-2015, 04:20 PM #2Member
- Join Date
- Feb 2012
- Location
- Palmerston North
- Posts
- 421
A very well laid out introduction package to navigation! Some great information in there.
-
08-09-2015, 07:09 PM #3Member

- Join Date
- Dec 2011
- Location
- Hastings
- Posts
- 5,692
Good on Ya @footsore

Pretty sure you covered all the bases there.
Cheers
Pete
-
08-09-2015, 07:30 PM #4Member
- Join Date
- Dec 2014
- Location
- Napier
- Posts
- 519
Awesome
Certainly methods that are no doubt slowly getting lost with the up and coming generation. I always carry a compass and print an A4 map off the computer where I am going. Certainly come in handy a couple of times.
-
09-09-2015, 07:47 AM #5Member
- Join Date
- Sep 2013
- Location
- Christchurch
- Posts
- 87
Yeah I tend to carry photocopies too. I'll have a black and white copy on which I make notes about where I find sign or feed etc. Back home I'll add this to a map of the hunting area after each successive trip and so build up a picture of the animals habits, the hot spots soon become apparent season by season. Originally Posted by TLB

As well as this I'll either tote the full map or more commonly several laminated A4 size colour photo copies [which are easier to keep handy in my shirt pocket and less of a hassle to open out to use].
-
09-09-2015, 09:47 AM #6Codswallop

- Join Date
- Feb 2013
- Location
- The Hill
- Posts
- 23,584
Footsore this is mean bro
I have cut this across to a word doc and will print and get to work 
-
09-09-2015, 09:55 AM #7Member

- Join Date
- Sep 2012
- Location
- Up in da hills somewhere near Nelson
- Posts
- 9,811
I print of a map of the area I am going to , using Freshman and blowing up to double the usual 1:50.000. This means it is much much easier to read, and is still on a scale that is usable in conjunction with a compass.
Forgotmaboltagain+1
-
09-09-2015, 10:02 AM #8Codswallop
- Join Date
- Feb 2013
- Location
- The Hill
- Posts
- 23,584
I am so bad that I think my compass is lying to me when looking at the GPS
 Its a mind fuck that its the other way around. Have started leaving the gps in my pack
-
09-09-2015, 12:47 PM #9Member
- Join Date
- Feb 2012
- Location
- Palmerston North
- Posts
- 421
These wise words from my father always see me right... Originally Posted by Gibo
1. The compass is right
2. The map is right
3. You are wrong
Doubt the doubt and trust your tools.
-
09-09-2015, 01:25 PM #10Member

- Join Date
- Jun 2015
- Location
- Murchison
- Posts
- 847
Wise words alright... but move the compass around a bit to ensure nothing is causing a local deviation... Proximity to magnetic fields from phones/GPS/Iron sand concentrations/guns/head lamp batteries, any old iron... etc. Originally Posted by Shooter
Dan88 likes this.
-
09-09-2015, 01:34 PM #11Member
- Join Date
- Sep 2013
- Location
- Christchurch
- Posts
- 87
Good point LBD and ensure the compass is level and the needle is able to swing freely. Originally Posted by LBD
-
09-09-2015, 01:31 PM #12Member
- Join Date
- Sep 2013
- Location
- Christchurch
- Posts
- 87
Them's wise words alright Originally Posted by Shooter
I've had plenty of times that my inbuilt navigational sense has been at odds with the tools -invariably the tools have been right.
Points I've noticed about my own estimations
1/ At the end of the day when I'm tired, I tend to underestimate how far away camp is - I'm buggered and I'm willing myself to be closer to my food and bed than I actually am.
2/ When I've been moving in slow careful stalking mode I overestimate how far I've travelled. If I stalk up a spur or stream from the main valley I'm always shocked as to how quickly I get back to the start point once I've switched back to tramping mode.
When what the tools are indicating to you is a suprise the question to ask is How have I screwed this up? rather than What is wrong with this bl**dy compass? !
Ignore your ego - it tends to talk Sh*tveitnamcam and Gibo like this.
-
09-09-2015, 12:10 PM #13Almost literate.


- Join Date
- Dec 2011
- Location
- Nelson
- Posts
- 25,107
Whats the other way around gibo?
Sent from my SM-G800Y using Tapatalk"Hunting and fishing" fucking over licenced firearms owners since ages ago.
308Win One chambering to rule them all.
-
09-09-2015, 12:12 PM #14Codswallop
- Join Date
- Feb 2013
- Location
- The Hill
- Posts
- 23,584
My gps is wrong and my compass is correct Originally Posted by veitnamcam
The thick shit in the Kaimais is great for screwing with the direction the unit is facing. Not really a mind fuck just that I got so dependant on my gps I thought my compass was all shit
-
09-09-2015, 12:14 PM #15Almost literate.
- Join Date
- Dec 2011
- Location
- Nelson
- Posts
- 25,107
Change your gps to north up. Same as your map.
Sent from my SM-G800Y using Tapatalk"Hunting and fishing" fucking over licenced firearms owners since ages ago.
308Win One chambering to rule them all.


 Reply With Quote
Similar Threads
-
Navigation with compass and map
By Myk in forum HuntingReplies: 66Last Post: 11-10-2015, 09:20 PM -
Training techniques
By chrome in forum Hunting DogsReplies: 15Last Post: 03-06-2015, 10:50 PM -
RECOMMEDATIONS FOR A VERY GOOD NAVIGATION / MARCHING COMPASS
By Woody in forum Firearms, Optics and AccessoriesReplies: 19Last Post: 19-01-2015, 11:24 AM -
Compass Brands
By RichieRich in forum Gear and EquipmentReplies: 35Last Post: 05-11-2013, 12:09 PM -
Hunting footwear & techniques
By Scouser in forum HuntingReplies: 14Last Post: 31-05-2013, 07:46 PM
Tags for this Thread
- 403,
- accuracy,
- advice,
- army,
- arrow,
- axis,
- binocular,
- body,
- canada,
- canterbury,
- dial,
- food,
- fusion,
- gear,
- gps,
- half,
- hunting,
- information,
- lost,
- maps,
- measurement,
- navigation,
- north,
- objective,
- pack,
- parts,
- pengy,
- photo,
- poi,
- ridgeline,
- river,
- safe,
- scout,
- shipping,
- stalking,
- stash,
- technique,
- techniques,
- topo,
- tramping
 Posting Permissions
- You may not post new threads
- You may not post replies
- You may not post attachments
- You may not edit your posts
Welcome to NZ Hunting and Shooting Forums! We see you're new here, or arn't logged in. Create an account, and Login for full access including our FREE BUY and SELL section Register NOW!!
All times are GMT +13. The time now is 06:03 PM.

Bookmarks