

 119Likes
 LinkBack URL
 About LinkBacks
If you've got it try 4227 instead, think of it as a glorified 410 shotgun with a half oz load
Welcome guest, is this your first visit? Create Account now to join.
Welcome to the NZ Hunting and Shooting Forums.
Search Forums


User Tag List
+ Reply to Thread
Results 31 to 45 of 69
-
12-05-2024, 04:37 PM #31Member


- Join Date
- Oct 2014
- Location
- Tararua
- Posts
- 6,744
Micky Duck likes this.
-
-
12-05-2024, 05:32 PM #32Member

- Join Date
- Dec 2014
- Location
- canterbury
- Posts
- 5,447
That's sort of what its intended for Originally Posted by Boxton

During the roar I was off hunting on my own one day ( the guys I was guiding had celebrated a bit hard the night before ) and I got onto a couple of stags in the bush.
Had my modern single shot 7mm RM and wished I had a vintage rifle in hand.
Went bush for about an hour and saw 17 deer all shootable within 75m. 12 hinds and 5 stags a mixture of ages.
I shot a 10 pointer that would have been an easy shot with open sights and anything 45 cal or bigger would have left a decent blood trail if it was still standing.
This A&N had been brought before the roar trip and was wending it's way to CHCH.
I did shoot a deer and a billy goat with my 1885 45-70 on that trip.
But I was just getting over having had Covid two weeks before and honestly I carried the 1885 for a number of days ( can't bear not to have a rifle in hand even if I'm guiding someone ) and felt like something 4 pounds lighter would be nicer to carry.
With the bonus of it being light enough to have in the hands more of the time and not on the shoulder.Micky Duck and Boxton like this.The Church of
John Browning
of the Later-Day Shooter
-
12-05-2024, 05:38 PM #33Member
- Join Date
- Dec 2014
- Location
- canterbury
- Posts
- 5,447
There was plenty of 45-60 300 JHP IMR 4198 data so that was the obvious first try out. Originally Posted by Marty Henry
I use that powder in Nitro for Black loads and it runs clean in those with wool filler.
I will try all these loads again with magnum primers. Maybe standard large rifle just wasn't getting it going well enough.
And maybe unburnt powder is no big deal ?
It just looks terrible.
I will try a BP cast lead 360 grainer some time when I have time to cast a heap moreThe Church of
John Browning
of the Later-Day Shooter
-
12-05-2024, 07:19 PM #34Member

- Join Date
- Apr 2015
- Location
- Geraldine
- Posts
- 23,058
try it with wool filler too ....might help,might not LOL.... only two projectiles to find out at end of day.
75/15/10 black powder matters
-
12-05-2024, 07:26 PM #35Member
- Join Date
- Dec 2014
- Location
- canterbury
- Posts
- 5,447
I was running it with a little toilet paper filler because 4198 only half filled the case Originally Posted by Micky Duck
Micky Duck likes this.The Church of
John Browning
of the Later-Day Shooter
-
12-05-2024, 08:20 PM #36Member
- Join Date
- May 2019
- Location
- Christchurch
- Posts
- 616
Do you have Magnum primers
I have a couple spare if you need them
-
12-05-2024, 08:26 PM #37Member
- Join Date
- Dec 2014
- Location
- canterbury
- Posts
- 5,447
-
13-05-2024, 10:35 AM #38Member
- Join Date
- Dec 2014
- Location
- canterbury
- Posts
- 5,447
For anyone interested in how this conversion was done here are some missing details on the process I used.
There are clearly a lot of little tips and tricks.
Just remember when epoxying in a liner that any soldering of parts needs to be done prior to final fitting the liner with epoxy.
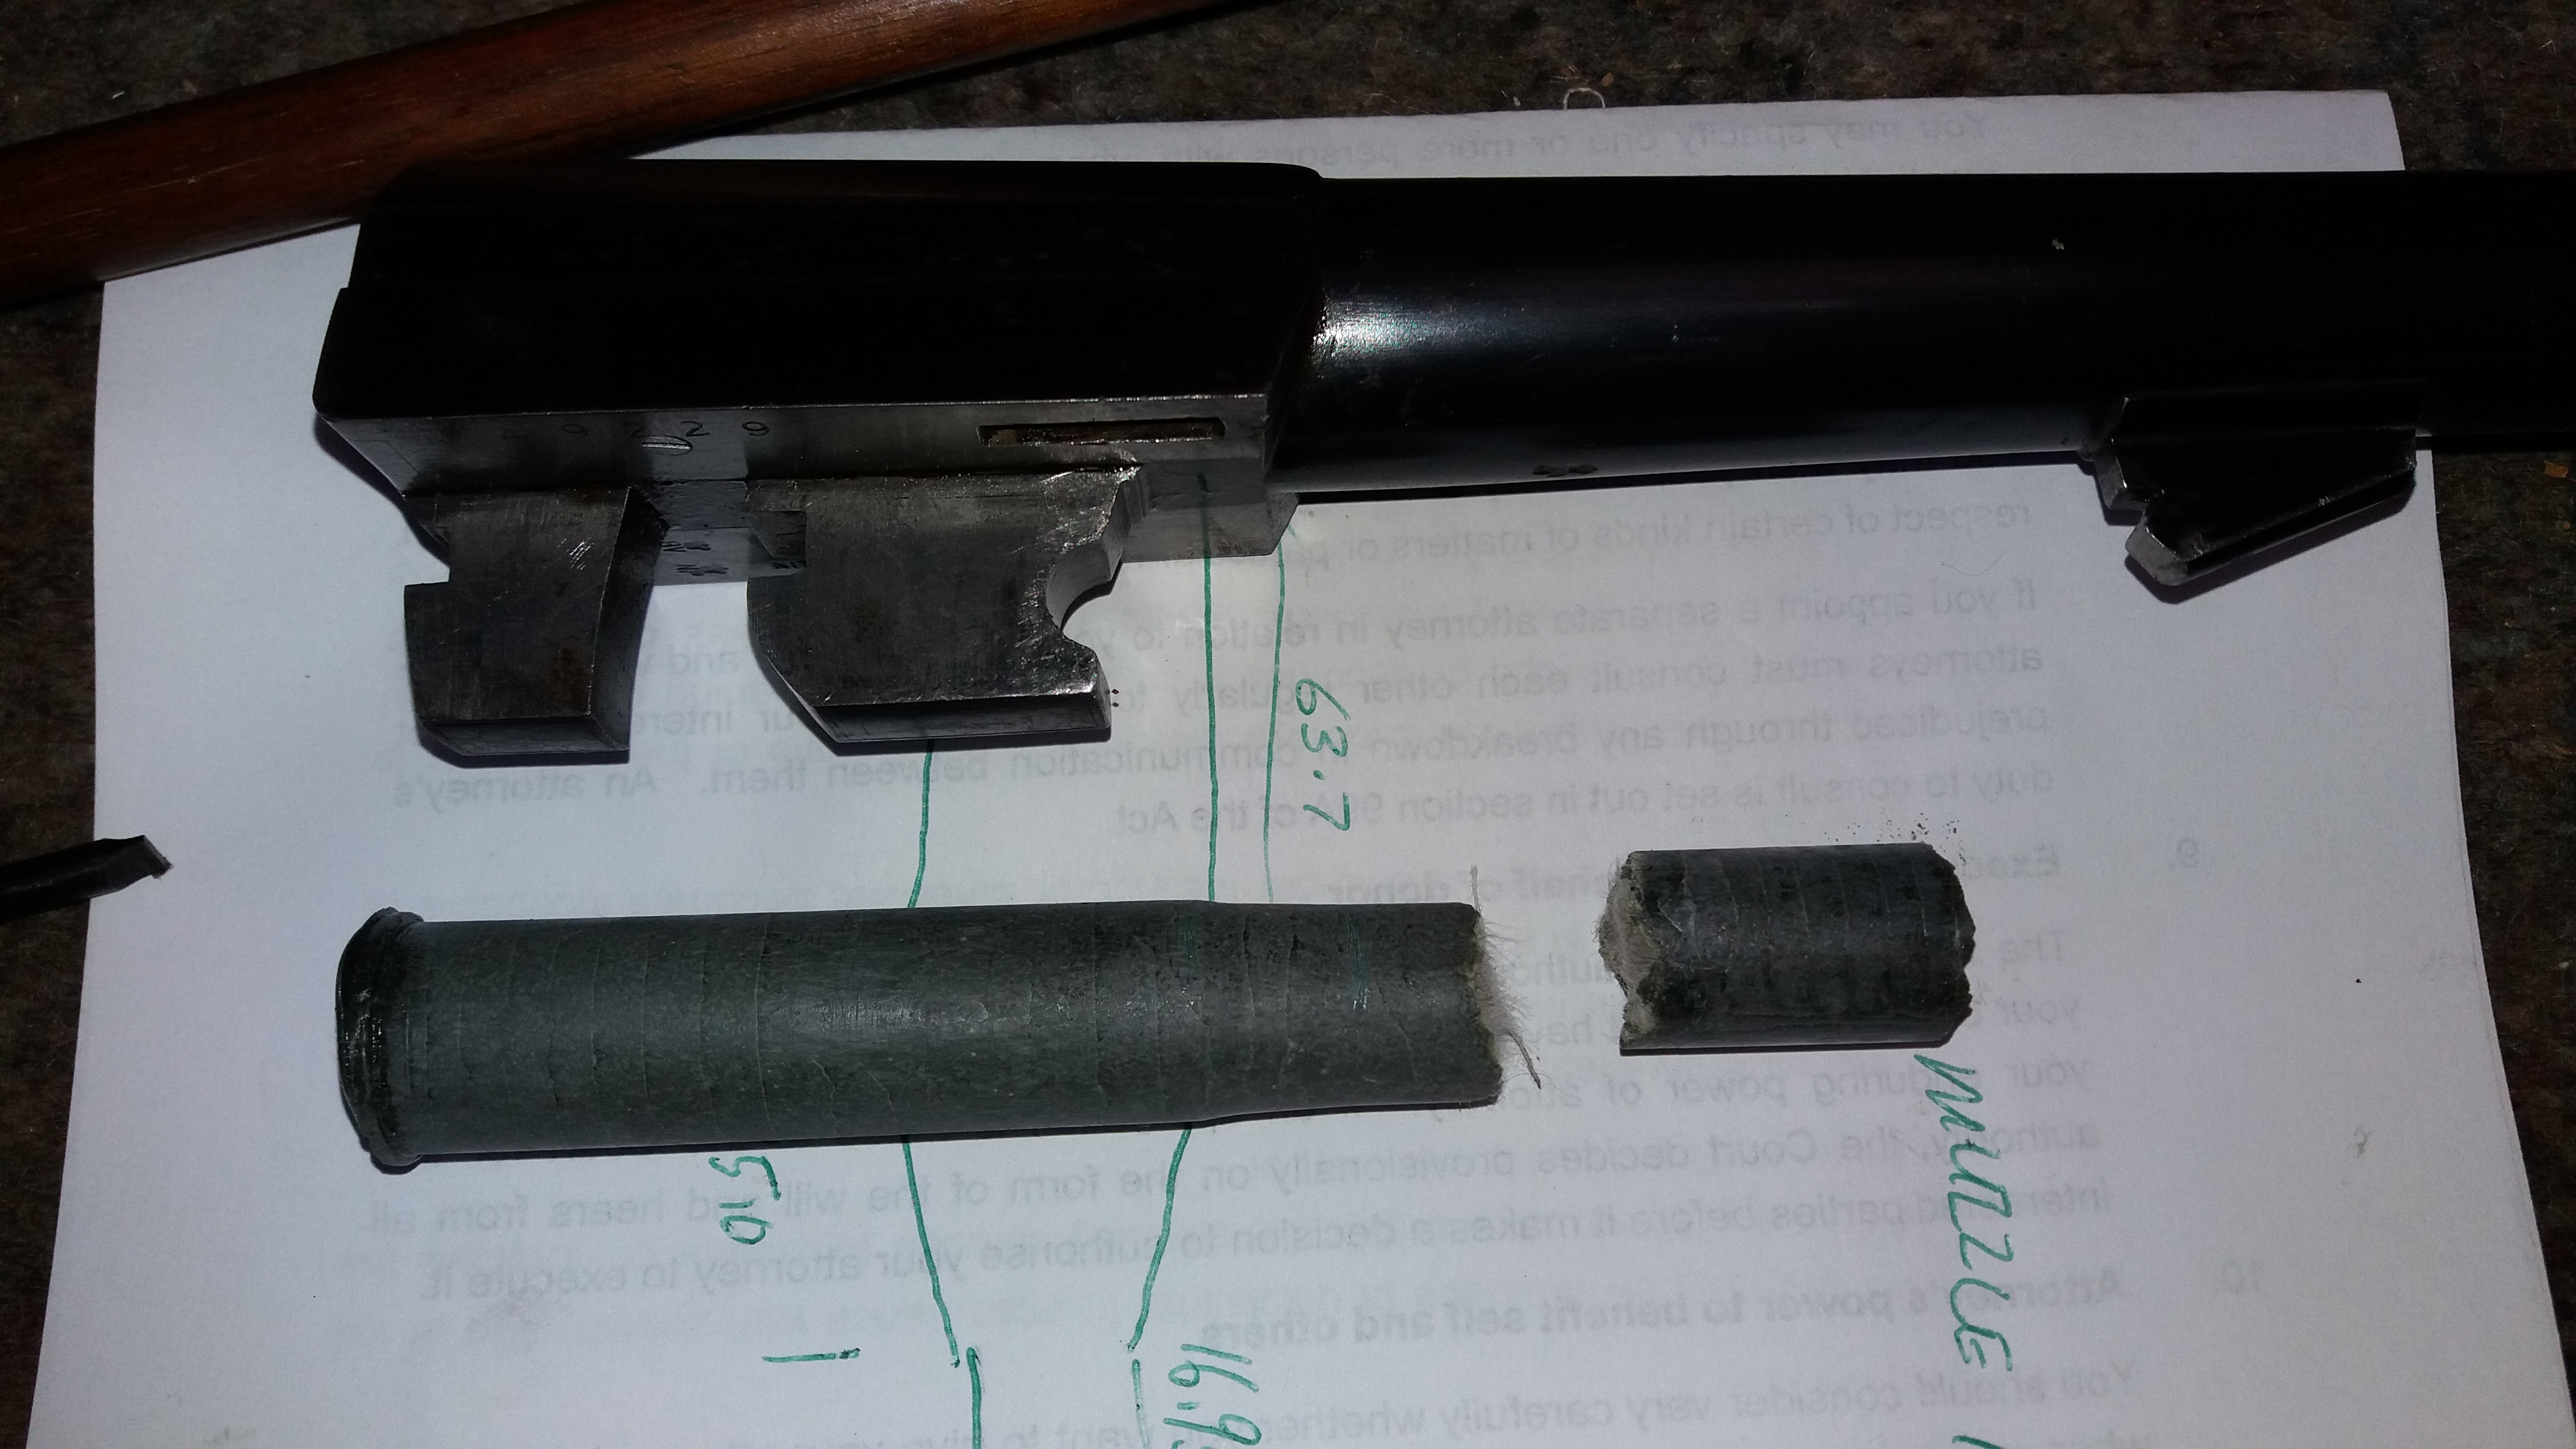
I took a sulphur / carbon chamber and bore cast.
The 16 gauge chamber has a reasonable amount of straight taper and there is the forcing cone to replicate in reverse. I wanted a very close fit the casting was a very accurate way of getting both lengths and diameters.
The smaller bore plug was cast about 50mm forward of the forcing cone. Once it hardened I pushed it gently forward to the muzzle to check if the barrel was indeed parallel and where the choke ( if any ) started.
There was no choke as cylinder bored. But I still did intend shorting the barrel a little when finished to get the balance point further back
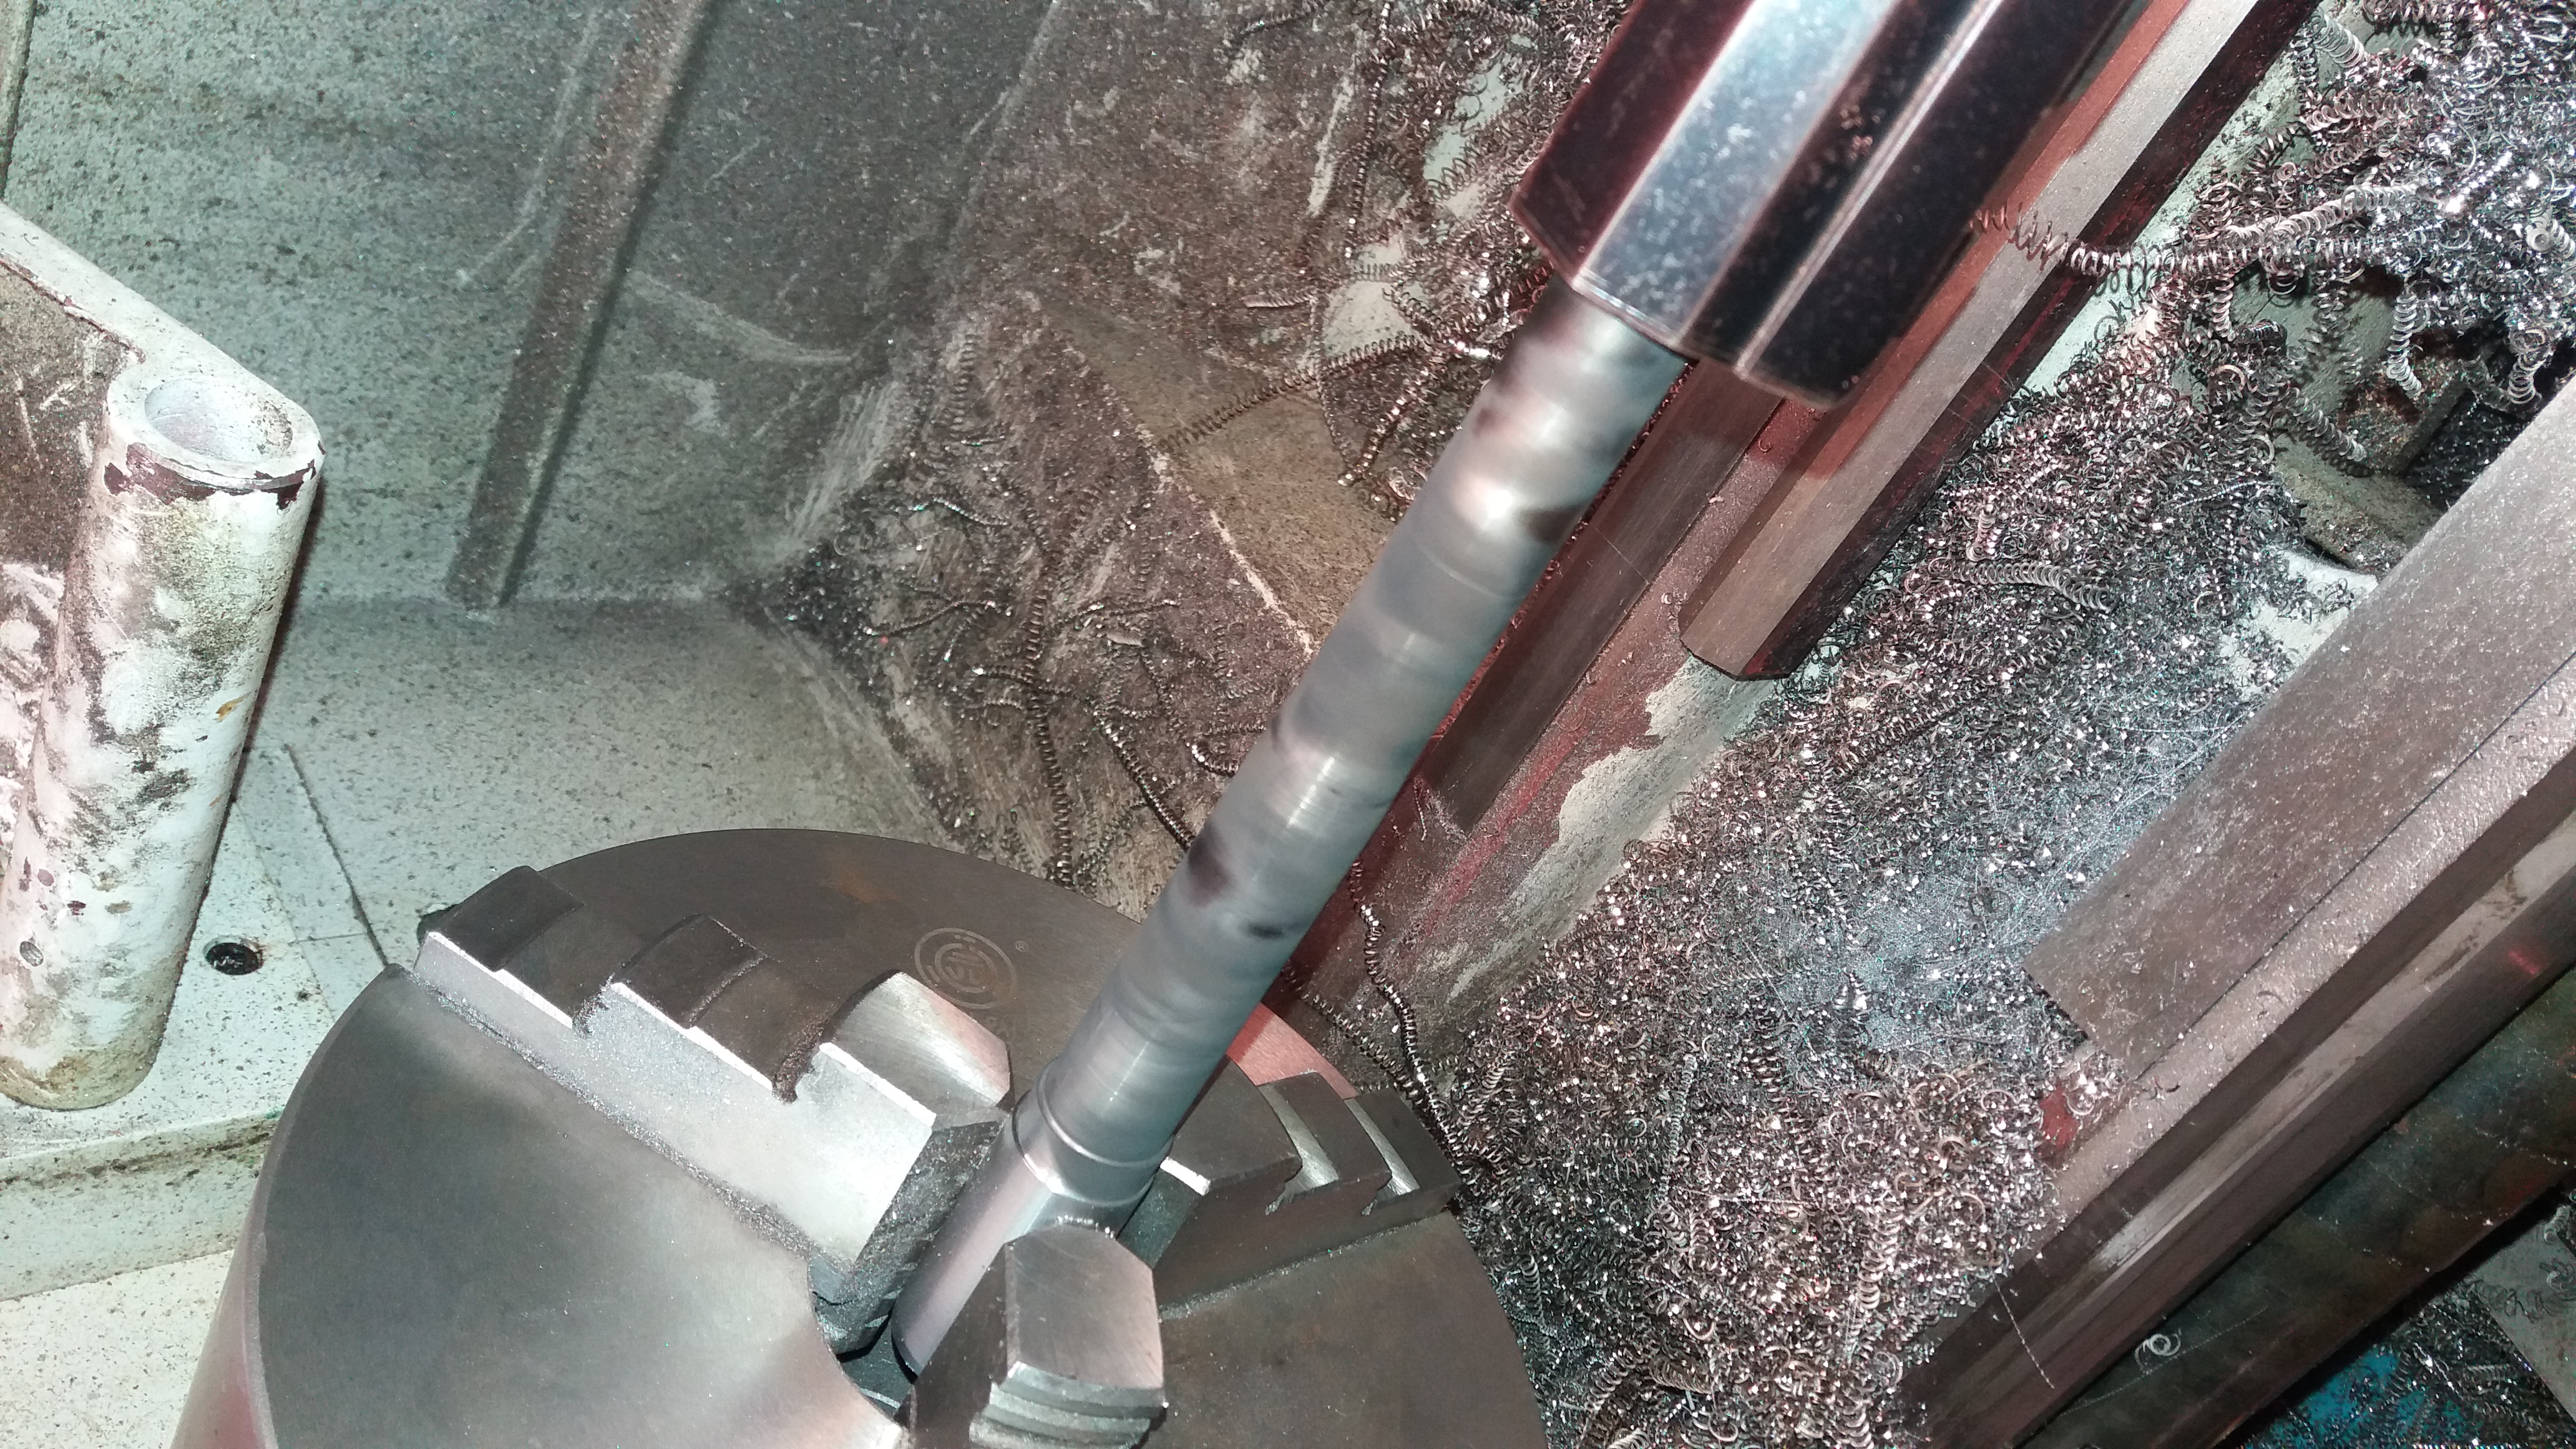
Then the task of turning down a new full diameter barrel blank. Lots and lots of swarf.
When the main bore section of the blank is very close to size the final fitting for a close slip fit is done in very light cuts and the tail stock is removed to check fit by slipping the barrel over the liner on the lathe.

Then on to the chamber area which was just a bit of following the numbers on the DRO and then use the smoke lamp to find the tight spots.
Lots of off and on with the tail stock to fit the barrel during this stage.
But well worth the effort because this liner ended up being very closely fitted in all points.
Usually liners are done with a "bore and line" on existing rifle barrels and there are only 2 diameters and a step between them at a known depth.
So lining an unmodified shotgun barrel is a little different.
This is the liner with smoke to slip barrel on and find the high spots where the smoke is rubbed off.
Liner fully fitted and breech space done. Chamber is not yet cut.
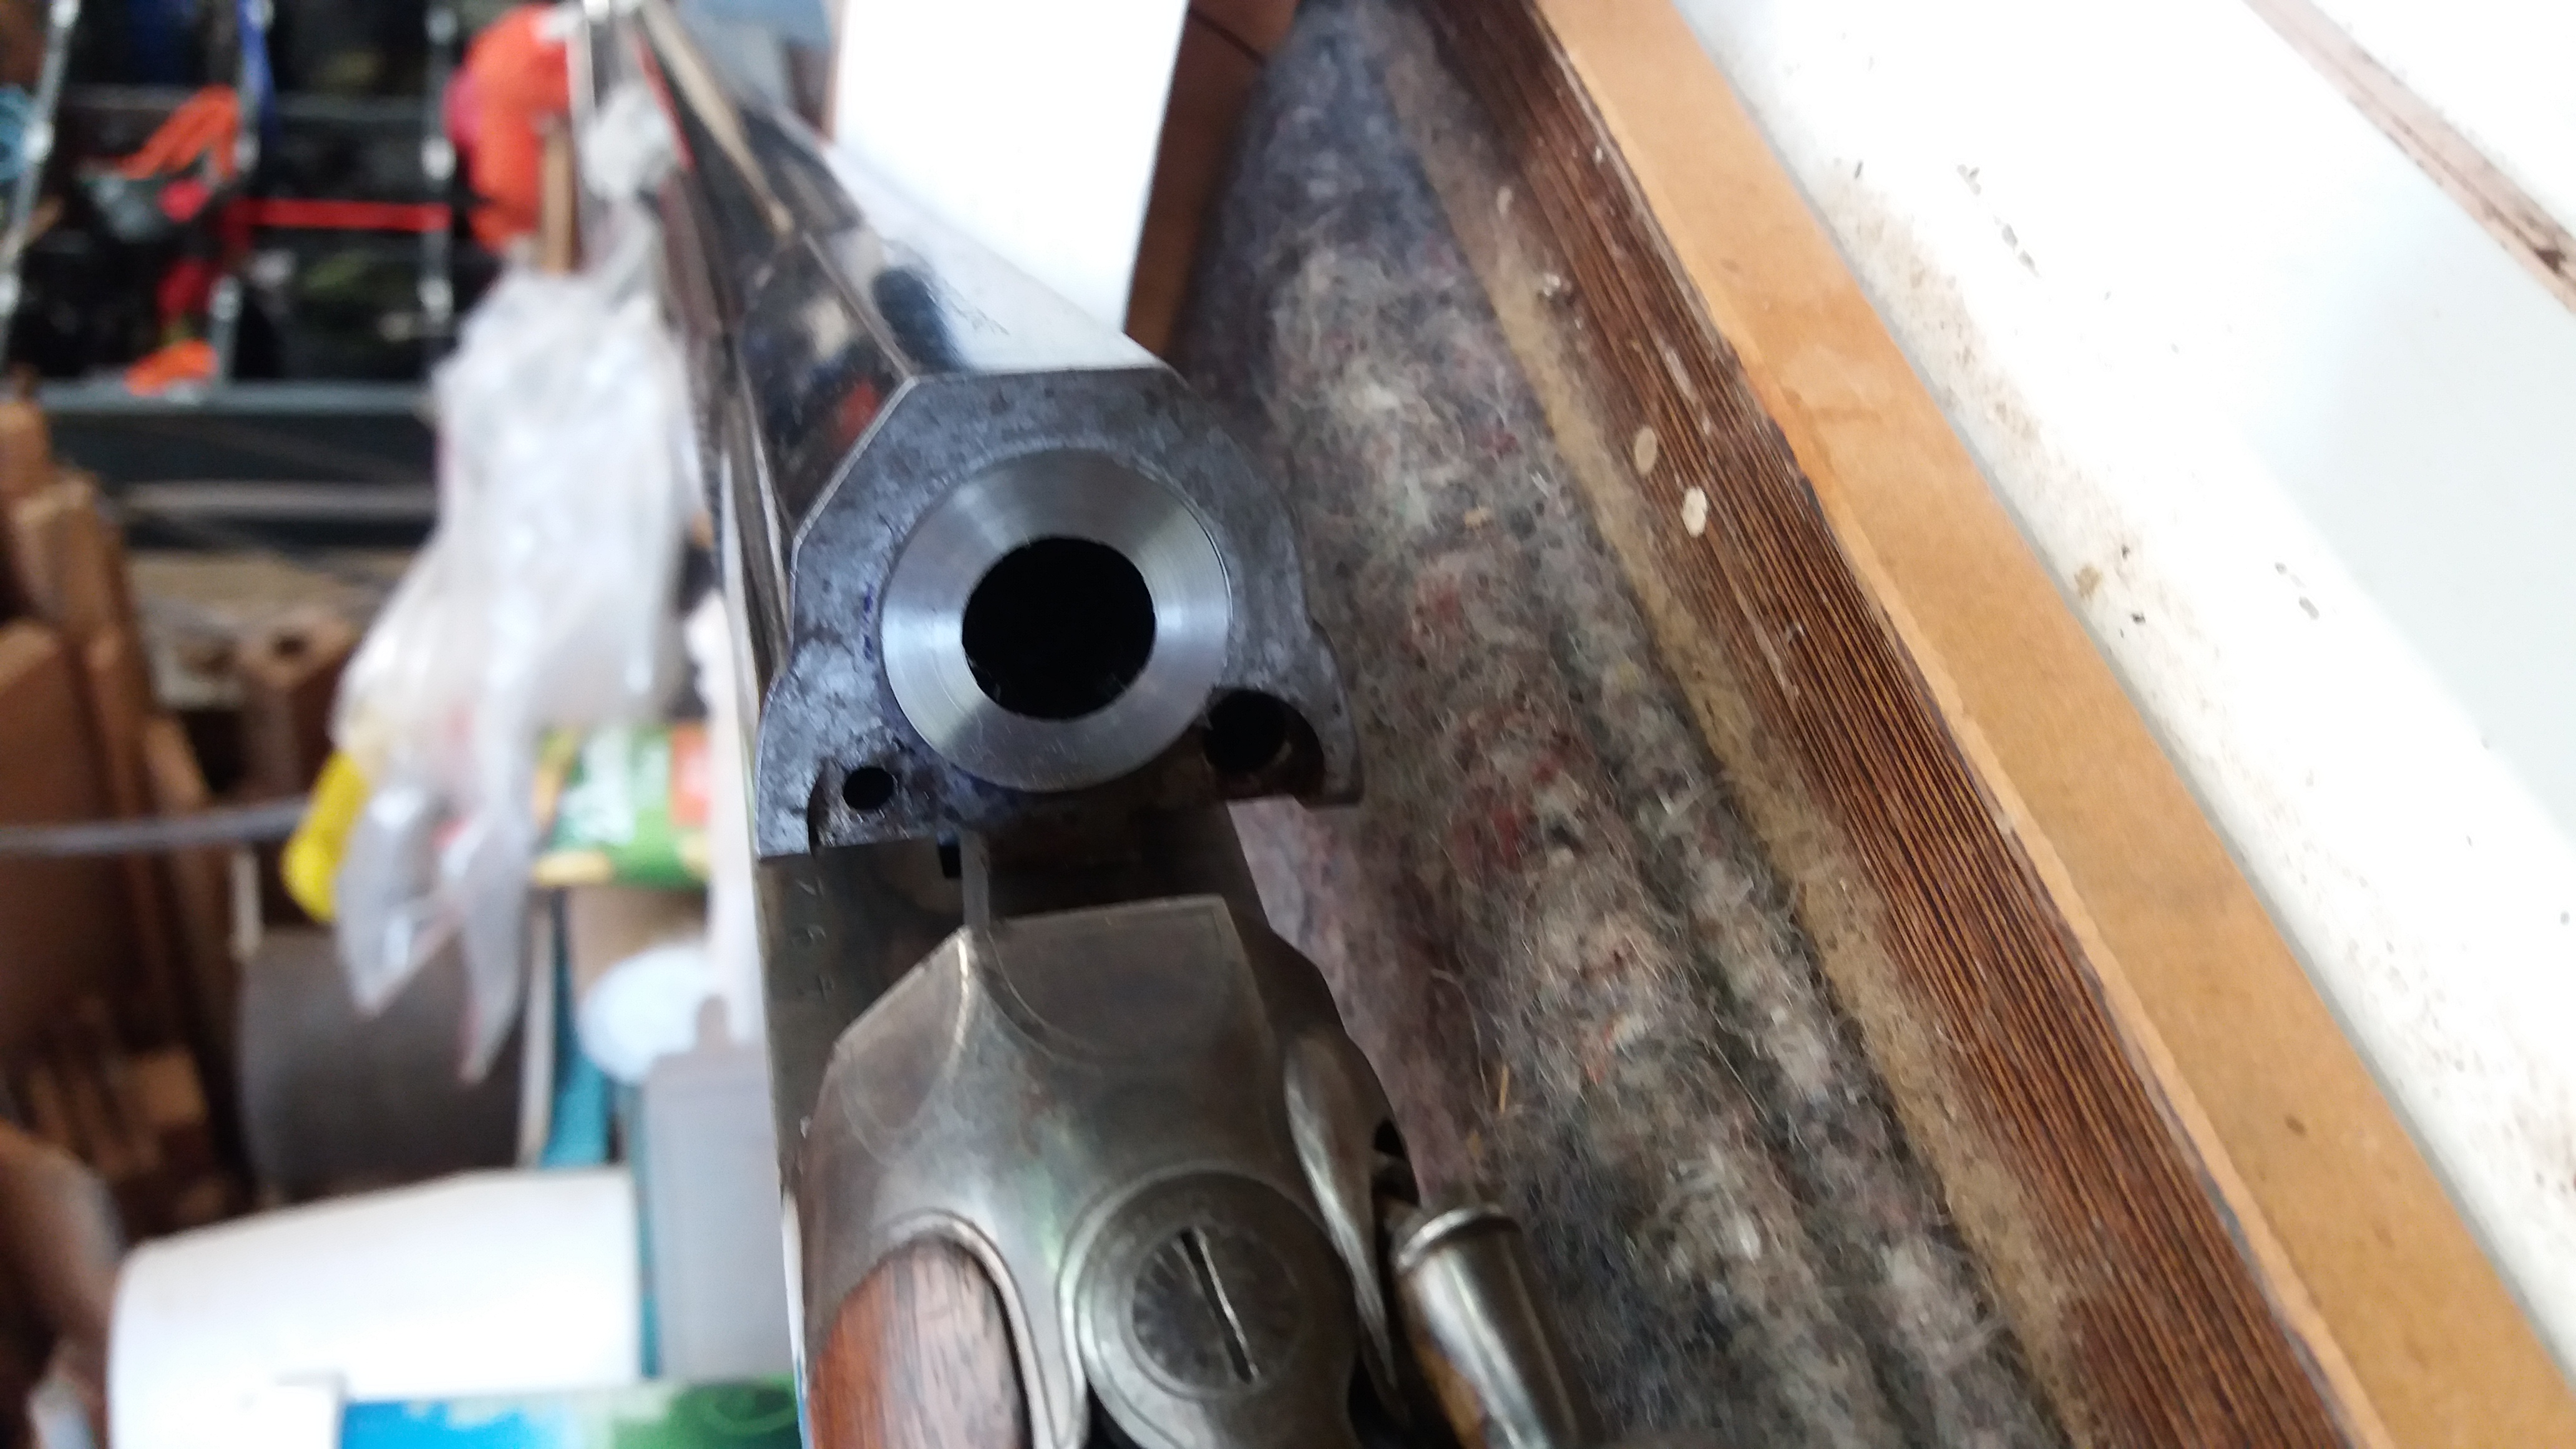
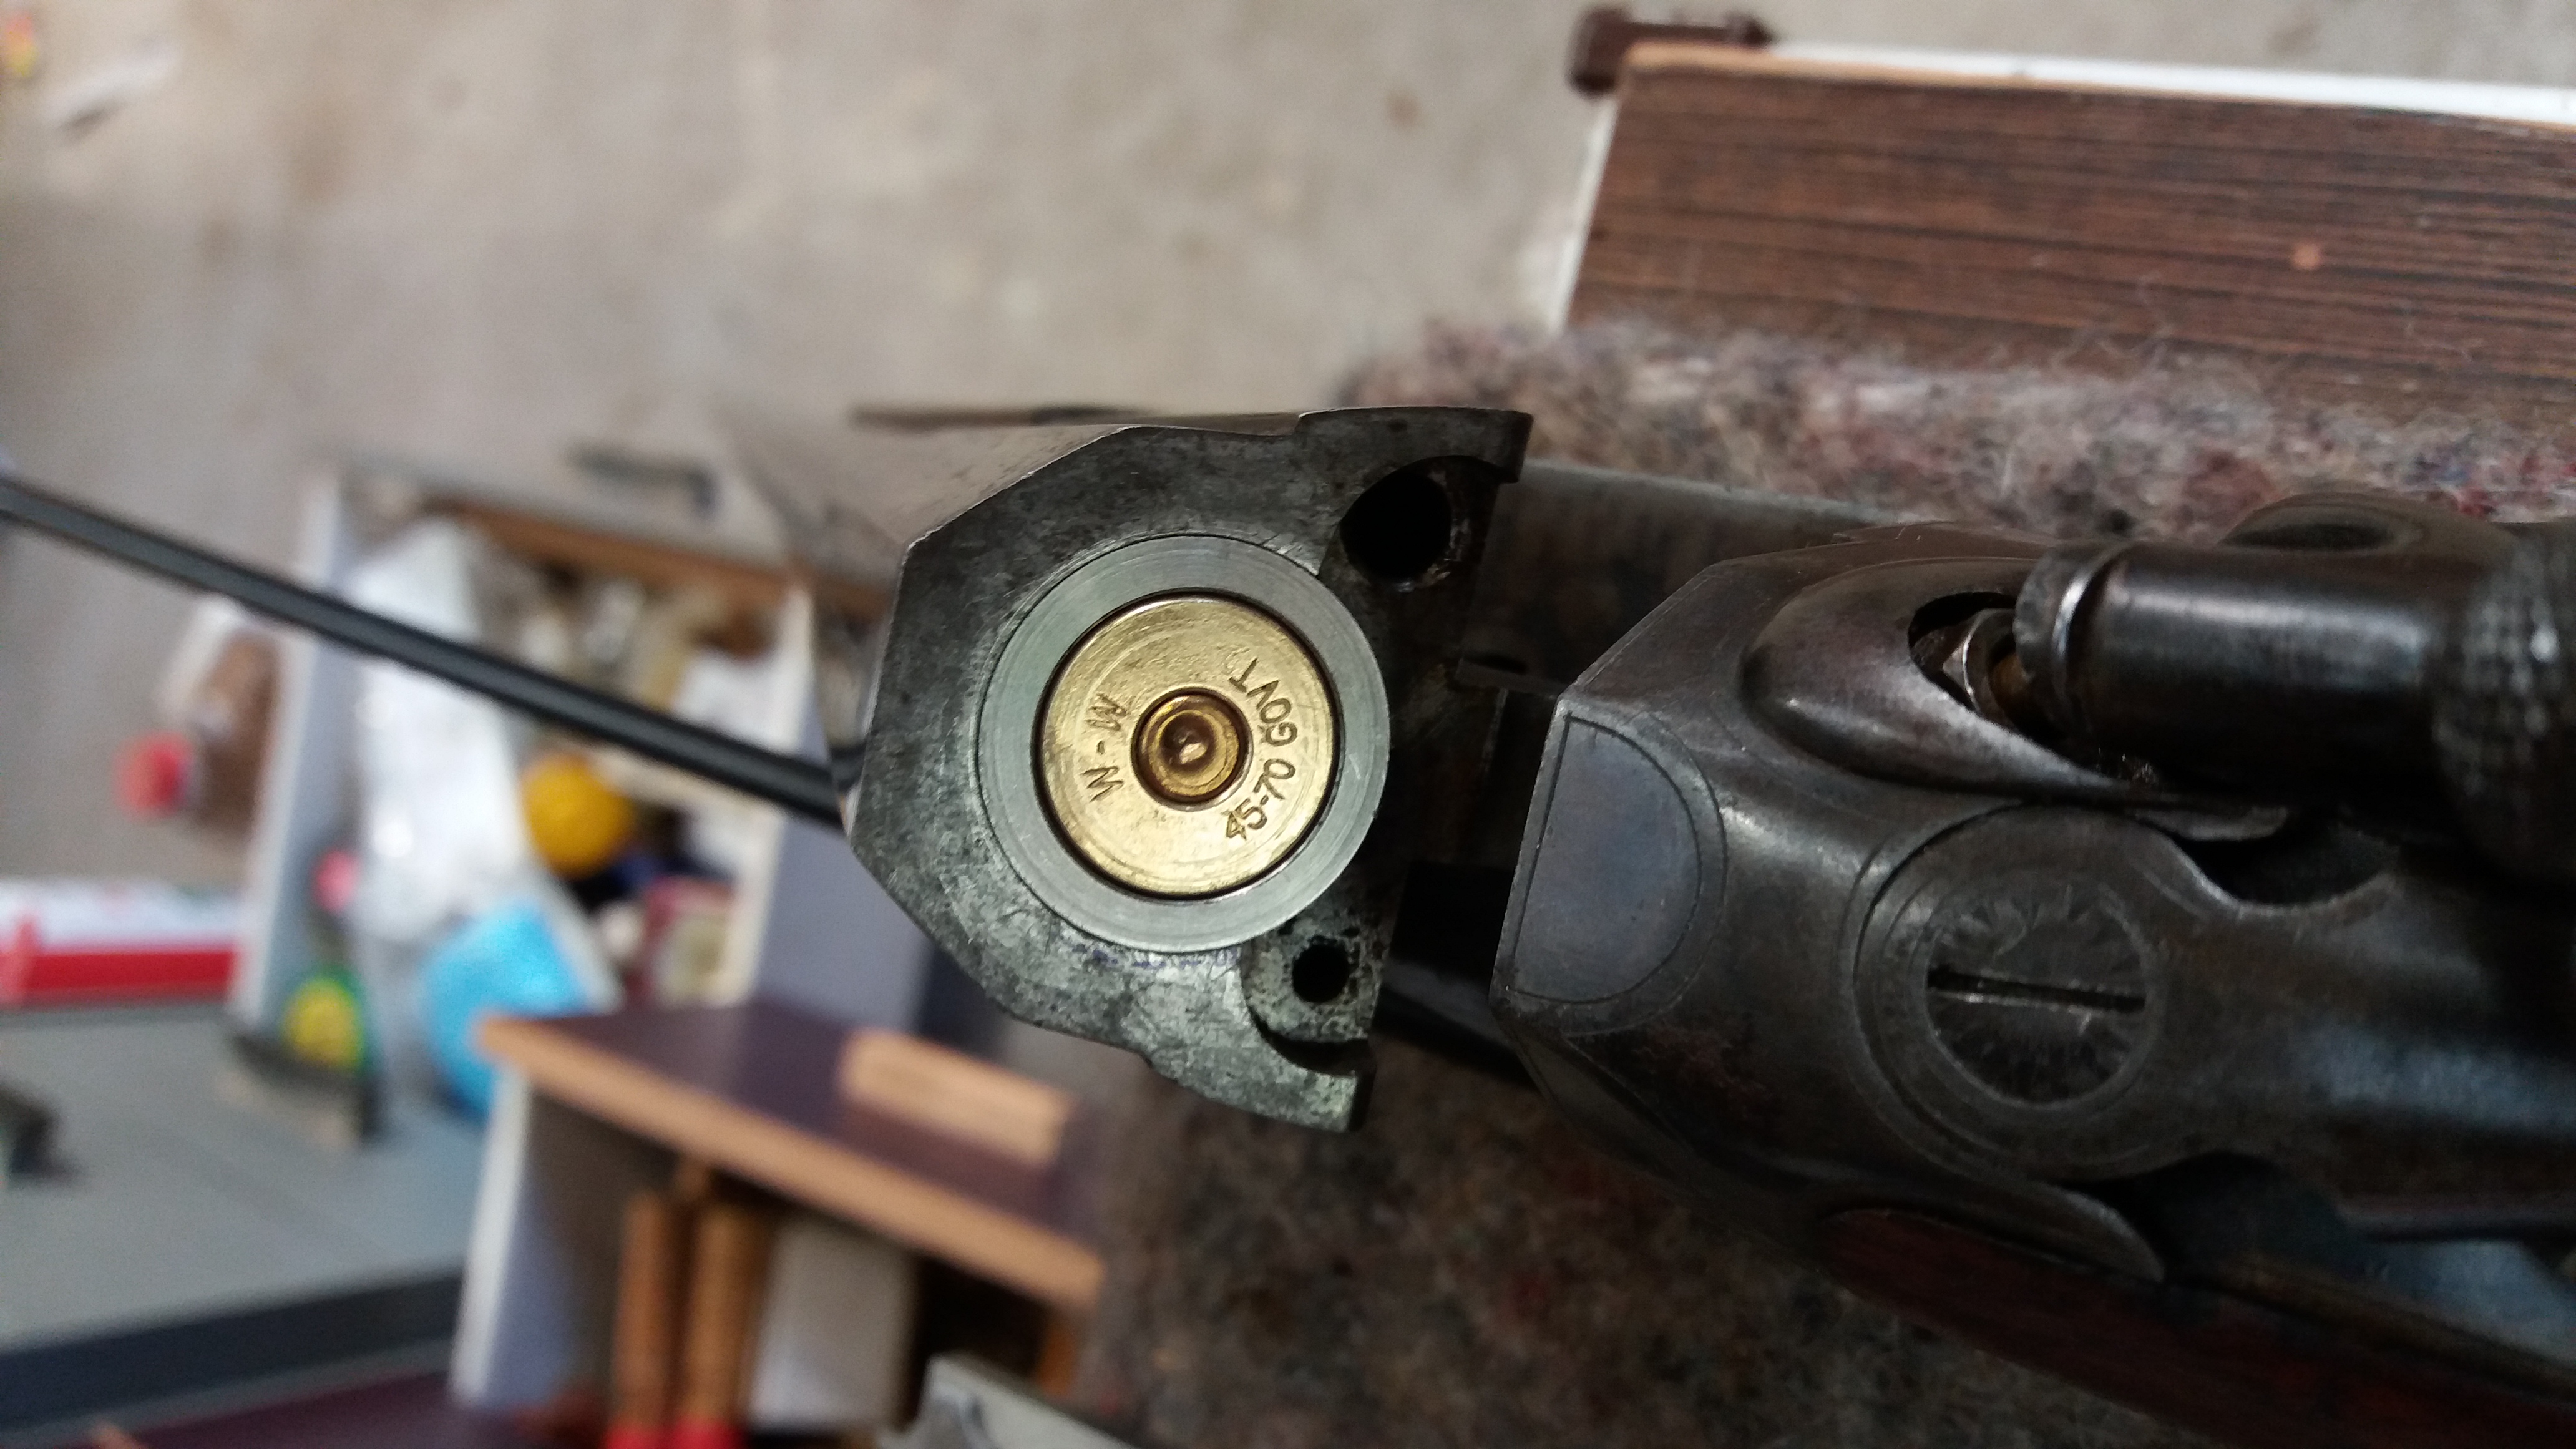
Cut the 45-60 chamber and then dry fit to barrel and check firing pin protrusion on a formed and primed case.
Not shown is having machined a section of the breech flange off the liner for where the extractor needs to be re fitted
And not shown is the new extractor extension fitted to the existing 16 gauge extractor.
Epoxy fitting the liner
There are no images of this stage as its messy and can be quite difficult.
You will need a hydraulic press to fully seat a stepped liner because liquids are uncompressable. You need to force excess epoxy out both ends from the step area.
Silicon tapered plugs are great to avoid lots of epoxy getting into the barrel.
You need to mix the epoxy accurately. Mix plenty and thoroughly to get the mix right.
Try and get some epoxy into the bore.
Coat the liner well as it goes in. There will be plenty coming out the breech as you gently turn it in,
Have the press set up ( dry run first ) so you can roughly clean up the mess and then press in the last few MMs
The epoxy puddle in the forcing cone area will go out both ends of the barrel / liner.
Its messy but you don't need to leave it in the press because once the excess is gone nothing will move.
And you don't need to rush because the epoxy has plenty of pot life if you mix it in a flat container. Never mix it in a small deep container.
Then you can clean up the sticky mess with acetone etc.
You can even fit it to the frame once clean and check the liner is fully in place and that your extractor rebate is perfectly in place.
Due to the tapered chamber area, forcing cone and stupidly close tolerance I machined this this liner to, there was vastly more surface tension when fitting it than i was used to.
So prepare for it to go into the press. Have everything set to go and there should be no drama.The Church of
John Browning
of the Later-Day Shooter
-
13-05-2024, 10:46 AM #39Member
- Join Date
- Dec 2014
- Location
- canterbury
- Posts
- 5,447
I forgot to mention re the Epoxy
Acetone clean all the parts prior to final epoxy fitting
Mix about 3 or 4 table spoons worth of it to get it well mixed and accurate.
Put plenty on as the liner goes in.
Stick a clean pots under the barrel ( horizontal in vice with leather padding ! ) at both ends to catch the drips.
But when all done you will have only used about one teaspoon actually of the 4 tablespoons.
If you have done your job properly there was only a tiny space for the epoxy to stay in.
Bring it inside to a nice warm place and leave it for the prescribed curing time plus another day.
Also bring a small sample in with the barrel of your left over epoxy mix. It's just reassuring to see that it hardens correctly as well.
If you muck up the mix ... i don't know what you are going to doThe Church of
John Browning
of the Later-Day Shooter
-
13-05-2024, 12:30 PM #40Member
- Join Date
- Nov 2014
- Location
- Central Otago
- Posts
- 2,239
Good work! I prefer to tin both the barrel and liner and solder them in place to keep the muzzle and breech joins less visible, making sure to leave a wee bit proud at each end for hand finishing. 50mm of soldered area at each end is plenty.
-
13-05-2024, 02:02 PM #41Member
- Join Date
- Dec 2014
- Location
- canterbury
- Posts
- 5,447
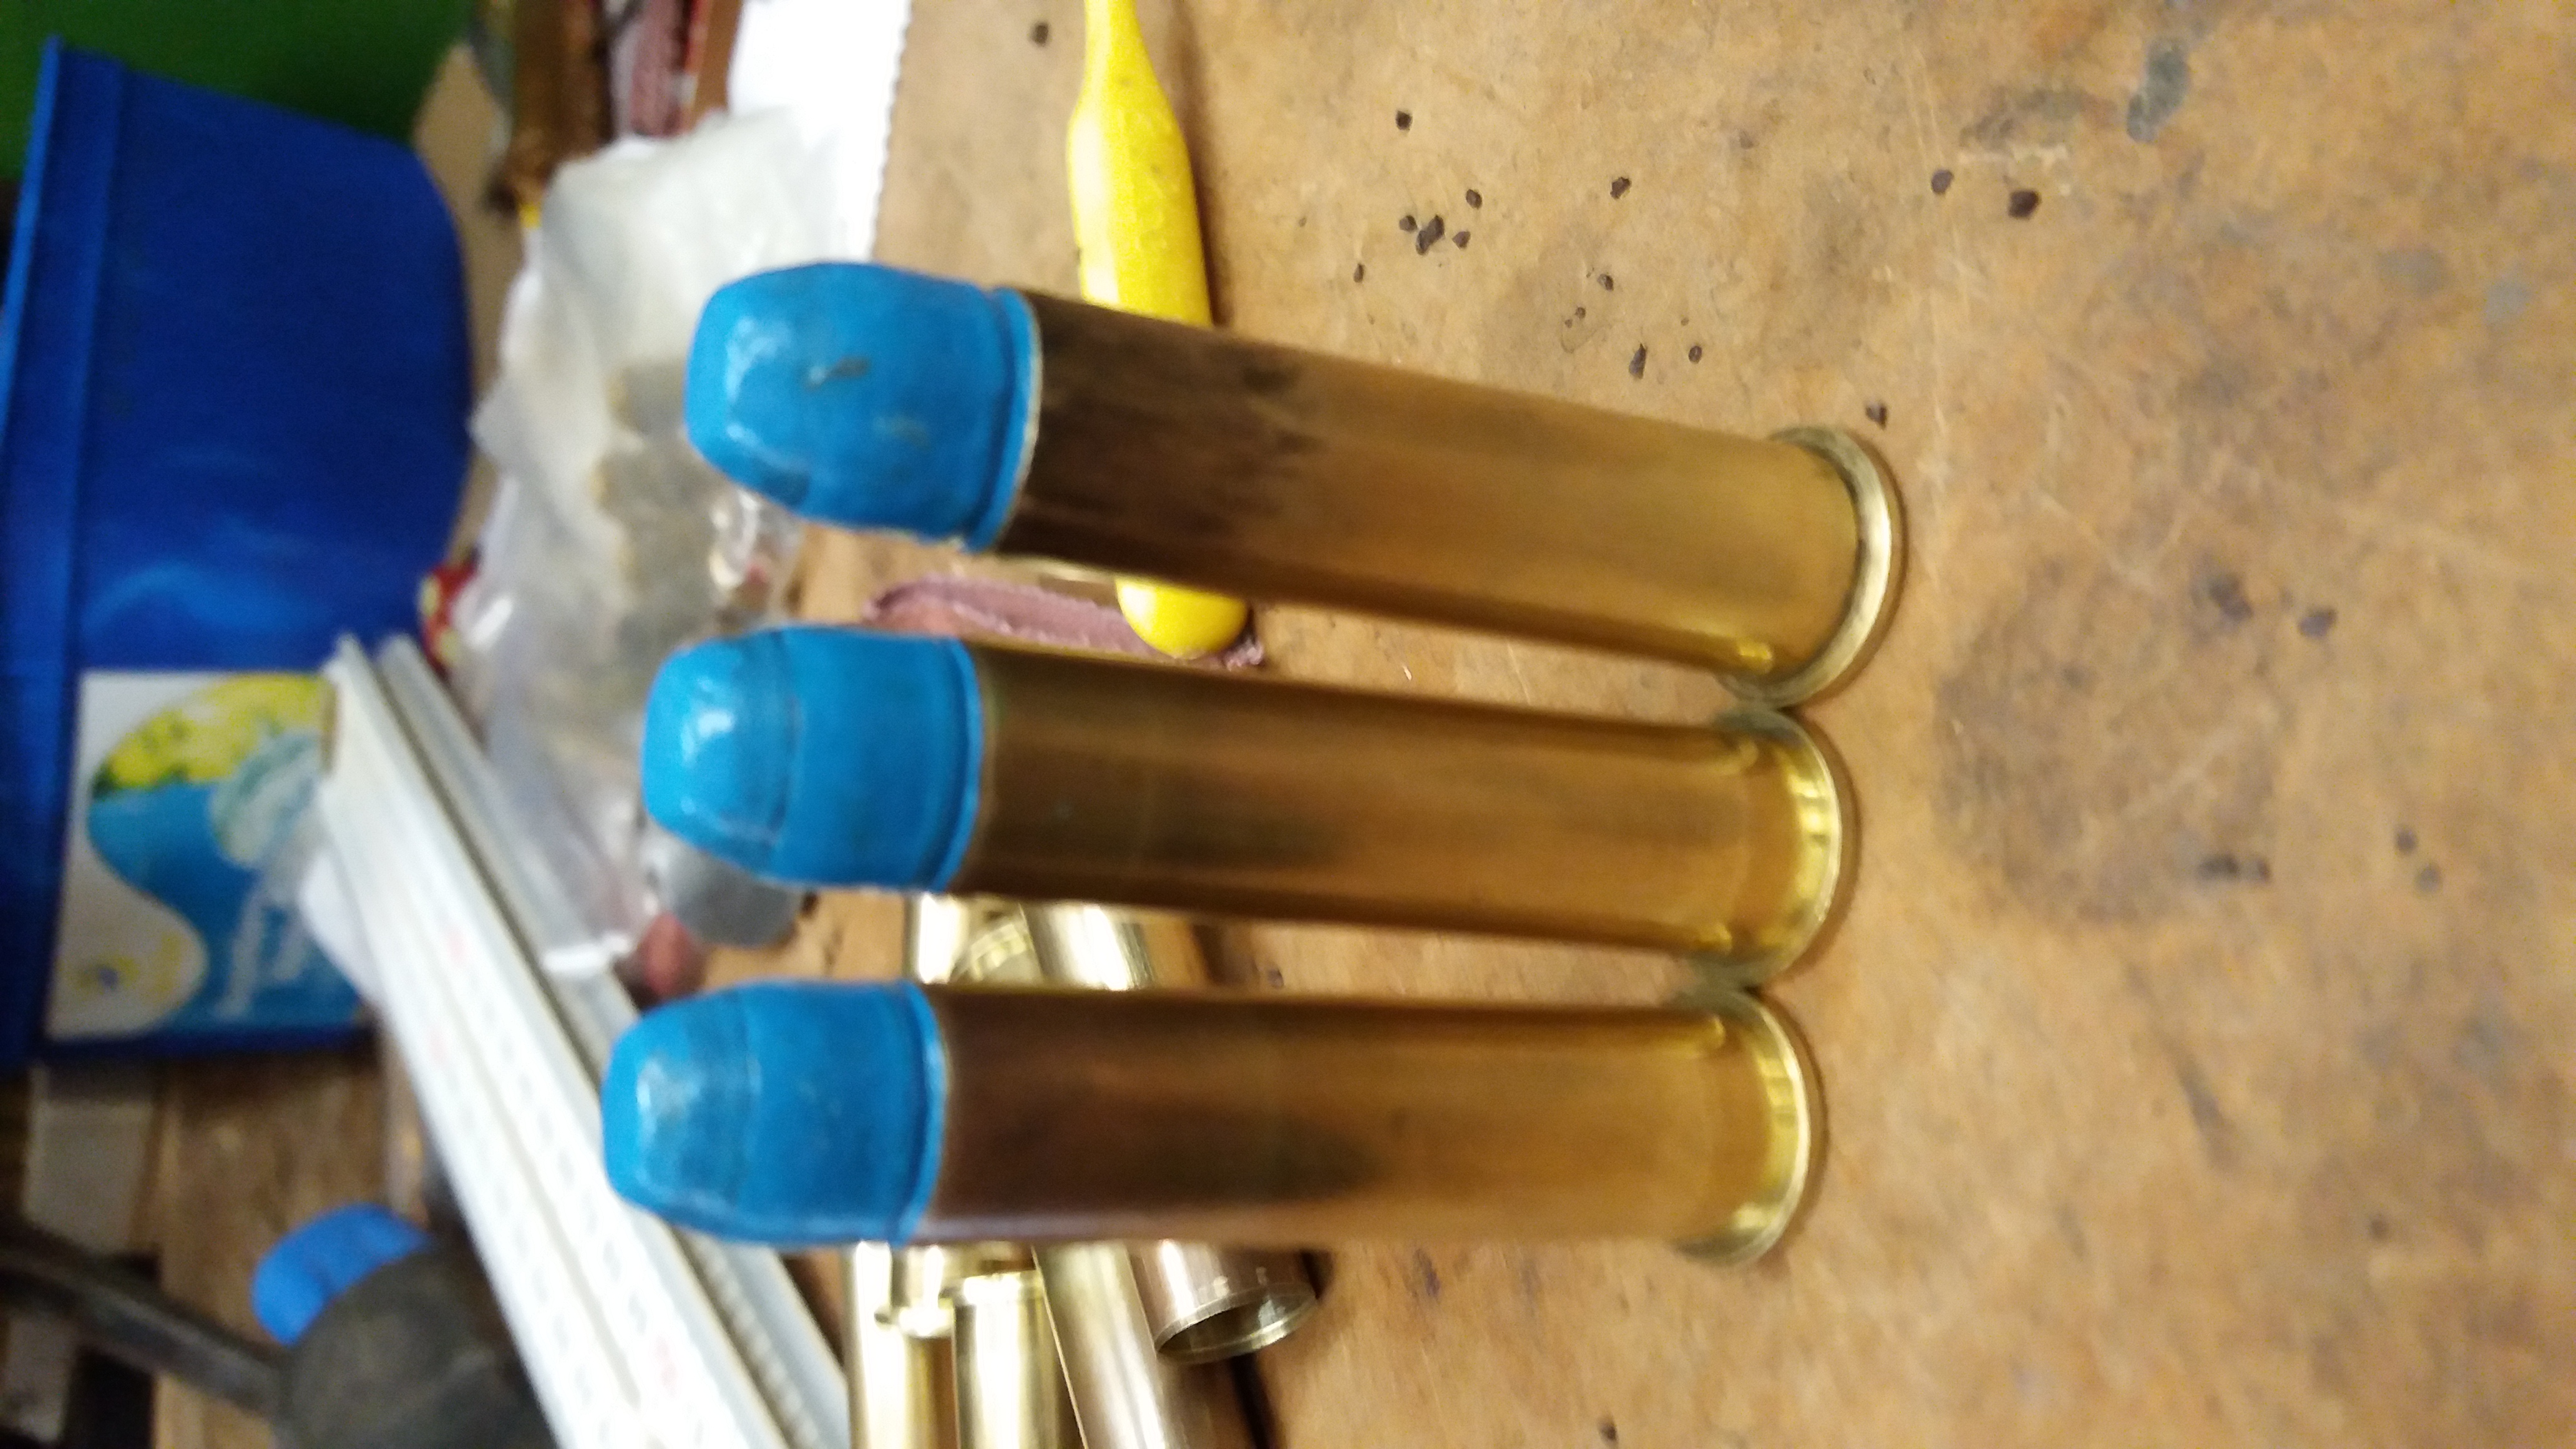
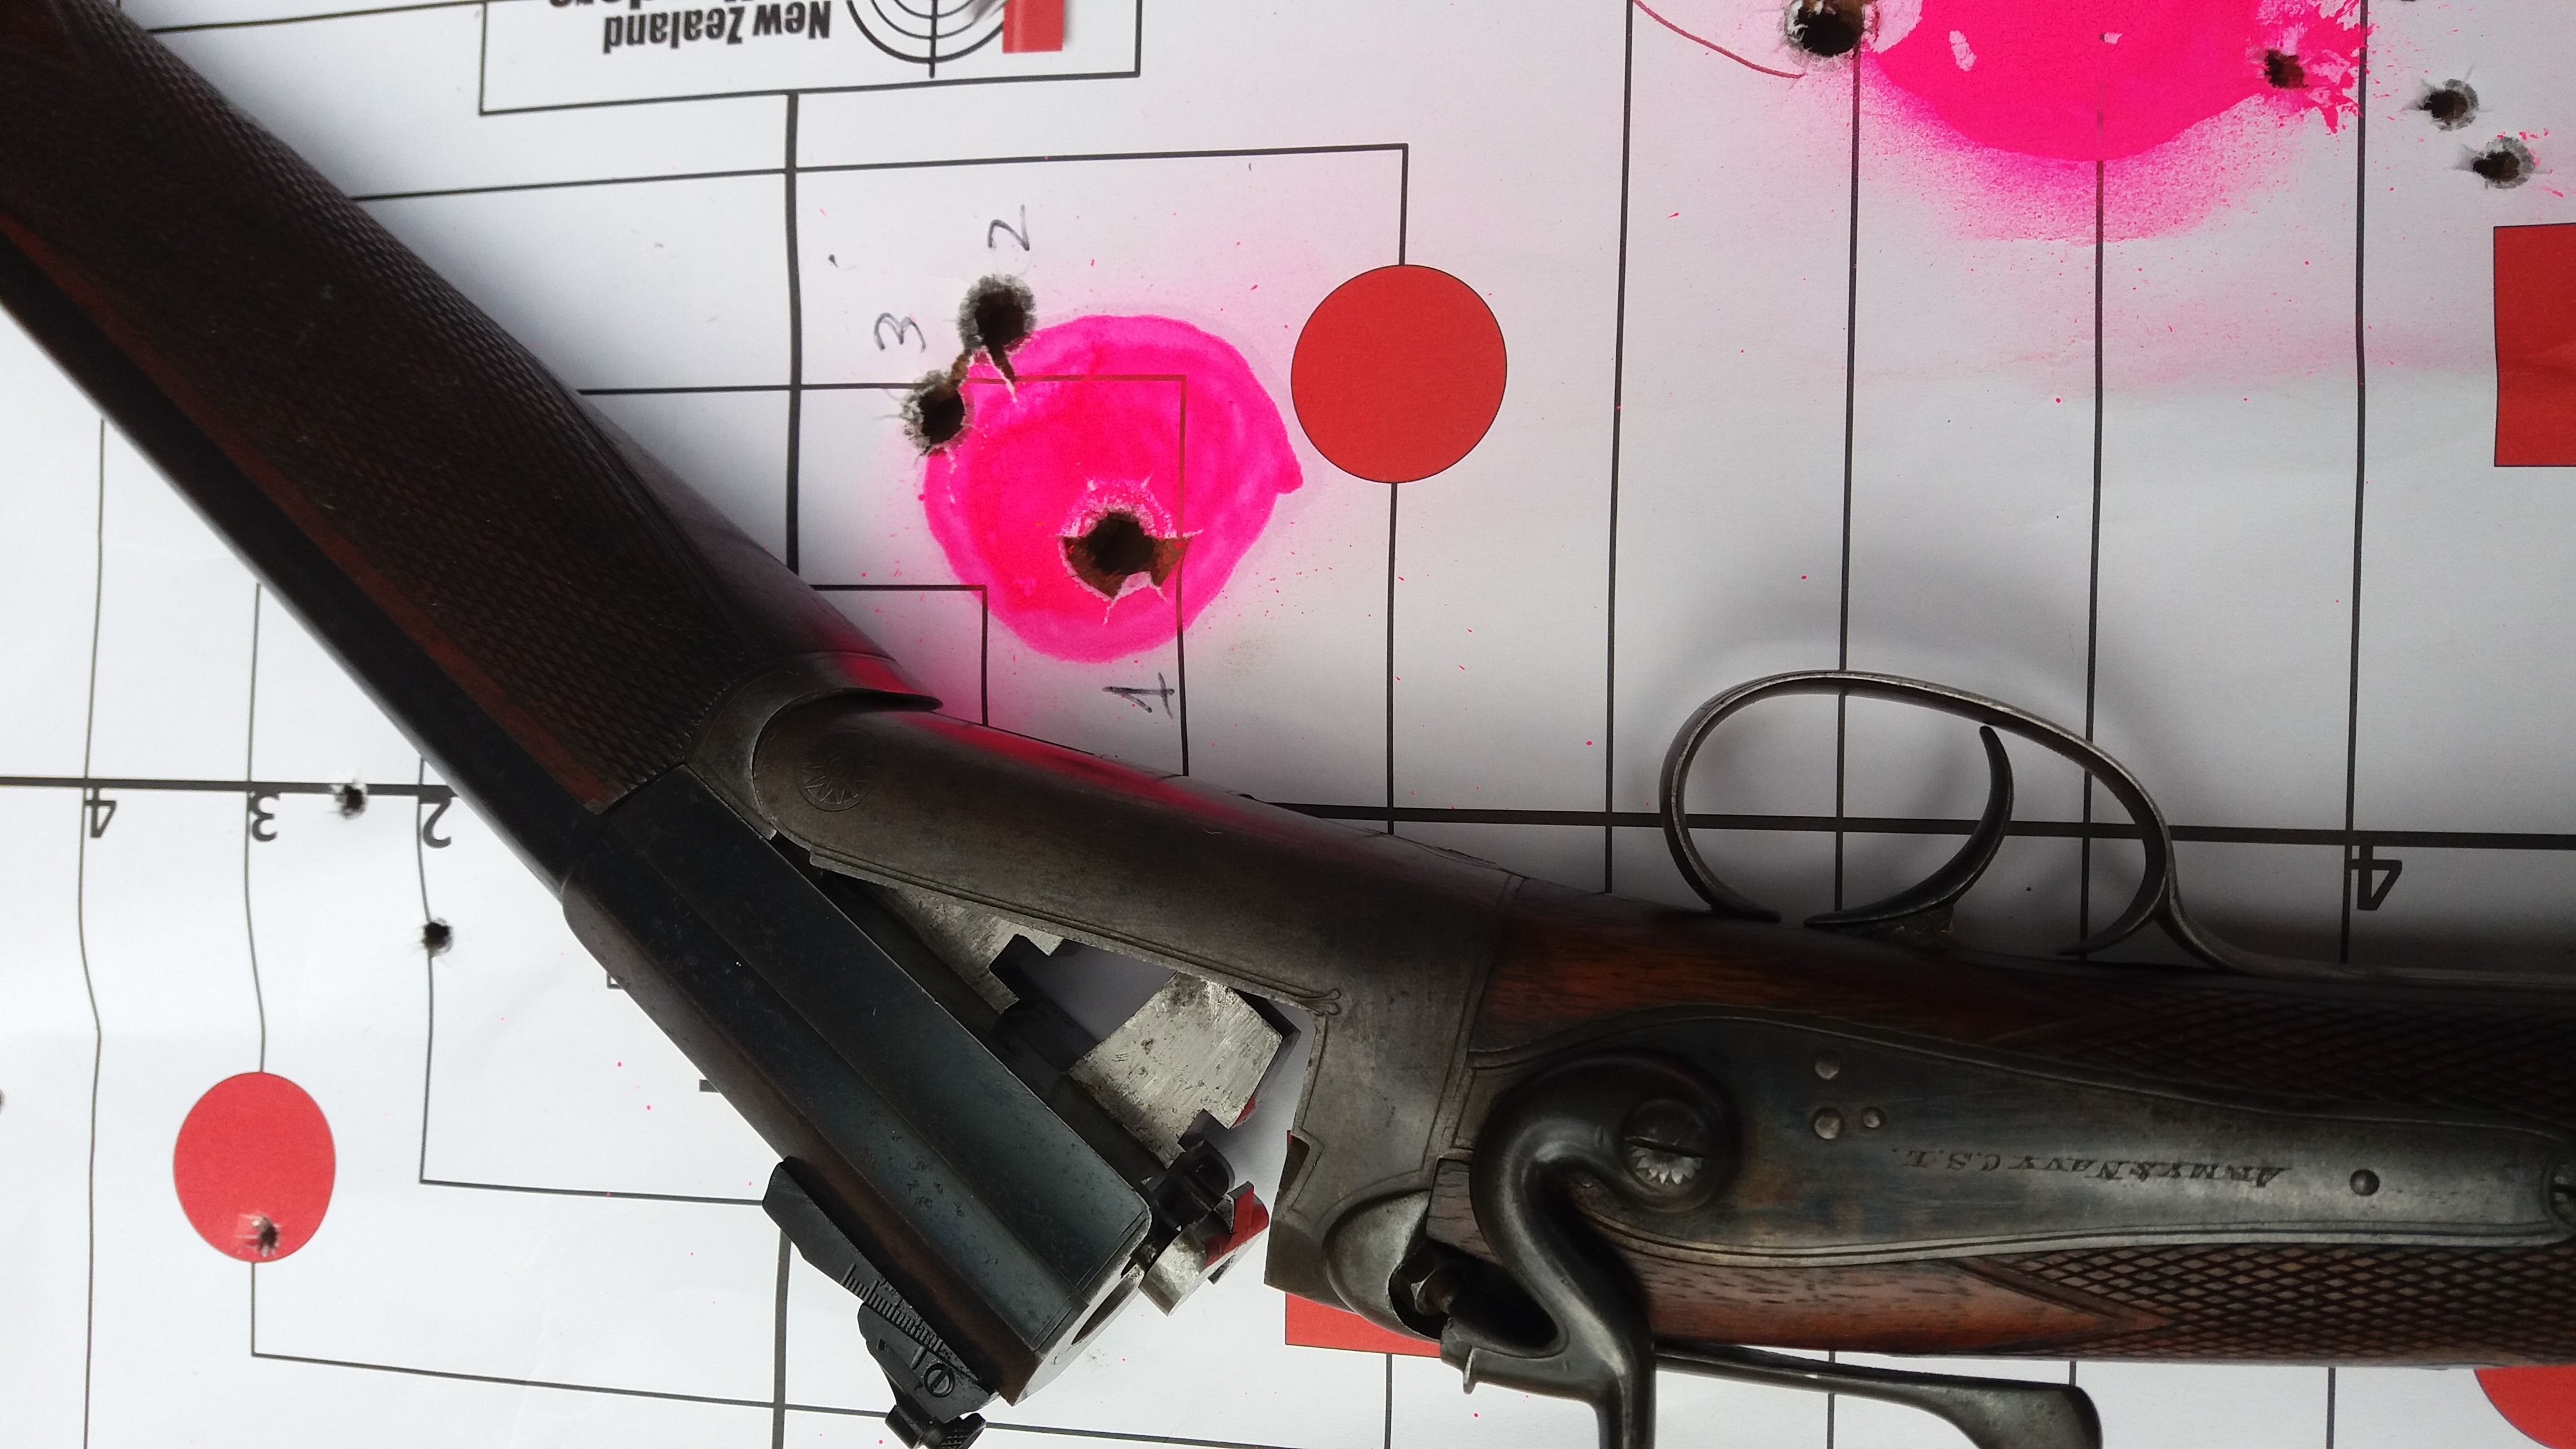
I can confirm that it like Black Powder
360 grain cast powder coated loads. 50 grains 1 1/2 FG and over powder card slightly compressed
 The Church of
John Browning
of the Later-Day Shooter
-
13-05-2024, 02:14 PM #42Member
- Join Date
- Dec 2014
- Location
- canterbury
- Posts
- 5,447
So what the BP cast lead load is screaming at me is that the nitro load that only half filled the case is very inconsistent and that the BP load which is 105% full is very consistent
I had better fire up the lead casting pot and make myself a heap more of those 360 grainers.
And maybe order that Lyman 457122 330 grain hollow point mould I like the look ofkristopher and Micky Duck like this.The Church of
John Browning
of the Later-Day Shooter
-
13-05-2024, 05:56 PM #43Member
- Join Date
- Sep 2013
- Location
- Taupo
- Posts
- 1,163
I've been using orange nail polish on the foresight of my single shot, cheap (ex $2 shop), very bright, waterproof and easily touched up.
akaroa1 likes this.
-
13-05-2024, 06:45 PM #44Member

- Join Date
- May 2014
- Location
- Waikato
- Posts
- 6,426
The same shade you had on your nails at the get together at Simons? Originally Posted by Ross Nolan
Sent from my iPhone using Tapatalk
-
13-05-2024, 06:52 PM #45Member
- Join Date
- Apr 2015
- Location
- Geraldine
- Posts
- 23,058
buy some glow in the dark powder off trademe...dirt cheap...and add a little to the polish..makes huge difference in low light. Originally Posted by Ross Nolan
75/15/10 black powder matters


 Reply With Quote
Similar Threads
-
Vintage Scopes
By gilly in forum Firearms, Optics and AccessoriesReplies: 12Last Post: 14-02-2023, 04:49 PM -
Vintage Equipment
By nevada in forum Reloading and BallisticsReplies: 14Last Post: 20-03-2014, 06:49 AM
Tags for this Thread
 Posting Permissions
- You may not post new threads
- You may not post replies
- You may not post attachments
- You may not edit your posts
Welcome to NZ Hunting and Shooting Forums! We see you're new here, or arn't logged in. Create an account, and Login for full access including our FREE BUY and SELL section Register NOW!!
All times are GMT +13. The time now is 05:58 PM.

Bookmarks