Welcome guest, is this your first visit? Create Account now to join.
  • Login:

Welcome to the NZ Hunting and Shooting Forums.

If this is your first visit, be sure to check out the FAQ by clicking the link above. You may have to register before you can post: click the register link above to proceed.

Delta ZeroPak


User Tag List

+ Reply to Thread
Results 1 to 13 of 13
Like Tree11Likes
  • 6 Post By ubique
  • 1 Post By northdude
  • 2 Post By ubique
  • 2 Post By ubique

Thread: DIY El Cheapo Gun Vise

  1. #1
    Member
    Join Date
    Jul 2014
    Location
    Upper Hutt
    Posts
    561

    DIY El Cheapo Gun Vise

    Bottom line up front:
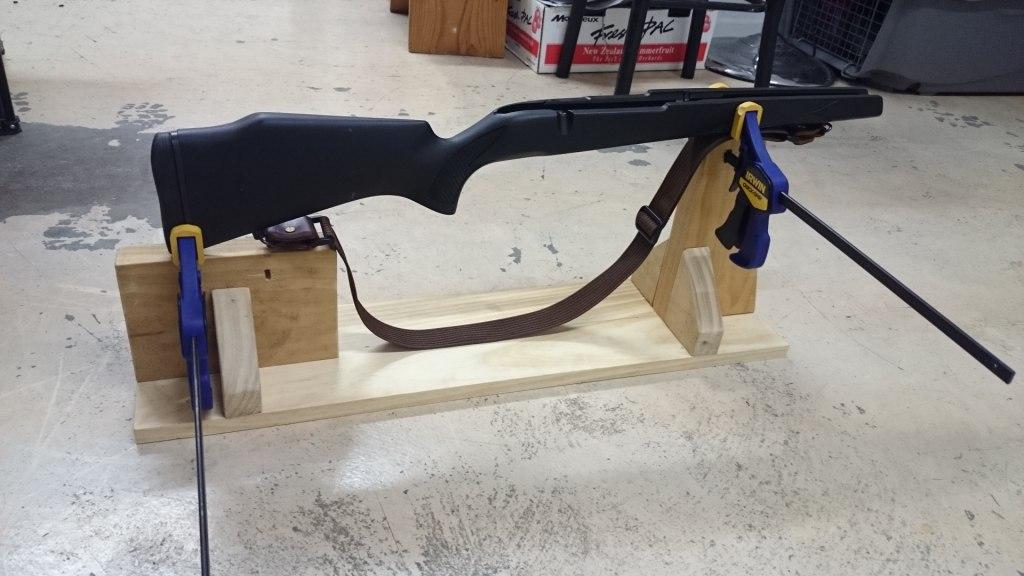
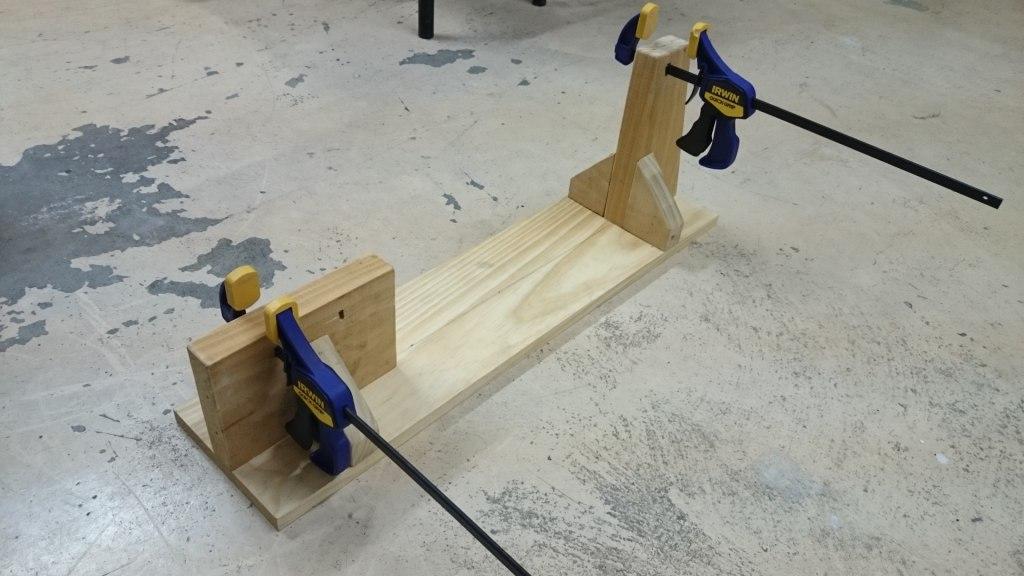
    1 x functional gun vise- Total cost - one afternoon of scribbling on a notepad and cutting wood in the garage. This was built from scrap timber and some wood clamps I had sitting around and most importantly, does the job.

    Name:  DSC_0445.JPG
Views: 21958
Size:  106.2 KB

    I've seen a couple of gun vises around (storebought and DIY) and thought that they would probably be handy for cleaning and doing light rifle modification.
    I haven't seen it done quite this way so thought I would put this up so you can a) you could admire the shoddy workmanship b) marvel at how I didn't die using a power drill and c) improve on this very basic design for your own afternoon projects.

    As it was my day off I decided that I would do something semi-productive (and didn't feel like weeding the garden) so rather than forking out for one of the plastic fantastic vises, I did a little bit of homework on what other people have done.

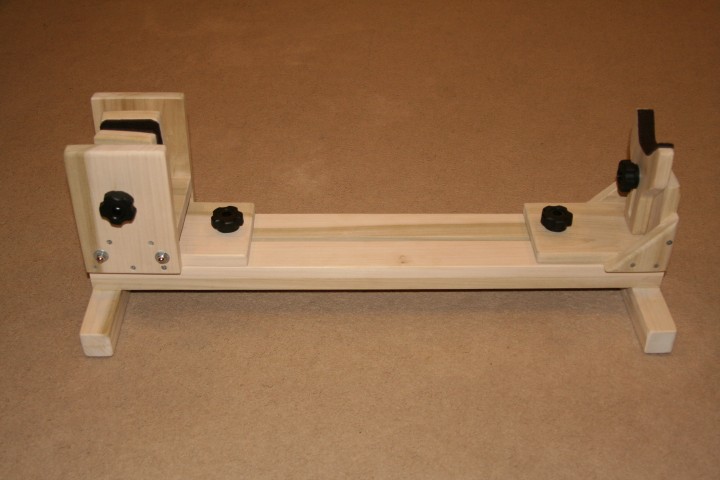
    There were a lot of awesome handmade vises people have put together but they tended to require a higher level of skill, specialized tools and/or expensive materials, all of which I lack.

    for example this work of art that someone else made:

    Name:  1s.jpg
Views: 39695
Size:  72.7 KB

    So I decided to create my own bastardised gun vise to do what I needed it to do:
    -be simple and convenient to use
    -hold firearms securely enough to work on/ clean them
    -hold each type of firearm I own
    -be non-marking
    -be cheap - free
    -not be permanently bench mounted
    -be relatively lightweight/ easily stored/ not a giant monstrosity

    So what I came up with was the idea to incorporate a couple of spare irwin quick grip clamps that I had lying around (2 for $10 at mitre ten bargain bin)
    One-Handed Mini Bar Clamps - Tools - IRWIN TOOLS with some scrap timber I had sitting in the shed. These are the second smallest in their range but are still rated to 140lbs. If you wanted to go really hard out they make 300 and 600lb versions

    I decided to use these clamps at both the barrel and stock ends, as I thought an unsecured barrel end might allow too much wiggle room if trying to do anything significant.

    From there I attached two timber support structures, one taller than the other, to a 750mm base. The taller support structure only has the one hole for mounting the clamp, while the lower, longer support has two holes to allow the clamp to be mounted in different positions to accommodate different length weapons/ provide different angles.

    Name:  DSC_0443.JPG
Views: 11285
Size:  107.4 KB

    All I had to do to install the clamps was drill holes in the timber to fit nice and snug and remove the roll pin from the clamp so that it can be disassembled.

    To use, I just put it on my work bench and hold it there with a g clamp at either end, providing a nice stable work platform.

    When I'm not using it, it is a 2 second job to remove the quick grips if I want to use them for other jobs. The rod on the clamps themselves are quite long (they can open up to over 30cm) so if I decide it really annoys me I might cut them to a more manageable length

    The next steps with this are to add cutouts to hold cleaning rods and bottles etc and add a protective coating to the wood that can handle common firearm cleaning solvents.

    Any suggestions on a good coating would be appreciated as would any other bright ideas for improving this beast.

    Cheers
    cambo, Rich007, nzfubz and 3 others like this.

  2. #2
    Member
    Join Date
    Feb 2013
    Location
    spreydon christcurch.
    Posts
    6,701
    a very productive afternoon in the mancave -well done on the enginuity.

  3. #3
    Member wsm junkie's Avatar
    Join Date
    Dec 2011
    Location
    Northern Rangitikei
    Posts
    1,449
    Cool

  4. #4
    Member Beetroot's Avatar
    Join Date
    Apr 2013
    Location
    Morrinsville
    Posts
    2,820
    Anyone know where you can get those plastic knob things shown in the second picture above?

  5. #5
    Member chrome's Avatar
    Join Date
    Mar 2012
    Location
    wellington
    Posts
    479
    Comac in palmy has all the nobs you could ever need


    Sent from the swamp

  6. #6
    Member stumpy's Avatar
    Join Date
    Feb 2014
    Location
    Delisle SK Canada
    Posts
    1,081
    +1 on comac , they have everything you could ever need ,,,, their catalog is freaking huge
    NO MATTER HOW MUCH IT HURTS, HOW DARK IT GETS OR HOW FAR YOU FALL , .....
    YOU ARE NEVER OUT OF THE FIGHT . (Marcus Luttrell)

  7. #7
    Member
    Join Date
    Dec 2012
    Location
    Wellington
    Posts
    1,786
    good for you, looks well made.
    "I do not wish to be a pawn or canon fodder on the whims of MY Government"

  8. #8
    northdude
    Guest
    Quote Originally Posted by Beetroot View Post
    Anyone know where you can get those plastic knob things shown in the second picture above?
    try the beehive they aren't plastic tho
    big_foot likes this.

  9. #9
    Member
    Join Date
    Jul 2014
    Location
    Upper Hutt
    Posts
    561
    Cheers for the feedback guys. I was cunning enough to tuck the empties out of sight - so I didn't kick off the great tui vs speights vs lion red war of 2015. The next iteration will have to have a bottle holder built into it, just because.

    I have used it a fair bit over the last couple of days and it has massively exceeded expectations. I don't now how I ever got by without it.

    I have used it with a half dozen weapons, in various states of dis-assembly ranging from full rifle, to barreled action to barrel only, and it has accommodated them all perfectly. My absolute favourite thing about it is that I can now easily work on weapons in any orientation at all - muzzle up, muzzle down, action rotated through 360 degrees. It is also solid enough to use to hammer out pins with a punch, which is ideal. I found myself turning a rifle on it's side to hammer out pins with a punch and that made life 100% easier.

    Now I'm planning to make a rack of sorts for cleaning kit and probably finish the whole thing in a polyurethane wood finish to protect it, as it is already accumulating a few oil spots

  10. #10
    Member
    Join Date
    Jul 2014
    Location
    Upper Hutt
    Posts
    561
    I've now decided not to bother with a rack/cutouts for cleaning equipment, as it is just more stuff to get in way and fall off when I hang the vise up. I've also settled on a black truck bed spray, tough, scratch proof and chemical resistant. And best of all, I already have a can lying around. I'll put photos up today or tomorrow when it has dried
    Frogfeatures and stumpy like this.

  11. #11
    Member
    Join Date
    Jul 2014
    Location
    Upper Hutt
    Posts
    561
    Here's a photo of the completed gun vise. Painting is complete and the truck bed coat is nice and grippy and seems pretty robust. I also added a SWR loop to help hold it in place when I hang it up on the wall. The more I use this thing, the more useful I find it.

    Name:  DSC_0457.JPG
Views: 6499
Size:  163.7 KB
    puku and 308 like this.

  12. #12
    Member
    Join Date
    Jul 2014
    Location
    Upper Hutt
    Posts
    561
    This thing is definitely the best weekends work I have ever done. I find myself using it for everything I do, both with the guns and for other tinkering. This thing has just about replaced my bench vise for anything light- medium duty.

    It's just awesome how it can hold anything in any orientation for me to work on
    -my 10/22, stripped to bits for fitting a new charging handle

    Name:  DSC_0624 (1024x576).jpg
Views: 5474
Size:  323.0 KB


Tags for this Thread

Bookmarks

Posting Permissions

  • You may not post new threads
  • You may not post replies
  • You may not post attachments
  • You may not edit your posts
Welcome to NZ Hunting and Shooting Forums! We see you're new here, or arn't logged in. Create an account, and Login for full access including our FREE BUY and SELL section Register NOW!!