


 LinkBack URL
 About LinkBacks
Nothing particularly special here, after collecting my 22 that had been in Dads gun safe for many years it suddenly felt very short and not particularly comfortable to hold. First step was stripping the stock, most of the crap on there came off pretty easily with a linbide scraper. Then I sanded as bit of shape into the hand grip area. The for end was a bit munted from having a home made bipod screwed onto it so that was cut off. Then basically all I did was roughly cut out some bits of mahogany and glue them on with epoxy (and a filleting/gluing powder and black pigment). A bit more sanding and a few coats of tung oil an it doesnt look too bad.
![Name: 20160613_124018[1].jpg
Views: 3284
Size: 1,006.8 KB](https://www.nzhuntingandshooting.co.nz/attachments/f53/50587d1465779045-jw15-modifications-20160613_124018%5B1%5D.jpg)
Welcome guest, is this your first visit? Create Account now to join.
Welcome to the NZ Hunting and Shooting Forums.
Search Forums


User Tag List
+ Reply to Thread
Results 1 to 13 of 13
 20Likes
Thread: Jw15 modifications
Hybrid View
-
13-06-2016, 01:52 PM #1Member

- Join Date
- Jan 2016
- Location
- Omaru
- Posts
- 565
Jw15 modifications
-
13-06-2016, 02:30 PM #2Member

- Join Date
- Dec 2012
- Location
- JAFA
- Posts
- 4,926
Sweet, well done...
 While I might not be as good as I once was, Im as good once as I ever was!
Rule 4: Identify your target beyond all doubt
-
13-08-2016, 05:30 PM #3Member
- Join Date
- Jan 2016
- Location
- Omaru
- Posts
- 565
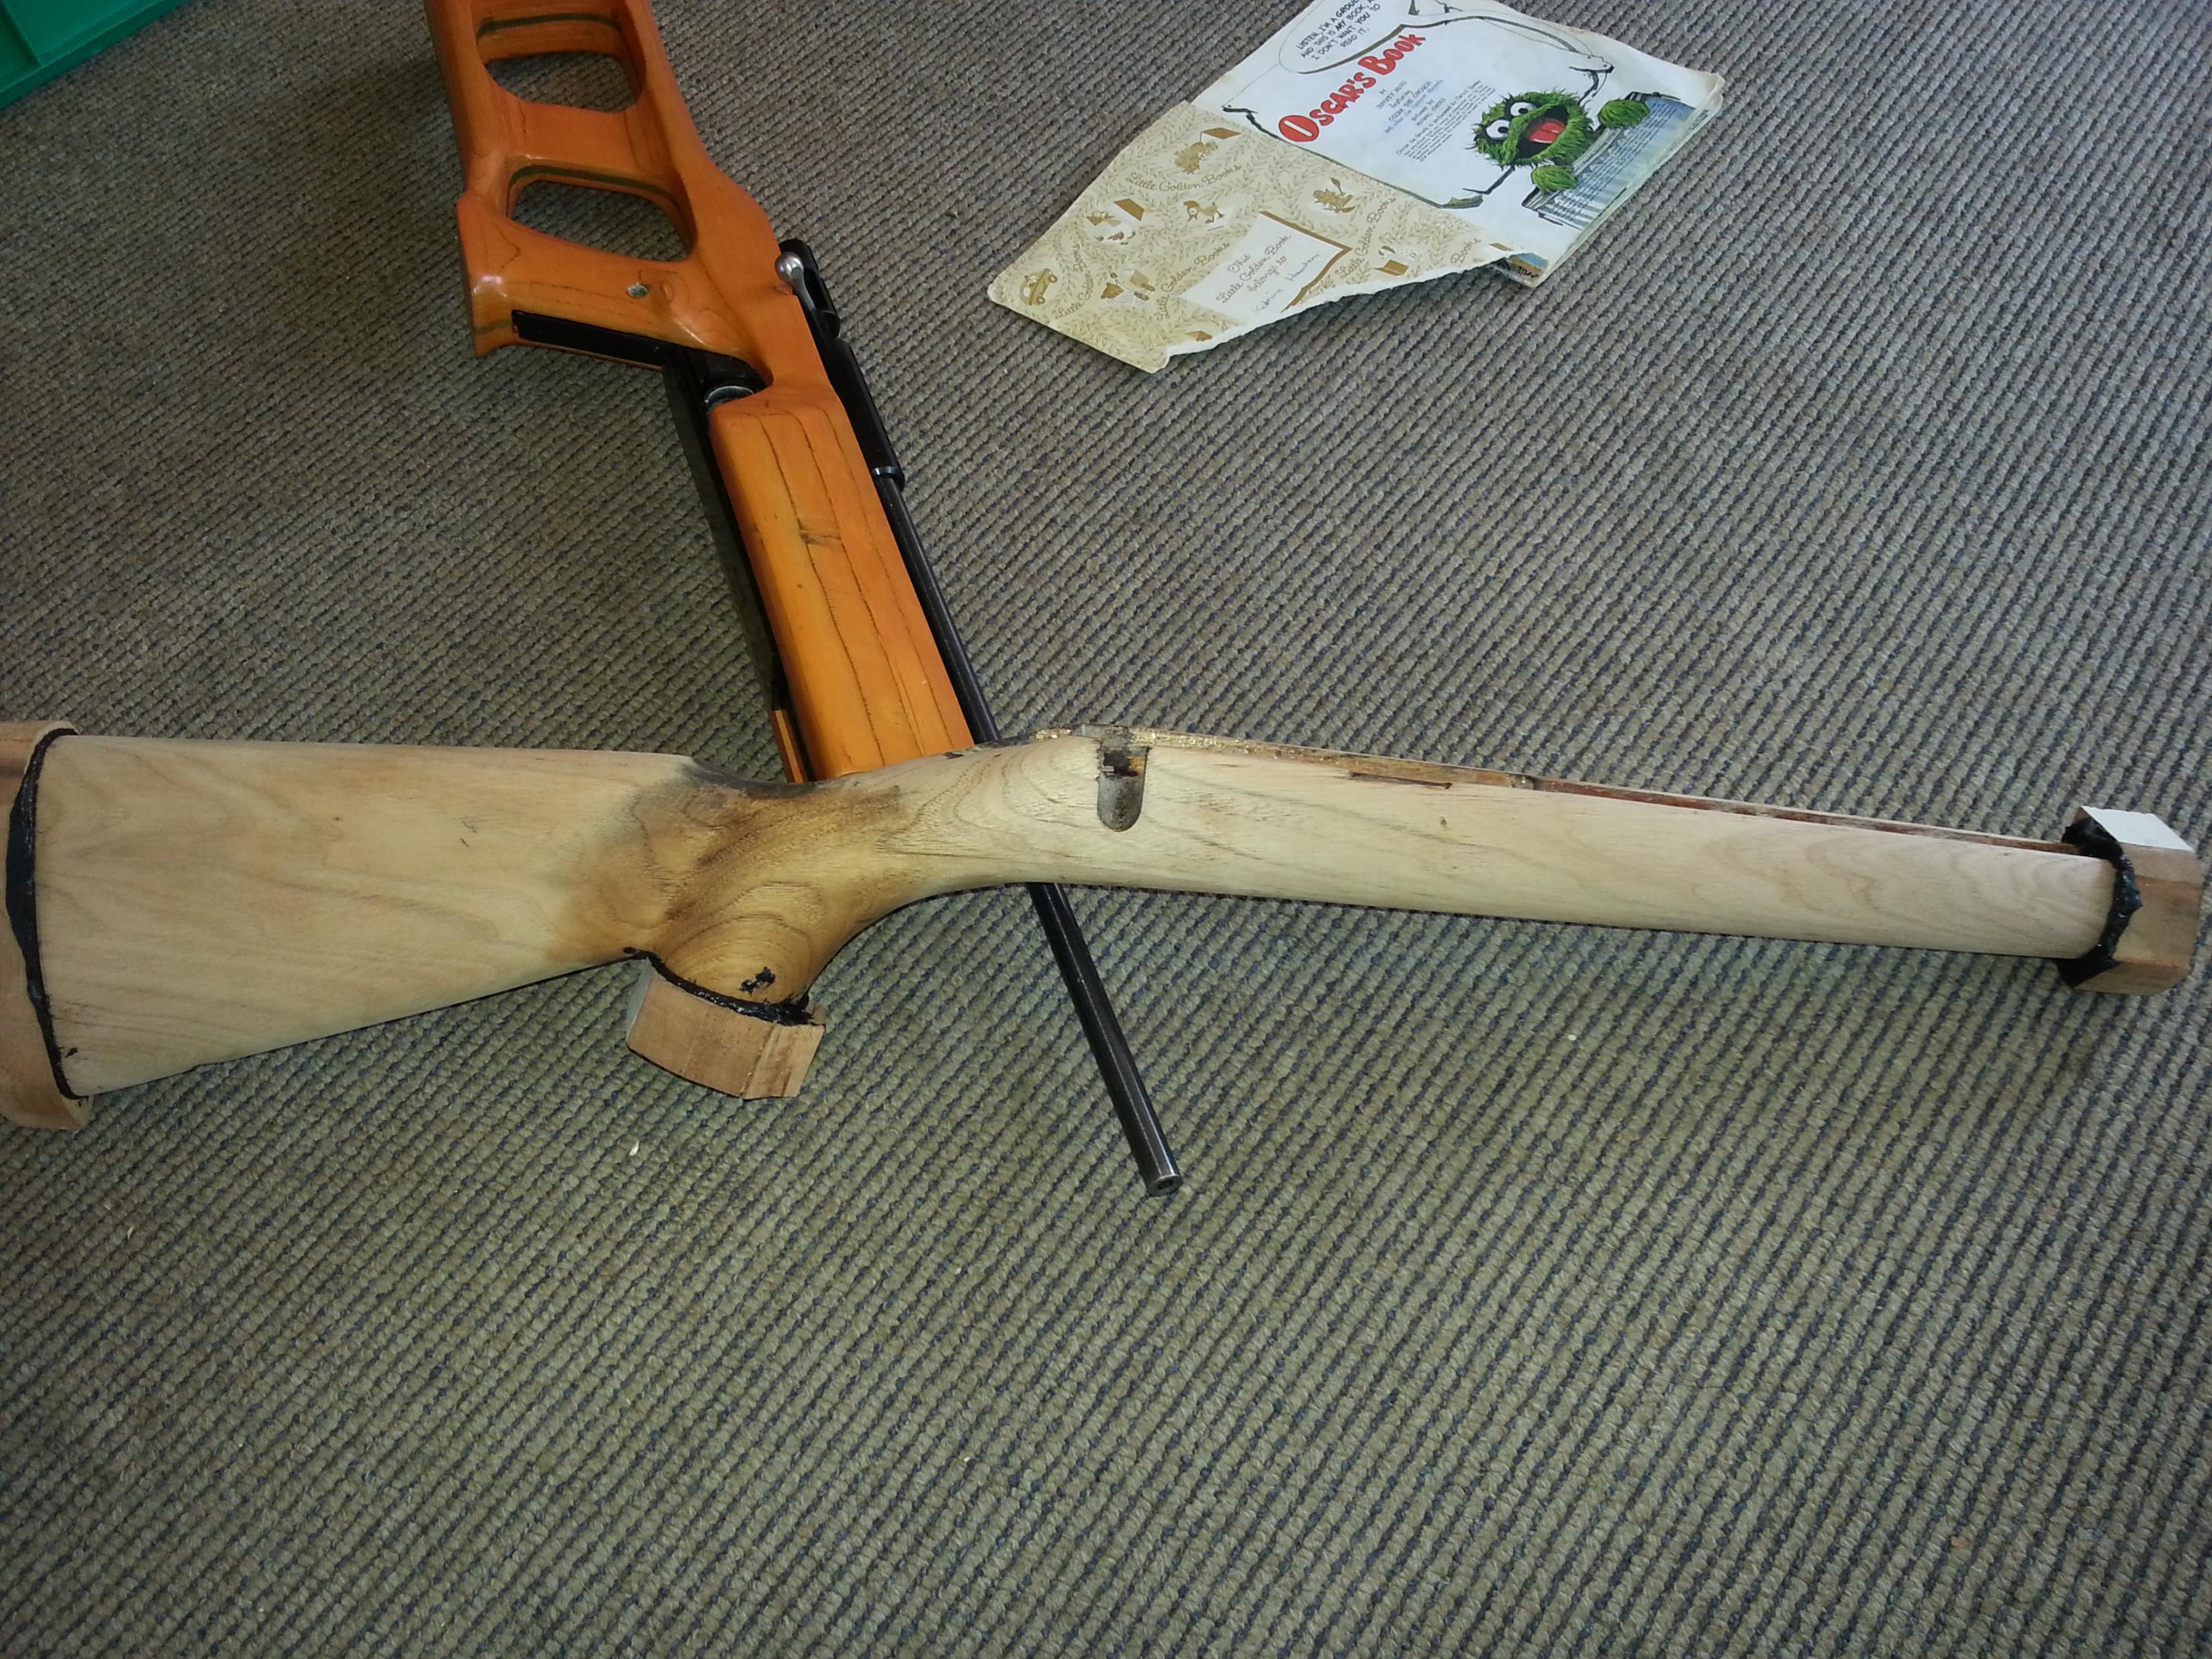
I was planning on making a new stock for this and had some rimu laying around (part of a door frame), there is a lot of this around the place in chch at the moment, anyway the plan was to glue two pieces together to get the required thickness and partially inlet them before I glued them. I cut out the rough shape I wanted and decided to have a practice run at in-letting with the bits I cut off, this was mostly successful so I collected up the other scraps I had laying around to make a stock. All of the joins have a couple of layers of glass in them to try and keep the rimu from splitting, there are a lot of joins as I didnt have any decent sized bits of wood. Unfortunately the first go at bedding the action failed so I had to split the top off the stock to get the action out and then soak it in acetone. Then some how I miss measured and the pistol grip ended up 20mm too far forward for the trigger. A new trigger was much quicker to make than mucking around with wood, although the stock is too long now..... still a work in progress
![Name: 20160614_142005[1].jpg
Views: 3185
Size: 496.5 KB](https://www.nzhuntingandshooting.co.nz/attachments/f53/53825d1471062498-jw15-modifications-20160614_142005%5B1%5D.jpg)
![Name: 20160813_153053[1].jpg
Views: 3126
Size: 514.0 KB](https://www.nzhuntingandshooting.co.nz/attachments/f53/53826d1471062505-jw15-modifications-20160813_153053%5B1%5D.jpg)
![Name: 20160813_154203[1].jpg
Views: 3265
Size: 399.0 KB](https://www.nzhuntingandshooting.co.nz/attachments/f53/53827d1471062511-jw15-modifications-20160813_154203%5B1%5D.jpg)
![Name: 20160813_153957[1].jpg
Views: 3431
Size: 487.0 KB](https://www.nzhuntingandshooting.co.nz/attachments/f53/53828d1471062517-jw15-modifications-20160813_153957%5B1%5D.jpg) HILLBILLYHUNTERS and sometimes like this.
HILLBILLYHUNTERS and sometimes like this.
-
13-08-2016, 10:16 PM #4Member
- Join Date
- Jan 2016
- Location
- Omaru
- Posts
- 565
Had a bit more of a play with this once the kids were in bed. Took a bit of work to get the trigger into the stock, once it was in the pull was lighter than the original and a lot smoother. There are a few reasons for this, first the sear engagement with the original trigger is set by the shape of the trigger stamping and sits against the bottom of the receiver, this was a bit tricky to meassure (and make accuratly) so I put the additional grub screw close to the pivot. This is further away from the pivot than the original contact point. This screw could be used to control sear engagement but Im not so keen on that as there isnt a lot of engagement to start with but it can be set so there is no slop in the trigger, when set like this with the second screw out it is a reasonably light single stage trigger. As the second screw is wound it it becomes 2 stage again with a slightly lighter pull than the original. The second screw is in the same position as the original one but is much bigger, I found the origninal one had been cutting a groove into the bottom of the recevier making it quite gritty. I filed then stonned the bottom of the recever to get rid of the groove, the brass screws should wear before the recever.
-
13-08-2016, 10:50 PM #5Member
- Join Date
- Feb 2016
- Location
- Stewart island / canterbury
- Posts
- 9,193
Hmmm might have to give this a go when I get back to my workshop, got a 10/22 that I could muck around with and plenty of spare timber. Totara railway sleeper should do it!
-
04-09-2016, 11:43 AM #6Member
- Join Date
- Jan 2016
- Location
- Omaru
- Posts
- 565
So the plans with this have changed slightly, was in at Guncity the other day and they had a very beat up JW15 on the rack for $100 which was too much but picked it up on sale for $75 yesterday. Other than the buggered stock the firing pin didnt engage on the sear all the time and the base plate slid off the bottom of the 10rnd magazine, the barrel looks ok and has been cut down and threaded. So basically I took a gamble that looks like it should shoot ok and is cheaper than cutting down the one I had.
Anyway I pulled it apart and the sear has either been ground down or worn down from rubbing on the file like surface of the underside of the firing pin so it didnt have enough engagement. It was also quite rounded so it got attacked with a fine stone. This does change the angle and remove even more engagement, however the trigger blade I made can adjust the engagement so this isnt a problem anymore, alternatively you could file down the original trigger just in front of the 2nd stage screw to restore engagement.
![Name: 20160903_145322[1].jpg
Views: 2944
Size: 571.8 KB](https://www.nzhuntingandshooting.co.nz/attachments/f53/55099d1472941452-jw15-modifications-20160903_145322%5B1%5D.jpg)
The bolt got dismantled and deburred, especially the protrusion that picks up the round, all three sides of this were smoothed out with a diamond lap, the sharp edges were taken off the extractor pin grooves and the extractors were deburred and the edges broken (except the hooks). The firing pin was smoothed on the bottom surface that runs on the sear and the back end that is broached or shaped was cleaned up. The magazine guide/ejector was also cleaned up with a diamond lap and the burr in the action from the locking lugs was taken off.
![Name: 20160903_131527[1].jpg
Views: 2937
Size: 519.8 KB](https://www.nzhuntingandshooting.co.nz/attachments/f53/55100d1472942186-jw15-modifications-20160903_131527%5B1%5D.jpg)
It engages the sear 100% now and wont disengage with vigorous banging on the floor. Im not keen to chamber live rounds at home but surprisingly it will feed 10 fired shells perfectly so Im going to assume it will work.
What other bits are people cleaning up on these? NZrimfire seems to be pretty dead now days
-
11-09-2016, 01:49 PM #7Member
- Join Date
- Jan 2016
- Location
- Omaru
- Posts
- 565
Had a bit more of a play with these, it would be interesting to know how many of these have to be reworked at the factory to be functional. The two I have start with 92 and 93 so presumably that is the manufacture year. The older one which I have had from new works fine, the newer one doesn't (kind of). Measuring them and comparing components the sear is located almost 2mm further forward on the newer gun. This means that the safety is almost unusable and there is no half cock position on the bolt, if the trigger is pulled with the bolt in the half cock position it will close and release the firing pin (it may or may not fire though). The bolts and receivers are remarkably similar though. Interestingly the length of pull on the newer stock is 10mm longer.
Onto the modifications, put a bit of shape in the trigger, doesnt look like a piece of keysteel anymore, and a trigger guard, base metal and extended the magazine release.
![Name: 20160911_121147[1].jpg
Views: 2947
Size: 320.8 KB](https://www.nzhuntingandshooting.co.nz/attachments/f53/55445d1473554948-jw15-modifications-20160911_121147%5B1%5D.jpg)
![Name: 20160911_121137[1].jpg
Views: 3005
Size: 346.8 KB](https://www.nzhuntingandshooting.co.nz/attachments/f53/55446d1473554981-jw15-modifications-20160911_121137%5B1%5D.jpg) Maca49 and Frogfeatures like this.
Maca49 and Frogfeatures like this.
-
21-11-2016, 07:26 AM #8Member
- Join Date
- Jan 2016
- Location
- Omaru
- Posts
- 565
Got a little bit more done on this, had a go at stippling the stock, out of all the bits and pieces around the place that I found one of those cheap diamond burrs in the dremel worked the best, just a ball about 3mm dia. It would have looked neater if I had carved a boarder in but I didnt have anything to do that neatly and got impatient and went on to oiling it. It has about 4 coats of tung oil on it now. The next step is to have a go at phosphating the but plate and trigger guard.
![Name: 20161120_211606[1].jpg
Views: 2950
Size: 440.6 KB](https://www.nzhuntingandshooting.co.nz/attachments/f53/59307d1479666339-jw15-modifications-20161120_211606%5B1%5D.jpg)
-
21-11-2016, 11:02 AM #9Ejected
- Join Date
- Dec 2012
- Location
- HBC, NORTH of Auckland
- Posts
- 5,249
I was looking at that photo for ages before I noticed the rabbit.
-
21-11-2016, 07:32 PM #10Member
- Join Date
- Jan 2016
- Location
- Omaru
- Posts
- 565
Ironically the rabbit is probably a more socially responsible pet to have than a cat, but that gun will hopefully get a few rabbits! He mostly hops around inside, we did choose one with a colour that matched the carpet though, and hes got a litter box in the corner Originally Posted by Nibblet

-
21-11-2016, 12:11 PM #11Member
- Join Date
- Jun 2015
- Location
- christchurch
- Posts
- 18,569
nice job, the jw15 shoots well for the money but is generally a bit rough looking off the shelf.
how does it shoot and what stock oil did you use ???Kiwi-Hunter likes this.
-
21-11-2016, 07:37 PM #12Member
- Join Date
- Jan 2016
- Location
- Omaru
- Posts
- 565
I havent tried this one yet it had a very rough stock and didnt cock properly all the time, it was only $75 at the last gun city sale so even if it is average it wont be too much of a loss since the magazine feeds fine, it does look ok inside and the new trigger works better than the original ones but with a bit more travel. The stock is just bits of Rimu glues together with epoxy and glass in each join to try and stop it cracking. The oil is Pure Tung oil from here: Tung Oil Originally Posted by gonetropo
-
23-11-2016, 08:56 PM #13Member

- Join Date
- Feb 2015
- Location
- Rabbitvegas
- Posts
- 2,619
Mate that's an awesome effort, great skill's and something that's unique. I have an old JW 15A that I picked up cheap. When I say cheap it was $200 but the stock and metal work are unmarked and the salesman didn't look at it to closely but after I paid for it I pointed out it had a Burris scope on it, made in the USA and although a little scratched the glass is perfect .... BONUS
Got a suppressor which I had to drill out a little as the bore isn't centered in the barrel and the bullets were clipping the edge of the suppressor on the way out, not good but once that was sorted it shoots very very well, stupid well for the rough engineering and price.
It's interesting you have noticed slight differences in the manufacturing between the older and newer models.
Been a few posts about the JW15 on the forum over the past and the general consensus is the older early models are better.
Mine seems to have a tight chamber as after 300 rds it starts to become harder to feed ammo. Clean it and it great again, wax build up ??
Be interested to hear how it shoots, .....cool looking rabbit, despite shooting thousands of them I reckon they are cool little guys.


 Reply With Quote
Similar Threads
-
Bipod modifications (inspired by ChrisF)
By kimjon in forum Projects and Home BuildsReplies: 11Last Post: 02-08-2015, 11:08 PM -
JW15 ejector
By Savage1 in forum Firearms, Optics and AccessoriesReplies: 11Last Post: 06-07-2014, 09:52 PM -
jw15 problem
By northdude in forum Firearms, Optics and AccessoriesReplies: 9Last Post: 26-11-2013, 05:51 PM -
Tikka T3 Modifications
By 300winmag in forum Projects and Home BuildsReplies: 15Last Post: 22-12-2012, 10:37 PM
Tags for this Thread
 Posting Permissions
- You may not post new threads
- You may not post replies
- You may not post attachments
- You may not edit your posts
Welcome to NZ Hunting and Shooting Forums! We see you're new here, or arn't logged in. Create an account, and Login for full access including our FREE BUY and SELL section Register NOW!!
All times are GMT +13. The time now is 03:47 AM.

Bookmarks