

 22Likes
 LinkBack URL
 About LinkBacks
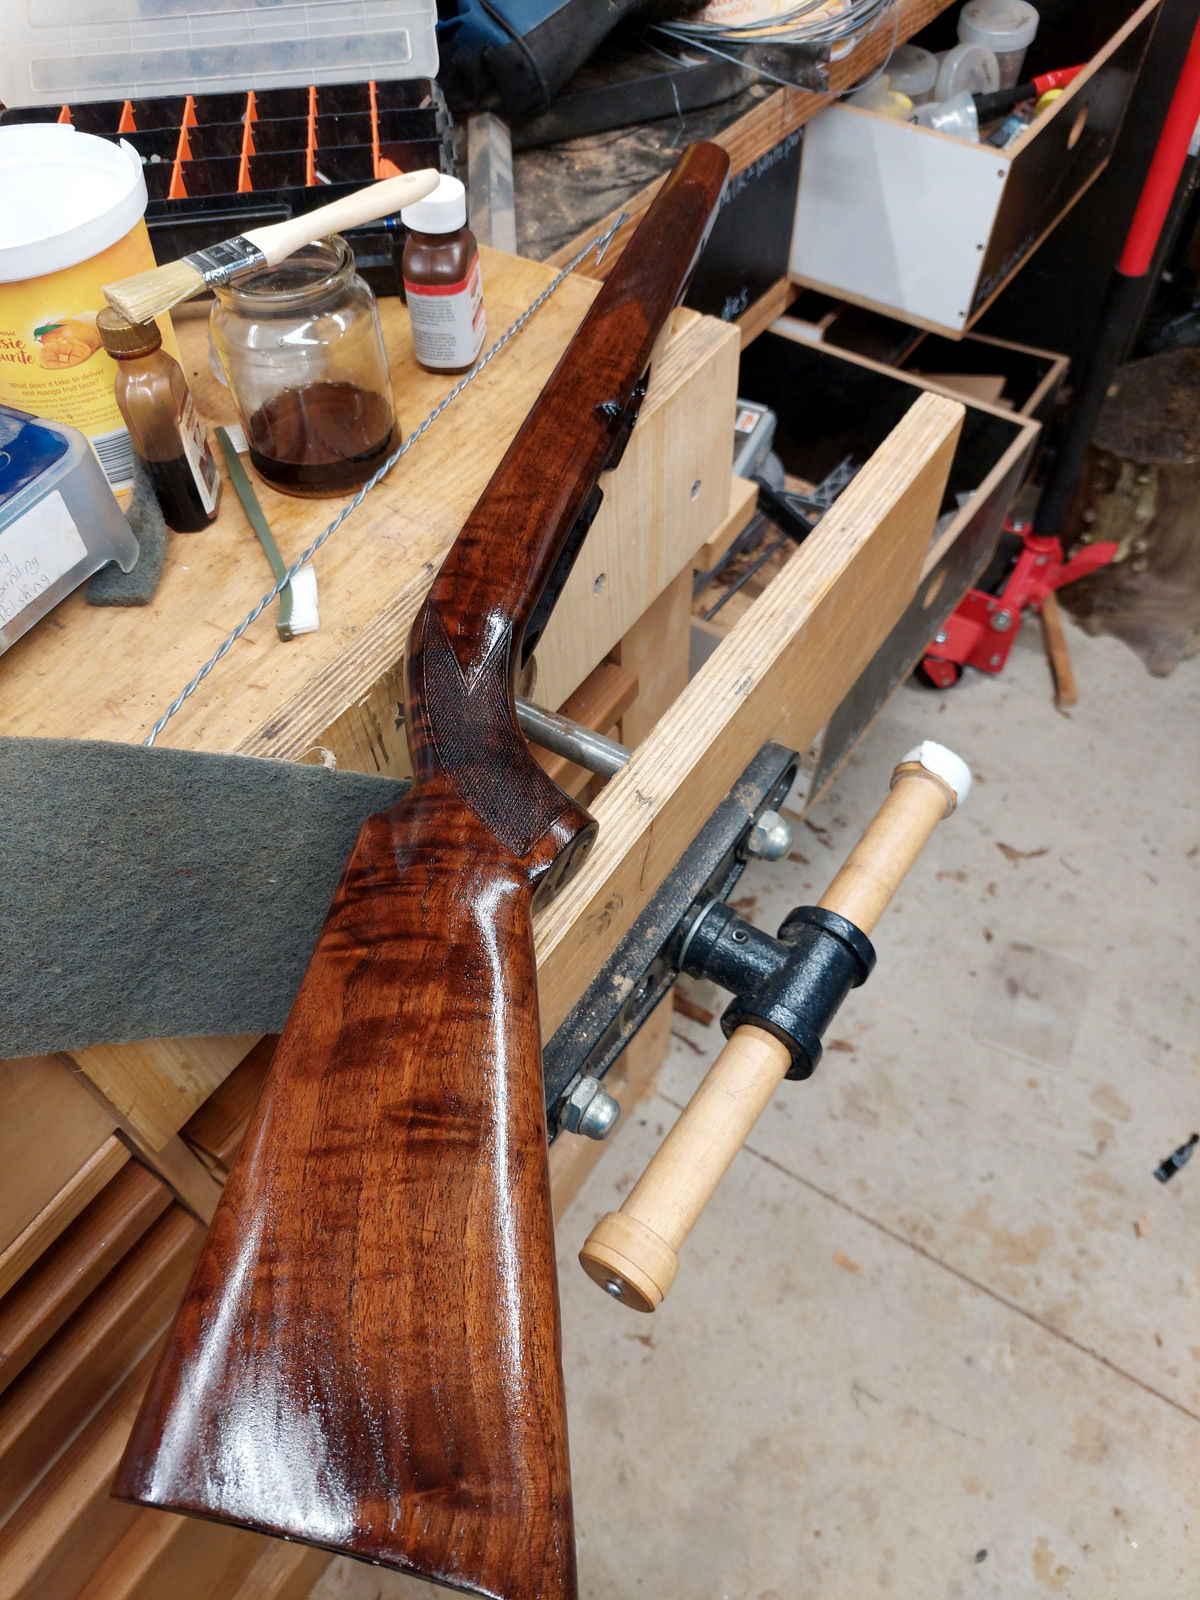
Been working on restoring a 1961 Winchester Model 88 and it's going nicely.
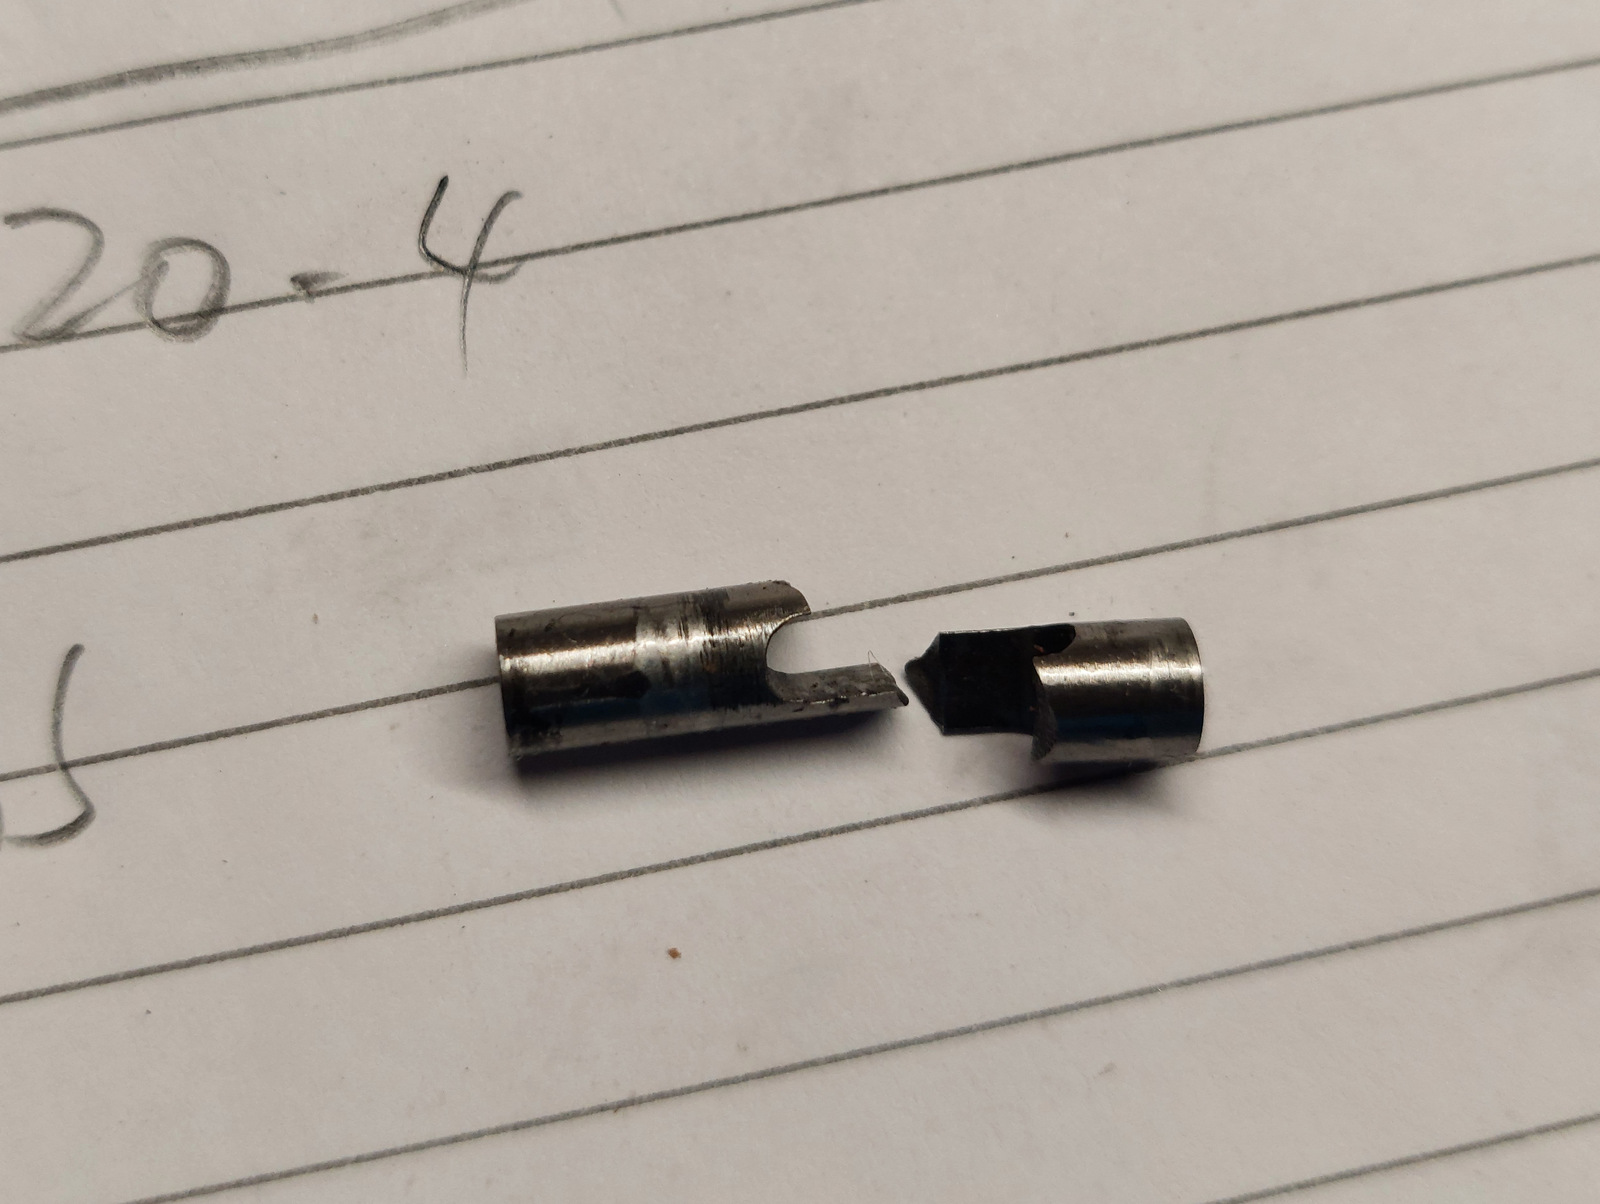
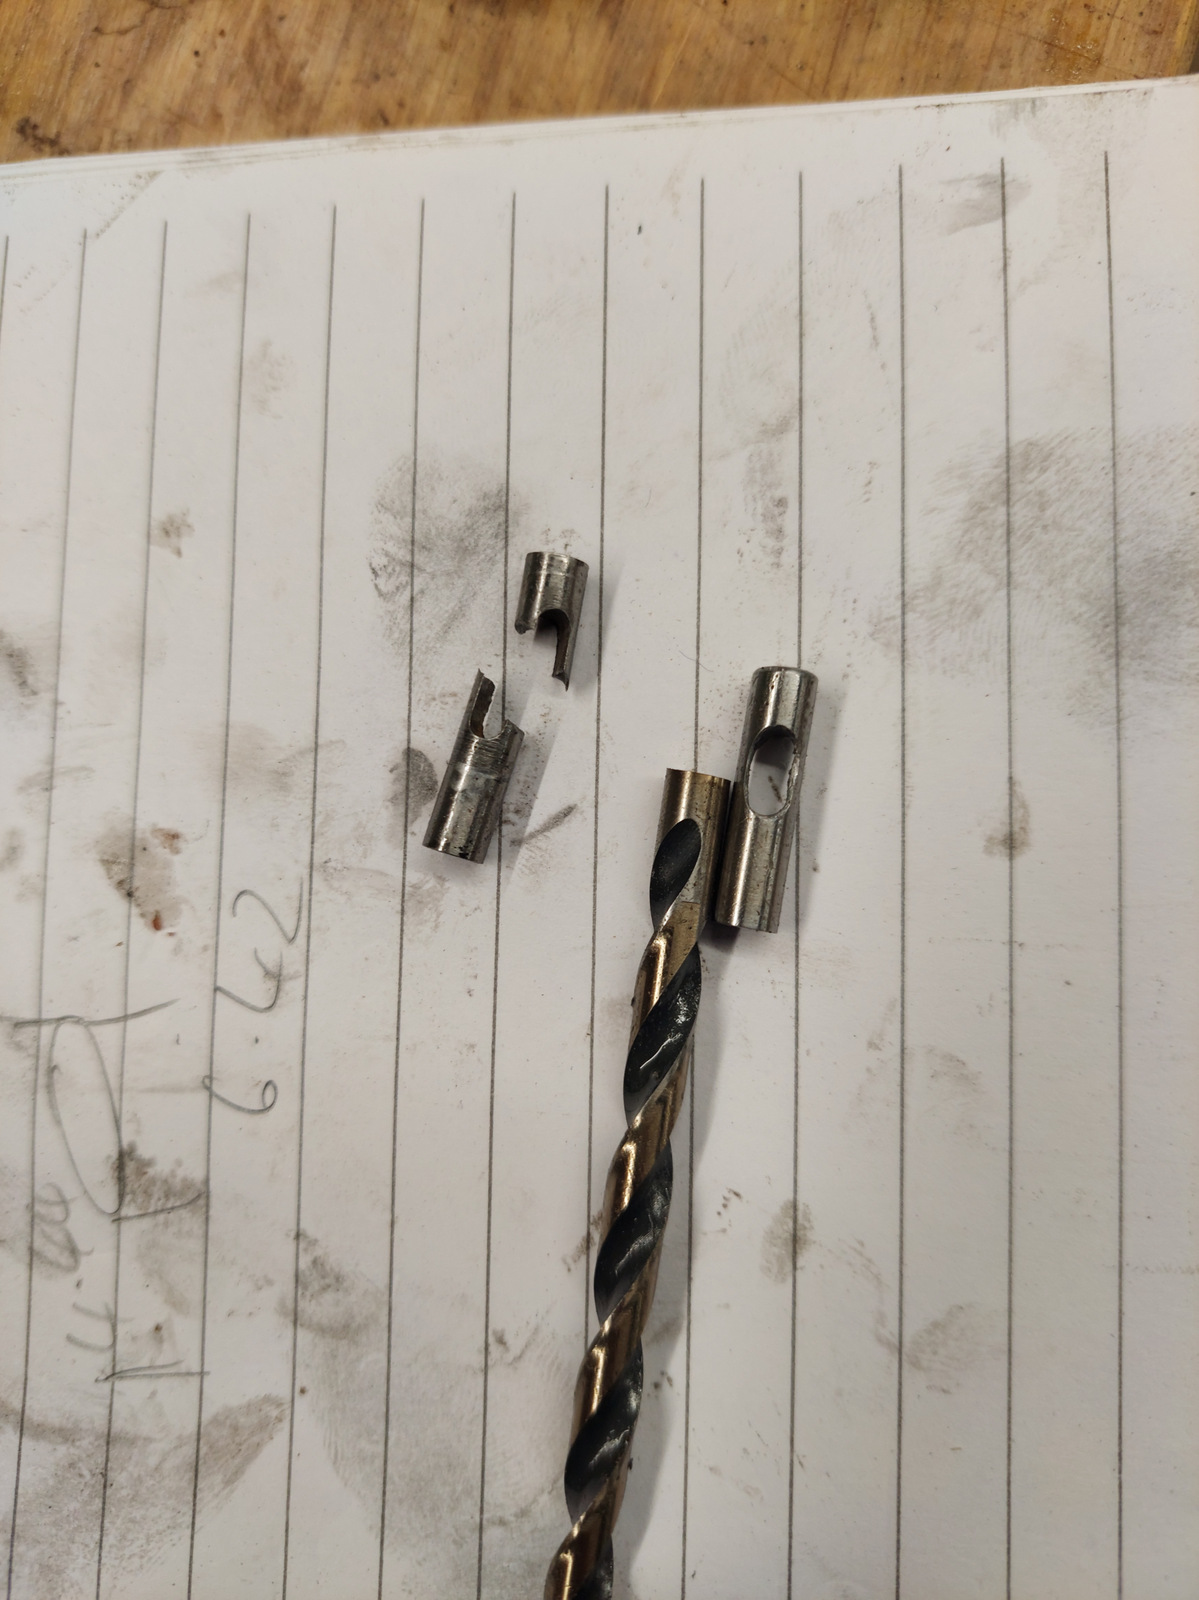
Disassembling the bolt revealed an issue. It looked like the last person to disassemble couldn't drift the firing pin retaining pin out and had smacked on the bolt cam lock pin shattering it in two. It still worked like that but not ideal. Very grateful that the firing pin wasn't broken or damaged.
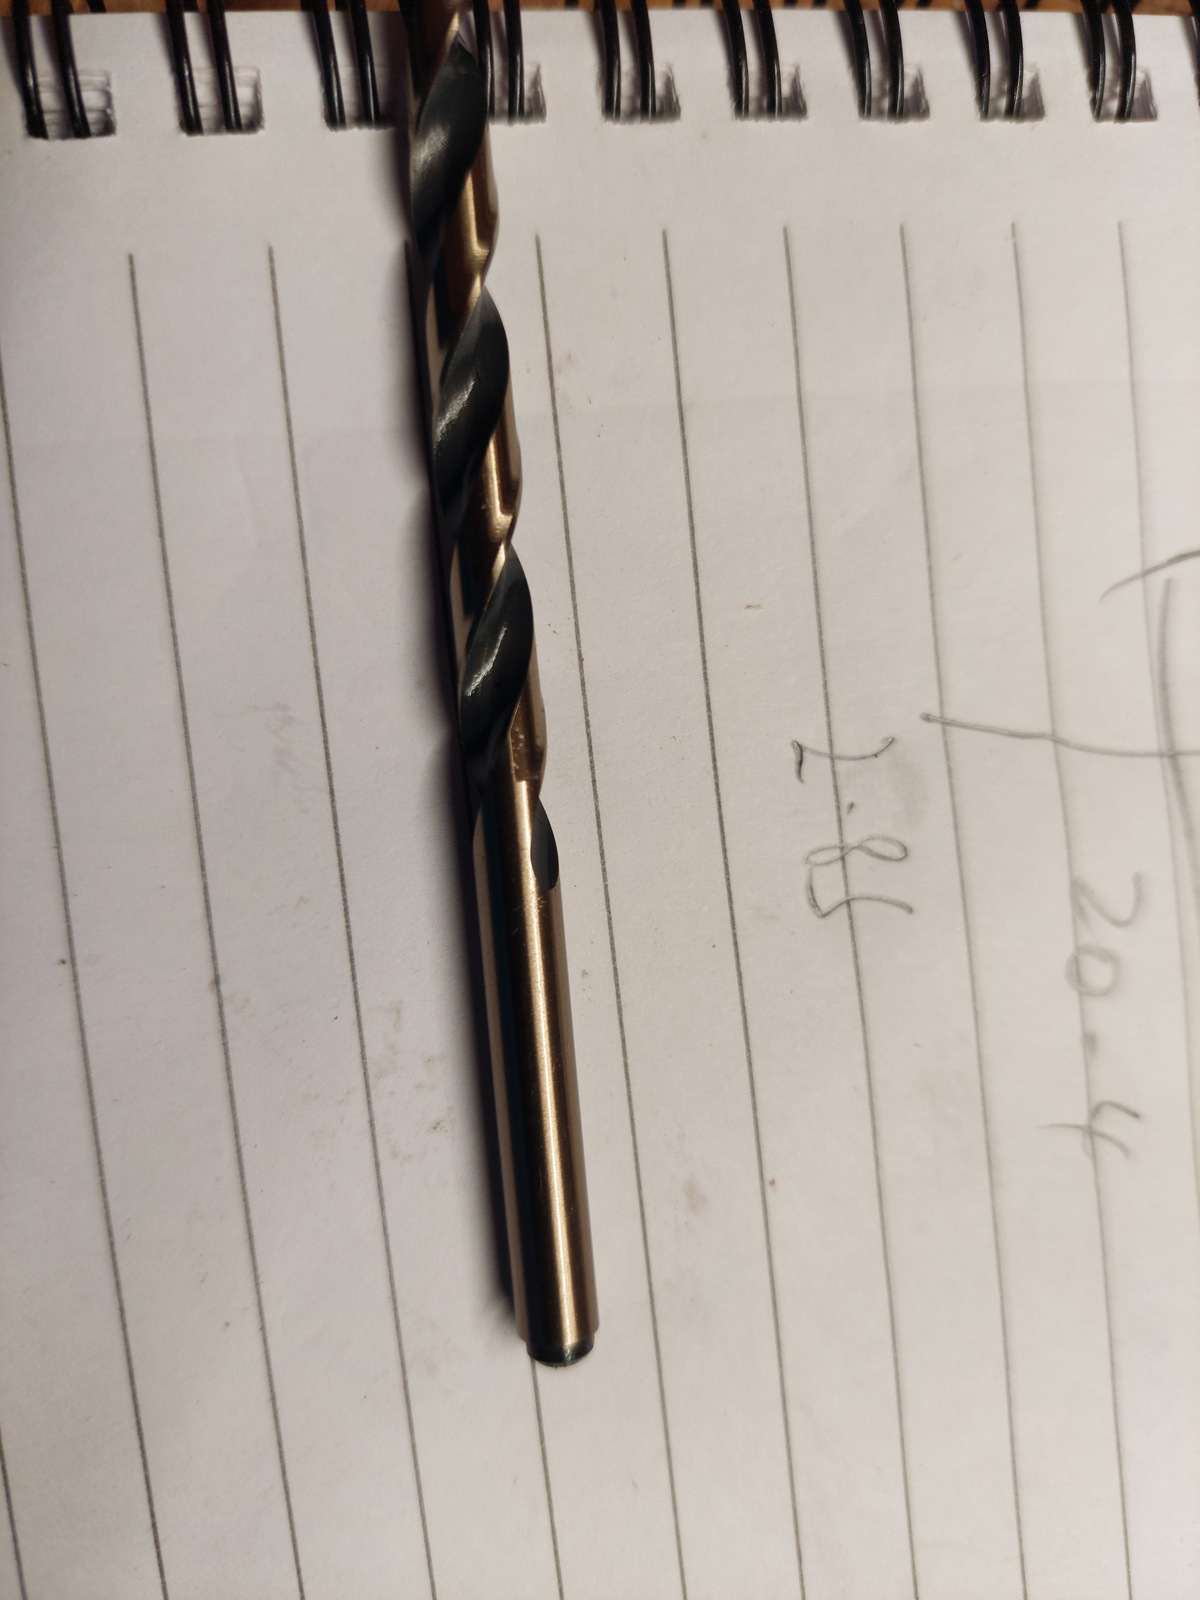
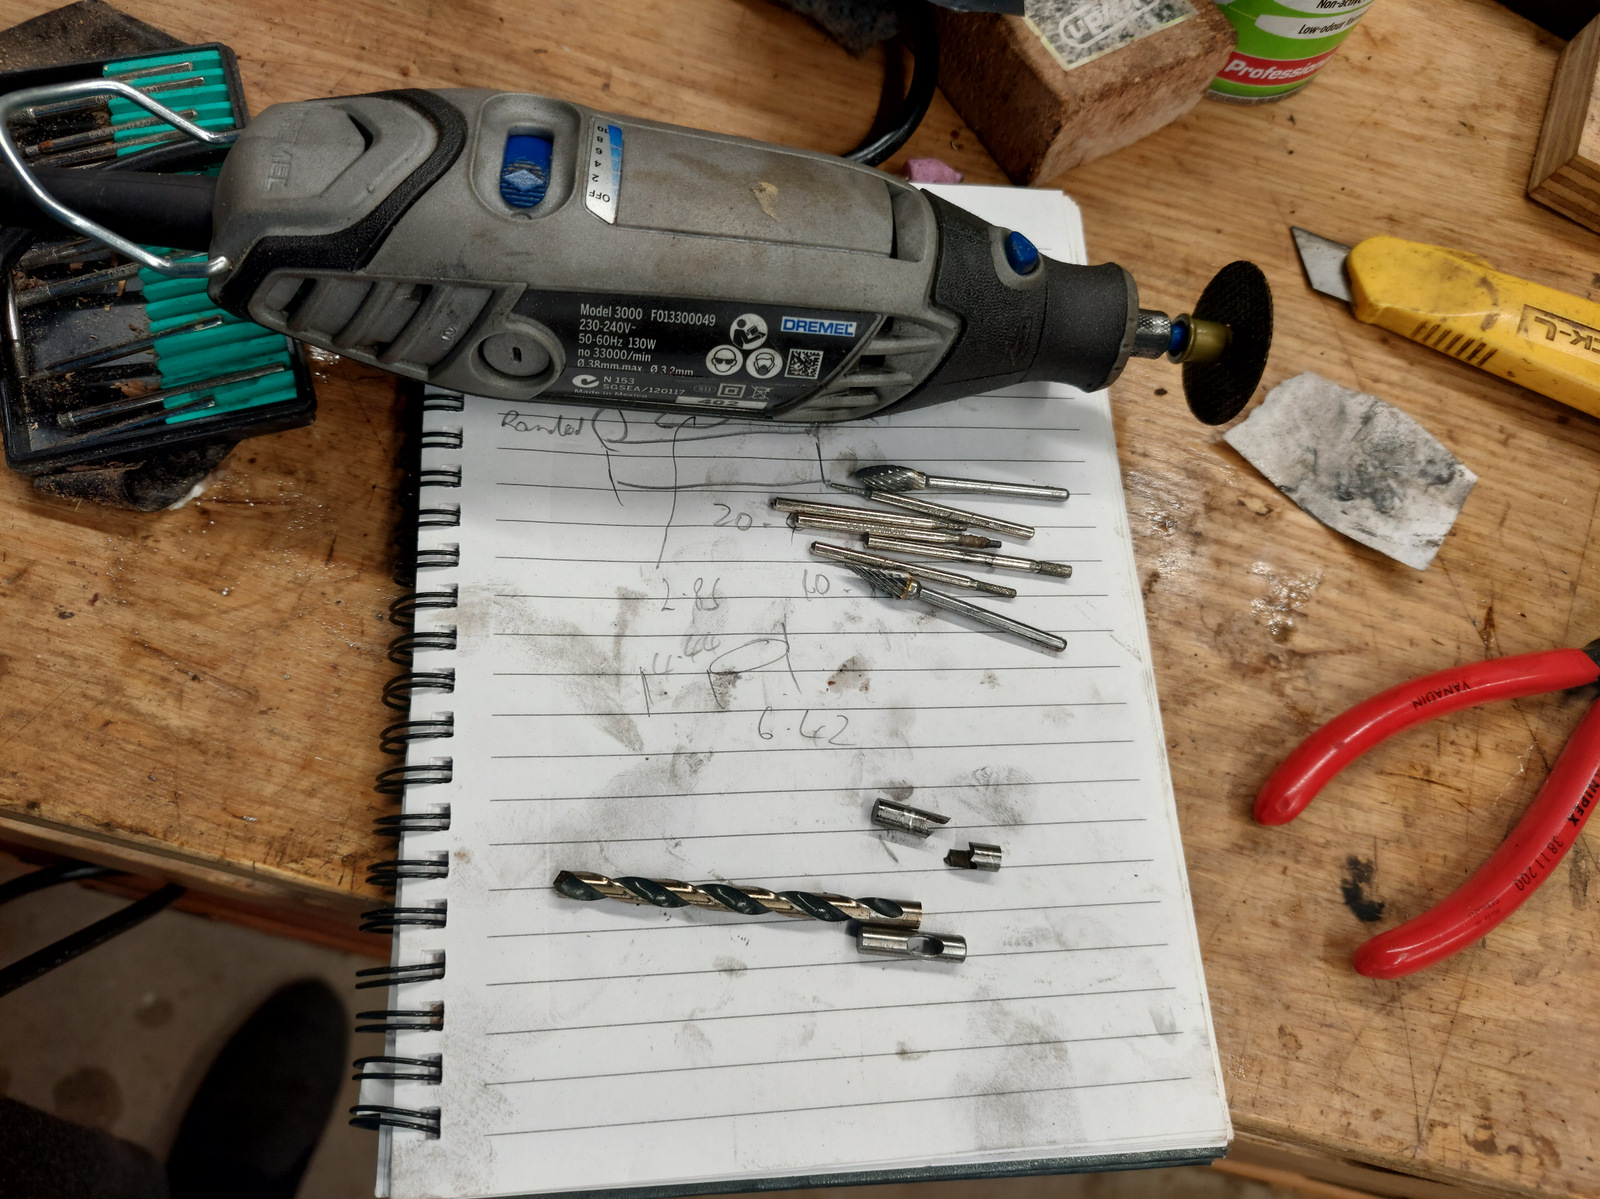
Unfortunately the New Zealand Winchester 88 parts store is fresh out of business. So I guess I'll make one. Conveniently a #7 drill bit is exactly the right size for the pin so I ordered one of those. It is a cobalt drill bit and hard as a hard thing! I probably should have found a simple HSS one as it was very hard to get a hole through! I had quietly hoped the shank would be softer and I could pop a 2.5mm drill bit through it but I was definitely not that lucky.
I don't have a mill so out with the diamond burrs and spent about 2 hours slowly boring a hole through the shank of the drill bit keeping it cool. Once the hole was all the way through it was much faster to widen and finish out the slot as I could cut on the side of the bits which have much more cutting speed. A quick deburr and polish later and I've got a functional part. I suspect it's harder than the original so should give at least another 60 years service.
The problem.
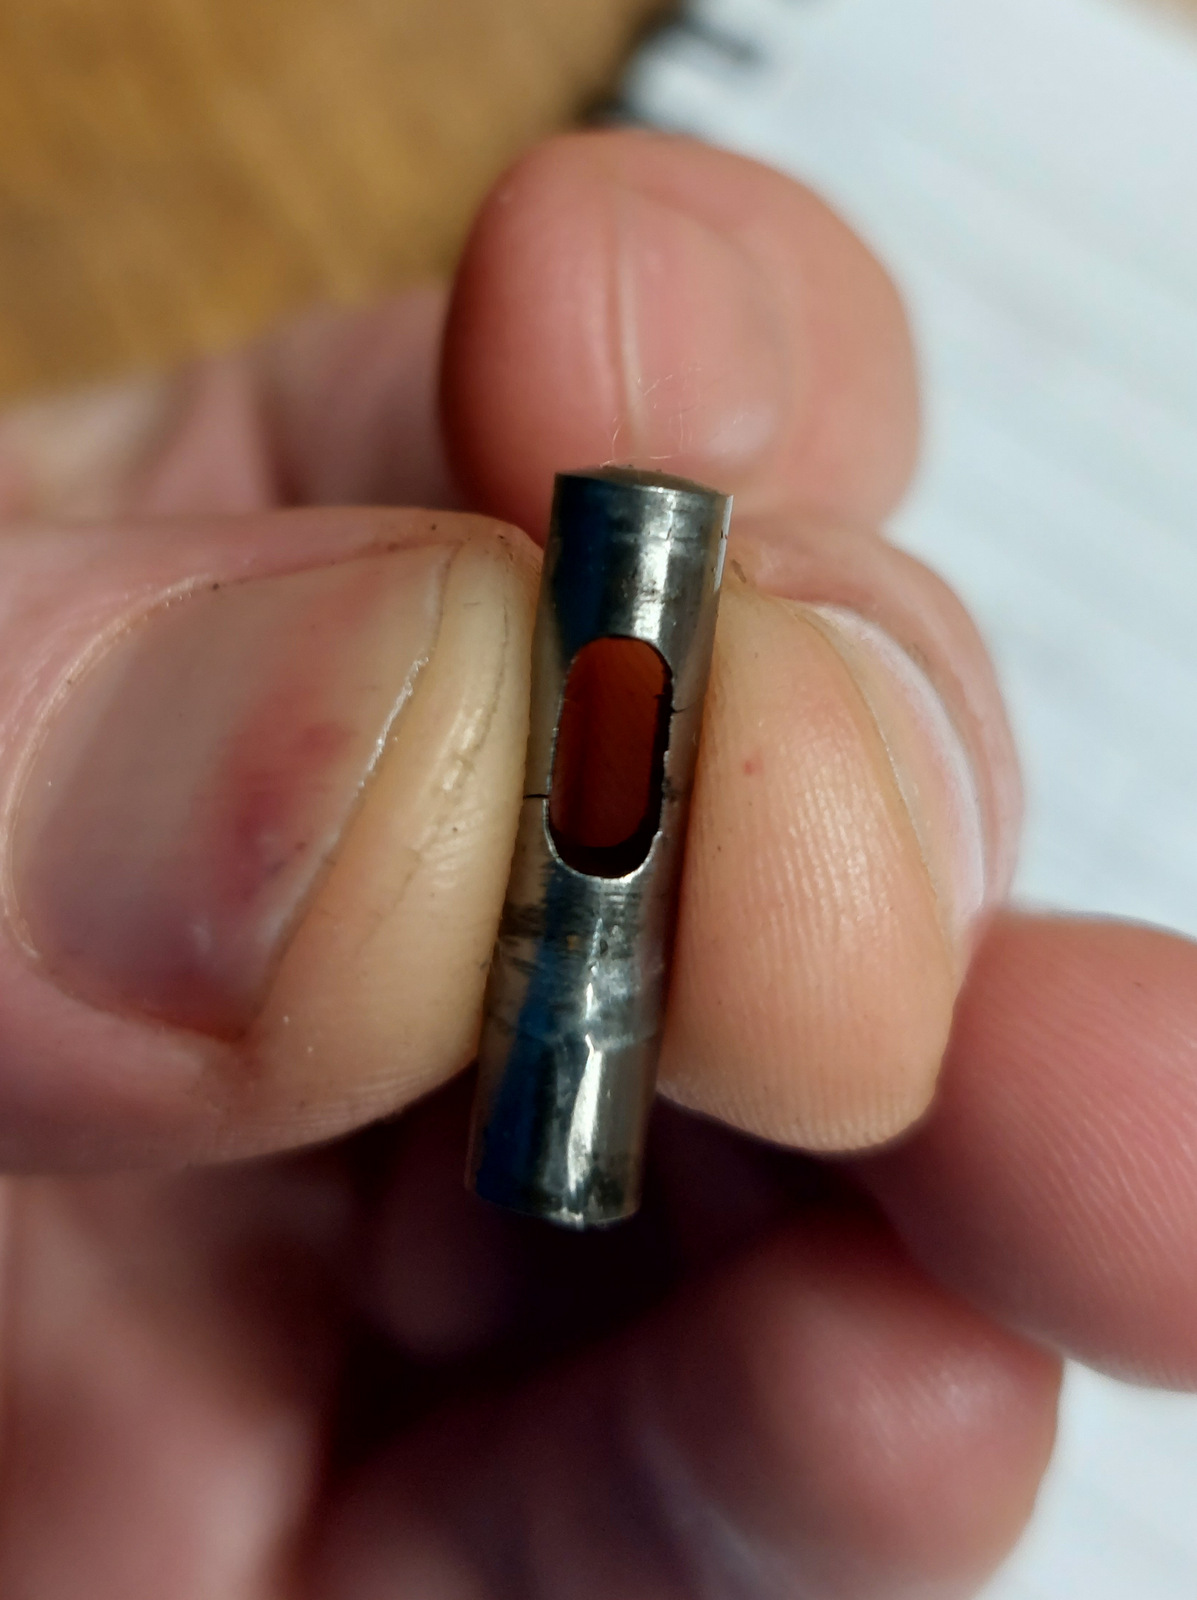
Could hold it together to get measurements. It has one round end and one flat end, I copied this to ensure proper function.
#7 Drill bit, perfect diameter shank to use for the pin.
A couple hours later.
Tools, simple but it got the job done.
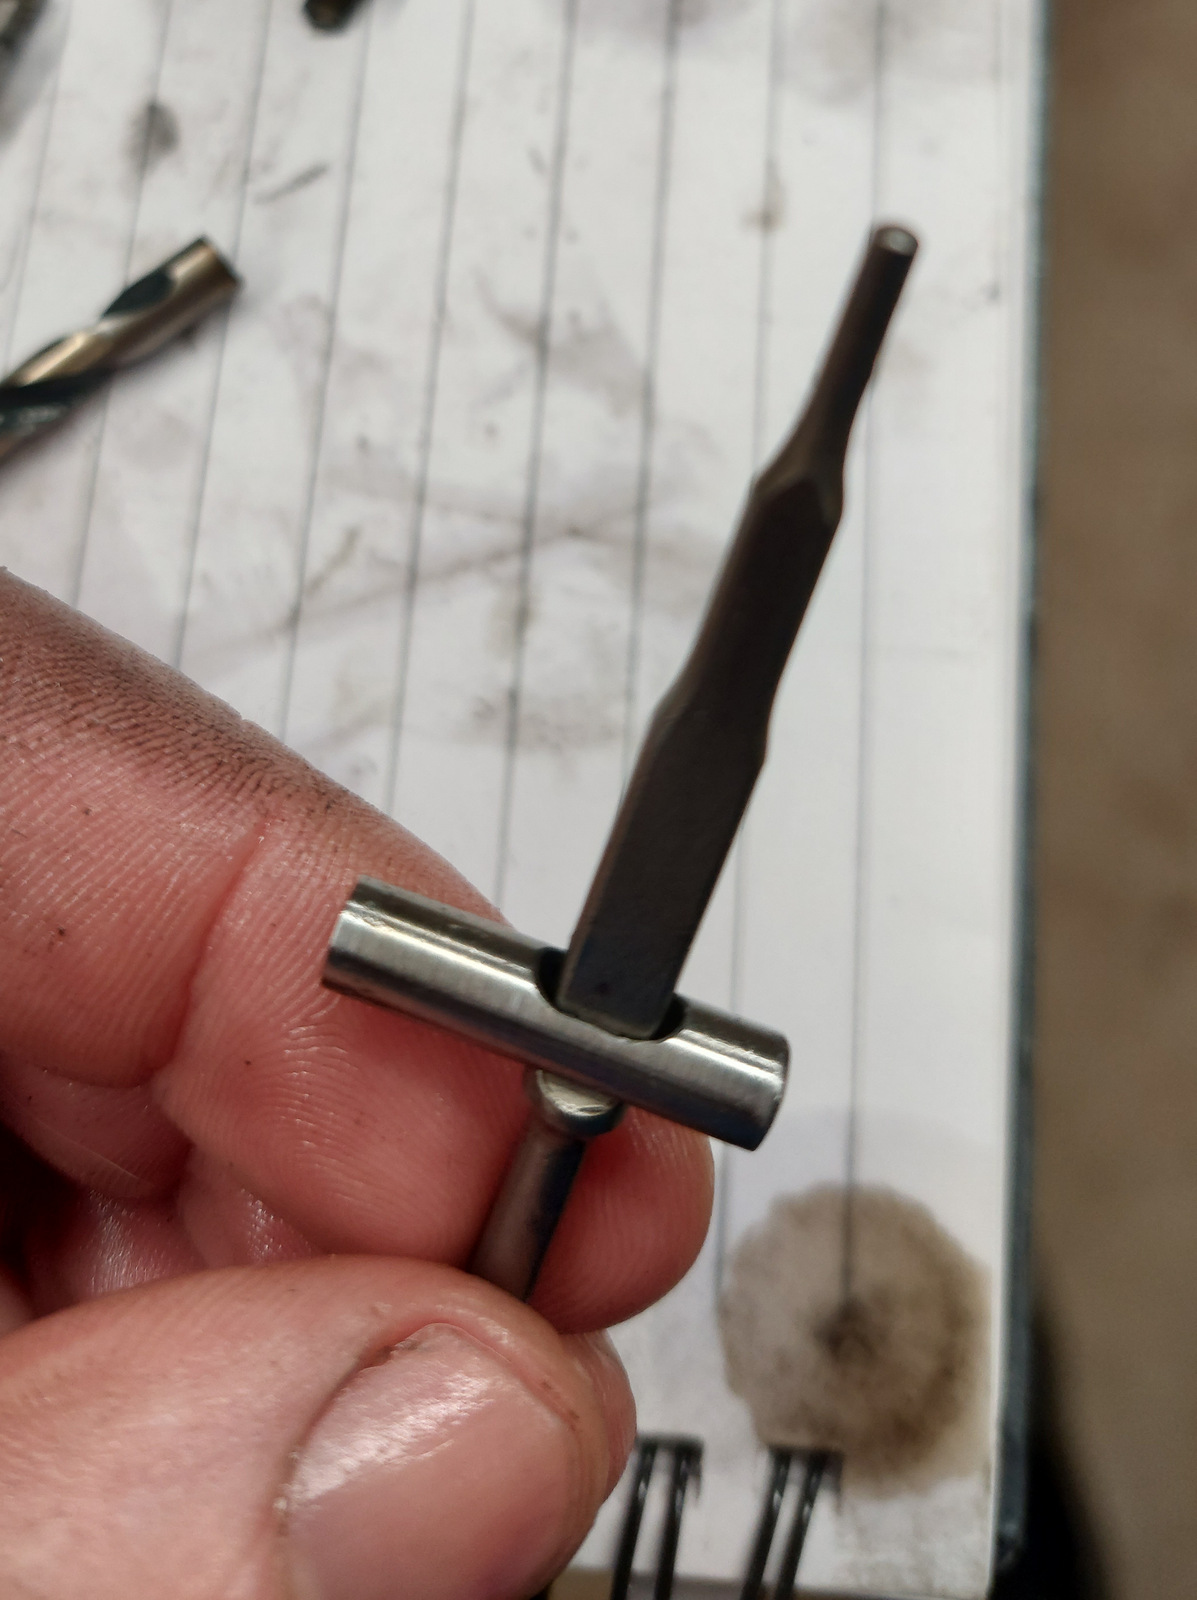
Test for clearance on the firing pin.
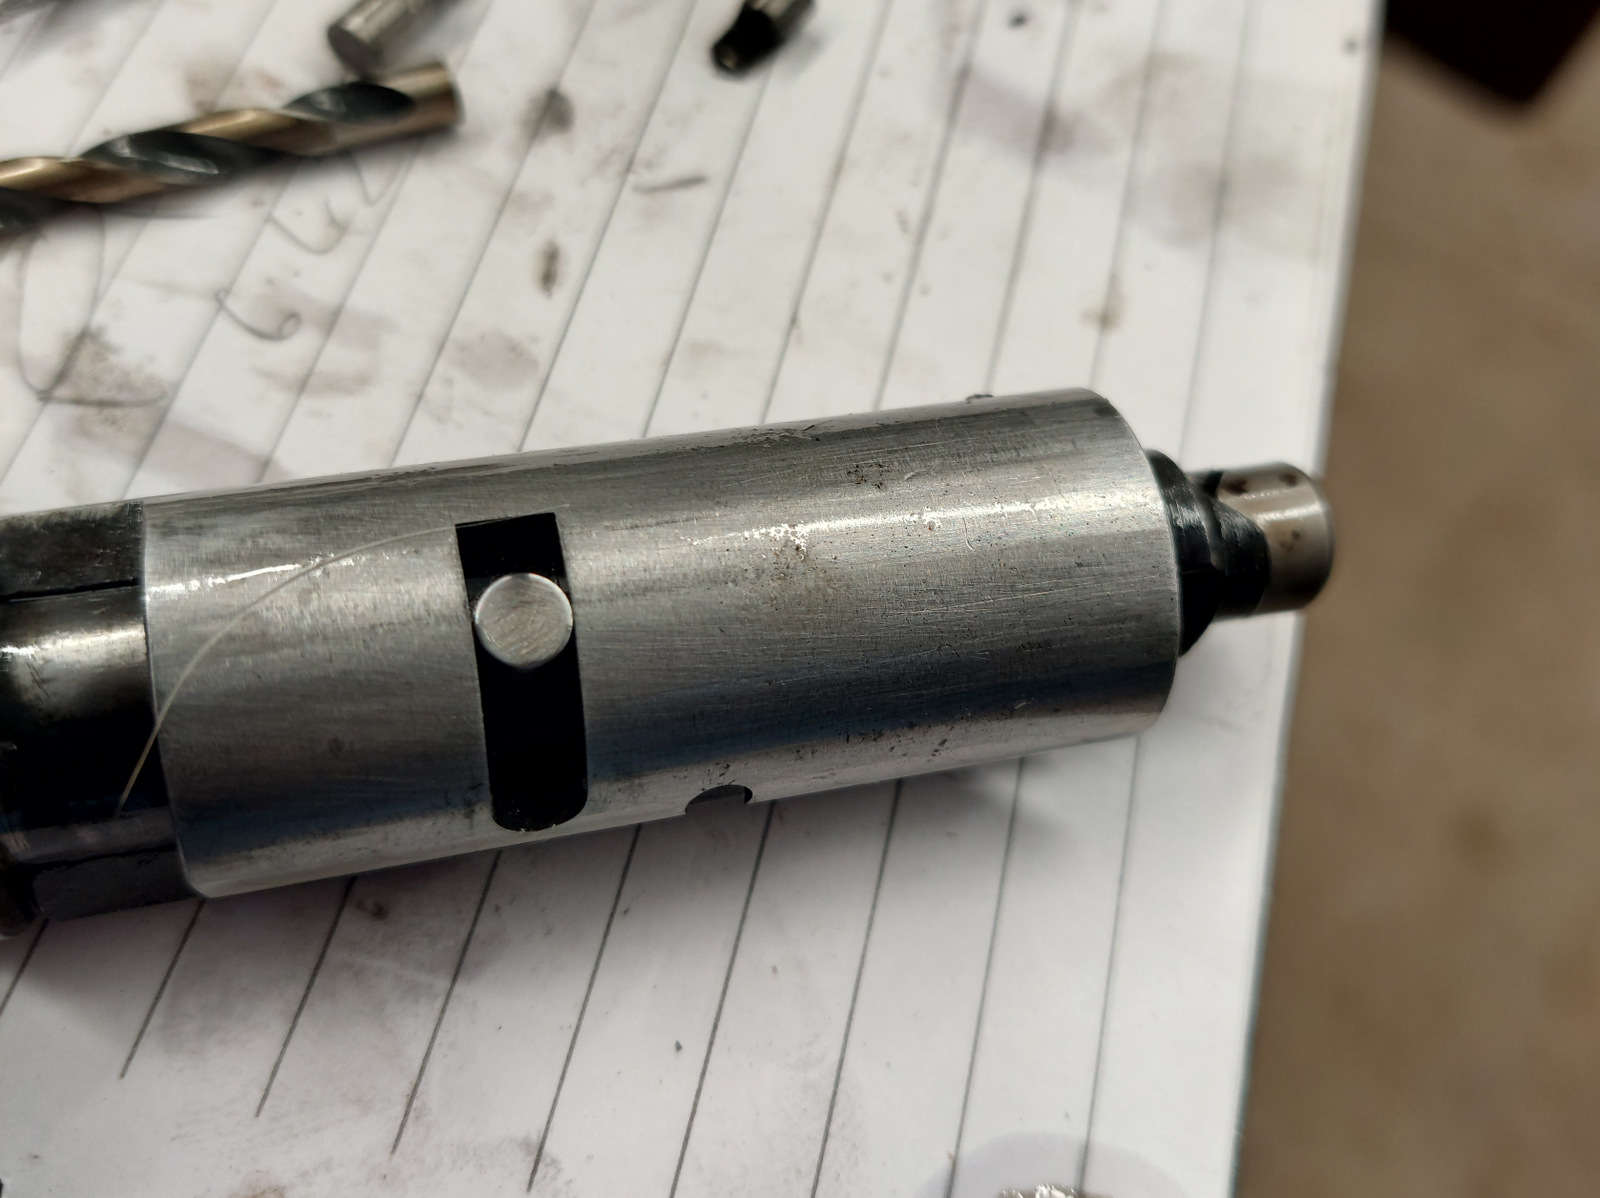
Test fit with bolt head, bolt cam, and bolt body, the firing pin goes through the slot in the pin inside the bolt body. You must remove the firing pin before disassembling the bolt.
The stock is coming along nicely. Just building up the finish slowly. Takes forever to dry in this weather. Once the finish is built up I can then re-cut the checkering.
Welcome guest, is this your first visit? Create Account now to join.
Welcome to the NZ Hunting and Shooting Forums.
Search Forums


User Tag List
+ Reply to Thread
Results 1 to 15 of 16
Thread: Winchester 88 Bolt cam lock pin
-
07-08-2023, 10:18 PM #1Member

- Join Date
- Dec 2011
- Location
- Te Awamutu
- Posts
- 849
Winchester 88 Bolt cam lock pin
Last edited by Makros; 07-08-2023 at 10:35 PM.
-
-
08-08-2023, 02:59 AM #2Member
- Join Date
- Aug 2015
- Location
- West Auckland
- Posts
- 1,053
Well done that man! Lovely job on the stock!
-
08-08-2023, 07:17 AM #3Member
- Join Date
- Jun 2023
- Location
- waimakau
- Posts
- 2,615
Looking good
-
08-08-2023, 10:01 AM #4Member
- Join Date
- May 2018
- Location
- Stewart Island Rakiura
- Posts
- 202
I used to have an 88. Decided to pull it all apart for a good clean. Far out was it a job and a half to put it all back together. Good work drilling through a piece of cobalt.
BSA likes this.
-
08-08-2023, 10:07 AM #5Member

- Join Date
- Jul 2021
- Location
- Whangarei
- Posts
- 388
Great job, I used a drill shank for a pin only last week (pivot pin on a ladder sight) , sometimes just perfect for the job.
-
08-08-2023, 10:15 AM #6Member
- Join Date
- Dec 2011
- Location
- Te Awamutu
- Posts
- 849
Yes, you must make a few shorter slave pins to hold parts together while you reassemble. Otherwise it takes 3 hands and 4 hours... Originally Posted by ghosts

Thankfully I also have a very detailed book on the assembly of the Winchester 88 with photos and instructions.
Also if you ever take the safety apart, wear safety glasses and do it in an impeccably clean room. The spring and tiny plunger will shoot out with a lot of speed. The plunger is extremely tiny you will never find it if lost.
-
08-08-2023, 11:06 AM #7Member
- Join Date
- Jun 2023
- Location
- waimakau
- Posts
- 2,615
For stuff like that ill get a big clear plastic bag that parts and hands can fit inside and take it apart inside the bag. Saved many a part doing rocket impersonations
-
08-08-2023, 12:42 PM #8Member
- Join Date
- Dec 2021
- Location
- Tauranga
- Posts
- 3,719
Was just about to add that about the clear plastic bag - I've only ever had one bit breach the bag and it carried on through a window (the bit that popped out didn't go through though).
Makros likes this.
-
08-08-2023, 12:51 PM #9Member
- Join Date
- Dec 2011
- Location
- Te Awamutu
- Posts
- 849
Fantastic tip on the bag. I will certainly make use of this when reassembling as I'm sure there will be a few failed attempts and parts flying for some of this.
I always call these sort of parts the "Jesus" parts. As in Jesus were the F did that go. Circlips , retention clips on gas struts, etc... ping, gone.
-
08-08-2023, 03:47 PM #10BSA

- Join Date
- Jul 2013
- Location
- West Of Centre
- Posts
- 325
What is the Title of that book. I took mine apart once many many many moons ago. Never again. Originally Posted by Makros
-
08-08-2023, 04:05 PM #11Member
- Join Date
- Dec 2011
- Location
- Te Awamutu
- Posts
- 849
Brought the electronic version and printed it out: Originally Posted by BSA
https://homesteadparts.com/shop/new-...ml?cPath=1_252
Worth the $20 odd.BSA likes this.
-
08-08-2023, 05:04 PM #12Member
- Join Date
- Dec 2019
- Location
- Okawa Hawkes Bay
- Posts
- 2,719
Greetings @Markos, Originally Posted by Makros
I made slave pins for mine as well, I don't know where I got the idea from. After a while the drama of taking it to bits, needing to be cleaned from the muzzle, average trigger and heavy apparent recoil from the stock with far too much drop resulted in it being sold.
Regards Grandpamac.
-
08-08-2023, 08:08 PM #13Member
- Join Date
- Dec 2011
- Location
- Te Awamutu
- Posts
- 849
This one is a .243 so recoil should be fine. Originally Posted by grandpamac
I'll just clean it with a boresnake although I didn't find disassembly/assembly to the point of removing the bolt was difficult at all.
Bonus today, I just found out Skinner makes peep sights for these rifles, so I just ordered a peep sight and a taller front sight for this rifle. I look forward to taking a file to the range to sight it in, you always get funny looks when sighting in new open sights and you start filing away on your rifle in front of the rest of the shooters lol.
Hopefully won't be too far away but still have to prep and rust blue all the steel parts. Most of the internal parts are perfectly fine but I'll do everything visible from the outside for consistency. Then get probably another 5 coats of finish on, then rechecker, final finishing and buffing out the stock. Load up some .243 and I'm away.
Rather enjoying this winter project so far.Last edited by Makros; 08-08-2023 at 08:16 PM.
BSA and Micky Duck like this.
-
08-08-2023, 08:12 PM #14Member

- Join Date
- Apr 2015
- Location
- Geraldine
- Posts
- 22,727
a limbsaver fitted would remove any remaining recoil..... you are a clever wee sausage....that pin would have been harder to do than you have made it look...full credit and full admiration.
75/15/10 black powder matters
-
09-08-2023, 10:51 PM #15Member
- Join Date
- Dec 2021
- Location
- Tauranga
- Posts
- 3,719
Especially out of a goddamned cobalt drill bit shank. FFS, I could have sent you some oil-hardening quenching steel which you could have nibbled the hole with your teeth it's that soft - then hardened it and tempered it for a similar end result just a lot less work.
But, just in the effort expended to achieve the result you did - I both express my admiration for your patience and work ethic and my congratulations on you actually succeeding in doing it!


 Reply With Quote
Similar Threads
-
284 Winchester X-bolt conversion.
By Troy Tempest in forum Firearms, Optics and AccessoriesReplies: 12Last Post: 26-06-2021, 05:30 PM
Tags for this Thread
 Posting Permissions
- You may not post new threads
- You may not post replies
- You may not post attachments
- You may not edit your posts
Welcome to NZ Hunting and Shooting Forums! We see you're new here, or arn't logged in. Create an account, and Login for full access including our FREE BUY and SELL section Register NOW!!
All times are GMT +13. The time now is 10:10 PM.

Bookmarks