


 LinkBack URL
 About LinkBacks
How would you repair this, second hand sheath with a couple of holes in it that look like they could rip which would make the sheath fall off belt. Stitch, Glue, webbing of some sort or would you put a patch right over the whole area to strengthen it
Thanks in advance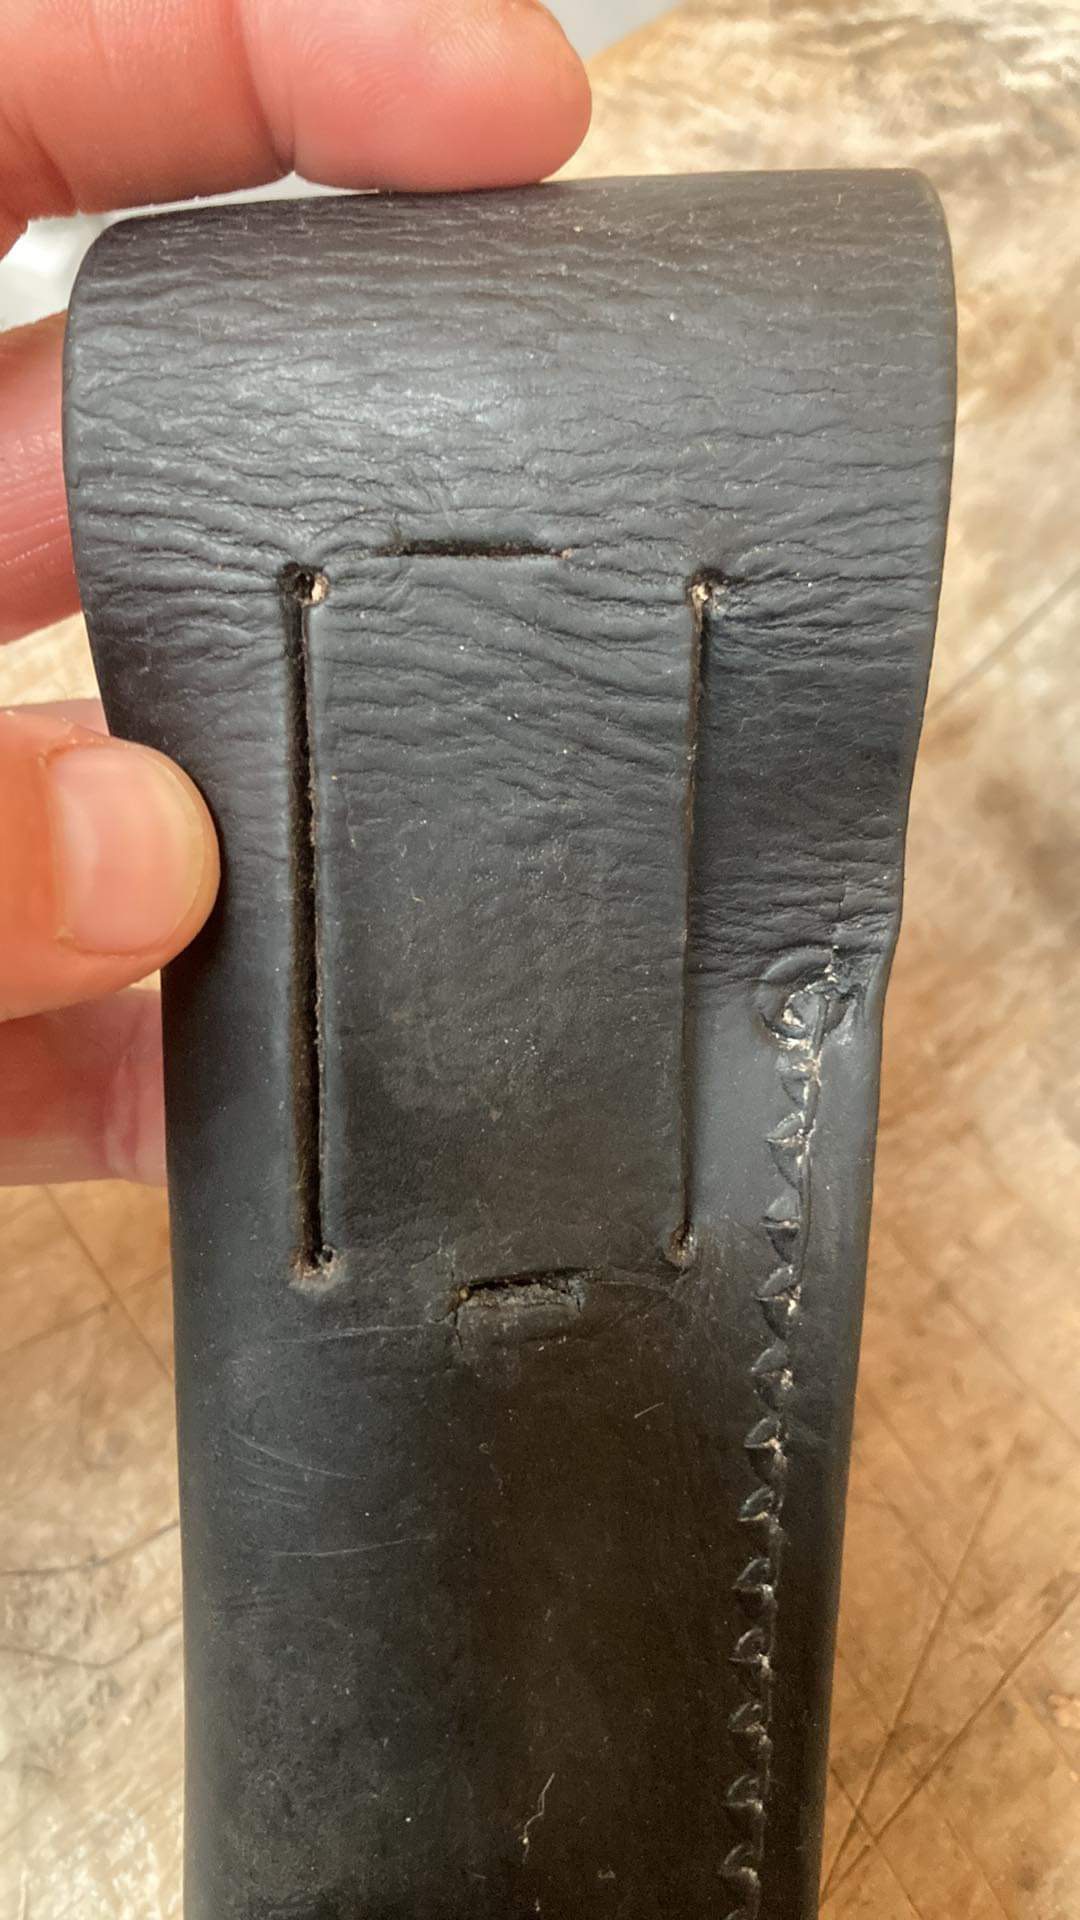
Welcome guest, is this your first visit? Create Account now to join.
Welcome to the NZ Hunting and Shooting Forums.
Search Forums


User Tag List
+ Reply to Thread
Results 1 to 15 of 15
 12Likes
Thread: Leather repair question
-
22-08-2023, 08:10 PM #1Member

- Join Date
- Jan 2013
- Location
- Whakatane
- Posts
- 194
Leather repair question
-
-
22-08-2023, 08:13 PM #2Member

- Join Date
- May 2014
- Location
- Wairarapa
- Posts
- 2,742
Personally I would leave it, unlikely to rip, could also put in ya day bag if you carry one. Worst case you could just stitch over the cut, but leather is tough to rip
Sent from my SM-S911B using TapatalkHILLBILLYHUNTERS and Micky Duck like this.
-
22-08-2023, 08:30 PM #3Member
- Join Date
- Apr 2022
- Location
- New Plymouth
- Posts
- 2,373
yes carry in day bag - to really repair that I would put new patch over top but that means taking sheath apart
-
22-08-2023, 08:33 PM #4Member

- Join Date
- Jan 2020
- Location
- Nelson/Tasman
- Posts
- 3,238
The holes are designed to stop the leather ripping along the cut line.
HILLBILLYHUNTERS and Billbob like this.Happy Jack.
-
22-08-2023, 08:33 PM #5Member
- Join Date
- Jan 2013
- Location
- Whakatane
- Posts
- 194
Awesome thanks guys!
-
22-08-2023, 08:34 PM #6Member
- Join Date
- Jan 2013
- Location
- Whakatane
- Posts
- 194
Talking about that top horizontal cut not the side ones. Happy jack
-
22-08-2023, 08:37 PM #7Member
- Join Date
- Apr 2022
- Location
- New Plymouth
- Posts
- 2,373
yes dont like the look of that cut Parky - could spread with age use -
-
22-08-2023, 08:39 PM #8Member
- Join Date
- Jan 2013
- Location
- Whakatane
- Posts
- 194
Agree mate. Can get at the top one with a stitch if it does rip, shouldn’t rip right across tho hopefully Originally Posted by Barry the hunter

-
22-08-2023, 08:44 PM #9Member
- Join Date
- May 2014
- Location
- Wairarapa
- Posts
- 2,742
Having made leather sheaths for a number of years I can assure you it will take alot to rip it so probably wouldn't worry about it too much
Sent from my SM-S911B using Tapatalk
-
22-08-2023, 08:47 PM #10Member
- Join Date
- Jan 2013
- Location
- Whakatane
- Posts
- 194
Yea I’ve seen your awesome work over the years mate. Agree will just use it and see normally only comes out on the belt when the pack is full of meat. Thanks for your advice appreciate it Originally Posted by HNTMAD
HNTMAD likes this.
-
22-08-2023, 08:48 PM #11Member
- Join Date
- May 2014
- Location
- Wairarapa
- Posts
- 2,742
Too easy fella Originally Posted by Parky
Sent from my SM-S911B using Tapatalk
-
22-08-2023, 08:52 PM #12Member
- Join Date
- Jul 2020
- Location
- Central North Island
- Posts
- 4,324
A reasonably strong repair could be made by joining the leather either side of that small horizontal cut between the two little stress relief punched holes at the top of the two large vertical cuts. For someone without a bunch of leather working gear, Use the smallest drill bit you can find to drill holes above and under that little cut, from left of the left vertical slot to right of the right vertical slot. About 4mm above and 4mm below that line. Then using a very large sewing needle and some canvas repair thread, sew the top to the bottom. Use a pair of needle nose pliers to push the needle through your pre drilled holes.
Then at least you will get some warning that its going to fail. The way it looks right now, a few times being caught by supplejack and it could tear right off and be lost.Parky likes this.
-
22-08-2023, 09:35 PM #13Member

- Join Date
- Sep 2019
- Location
- Ohakune.NZ
- Posts
- 404
As @HNTMAD said would take a fair bit to rip. The stitching will probably go first. Looks like the cuts were made deliberately. Be interested to know the purpose?.
Sent from my SM-G525F using Tapatalk
-
22-08-2023, 11:18 PM #14Member
- Join Date
- Feb 2013
- Location
- spreydon christcurch.
- Posts
- 6,717
Id say those cuts were made to allow for the old style pouch clips as used on vietnam era military webbing. re sewing leather -I ew lot of mine and use fishing braid (50lb rating).Ive even sewn a towrope using 50lb nylon doubled up .suffice to say i was very thankful it held sufficient to tow my buggered Hilux truck over the Otira gorge and did so quite comfortably. Needlewise grab a pack of assorted ones from warehouse or suchlike and use the largewr marked ones.as others say you can use a fine drill to drill your holes.
hunter Al.7mm08 and m101a1 like this.
-
22-08-2023, 11:35 PM #15Member
- Join Date
- Mar 2023
- Location
- Central South Island
- Posts
- 378
Looks to me like it will hold forever. But if you are concerned slip a strip of plastic cut off a milk bottle or similar in to the sheath and then stick a blob of 5 minute epoxy/araldite in each slit, leave it to set, and then remove strip of plastic.
Parky likes this.


 Reply With Quote
Similar Threads
-
Rod repair
By Gibo in forum FishingReplies: 11Last Post: 03-05-2023, 10:27 AM -
Leather Knife Shealth - needs repair
By Hunteast in forum Projects and Home BuildsReplies: 6Last Post: 22-05-2022, 10:29 PM -
Suede leather / Textile upper vs. leather upper boots.
By steadwah in forum Gear and EquipmentReplies: 6Last Post: 17-11-2020, 08:34 AM -
Toyota prado budget plan and repair question
By Friwi in forum Outdoor TransportReplies: 20Last Post: 05-10-2017, 08:38 AM
Tags for this Thread
 Posting Permissions
- You may not post new threads
- You may not post replies
- You may not post attachments
- You may not edit your posts
Welcome to NZ Hunting and Shooting Forums! We see you're new here, or arn't logged in. Create an account, and Login for full access including our FREE BUY and SELL section Register NOW!!
All times are GMT +13. The time now is 12:40 AM.

Bookmarks