

 105Likes
 LinkBack URL
 About LinkBacks
fark you cut her off short!!!!!!!! I see top of your barrel is higher,with rib,so discount my comment re ramp...on SHOTGUN it sticks up proud of barrel so can be notched as rear sight.
Welcome guest, is this your first visit? Create Account now to join.
Welcome to the NZ Hunting and Shooting Forums.
Search Forums


User Tag List
+ Reply to Thread
Results 46 to 60 of 79
-
22-06-2021, 08:00 PM #46Member


- Join Date
- Apr 2015
- Location
- Geraldine
- Posts
- 25,791
-
-
22-06-2021, 11:38 PM #47Member


- Join Date
- Dec 2015
- Location
- Papakura, Auckland
- Posts
- 605
It's about 775mm. Barrel is just under 14"
-
23-06-2021, 09:49 AM #48Member

- Join Date
- Sep 2016
- Location
- Waikato
- Posts
- 459
That's great info, thanks for taking the time to lay it out. I presume you haven't seen an issue with lengthening the chamber throat during lapping either? Originally Posted by SixtyTen

I'll have to give it a try one of these days. The Grey Birch barrel is long gone though - I took the refund while it was on offer. If the pre-heat is only 150C I expect you're right that the carbon wrap would have taken it - then again that particular barrel already had several features that had 'no business being on a rifle.' I have no idea what resin they would have used.
-
23-06-2021, 07:11 PM #49Member
- Join Date
- Apr 2015
- Location
- Geraldine
- Posts
- 25,791
so are you making another 12" one with other half of barrel???? LOL
-
11-07-2021, 09:10 PM #50Member
- Join Date
- Apr 2015
- Location
- Geraldine
- Posts
- 25,791
waiting for range report..............
-
24-07-2021, 02:59 PM #51Member
- Join Date
- Apr 2015
- Location
- Geraldine
- Posts
- 25,791
still waiting........
-
04-08-2021, 11:06 AM #52Member
- Join Date
- Dec 2015
- Location
- Papakura, Auckland
- Posts
- 605
I found a little time to do some work on this rifle again, so a small update.
I have been working on sorting out the sights before I permanently fix the barrel in place.
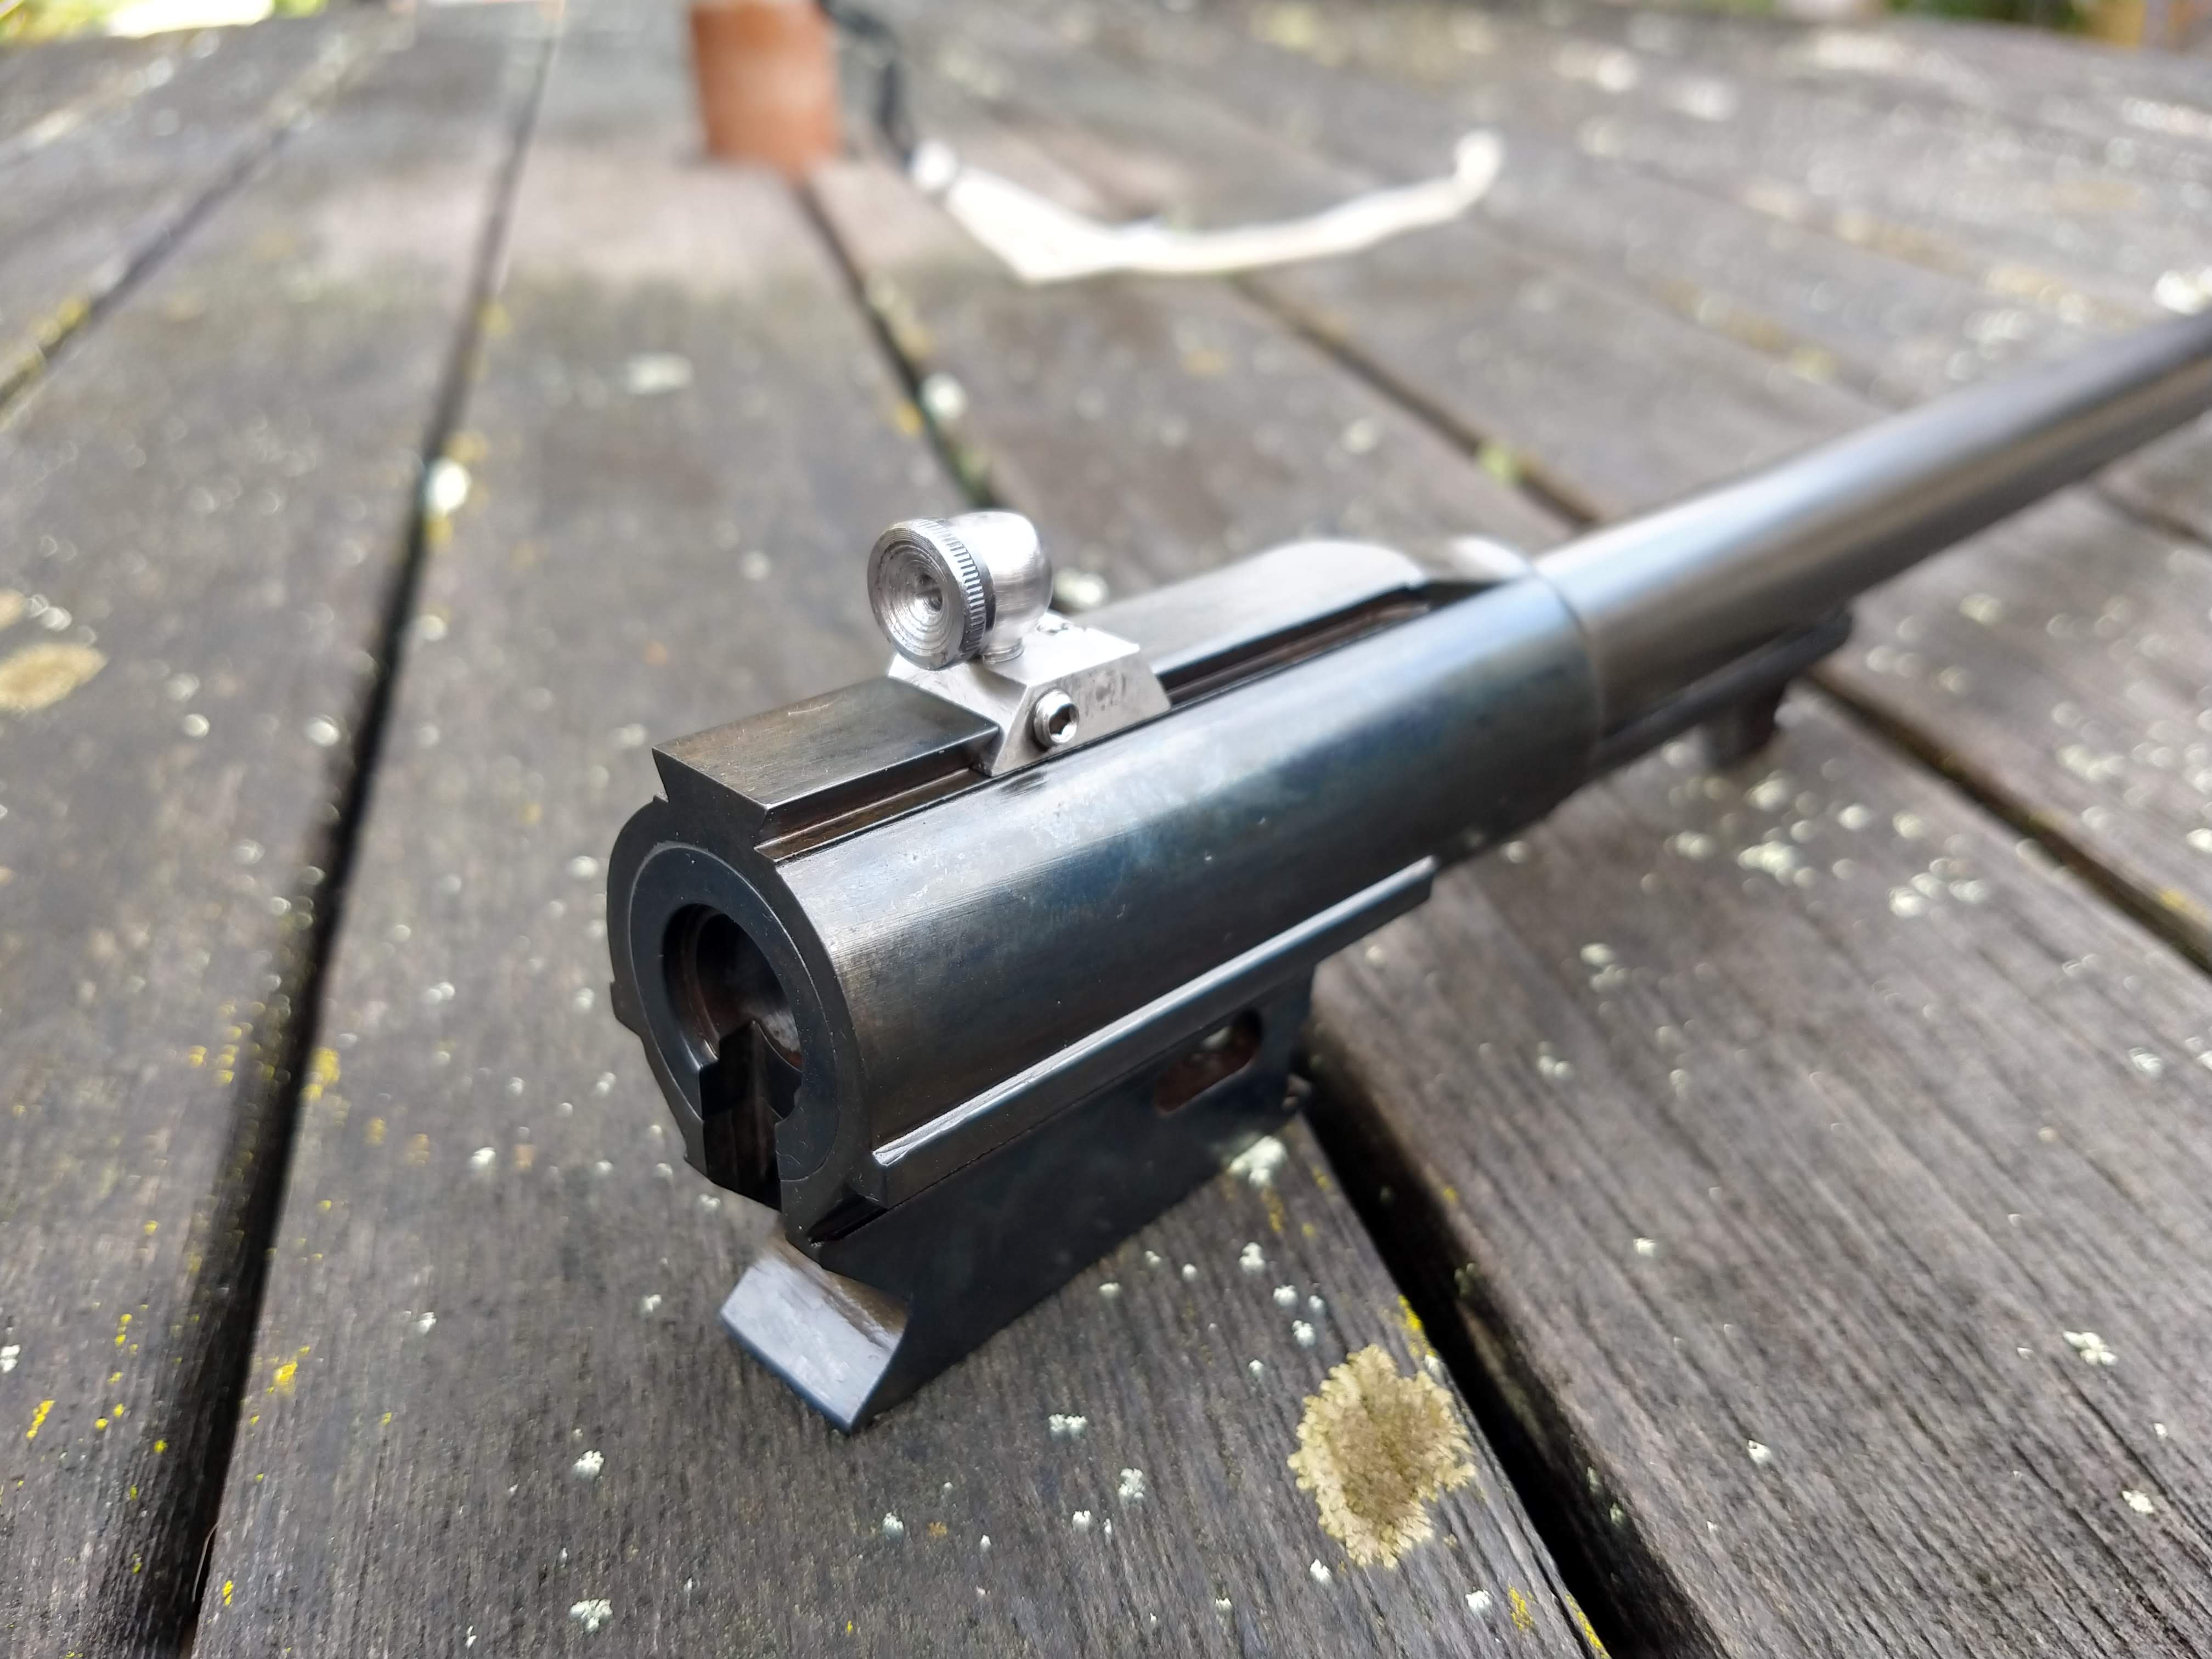
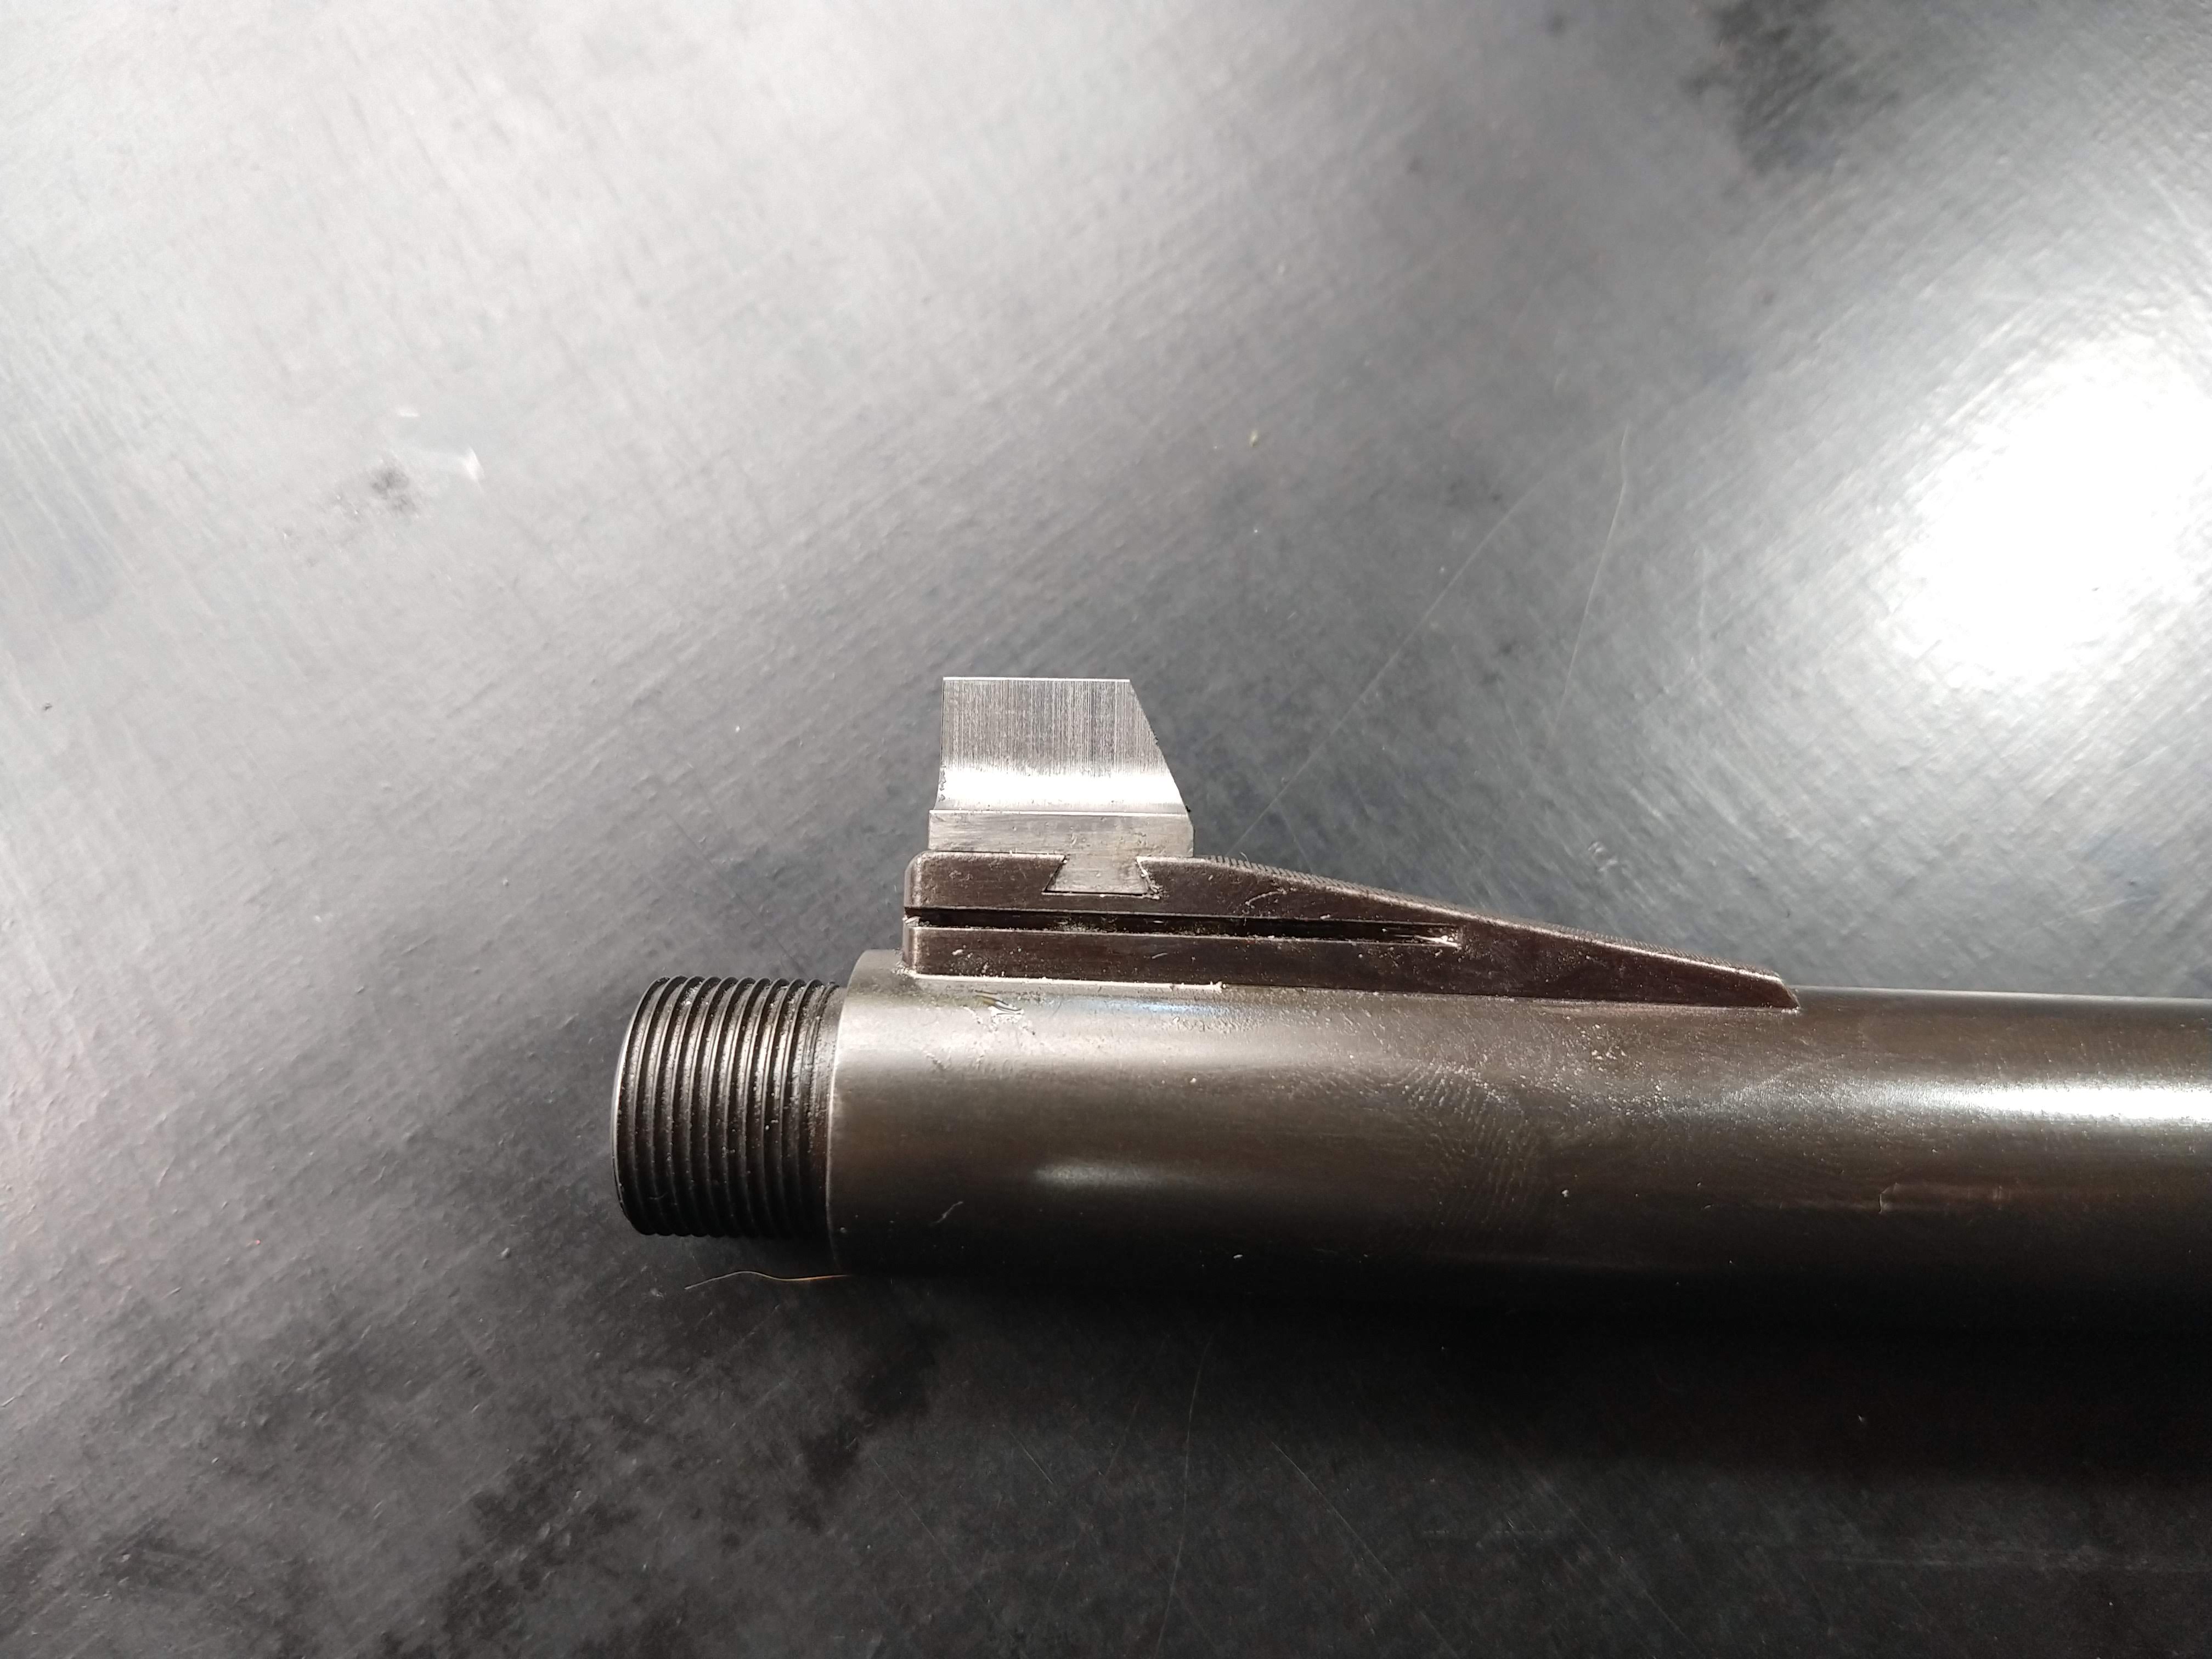
I ran through a few different designs for the rear sight and eventually settled on a simple and effective solution, which is to cut a dovetail 90degrees to the current top dovetail and have a removable insert the same is what is seen on a Skinner sight.
This means that I can still mount a scope if I want to by simply releasing the windage locking screw and sliding the whole sight block out one side. elevation change is done by screwing the threaded aperture mount up and down, this is locked by a grub screw. Windage is changed by sliding the block sideways and is also locked with a grub screw. My front sight will be adjustable for windage as well, so I should be able to zero the rear to a scribe line.
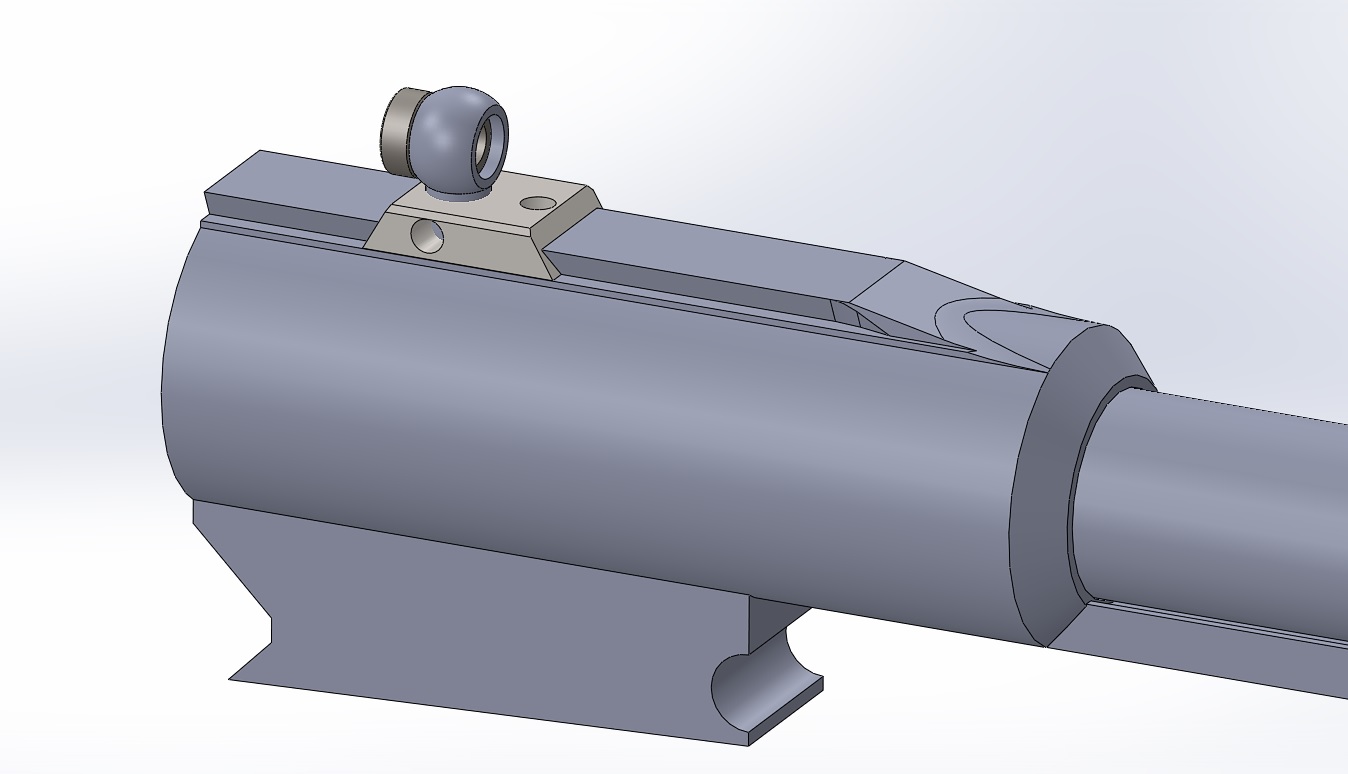
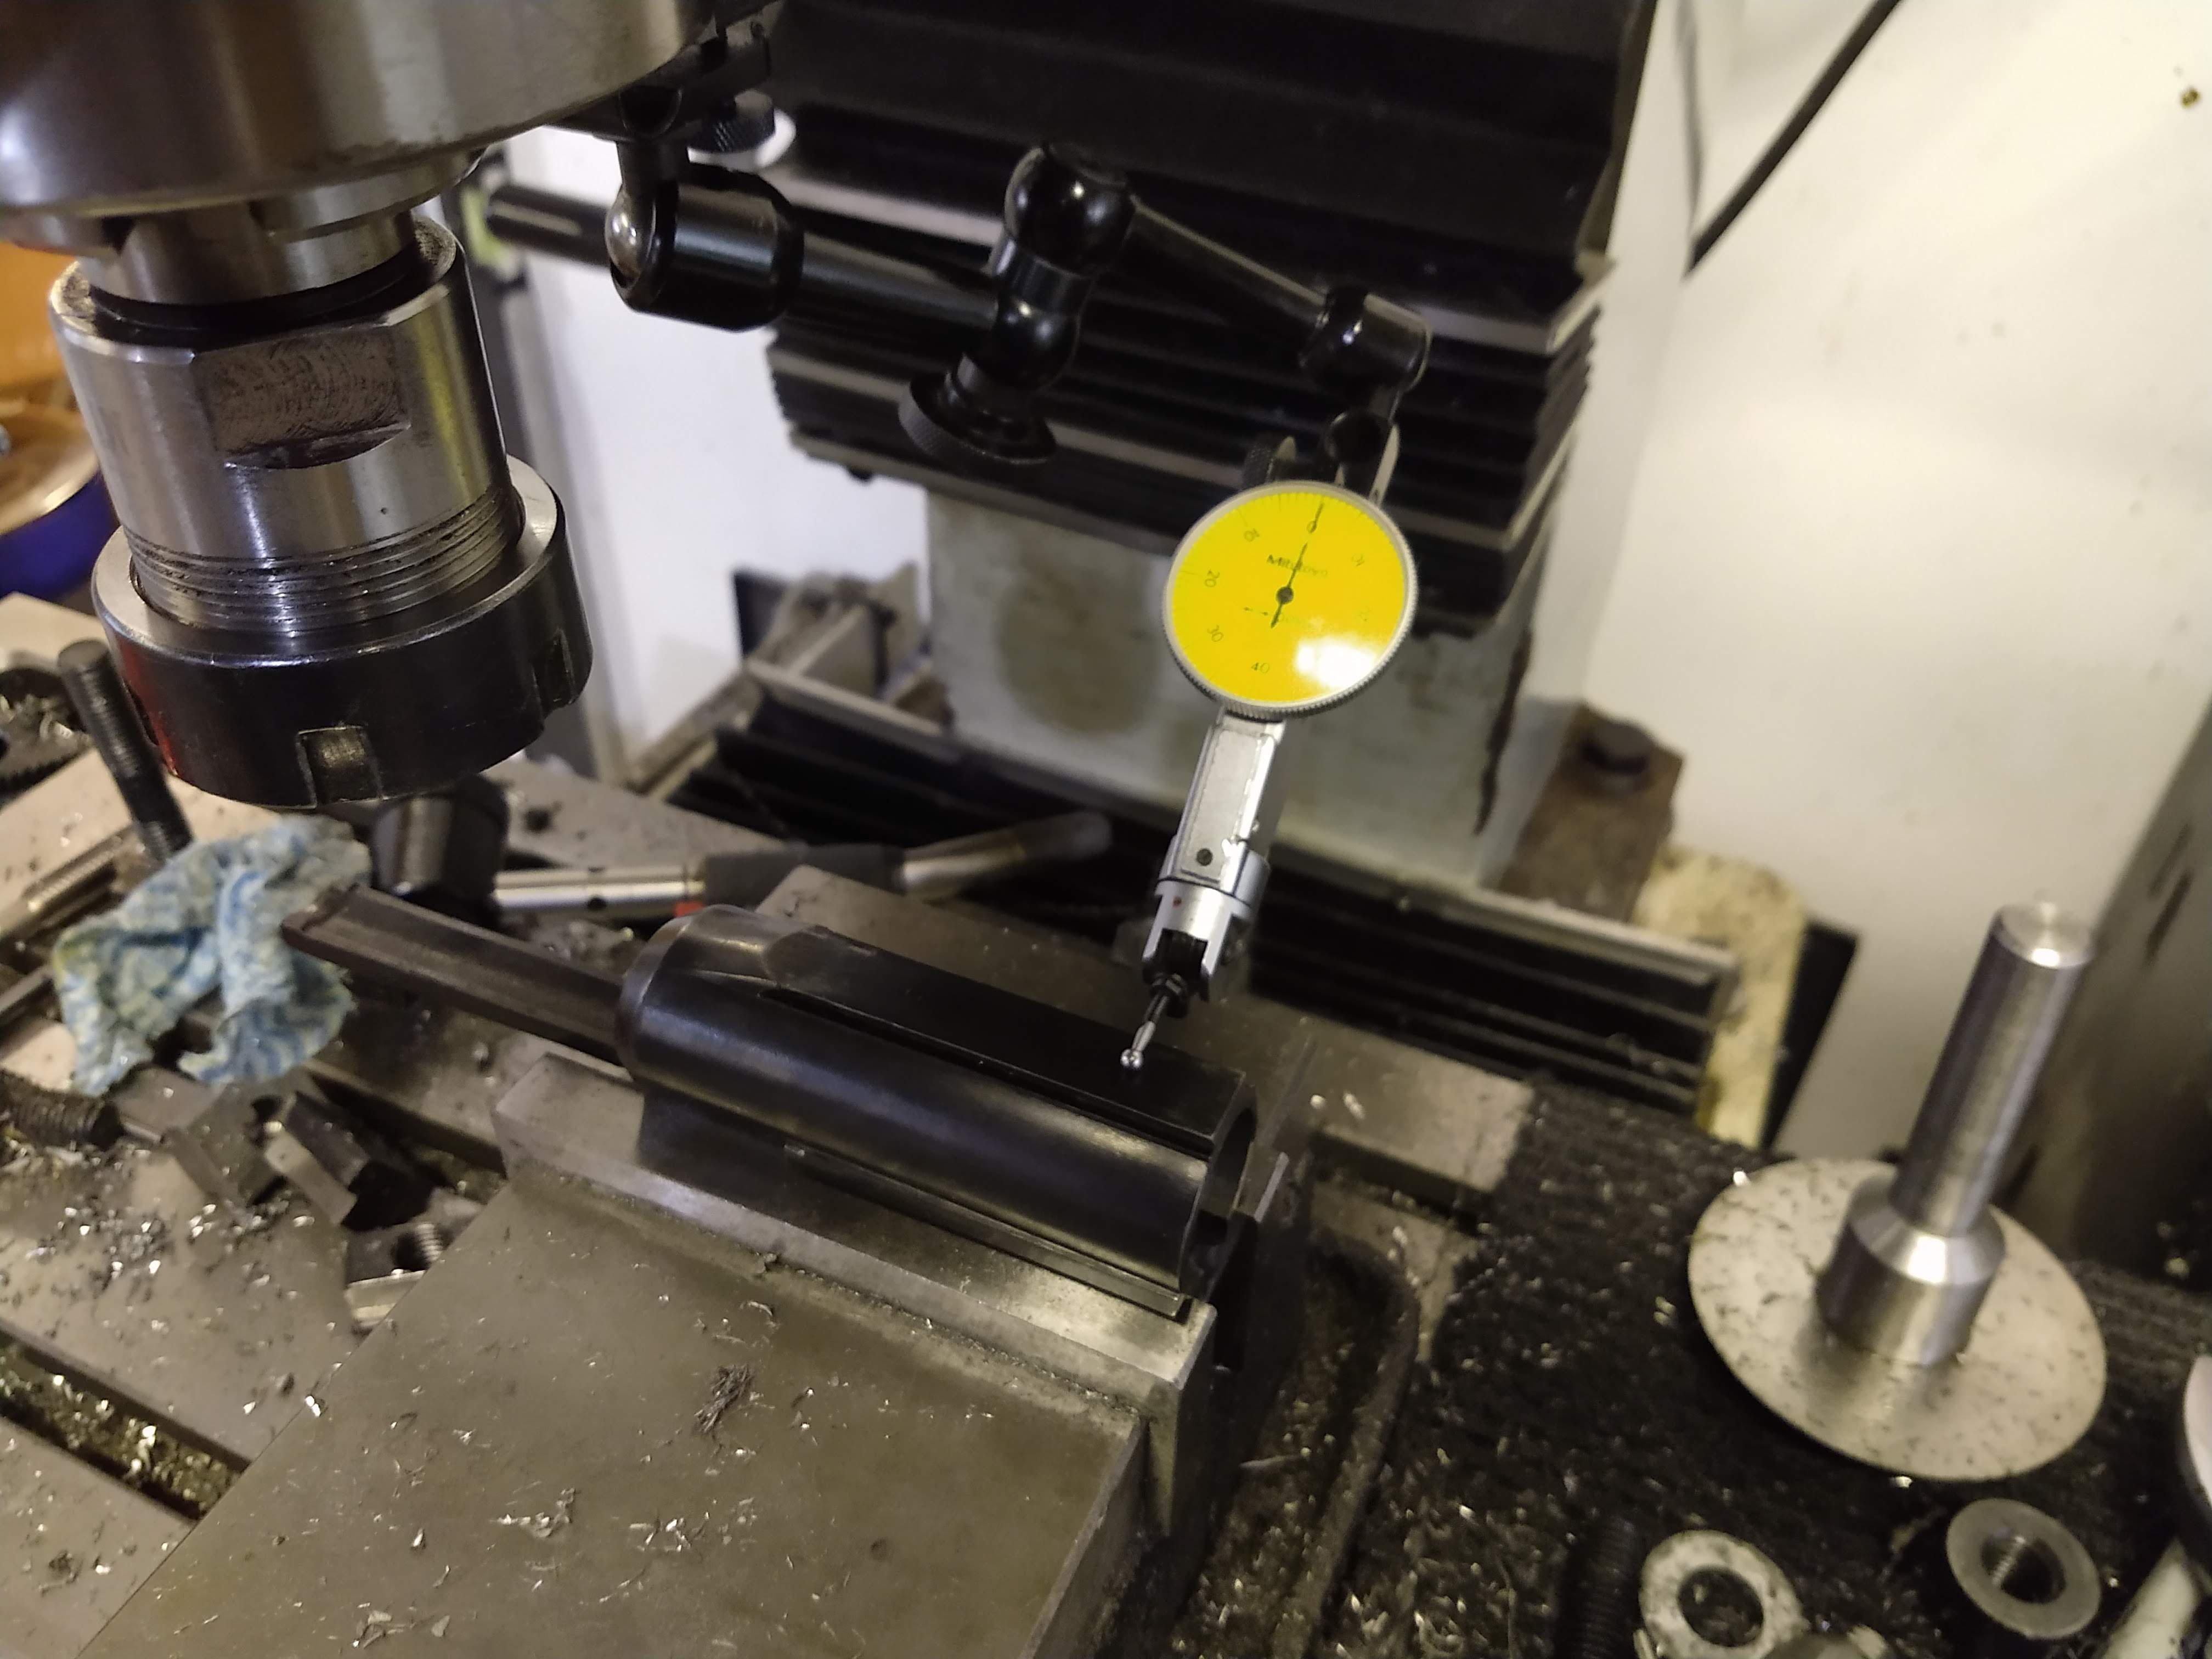
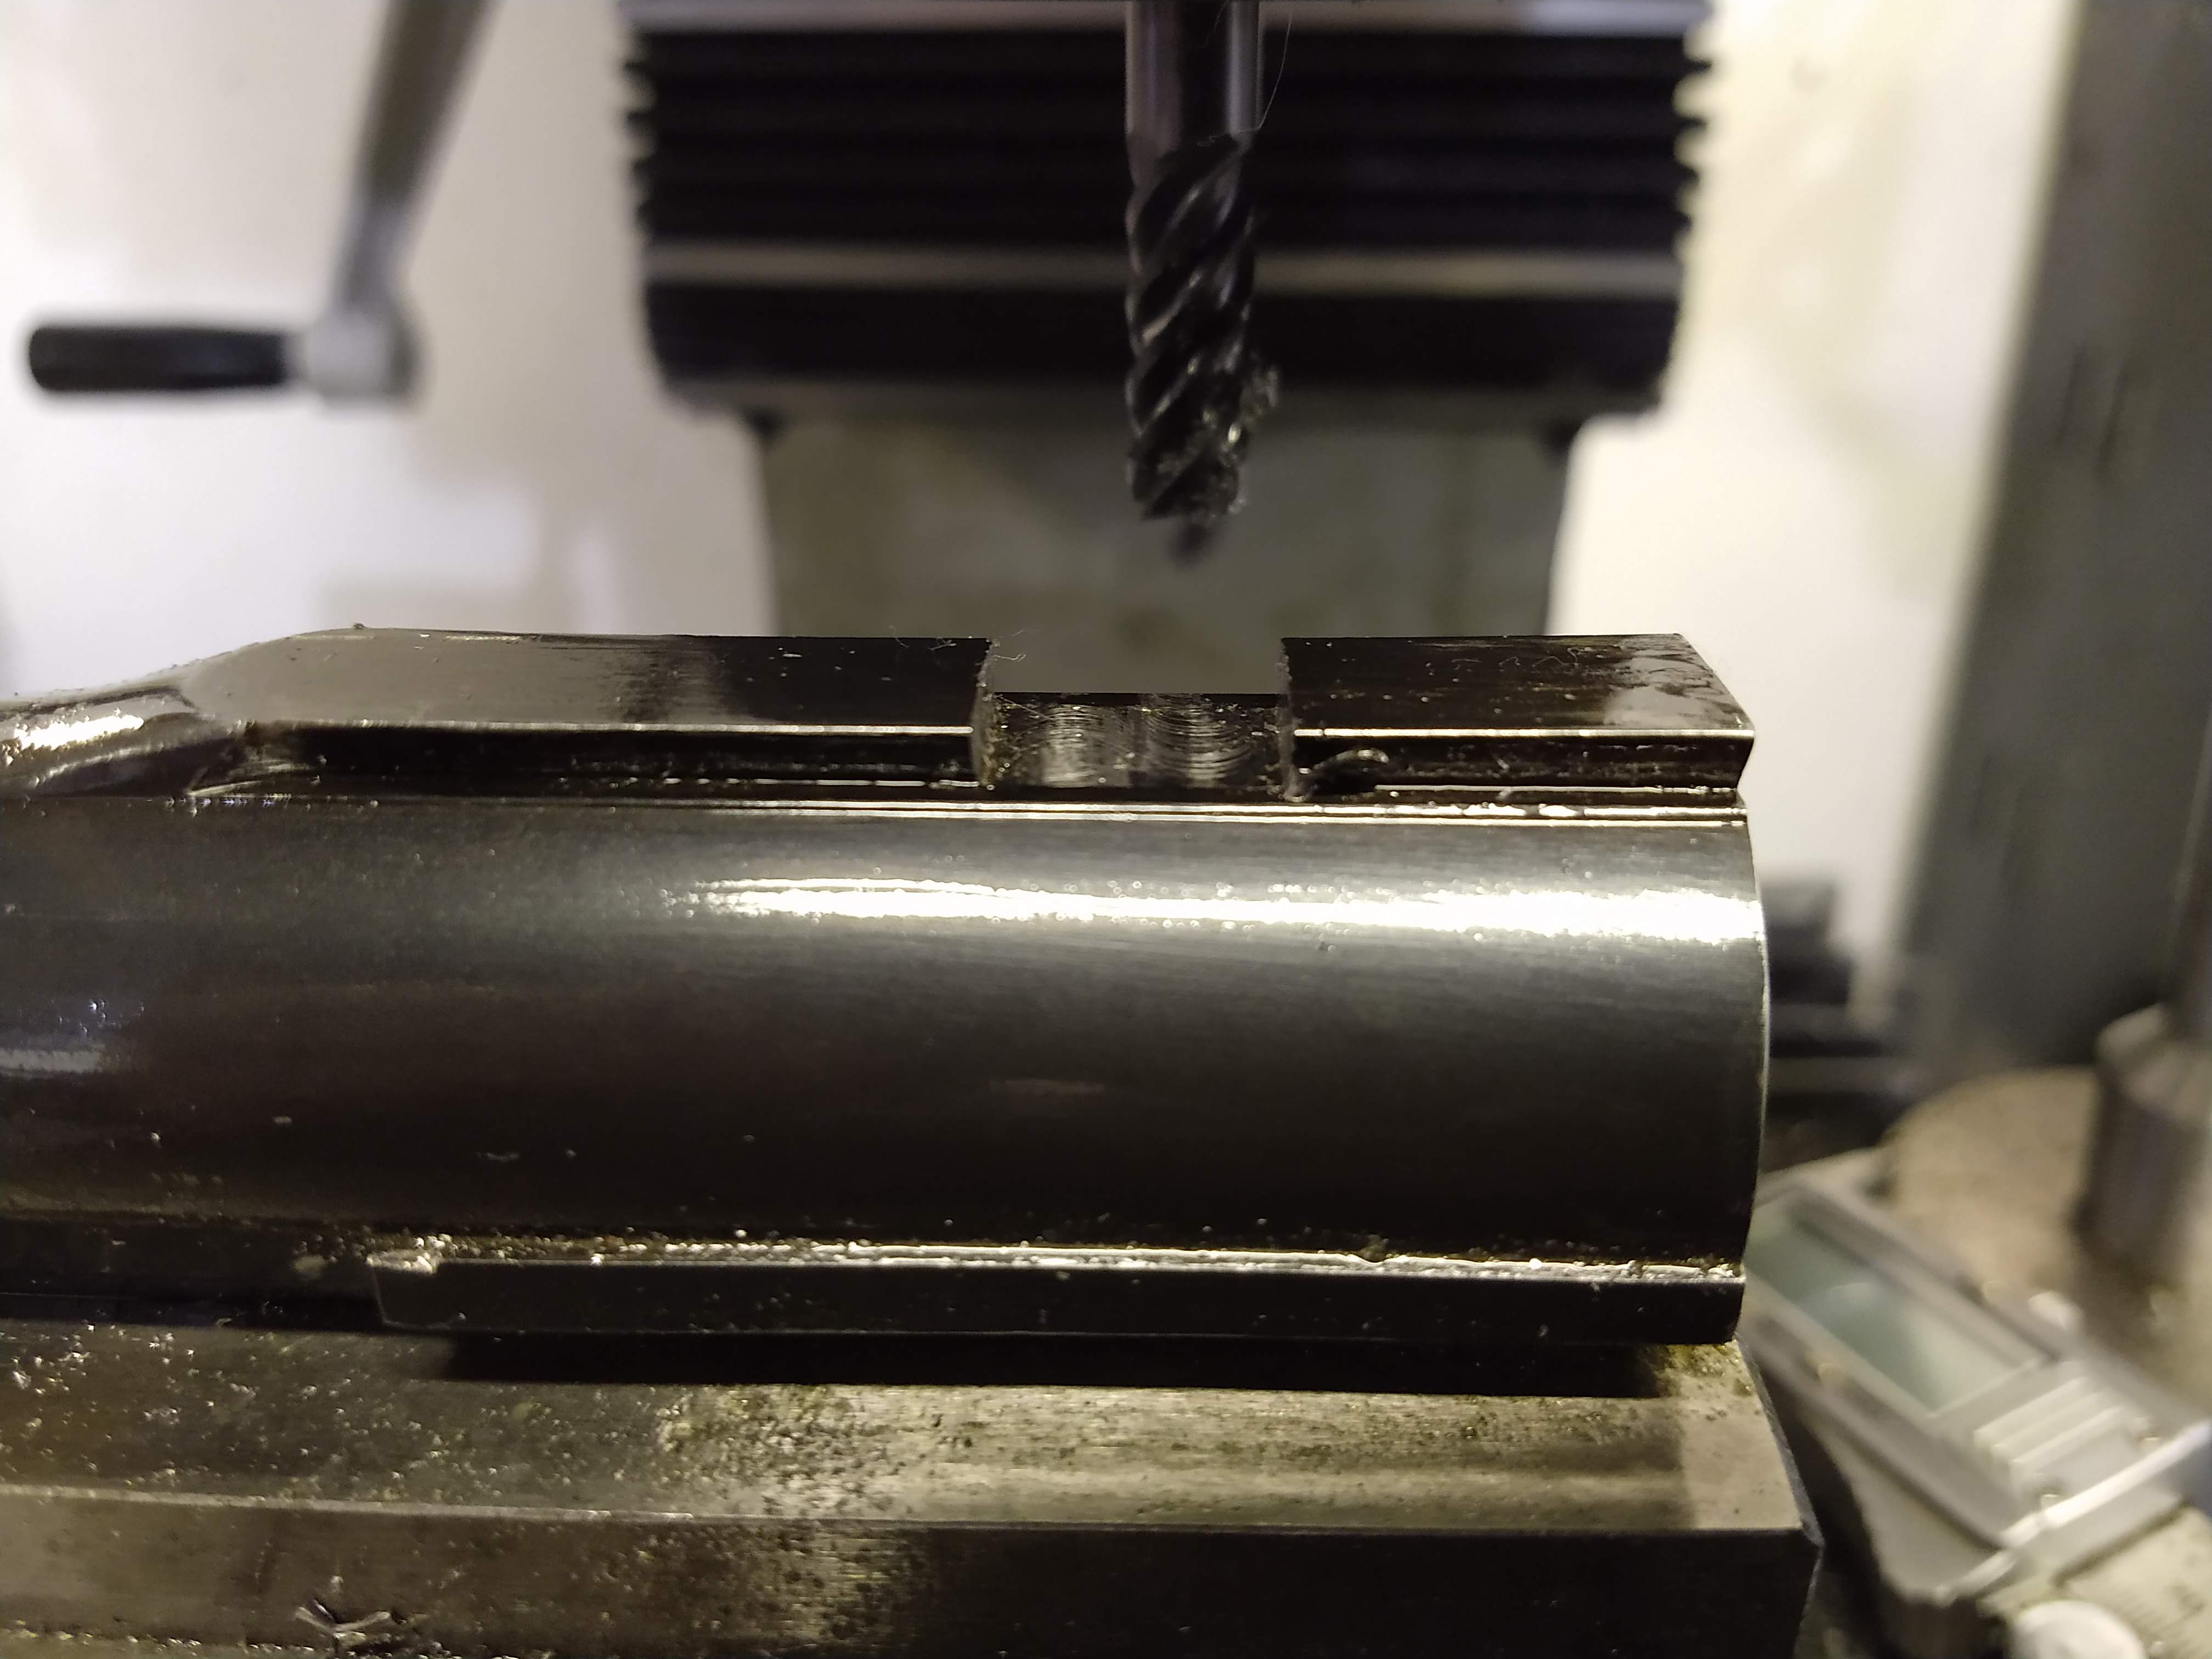
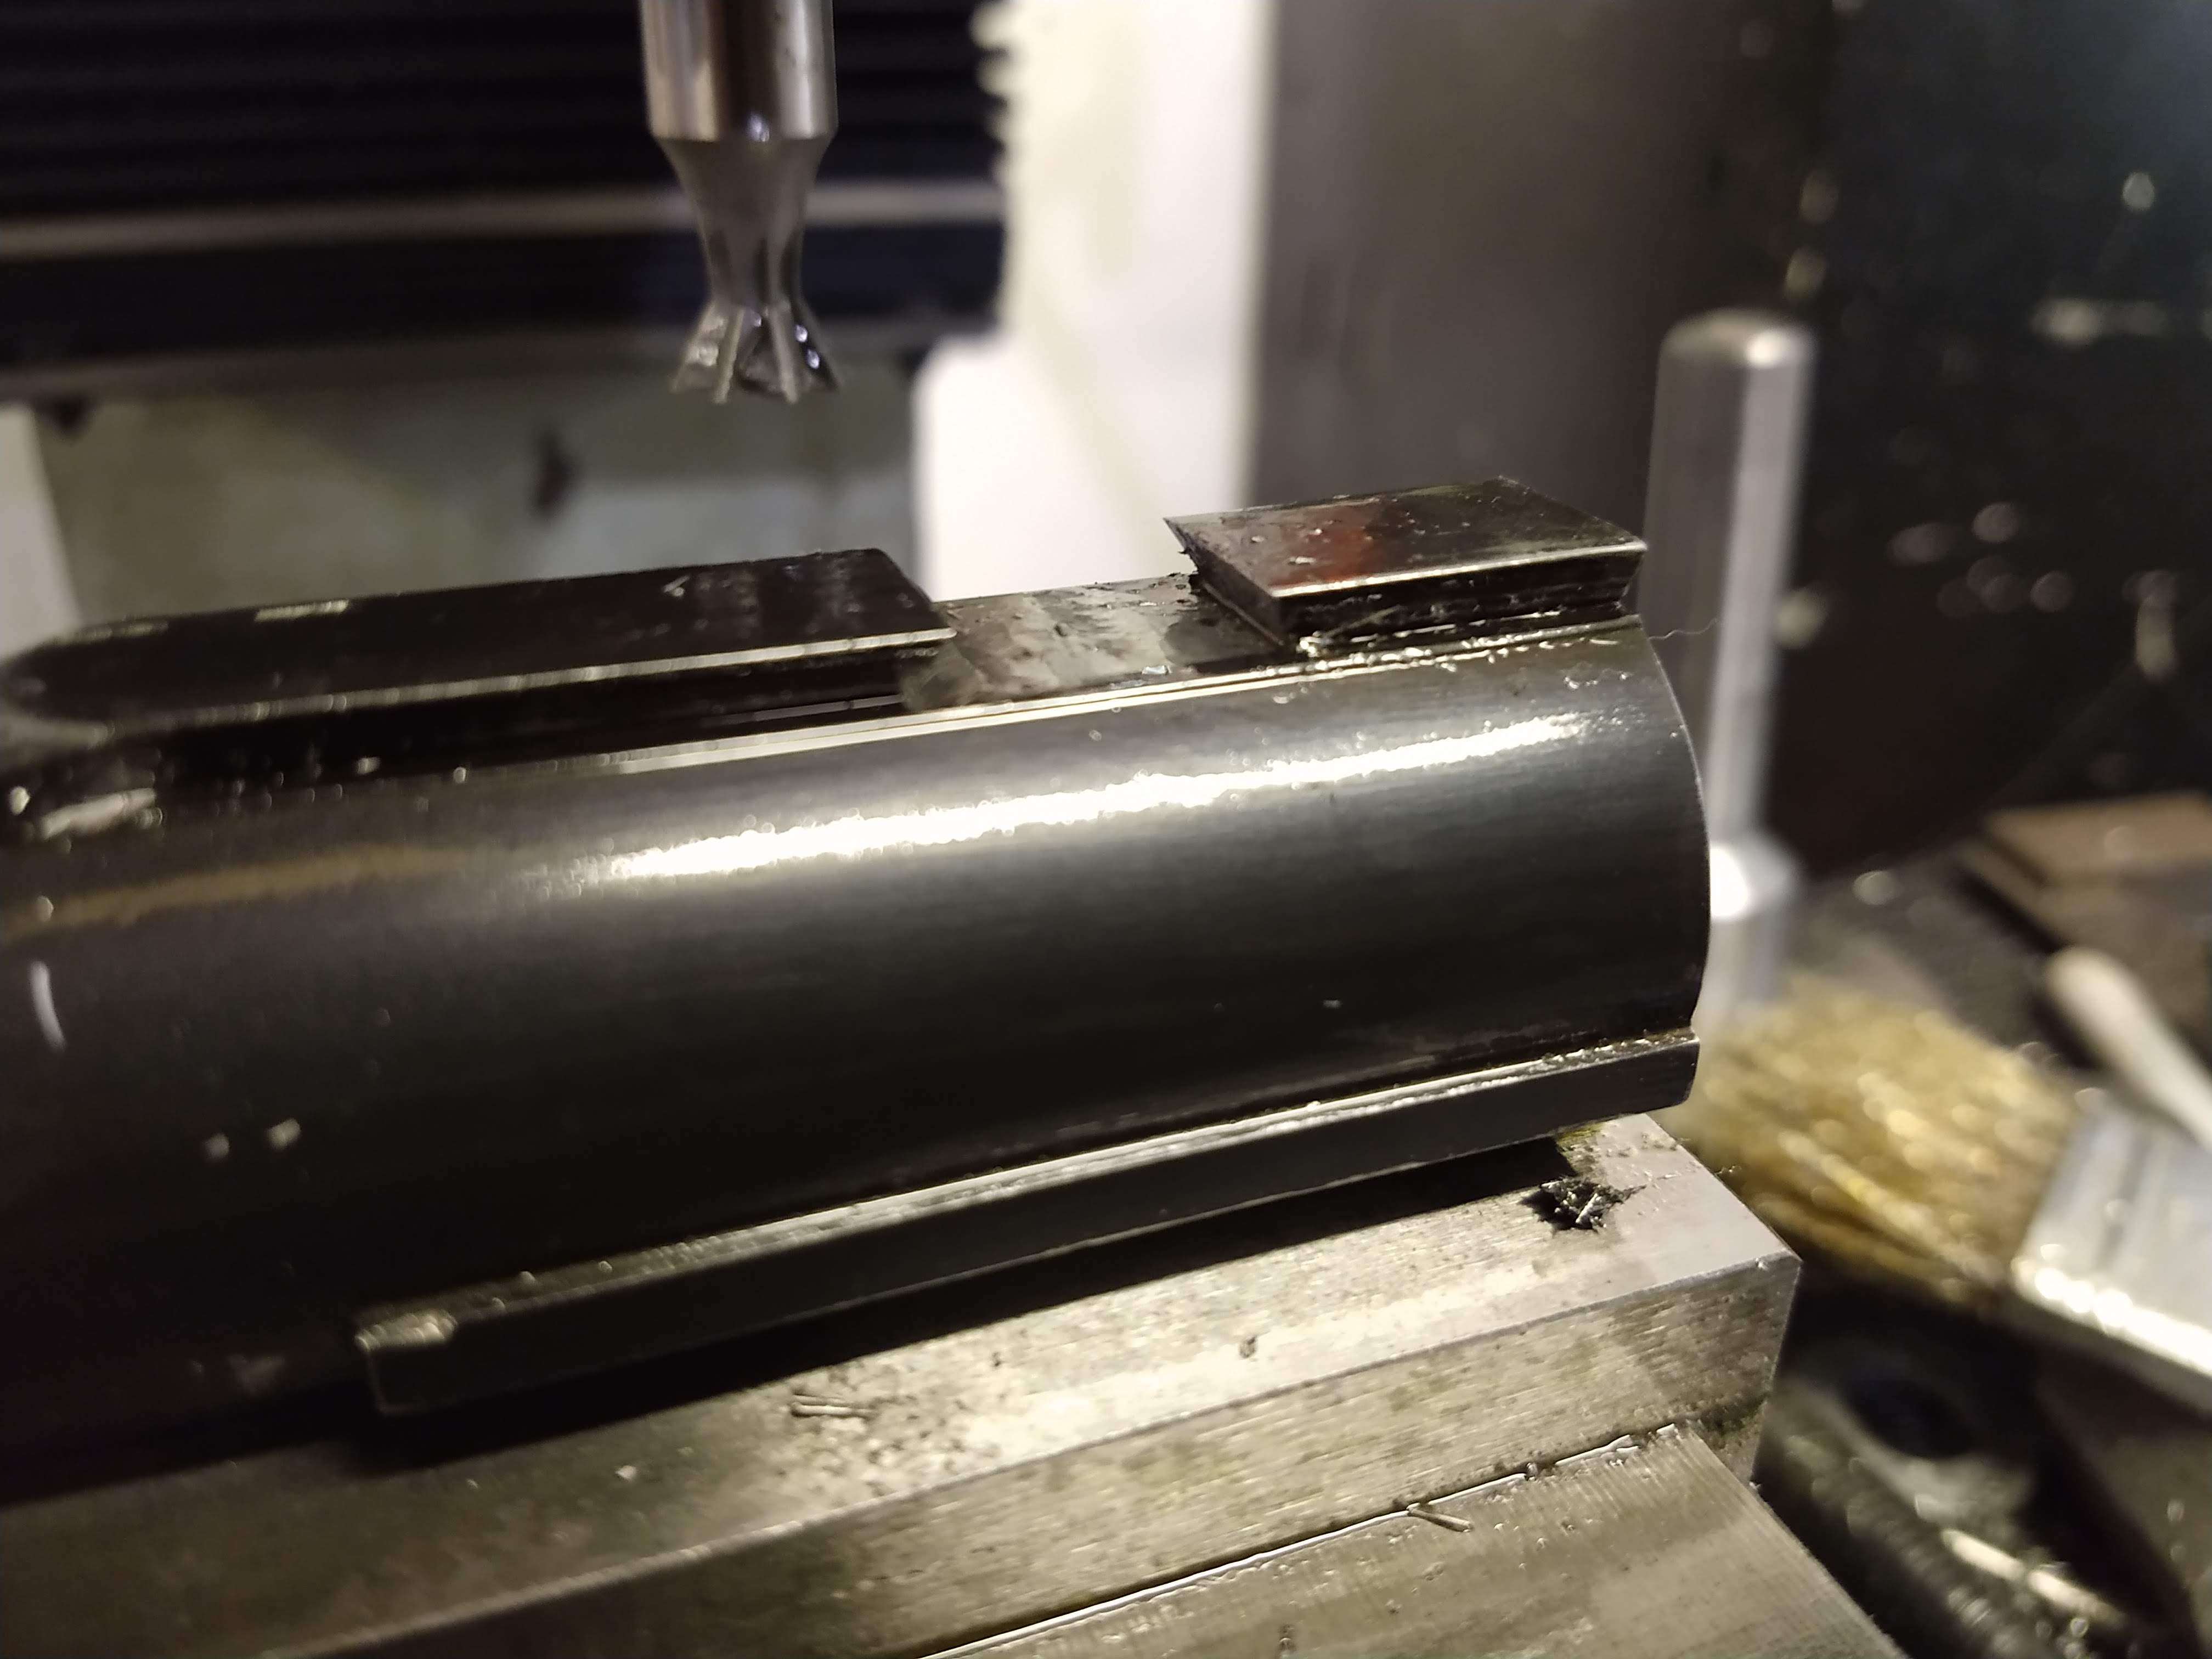
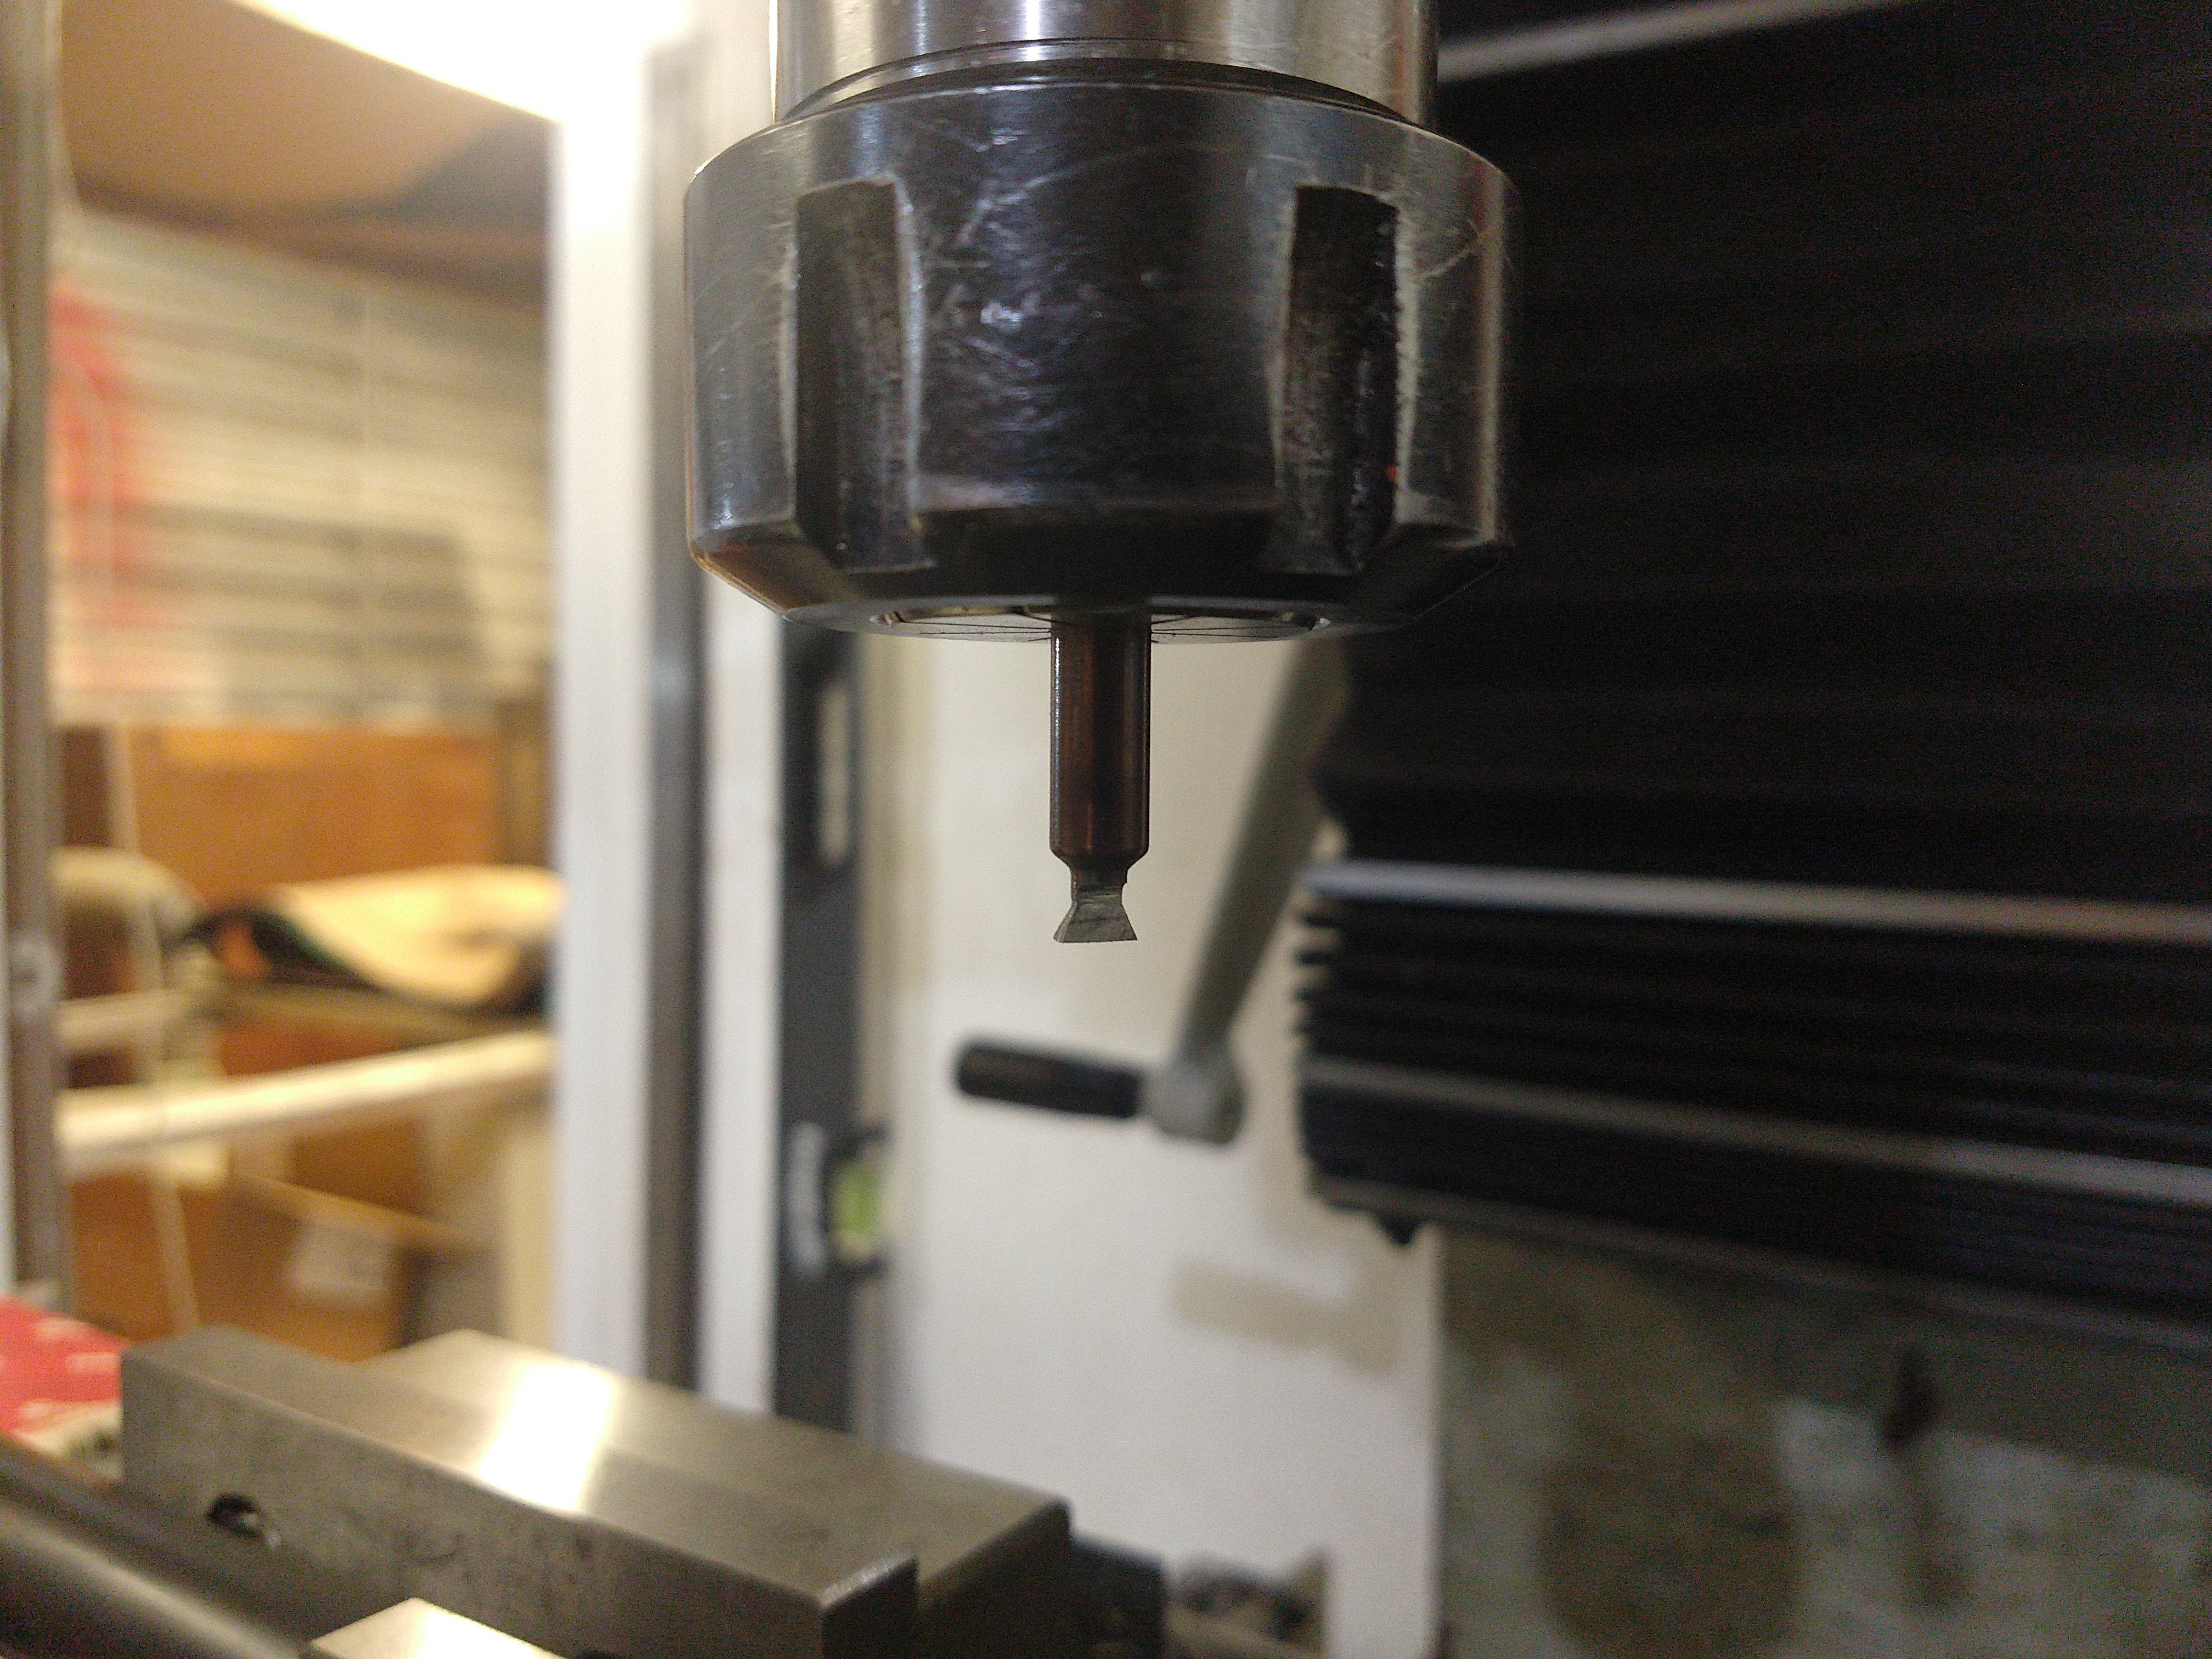
Cutting the dovetail in the barrel block was easy enough. I held it in the mill vice and used an indicator to check that the top rail was parallel to the table. I then cut the bulk of the material out with an end mill and cut the dovetail sides with a 60deg cutter.
After that was roughed out, I de-burred and smoothed everything out with a selection of stones.
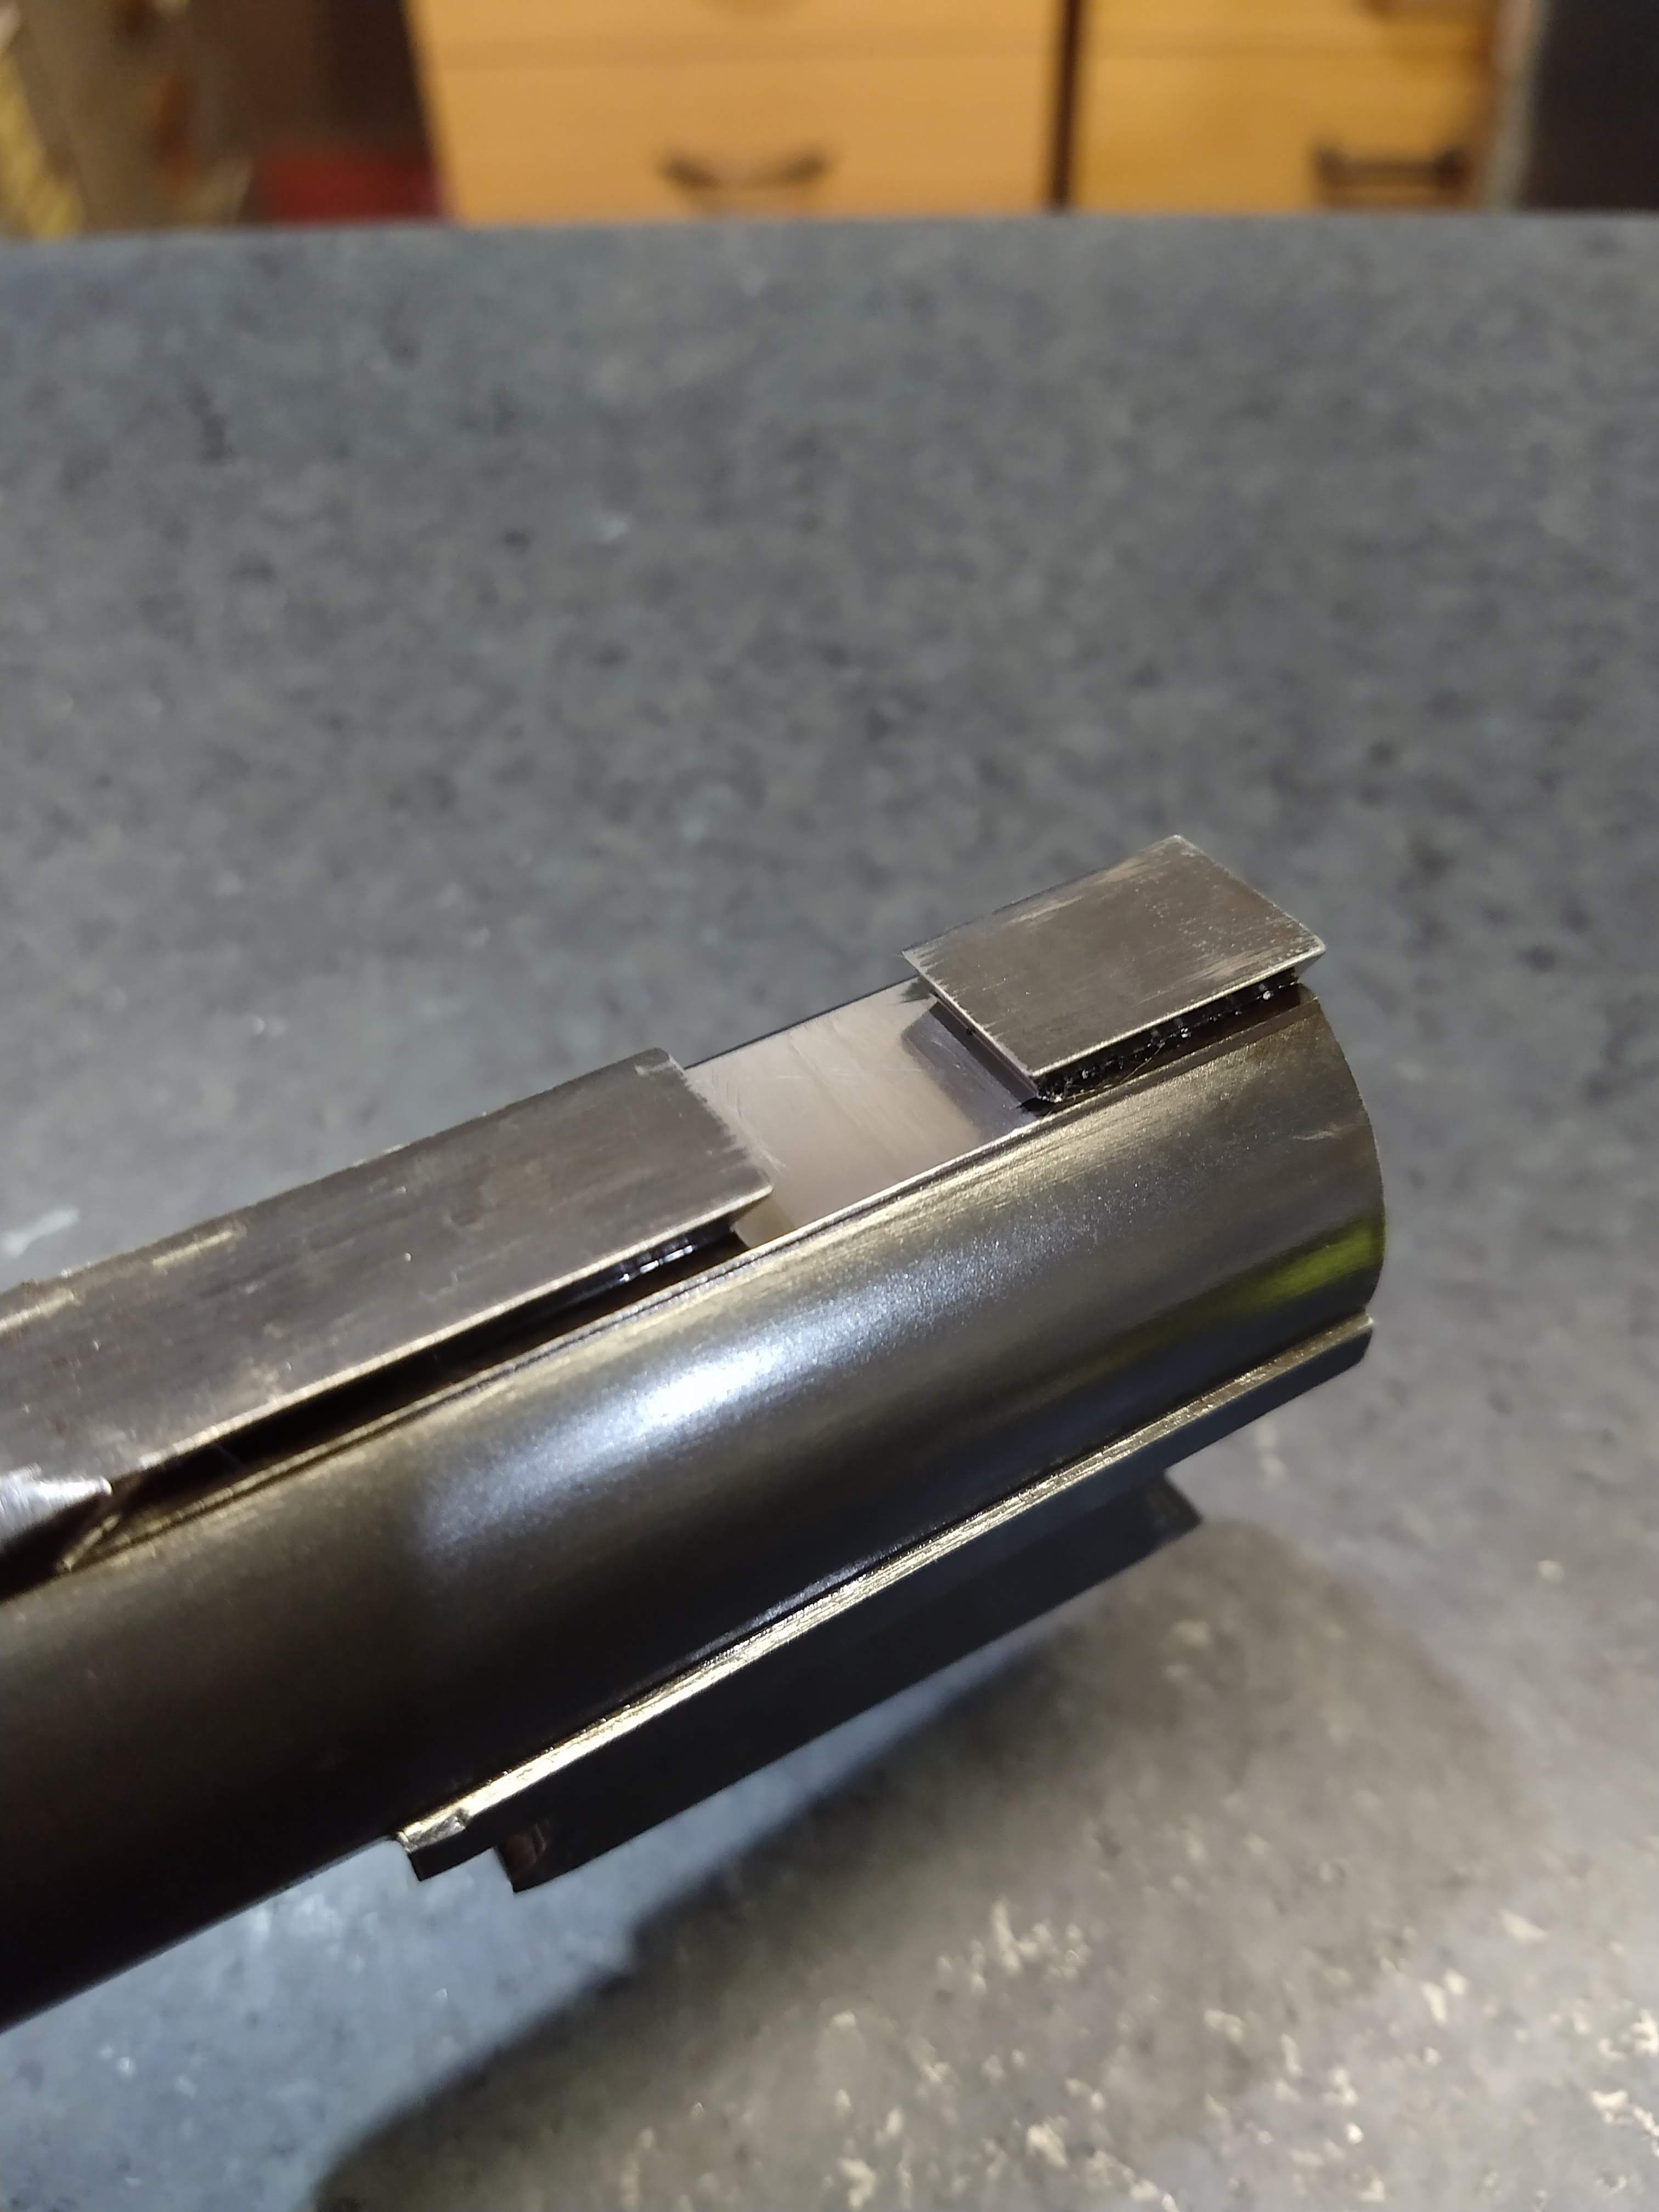
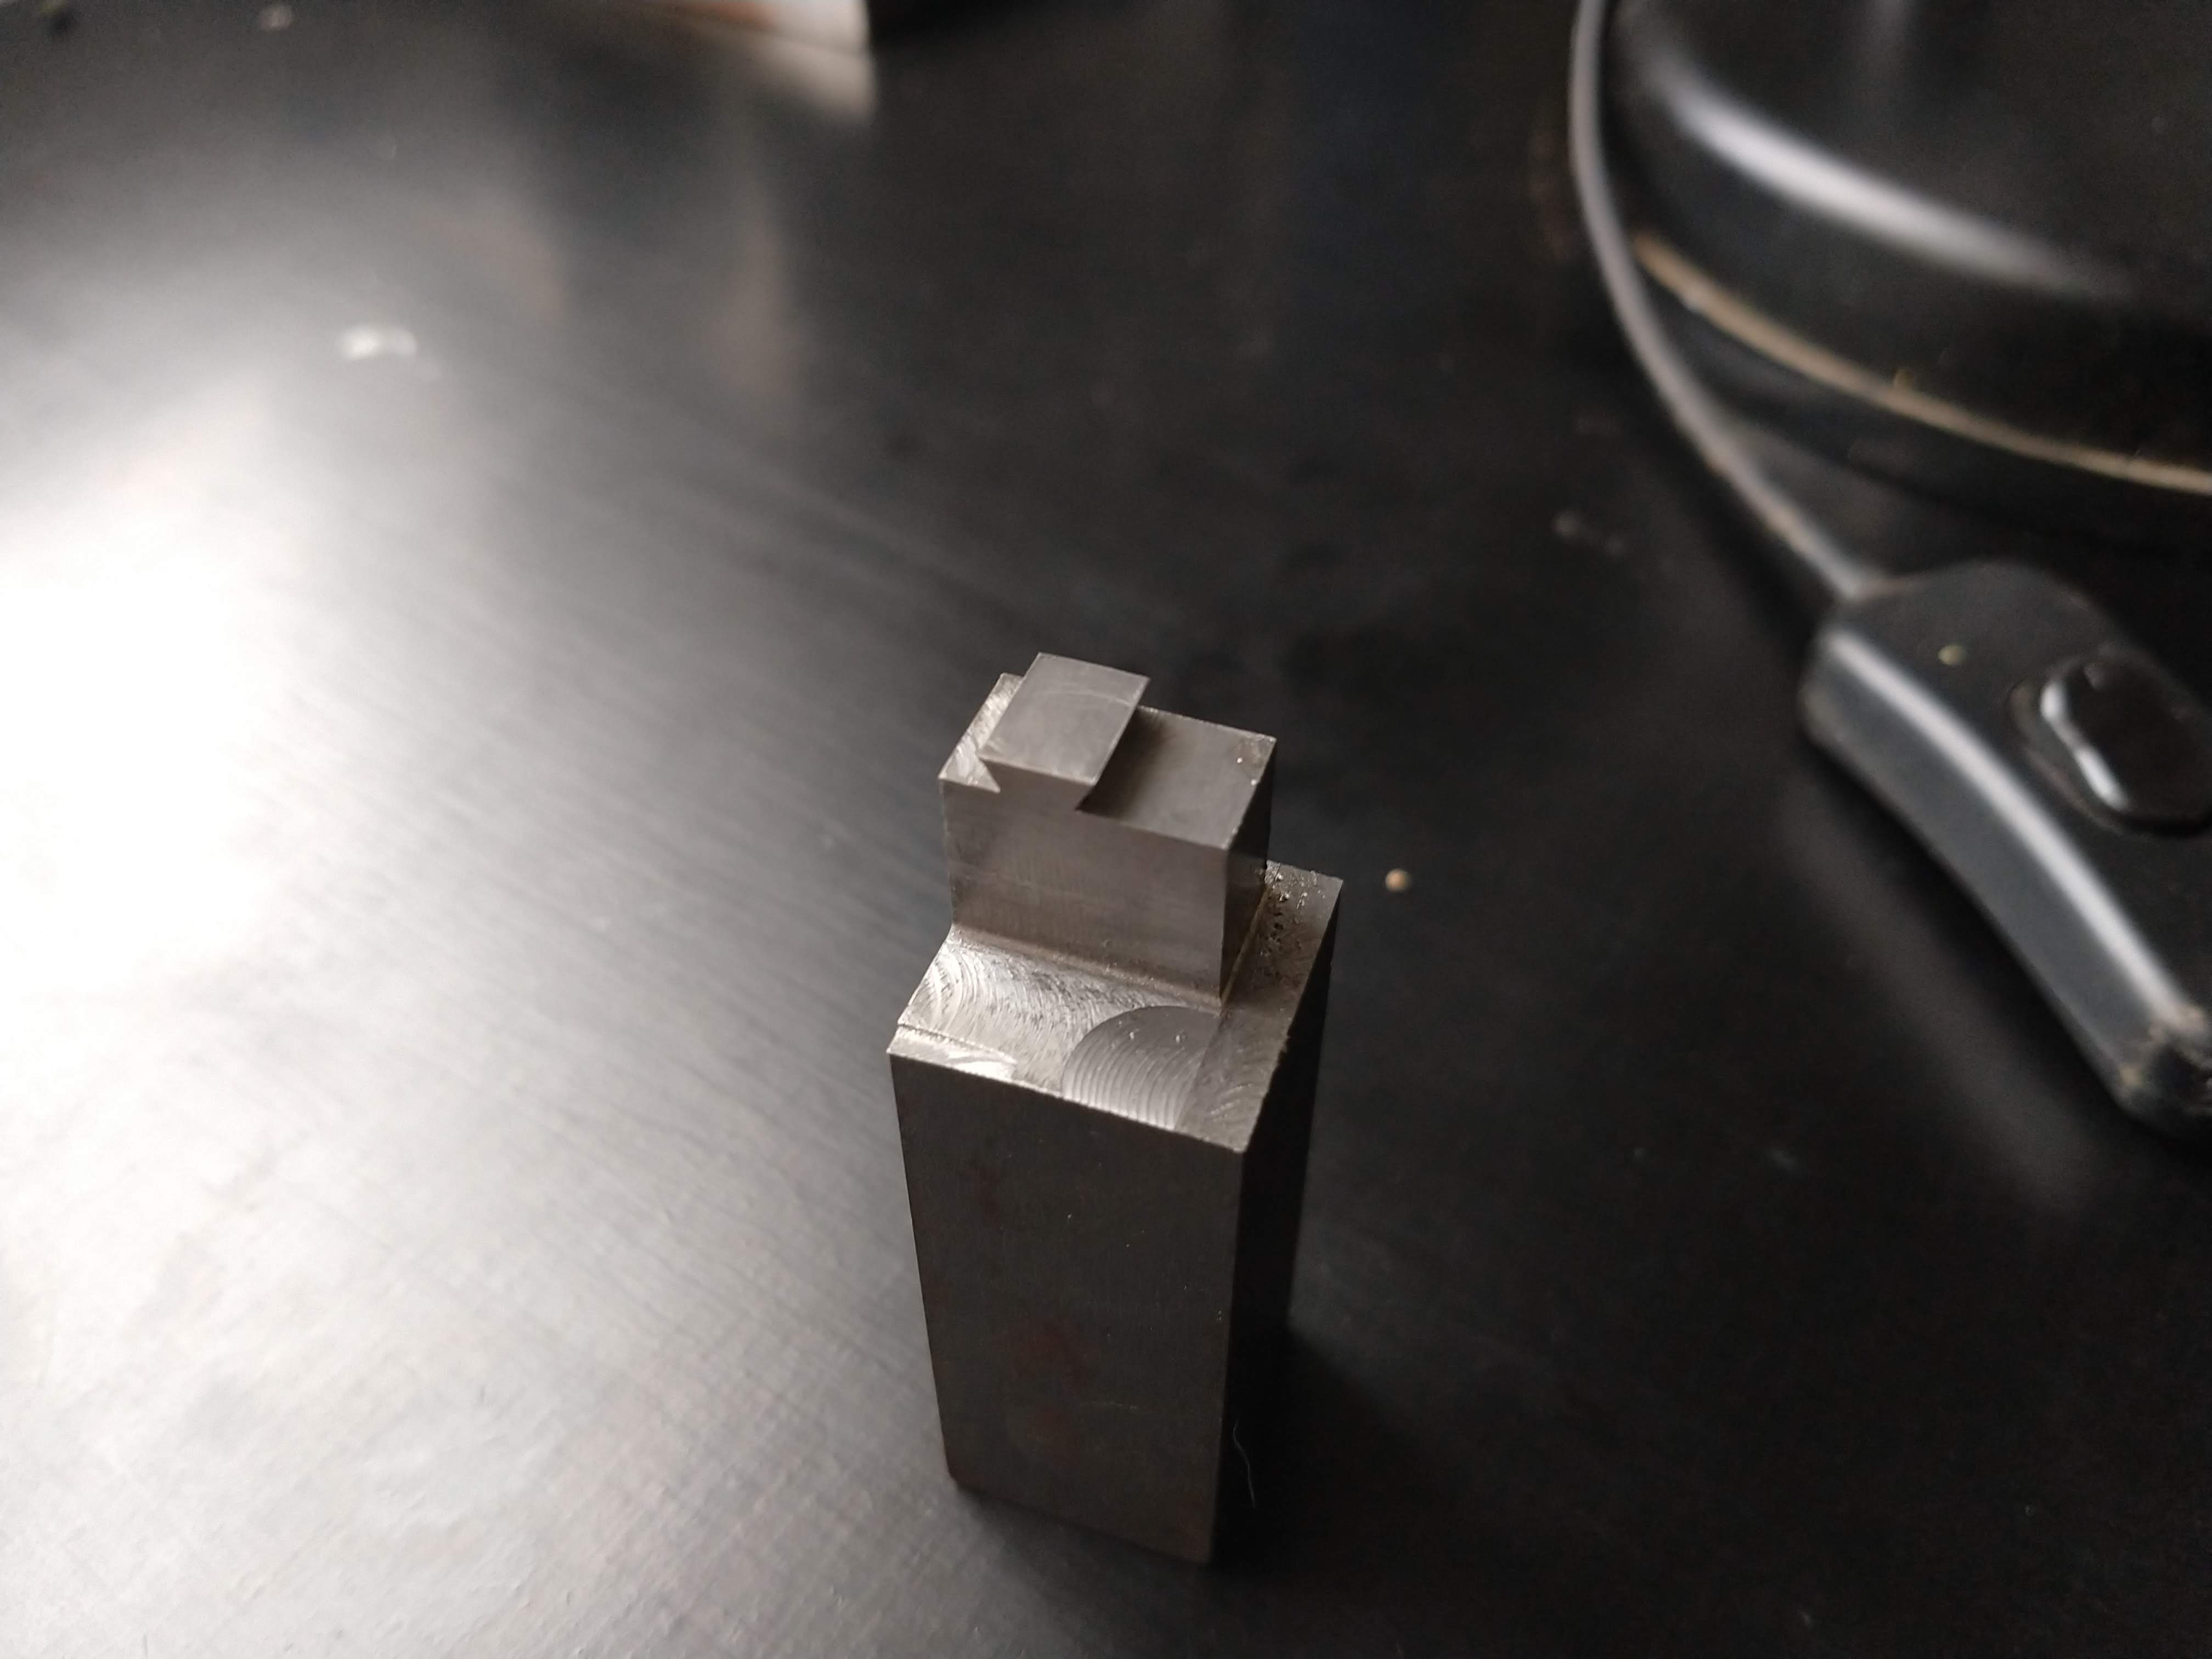
Once that was finished to size, I started on making the sight mounting block. This is made from an offcut of 416 stainless, as it machines beautifully and I can bead blast it and not have to finish it otherwise.
I need to either make or buy a very fine tap for the sight elevation screw. Im thinking something like M6x0.5 or M5x0.5. TradeTools have an M6x0.5 tap for about $35, which while expensive for a single hole, would be smarter than spending an hour or two making and hardening a tap from carbon steel.
I also found this front sight block soldered to a barrel stub I had in my offcuts box. I need to change the underside radius to match my barrel and make a new sight post, then I can solder it in place once the barrel is installed.
I now have brass, dies, powder, a handful of projectiles and primers for this rifle, but the range test is still a ways off. Lots to do beforehand. So settle down Micky Duck! I will get there.
-
04-08-2021, 01:52 PM #53Member
- Join Date
- Sep 2016
- Location
- Waikato
- Posts
- 459
Some great work going on there.
If a gun tap would do the job for you (it is a through hole you're talking about if I understand correctly?) I see CarbideNZ have M5x0.5 for $14 and M6x0.5 for $22. Bit cheaper than Tradetools. Originally Posted by SixtyTen
SixtyTen likes this.
-
07-08-2021, 04:19 PM #54Member
- Join Date
- Dec 2015
- Location
- Papakura, Auckland
- Posts
- 605
Thanks for the heads up, I had somehow missed that CarbideNZ had them. I just ordered a M5x0.5 Originally Posted by PaulNZ
I also got a couple of R8 collets for my mill which are mighty hard to find for a decent price.PaulNZ likes this.
-
22-08-2021, 02:39 PM #55Member
- Join Date
- Dec 2015
- Location
- Papakura, Auckland
- Posts
- 605
Seeing as I have been stuck at home for the last week, I managed to find some time to work on this rifle.
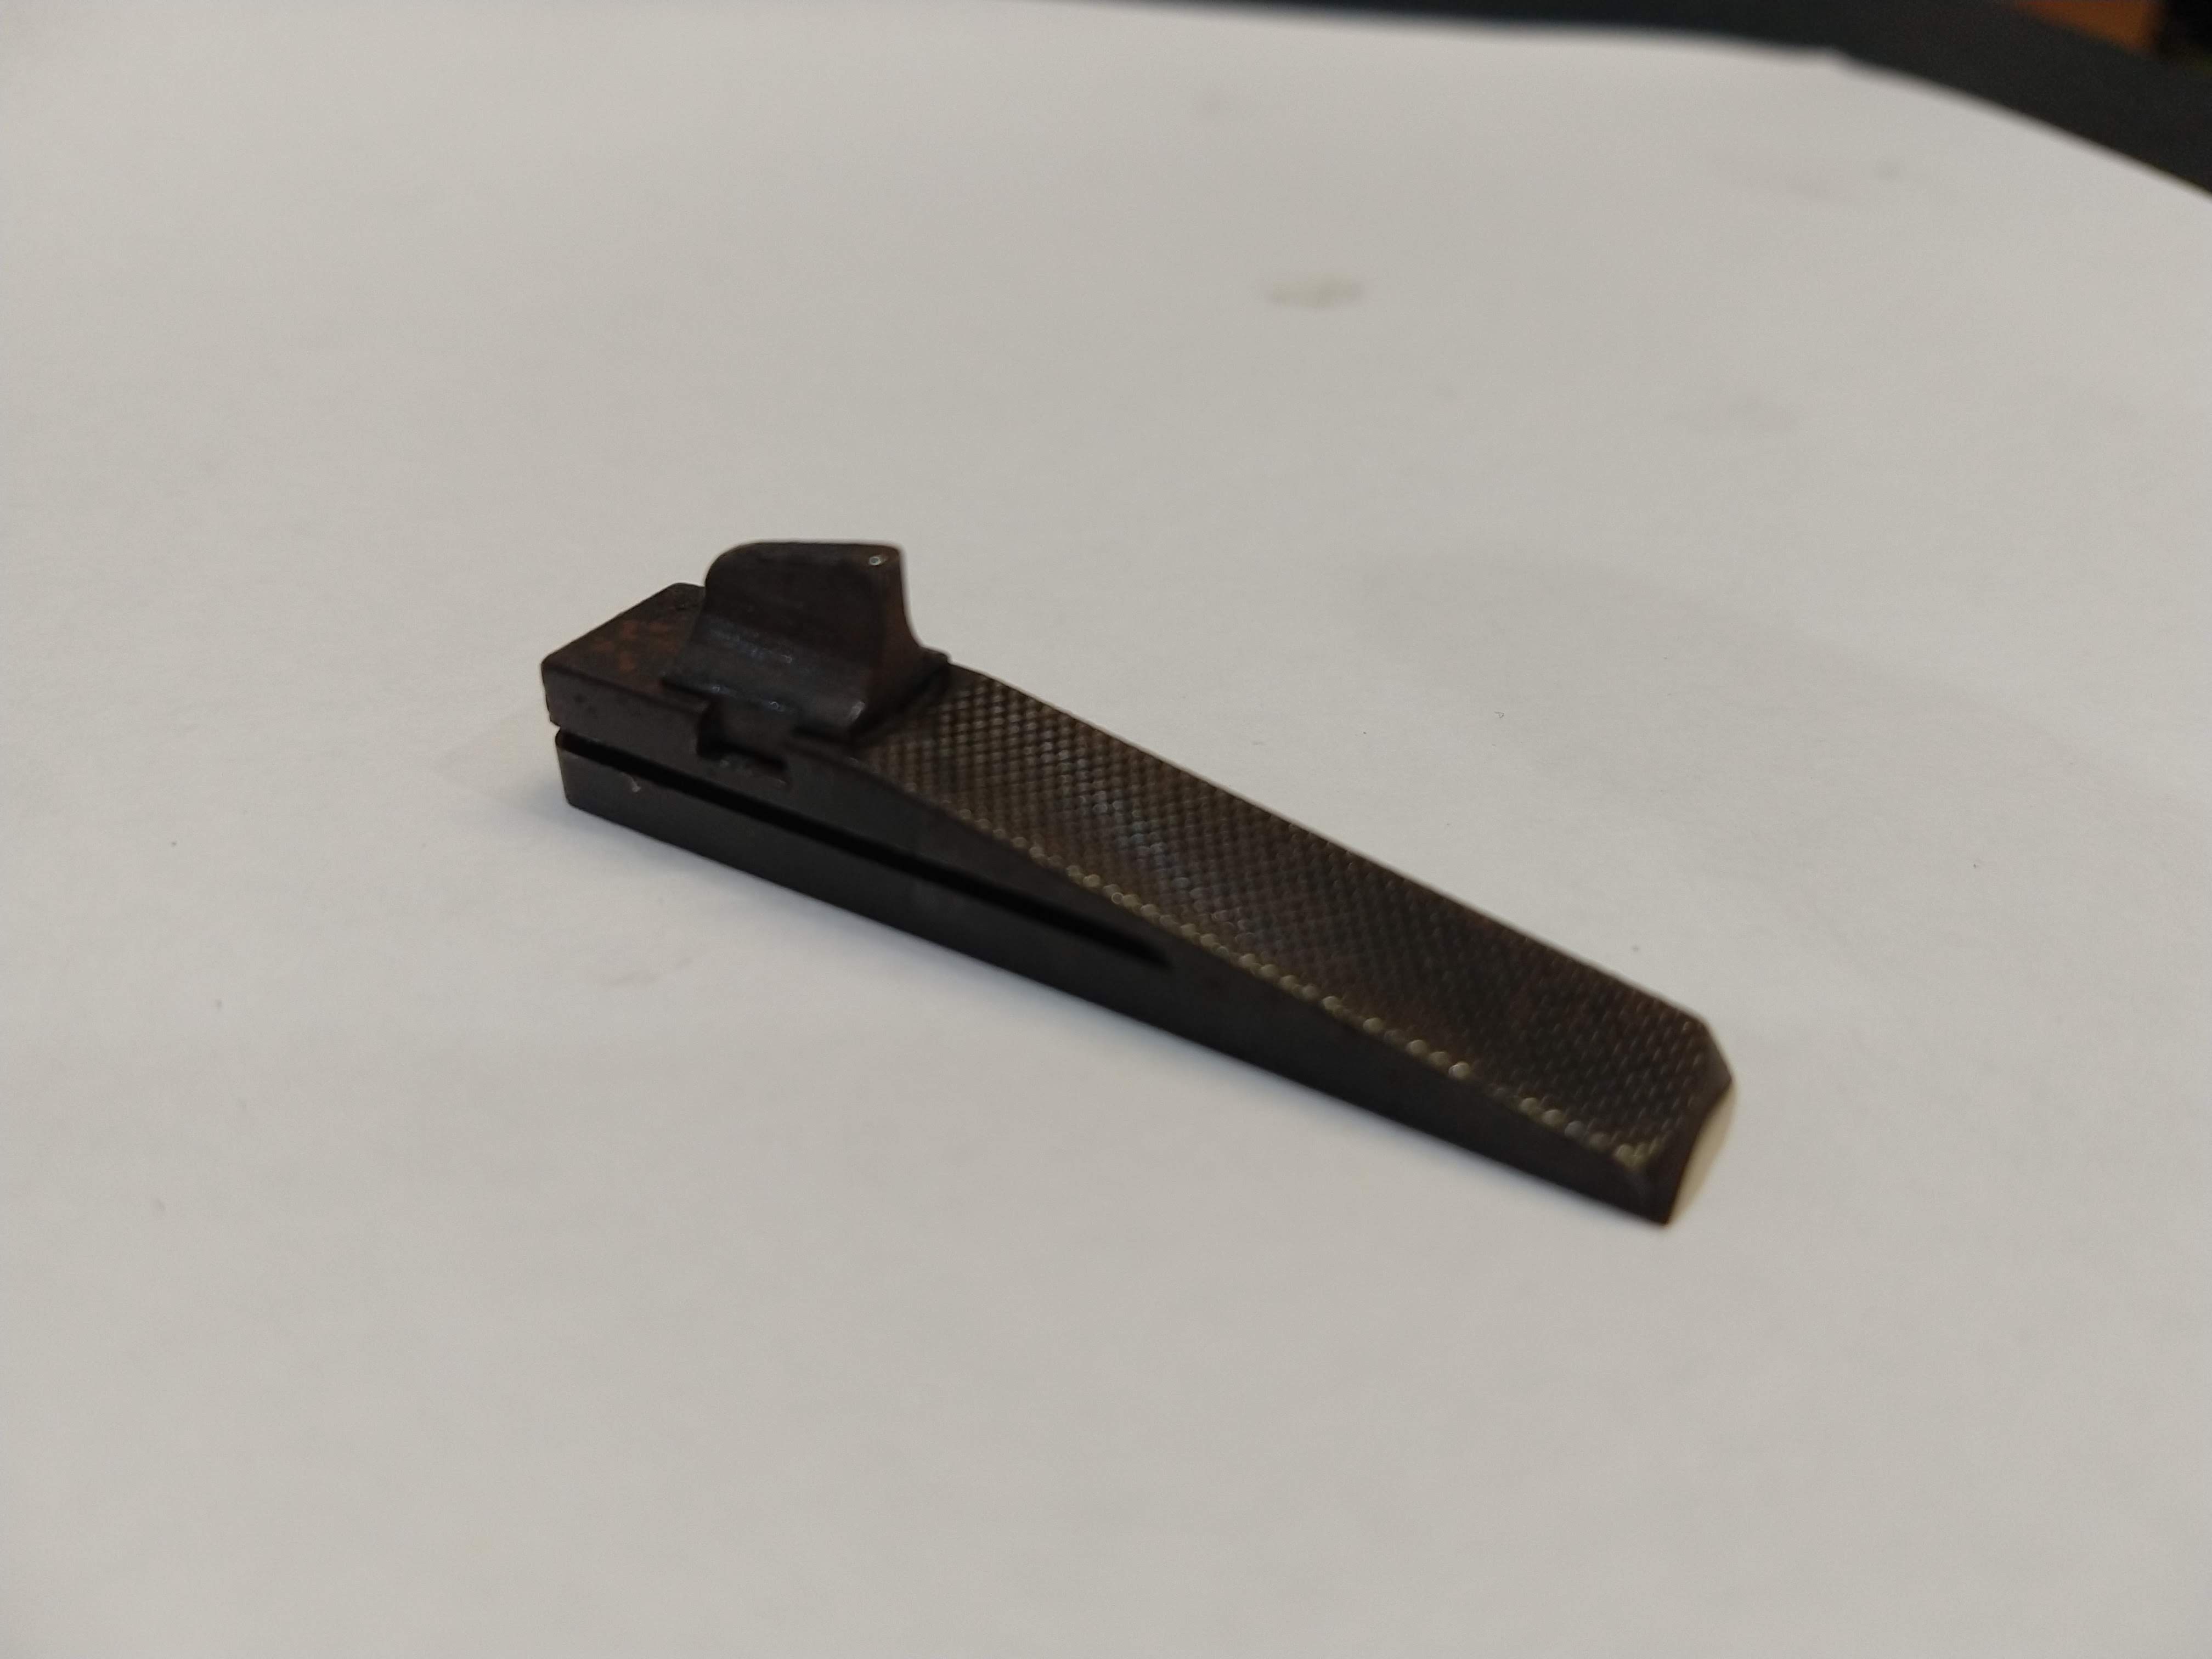
I finished off the sight block and made a aperture holder to screw into it. I am likely going to have to make this again, as the threaded hole for the aperture is not dead center on the threaded post that goes into the block. Meaning that if I rotate it 180degrees, the windage will change along with elevation.
I also made a quick aperture insert from an M6 capscrew. I will experiment with different sizes and designs once I start shooting it.
I cold blued the barrel and it came out way better than I expected. Turns out 4140 takes cold blue really well. The most important thing I have found is having the metal extremely clean before starting. I use CRC Brake Clean to degrease and then Acetone.
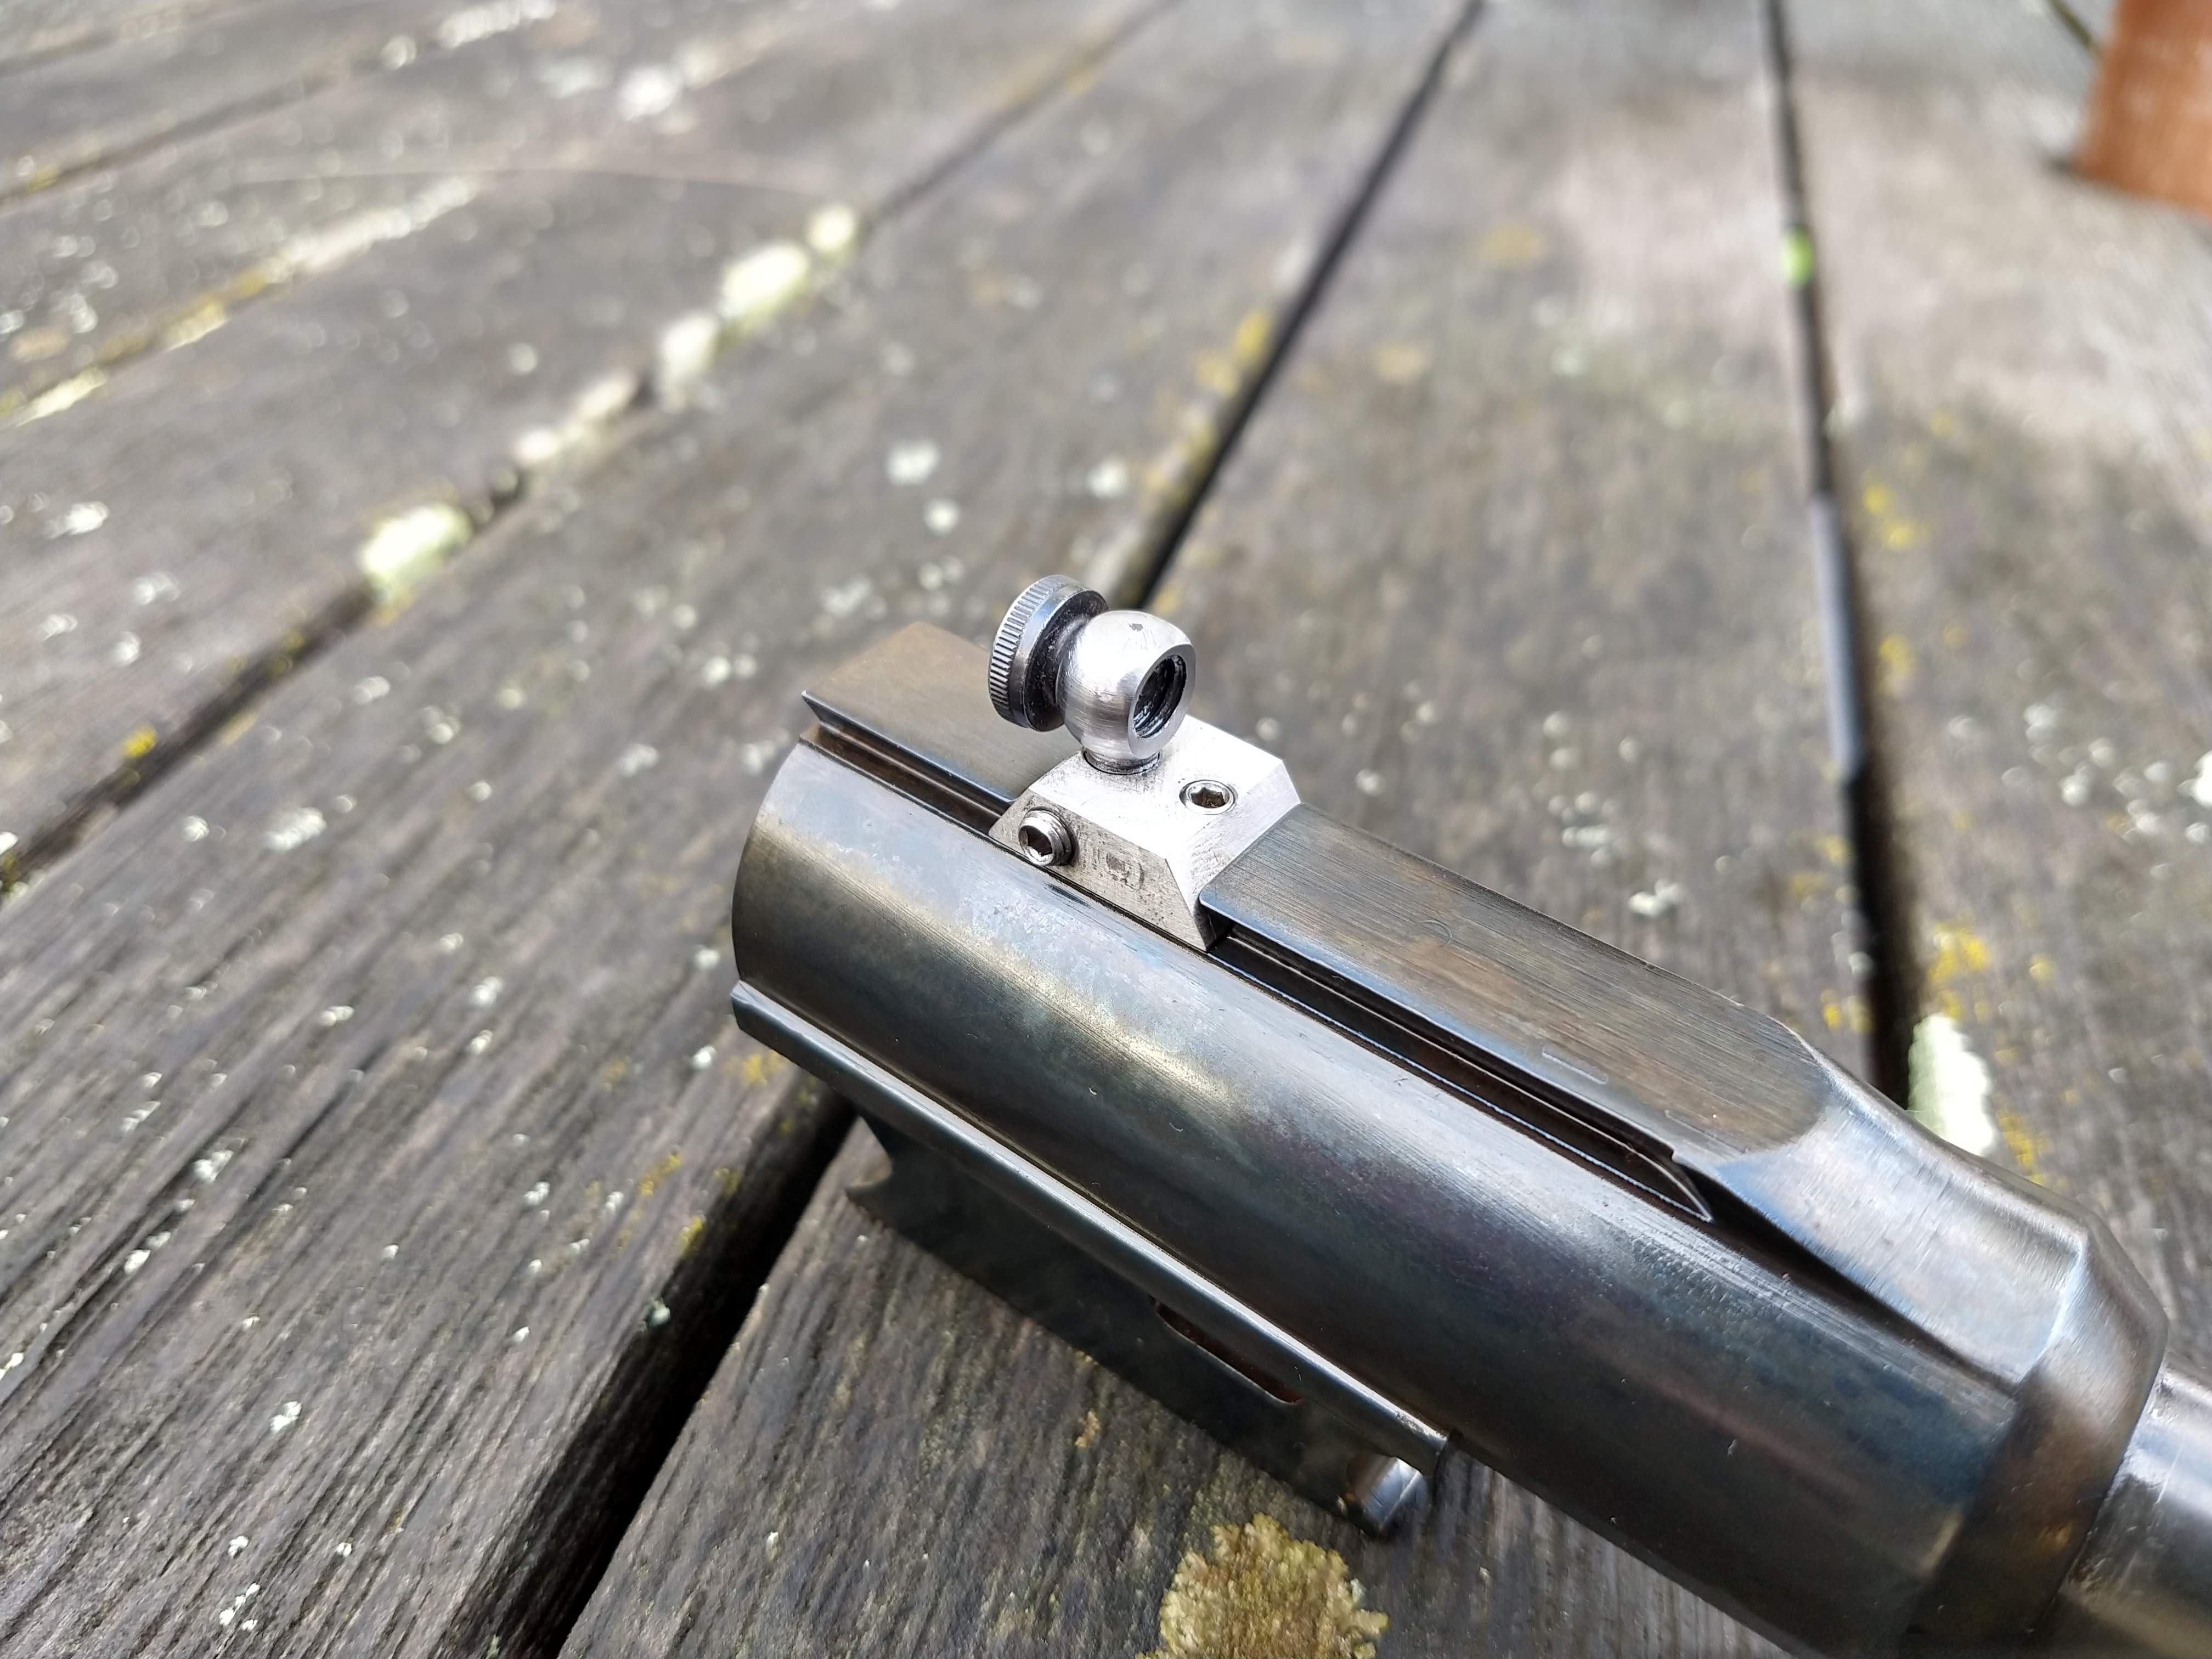
I ended up gluing the barrel in with JB Weld, as I am not that confident in my soldering skills to do a nice neat job. I also decided to glue the front sight base on with JB Weld. Time will tell whether this is a good idea or not. With proper joint prep, it should be more than strong enough.
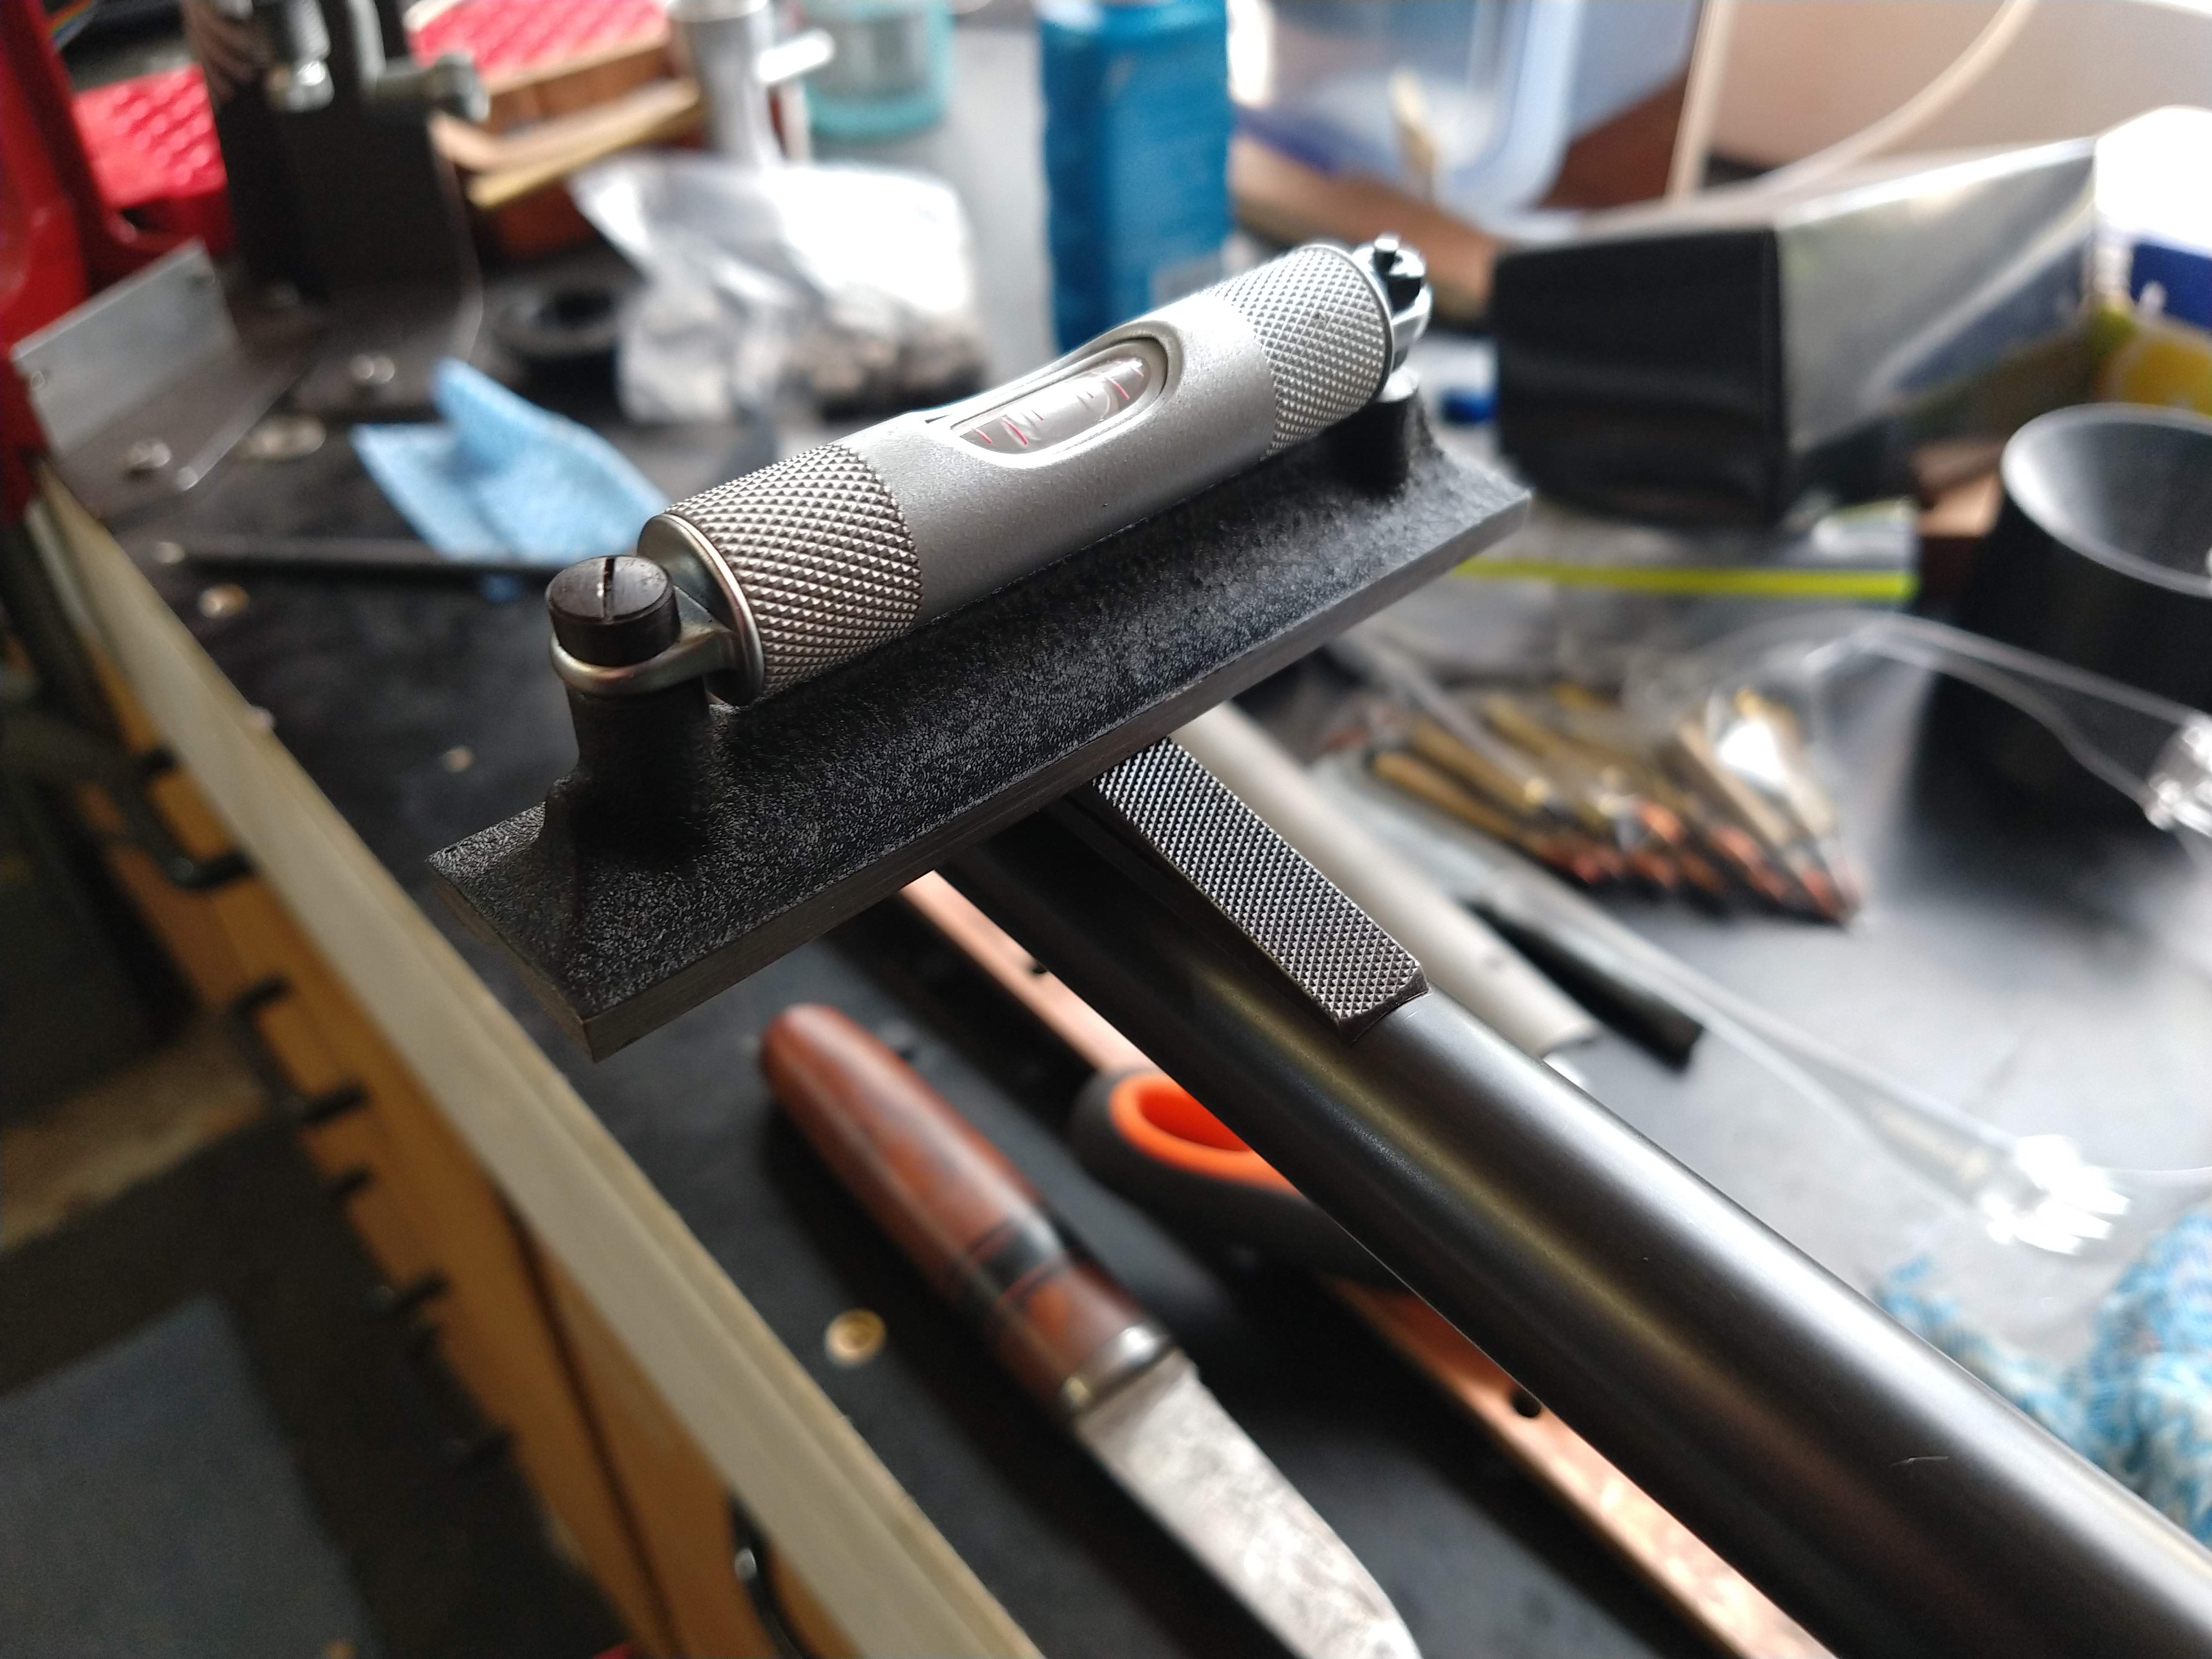
I used a machinists level to align the top face of the sight with the dovetail rail and marked its position. I then masked off and prepped the area for bonding. A good sand, brake clean, then acetone.
The sight base was held in place using a spring clamp and the joint cleaned up.
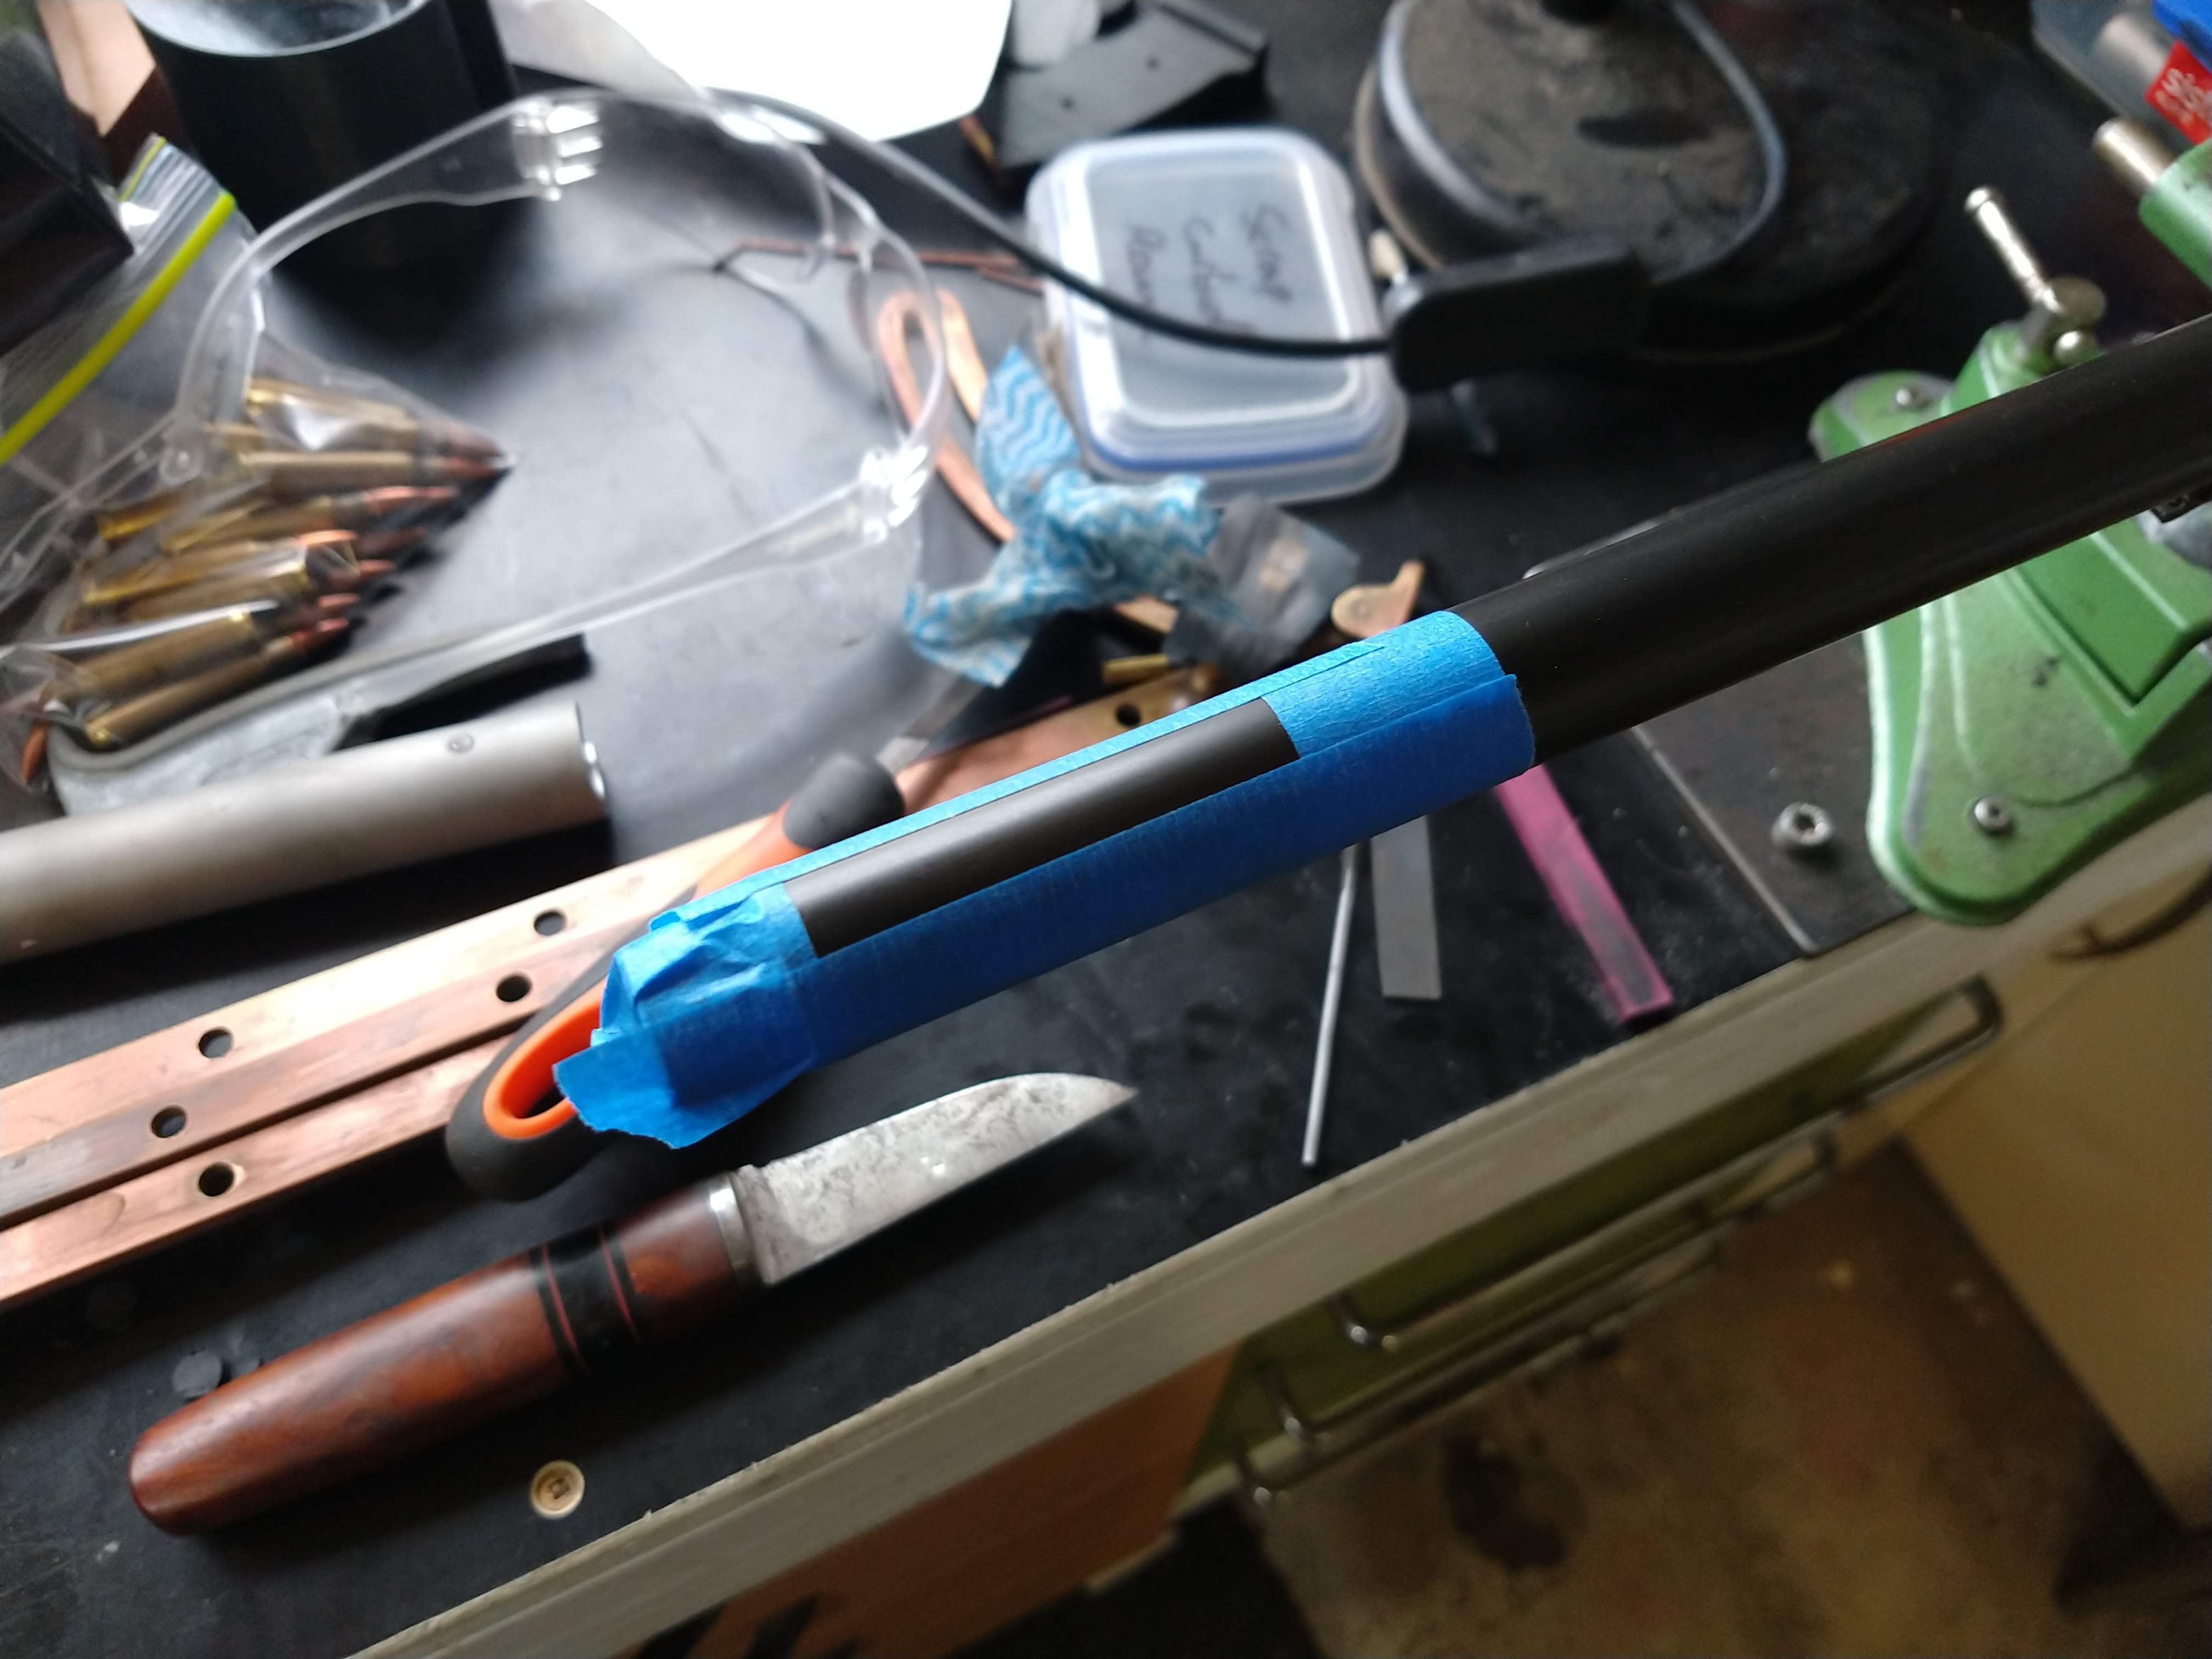

Once that was cured overnight in the hot water cupboard. I decided that I wanted to make the dovetail in the front sight block larger. This would have been much easier to setup before it was glued to the barrel.
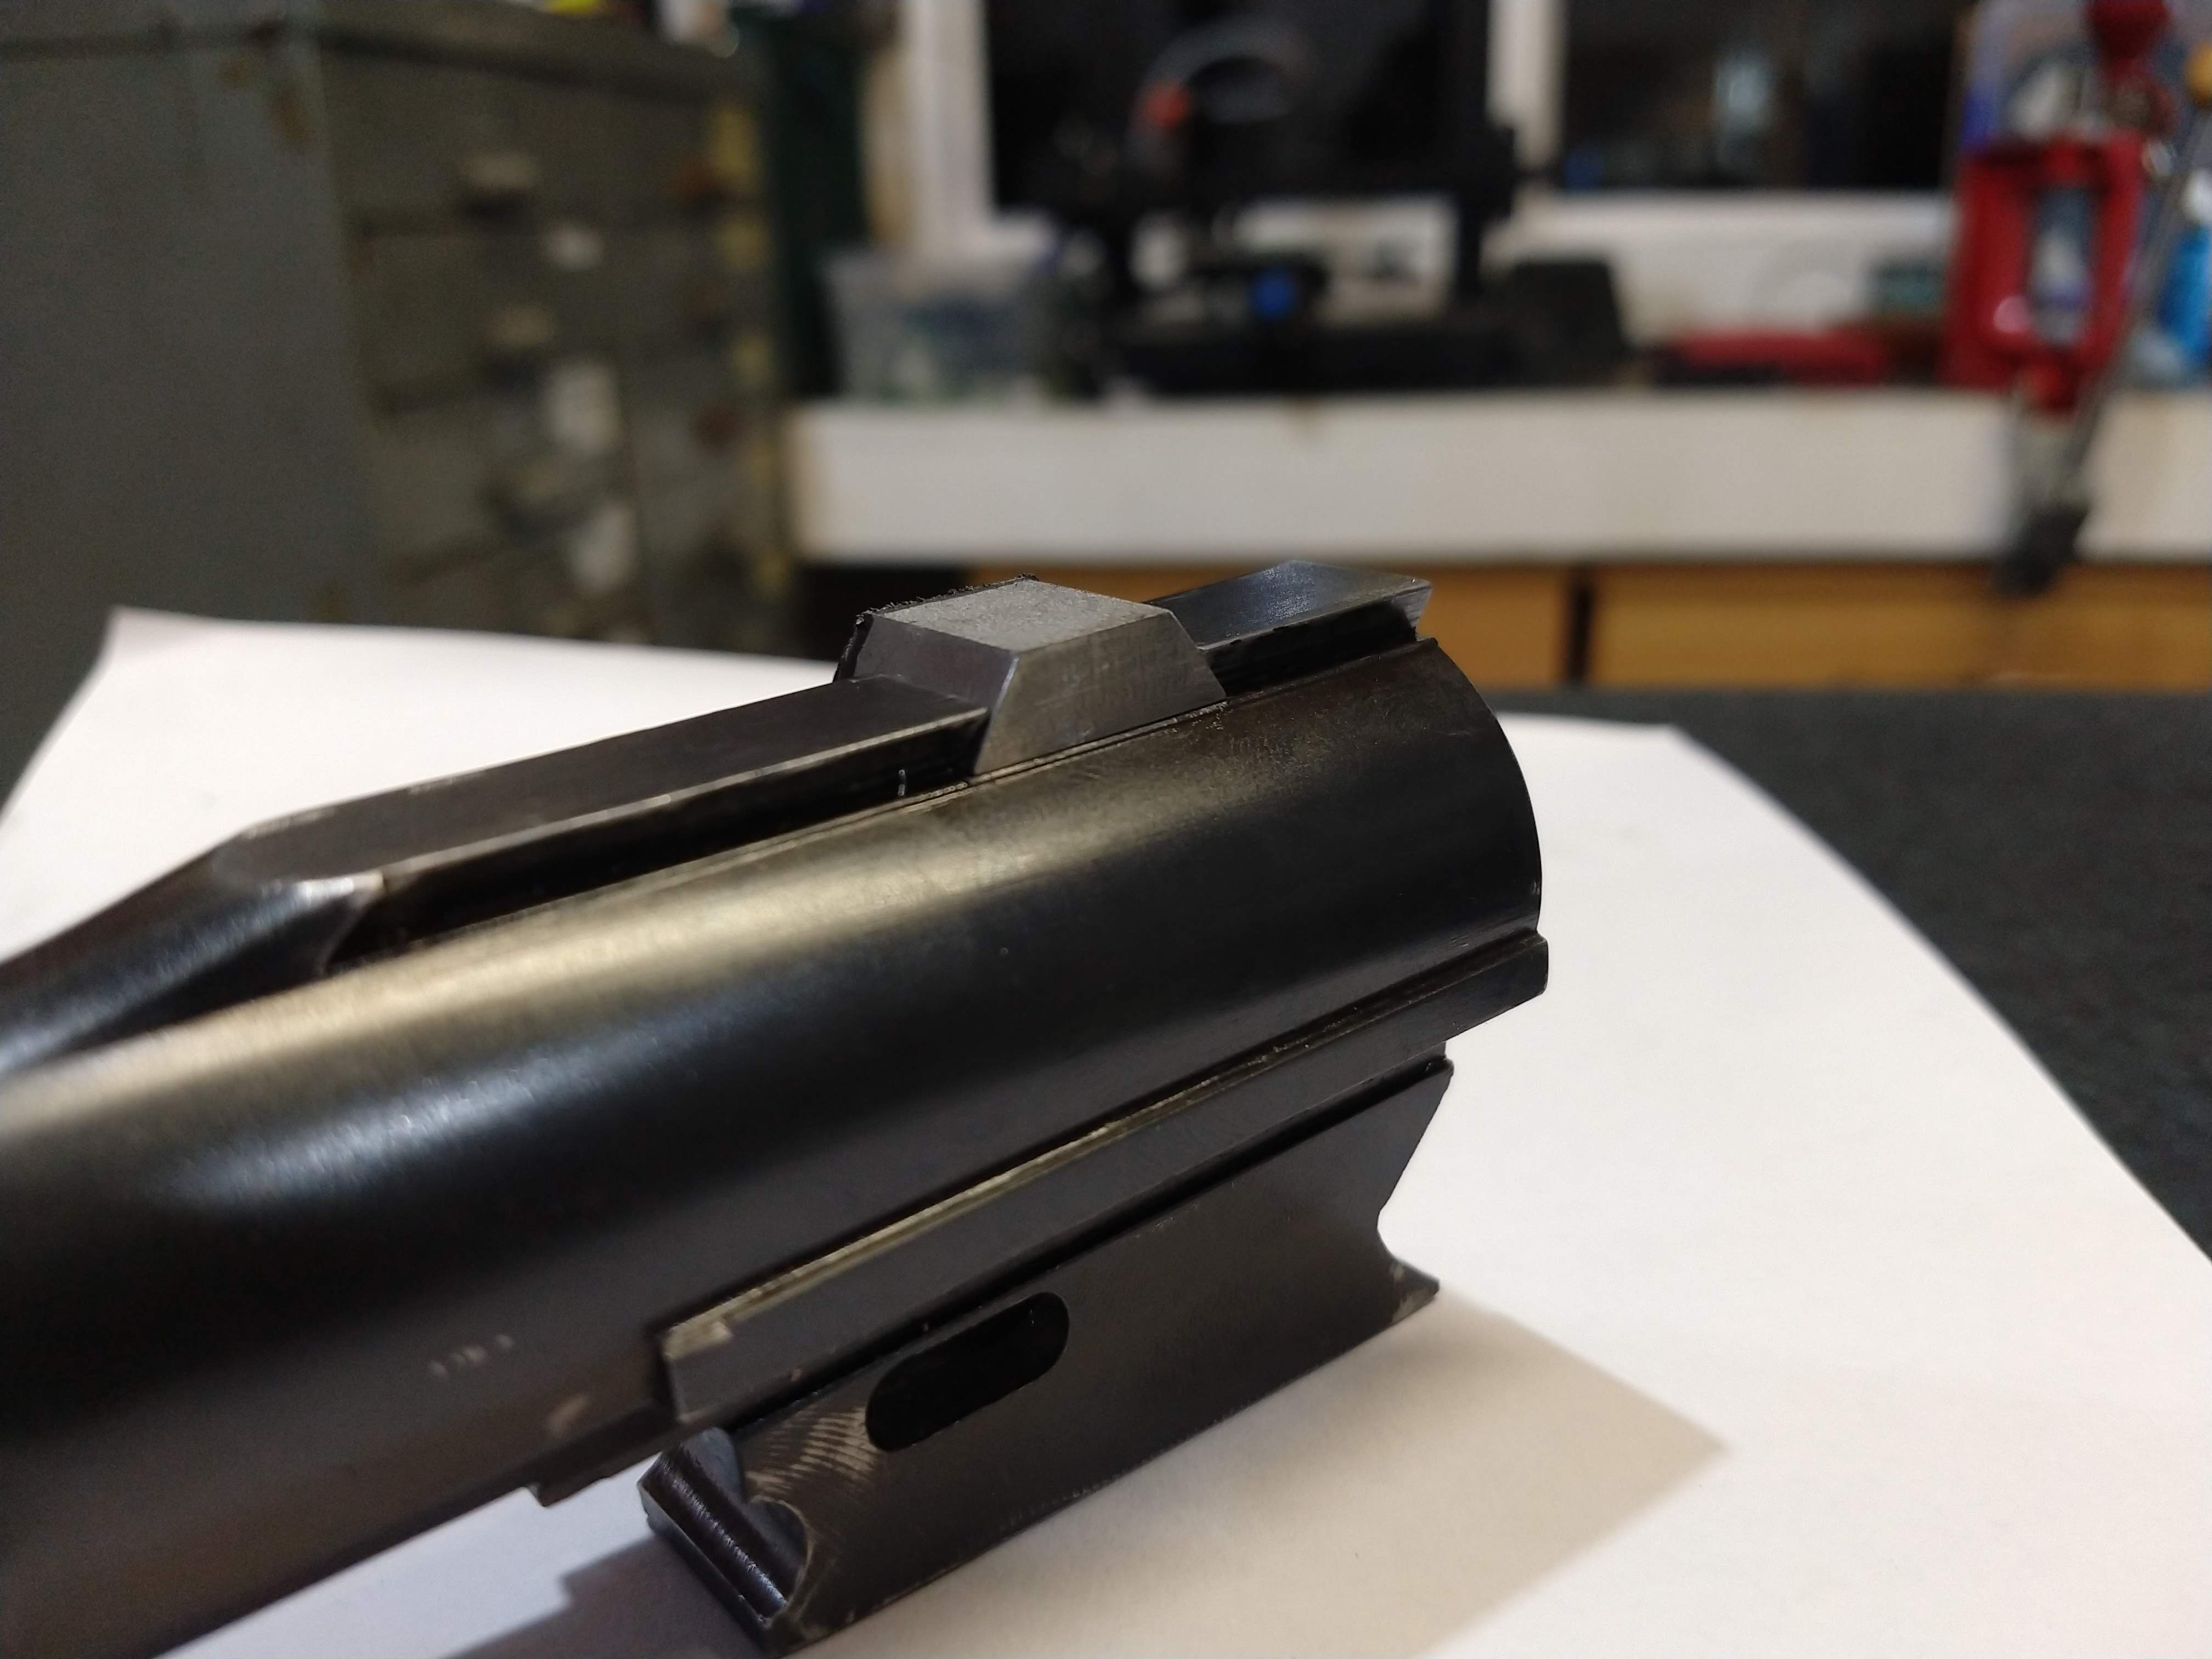
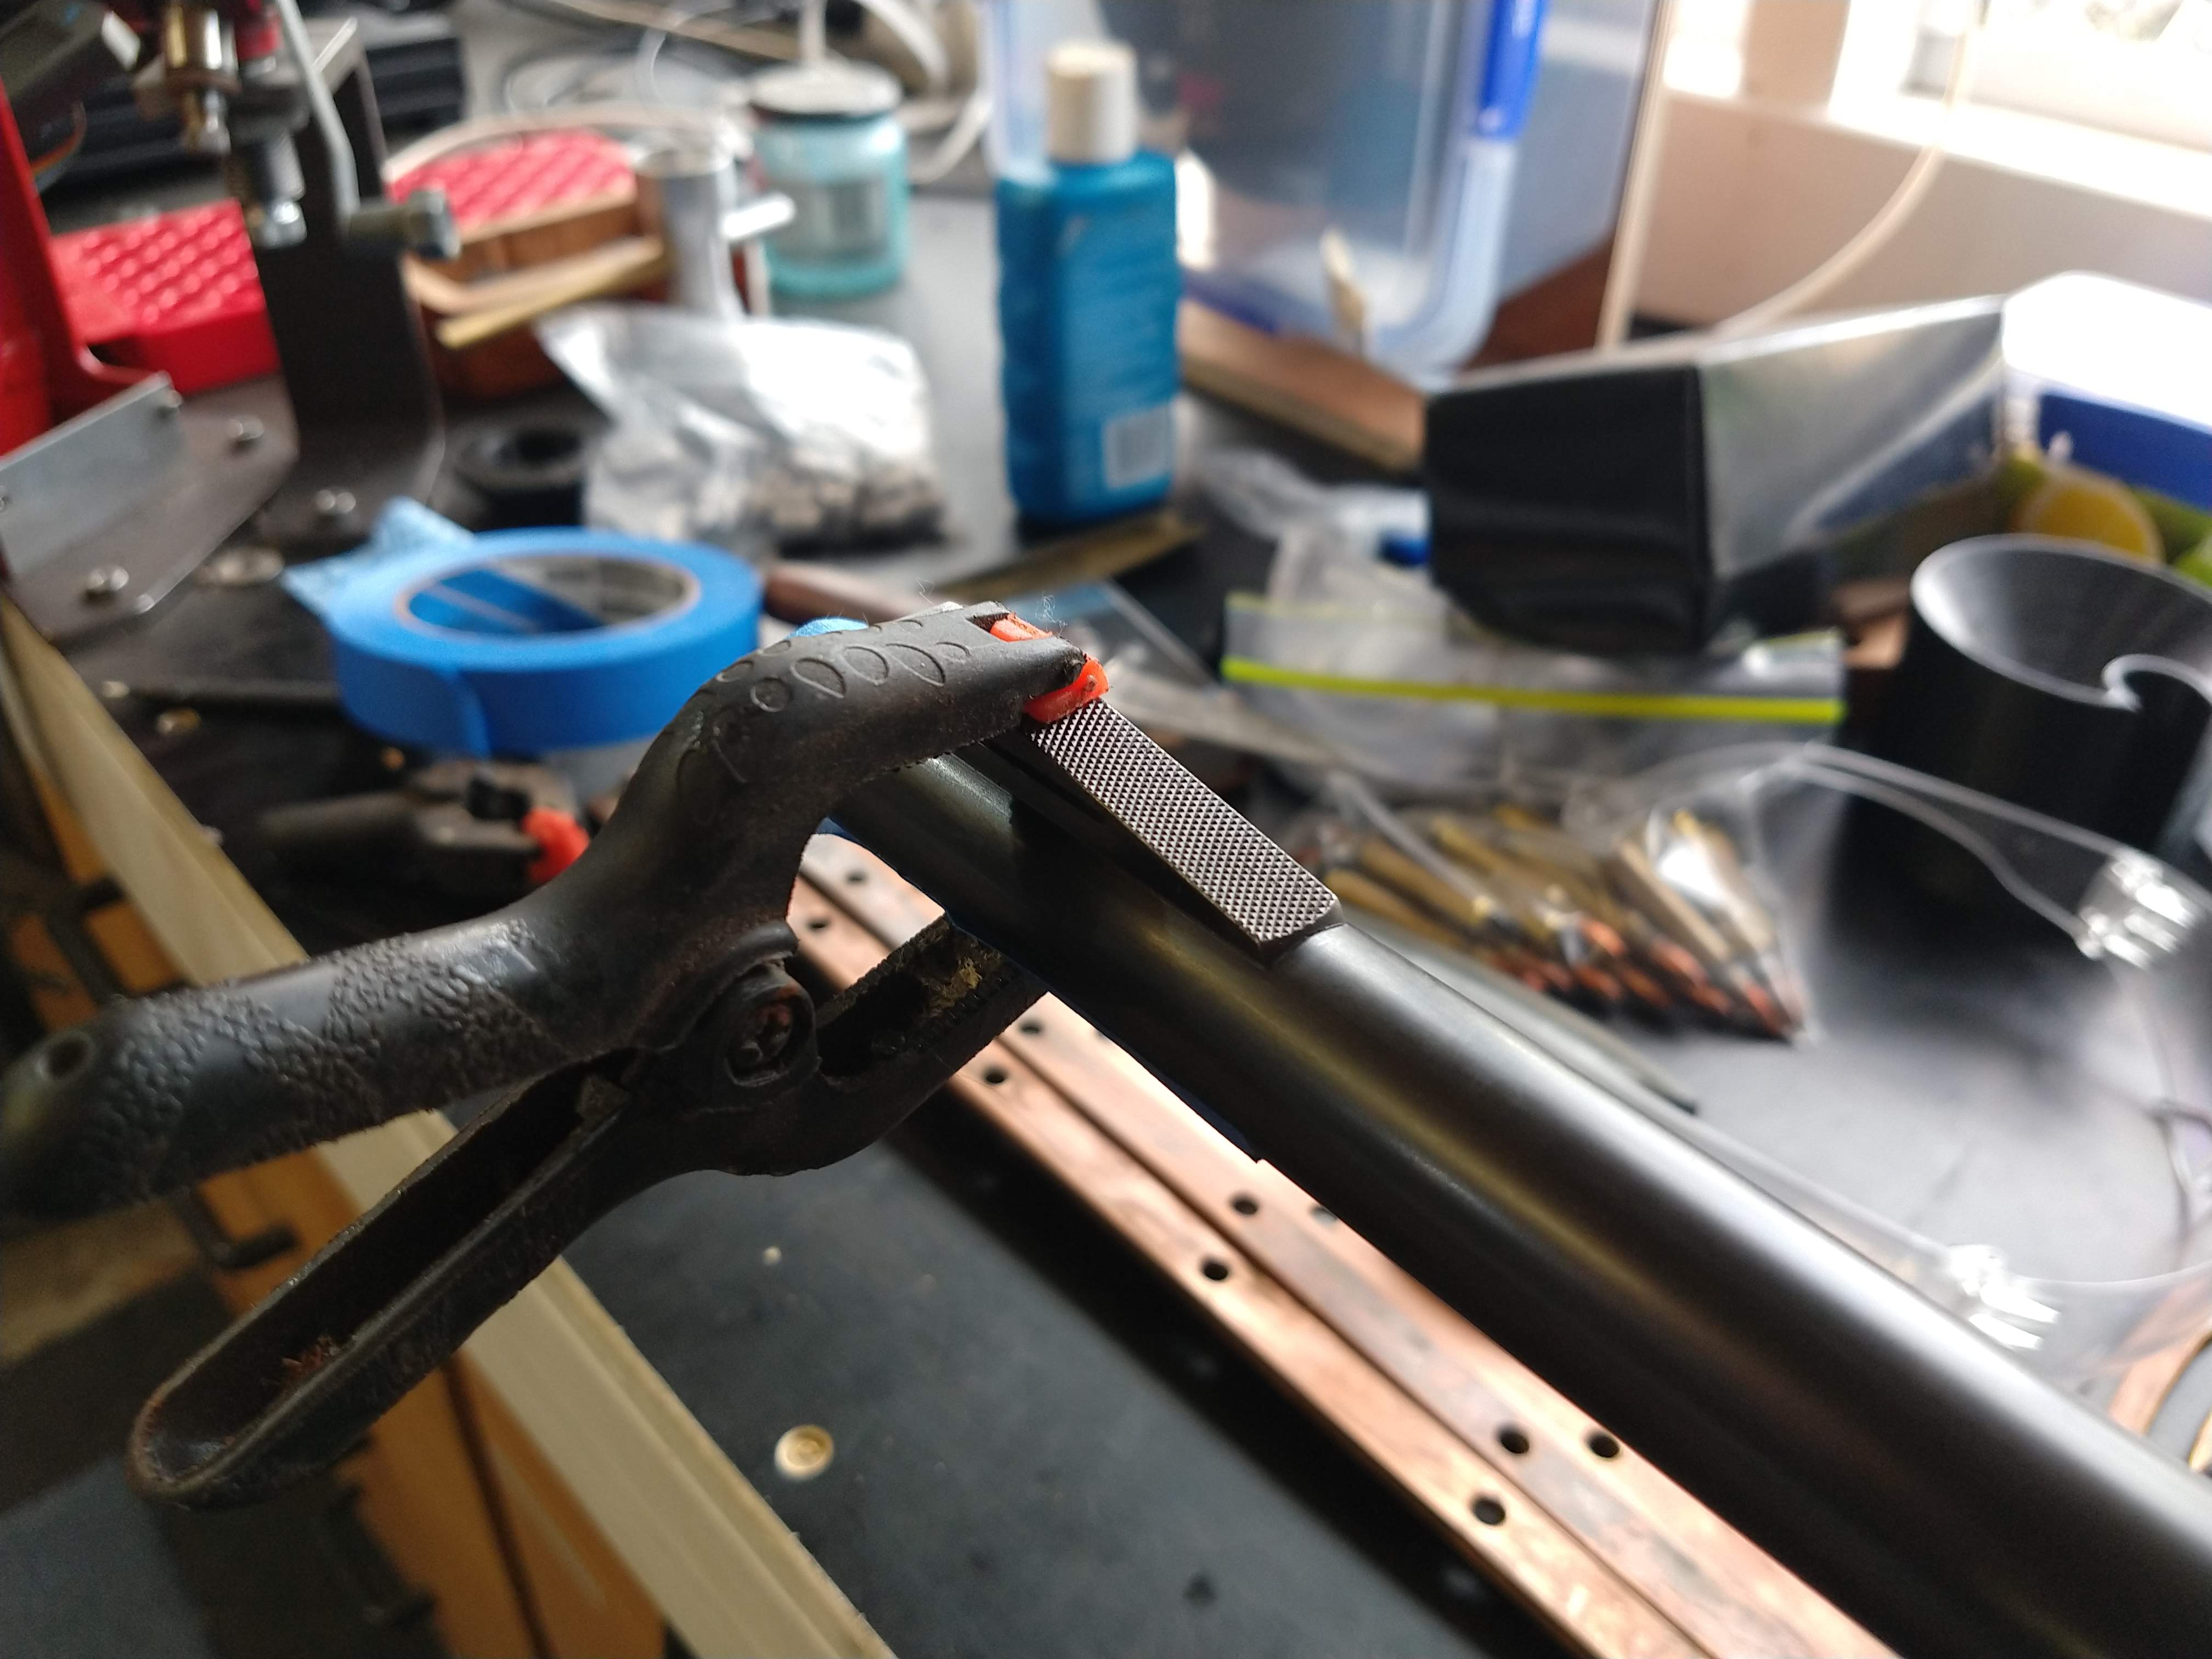
I did not have any dovetail cutters small enough, so I ordered a couple from ebay and then decided I couldnt wait that long and made my own from some 6mm Drill rod. It was a simple case of turn the correct profile on the lathe, polish, harden and temper the blank, and then grind it exactly in half on the surface grinder. I then manually added some relief to the bottom face and cutting edge. It worked surprisingly well and only tool about an hour to make. A good skill to have in a shop like mine.
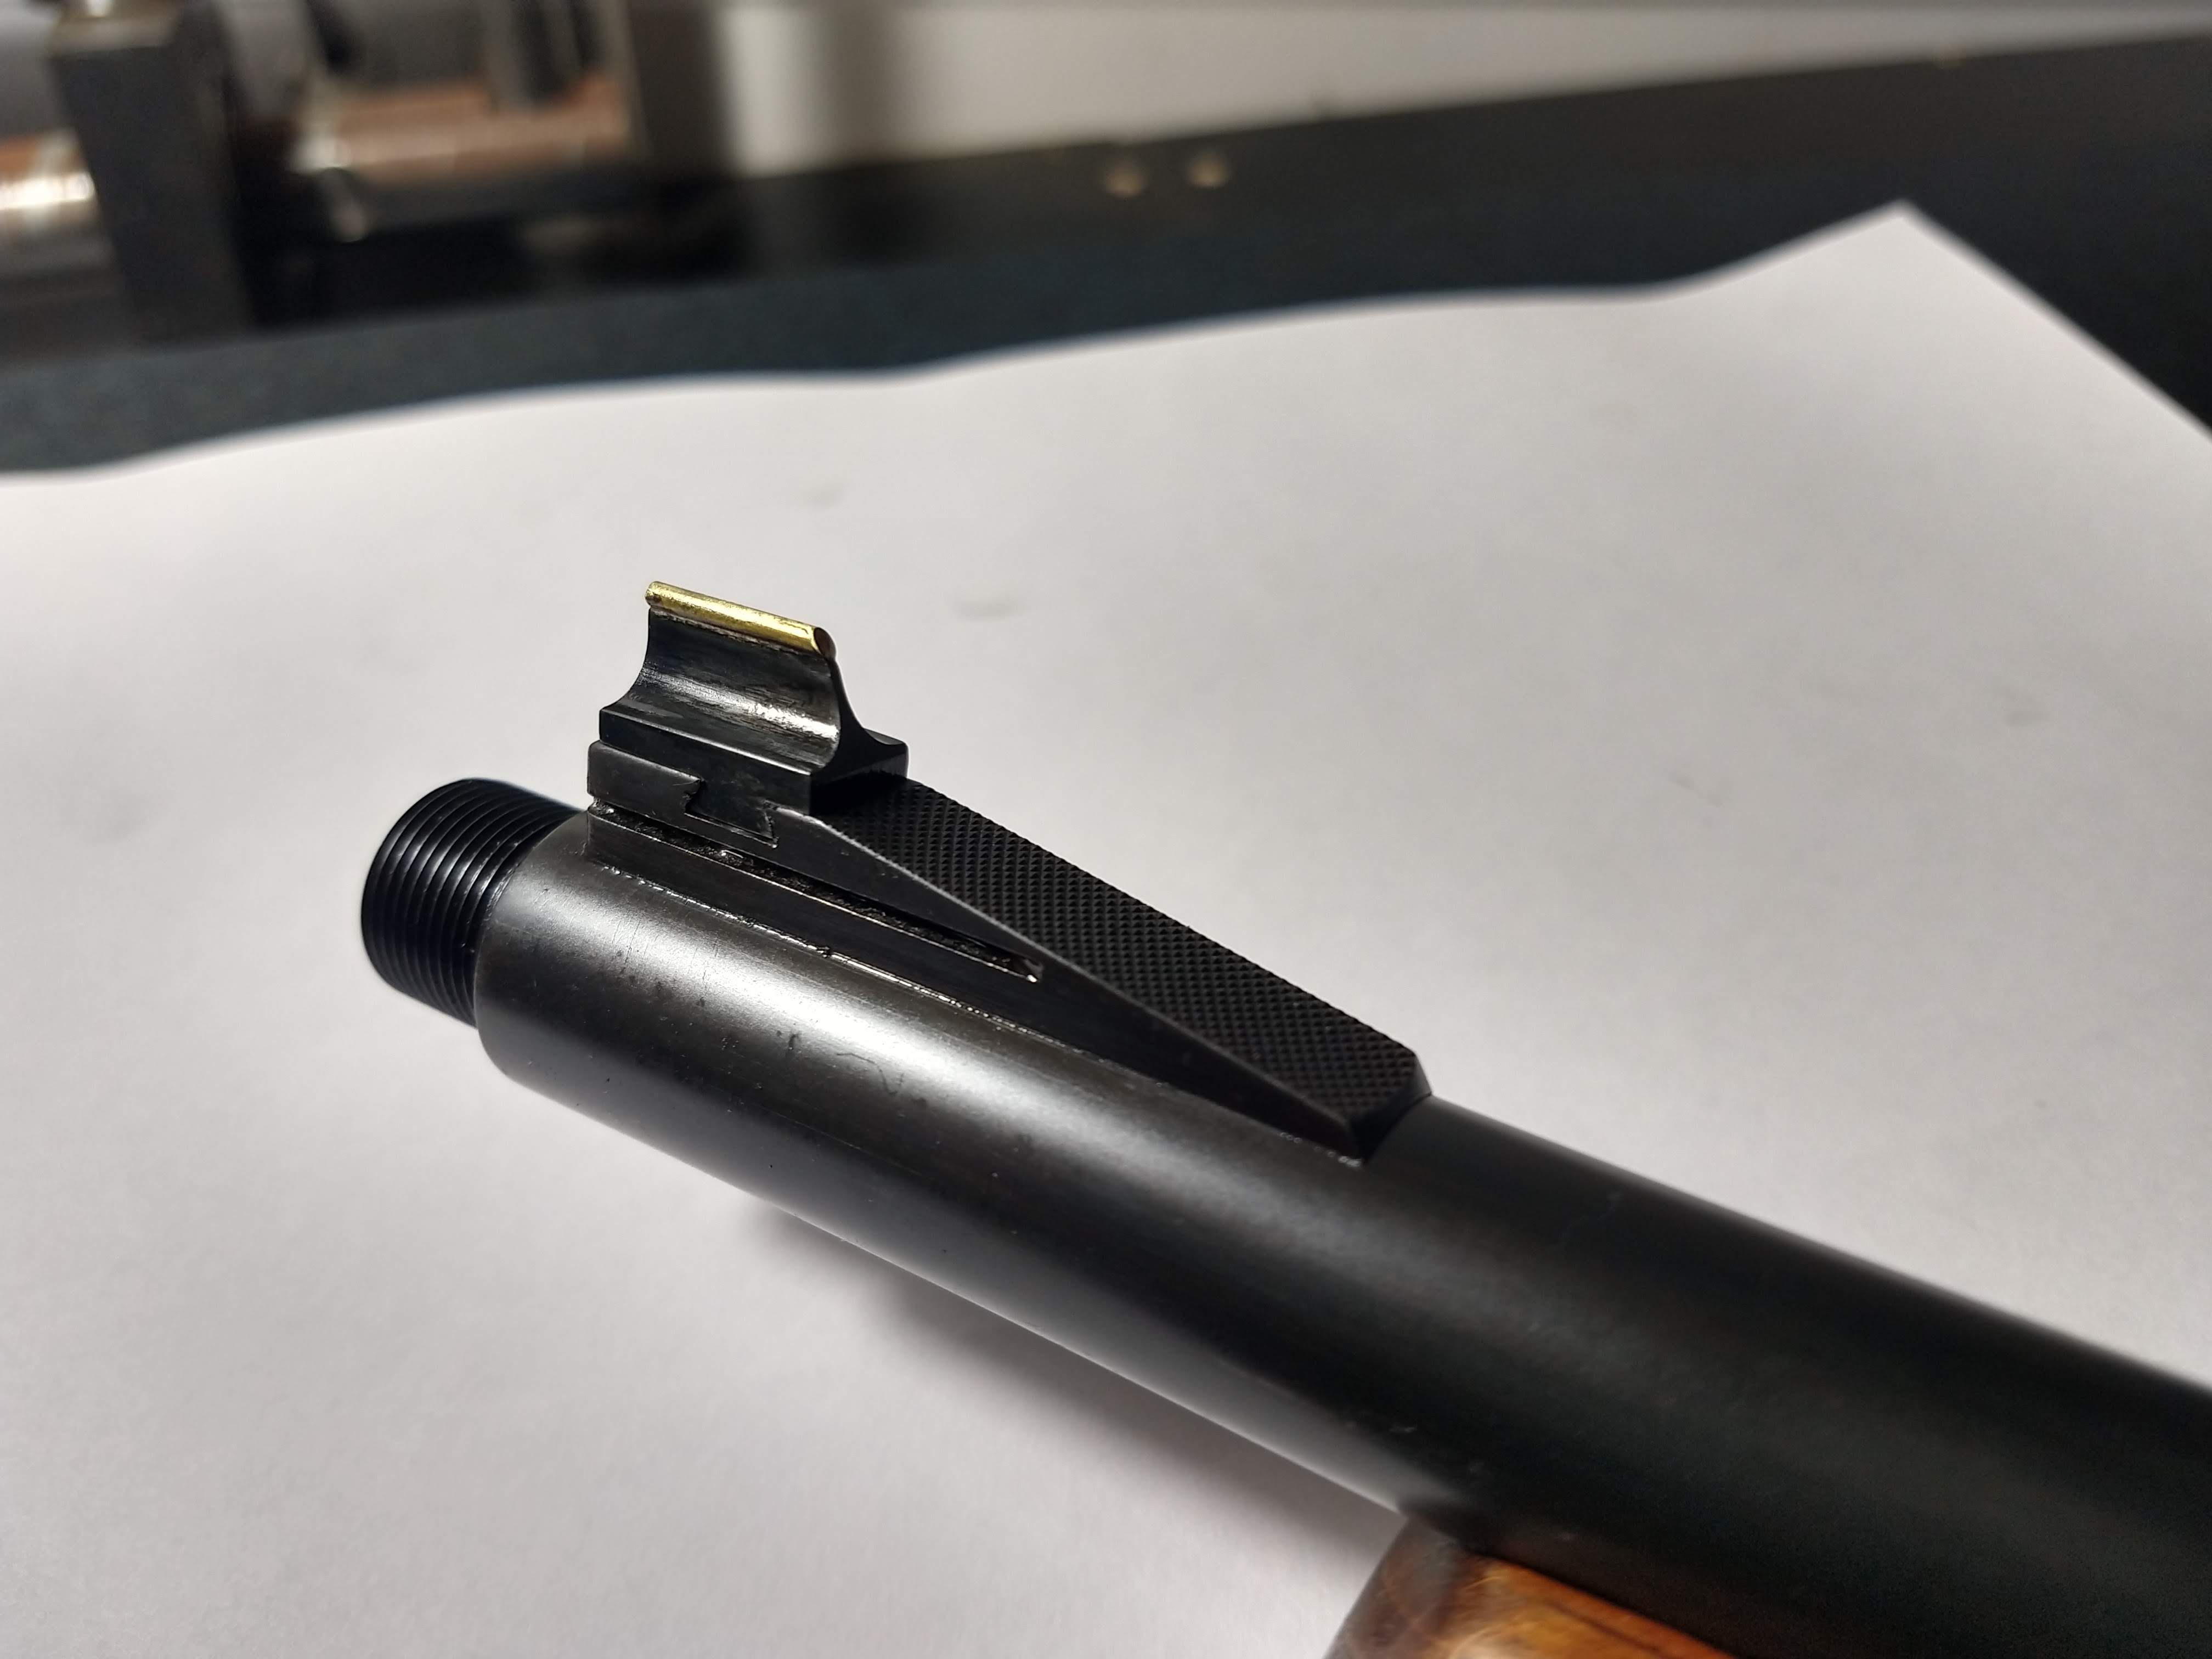
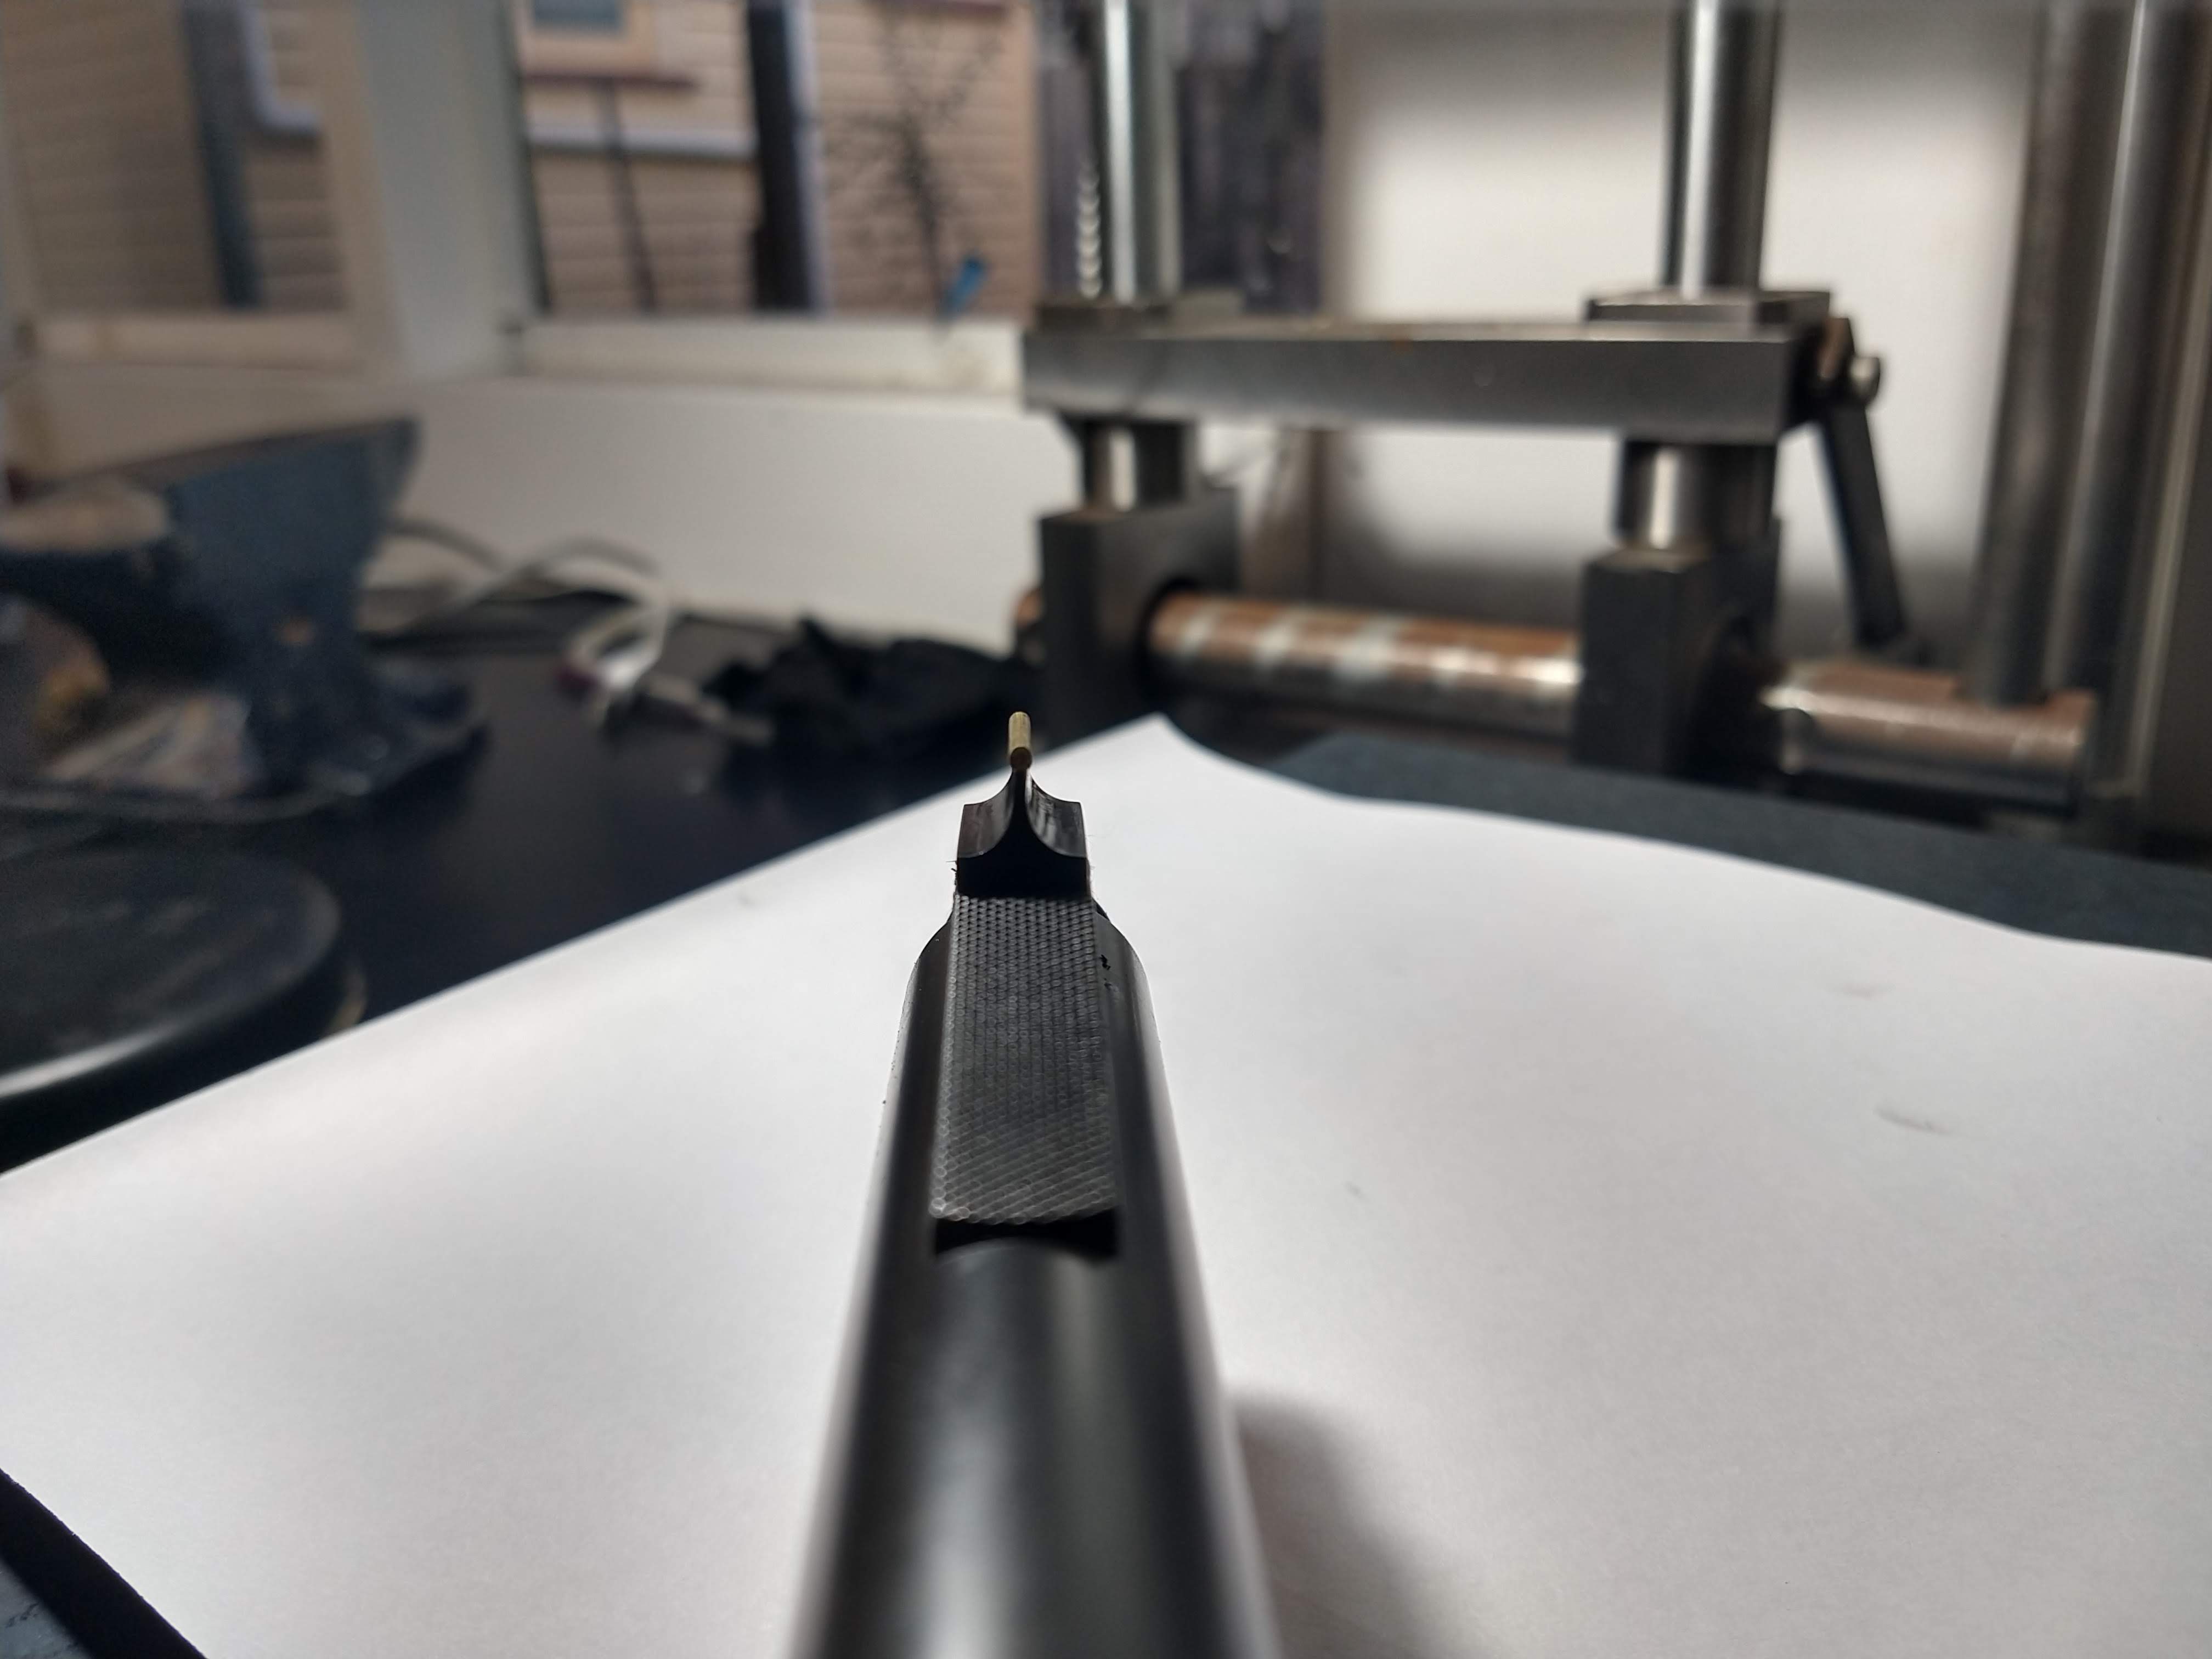
With the sight block dovetail finished, I could start on the front sight itself. I milled this from a block of O1 tool steel as the post is only 1mm wide and I wanted to harden it so its not easy to damage. I got lucky and got the dovetail fit perfect with only a couple of passes. Its a good firm fit that needs to be tapped into place with a punch, but doesn't need bashing. Once I had the dovetail cut, I removed it from the rest of the block and milled the post to size. I left it long initially and once it was on the rifle, I carefully measured the final required height and cut it down, I also milled a very small v into the top of the post to help align the bead.
After I hardened and colt blued the front sight I added a brass bead to the top. I have some fiber optic rod on the way, but this will do for now. The brass is about 1.4mm diameter and seems about right, maybe a touch too large.
I have been working on the leather buttstock cover today. Once its finished, I will post some more photos.
-
22-08-2021, 02:45 PM #56Member
- Join Date
- Nov 2012
- Location
- BOP
- Posts
- 21,410
Its a softies 45/70 if its not chucking 500 grains out the barrel! Originally Posted by mimms2
 Boom, cough,cough,cough
-
27-08-2021, 06:50 PM #57Member
- Join Date
- Dec 2015
- Location
- Papakura, Auckland
- Posts
- 605
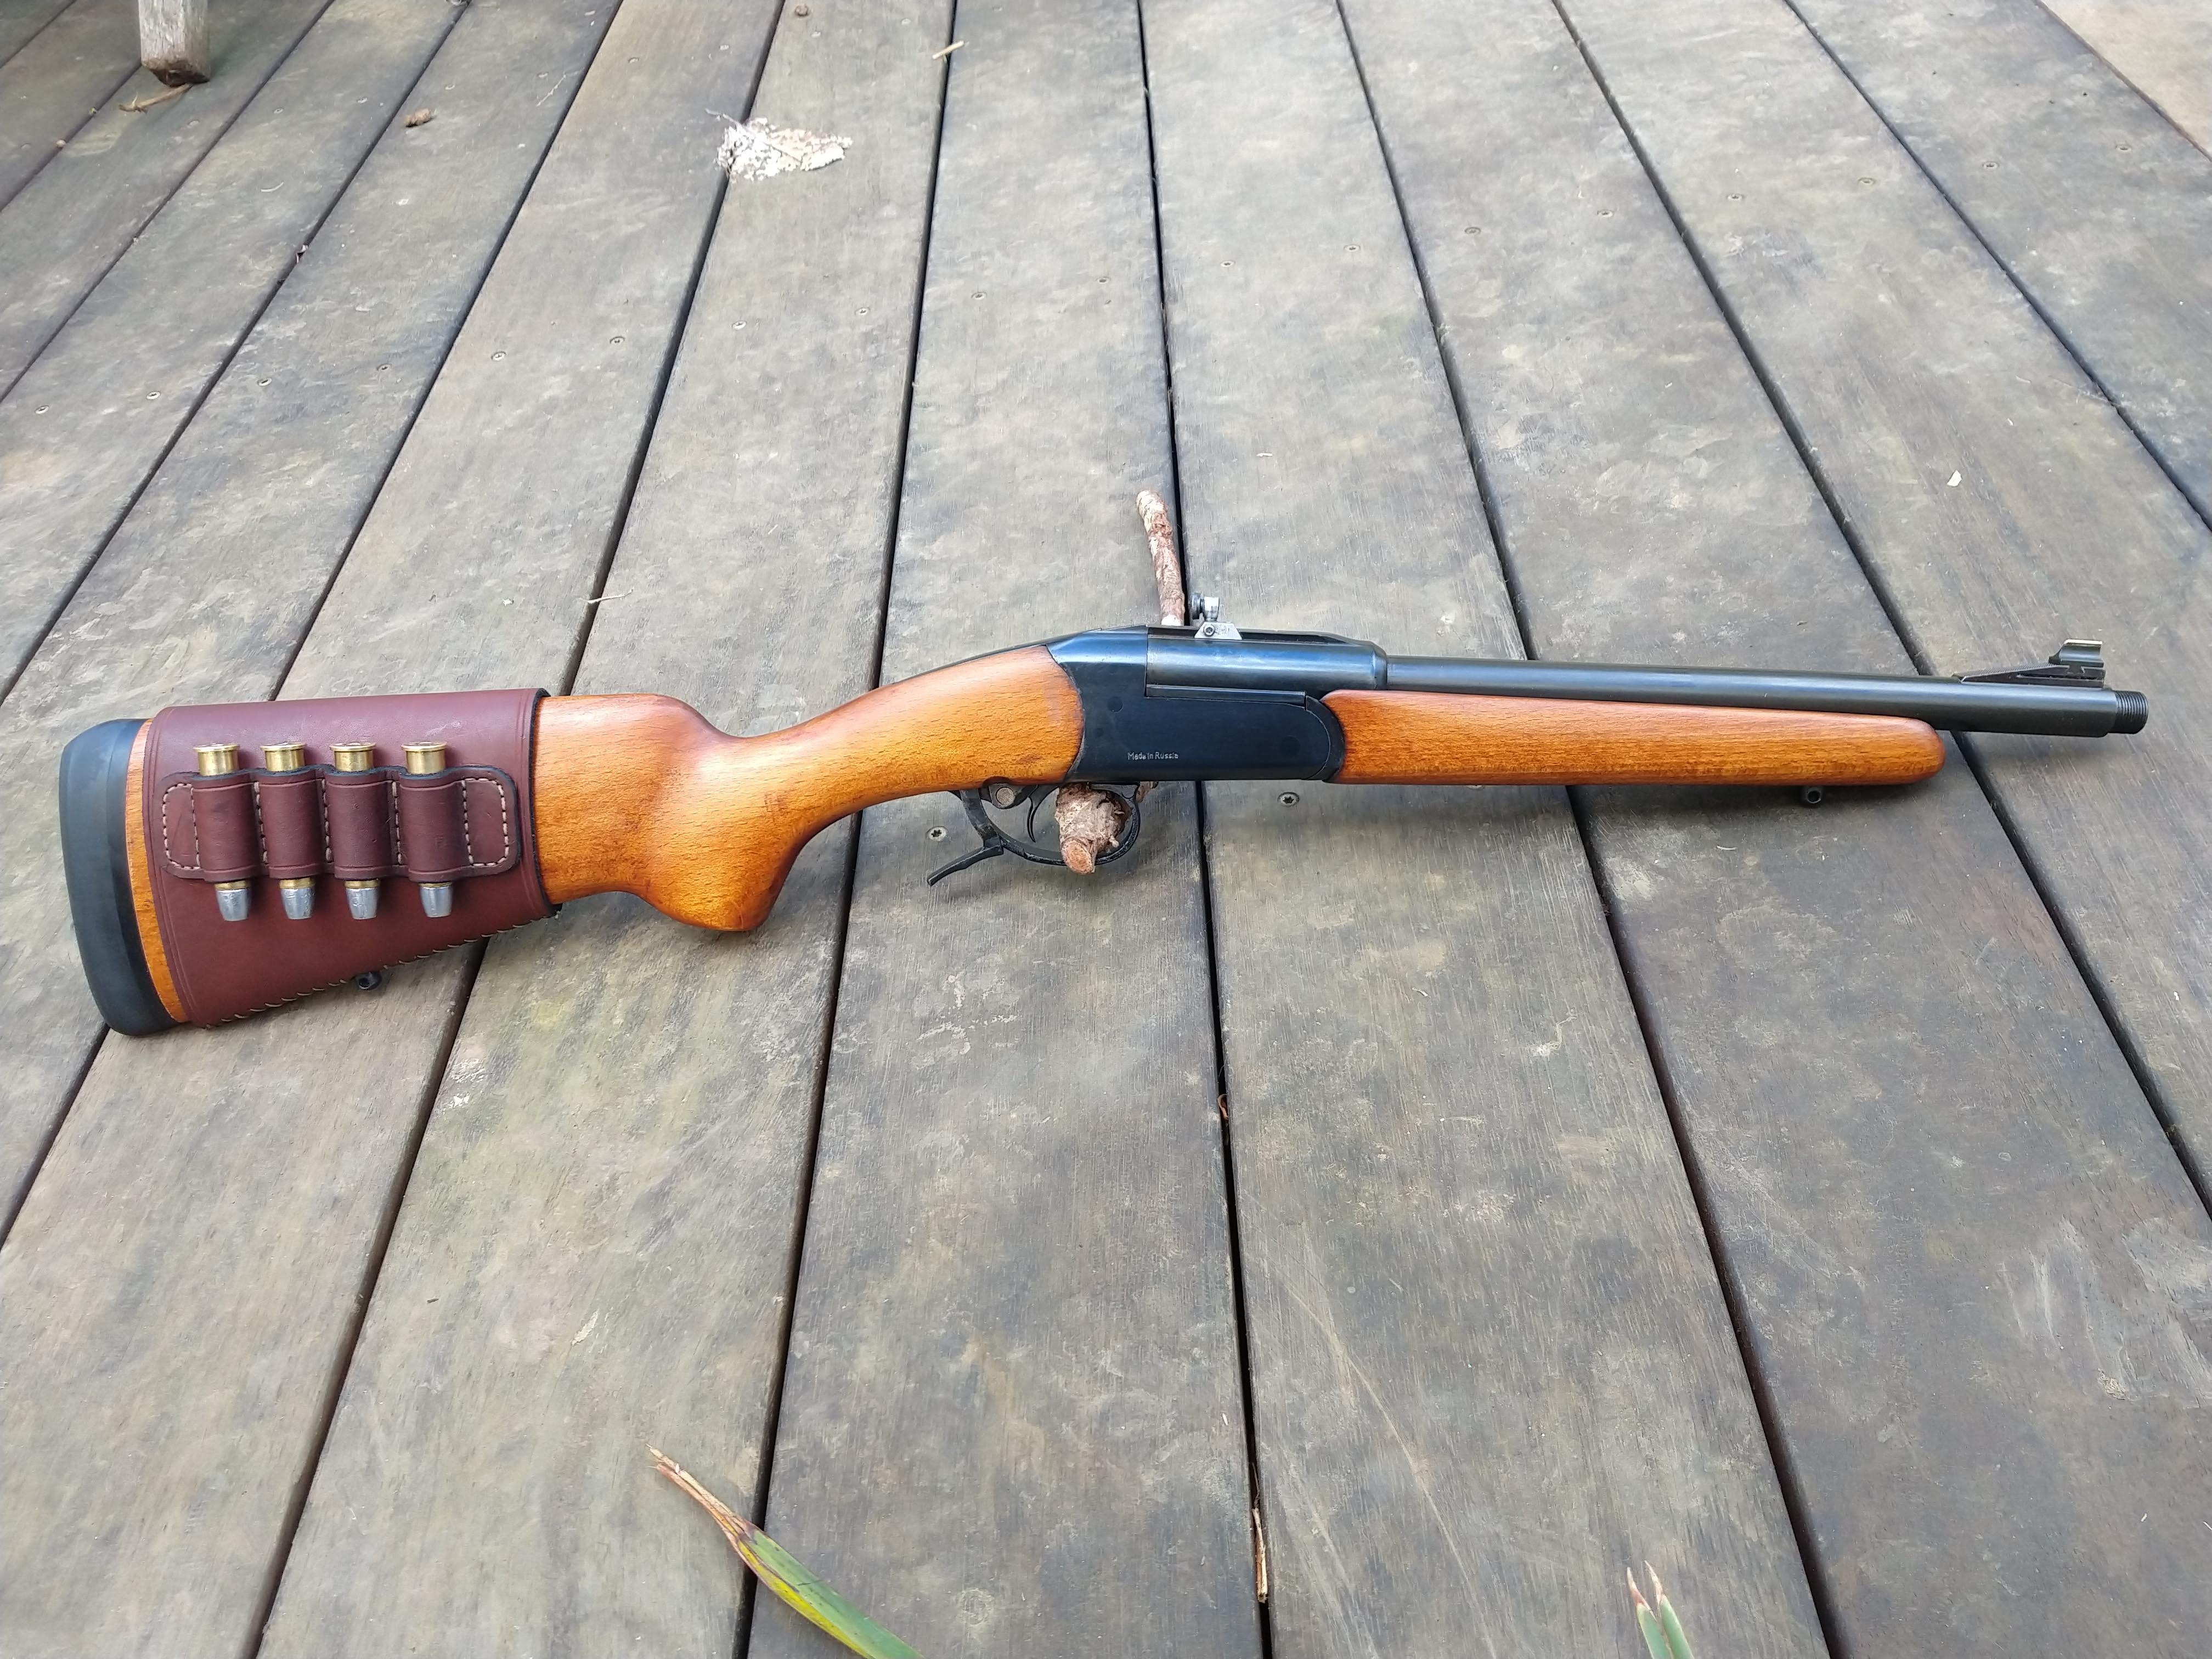
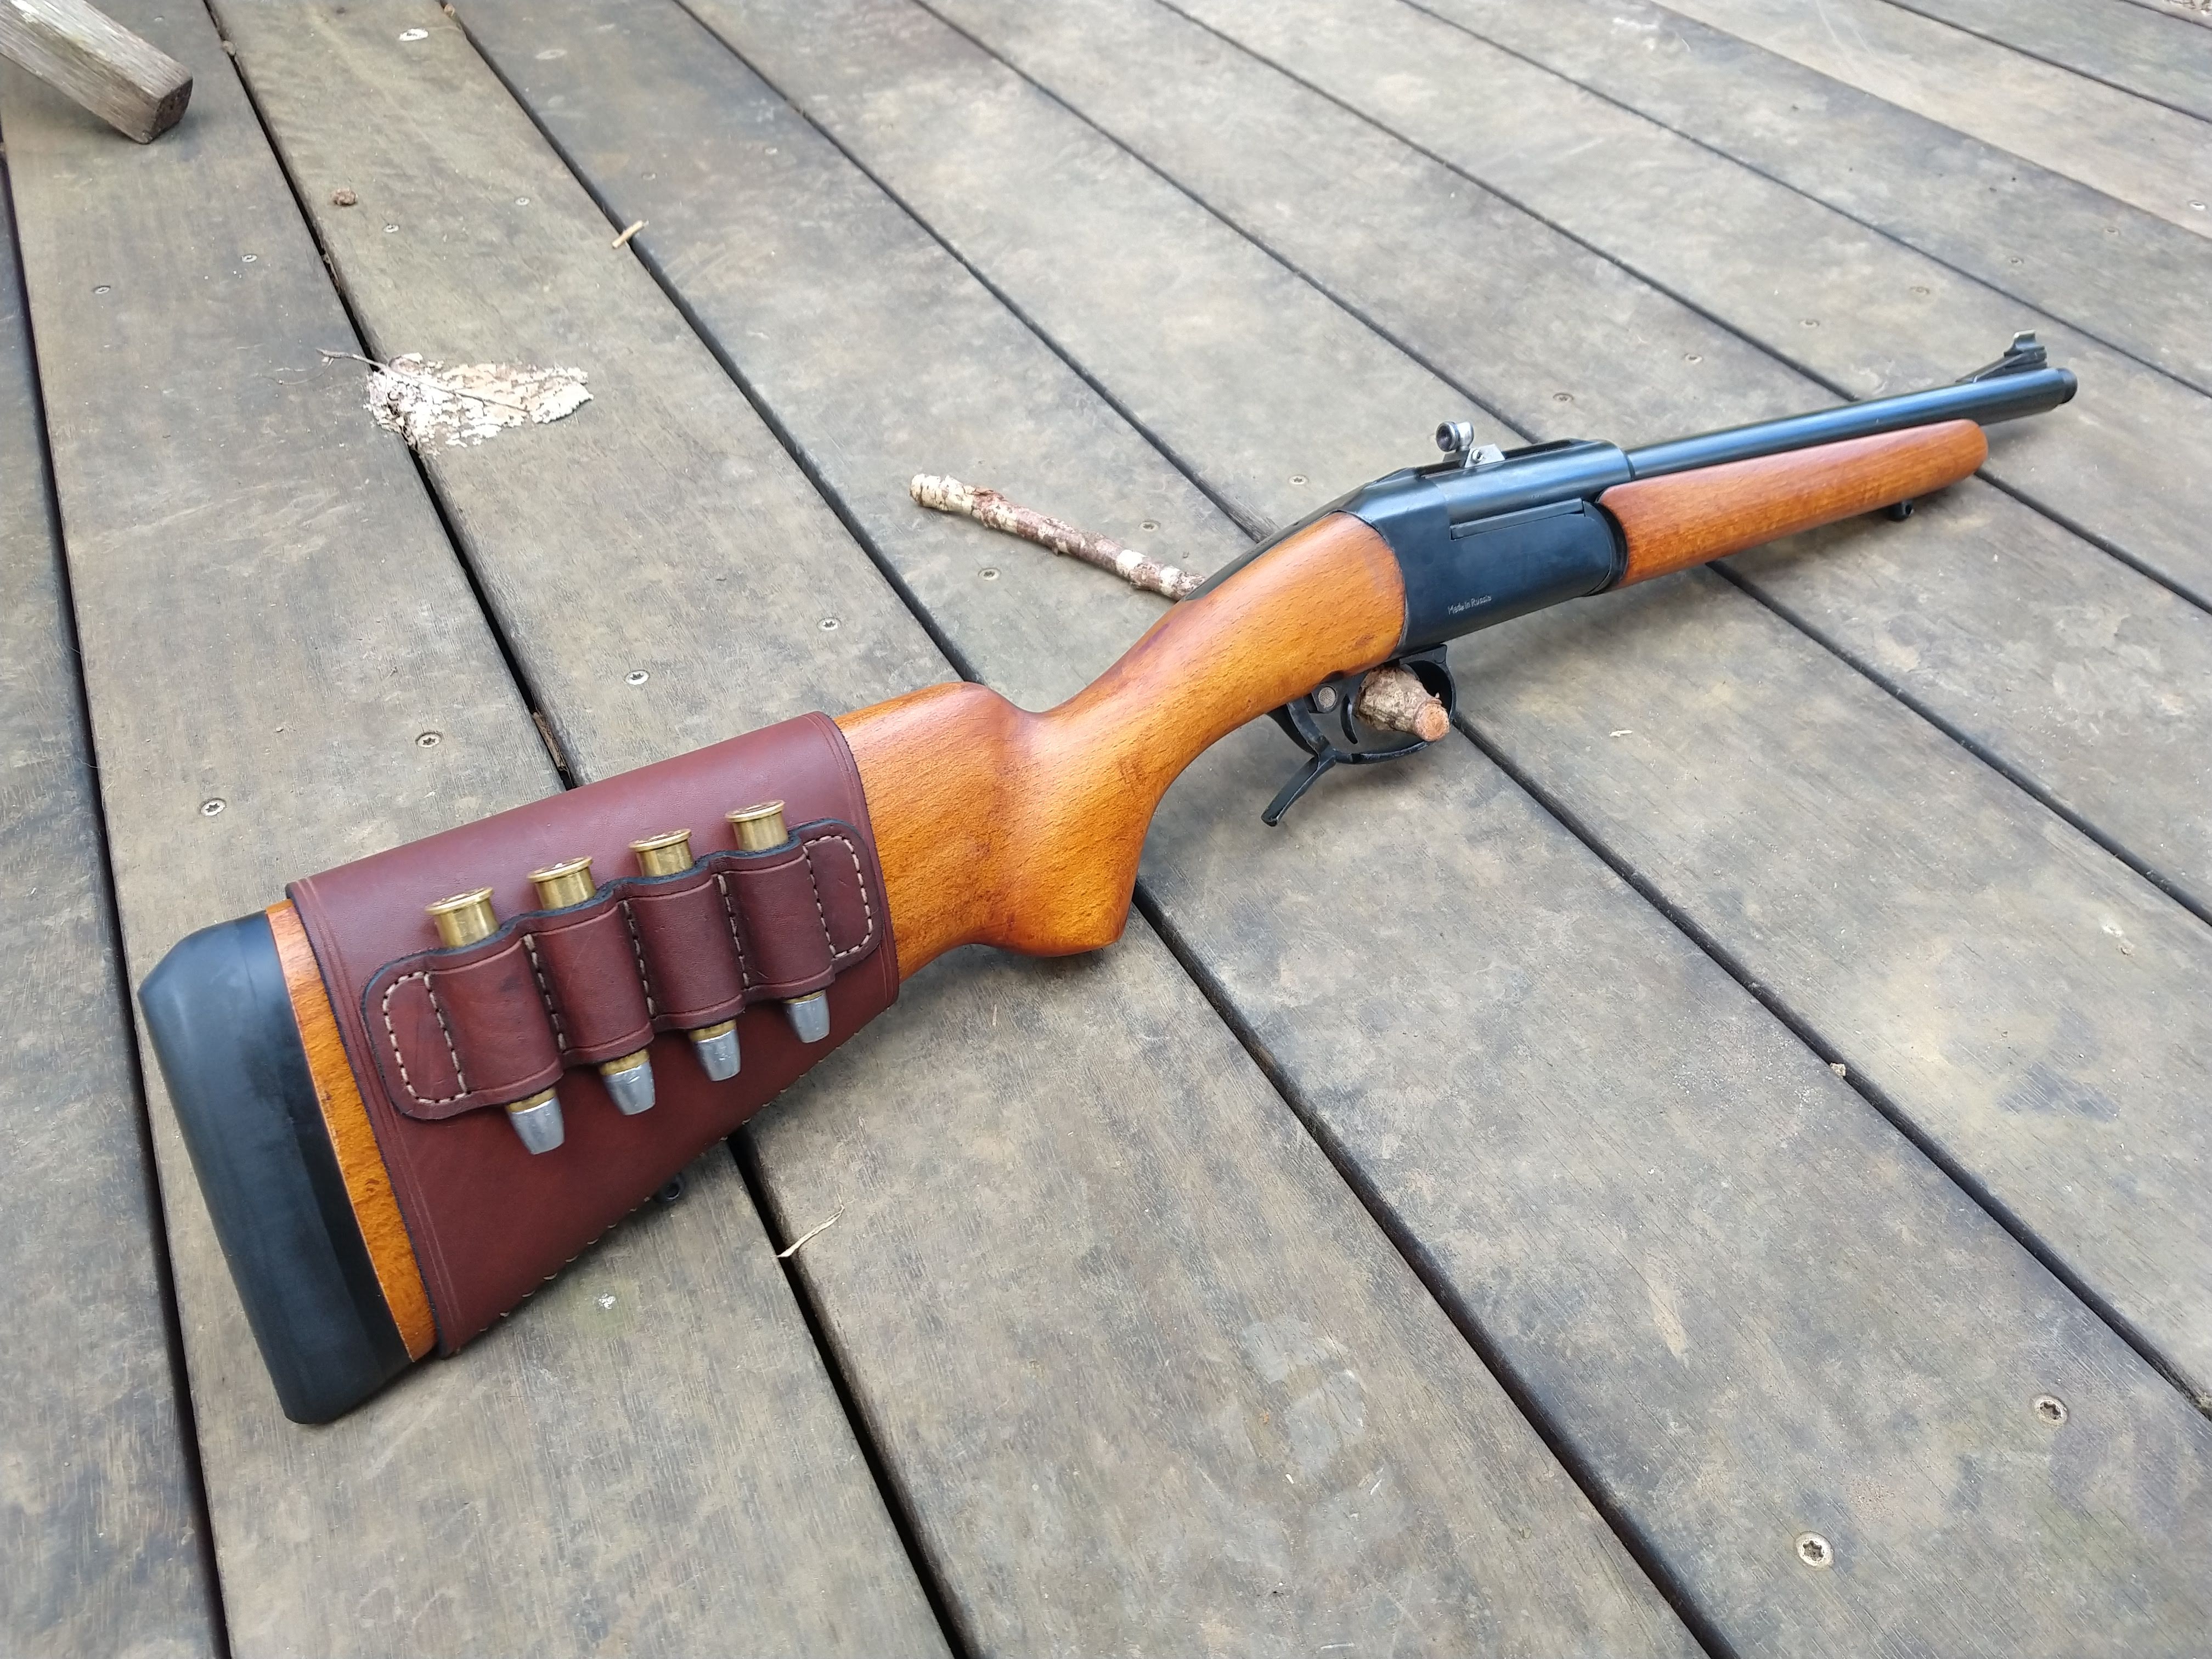
I have finally finished this "quick side project" more or less. I just need make a thread protector and to get a load that shoots ok. Bit hard at the moment being stuck in the middle of the suburbs. I will also make a suppressor for it at some point, but I have other things I need to work on for the moment.
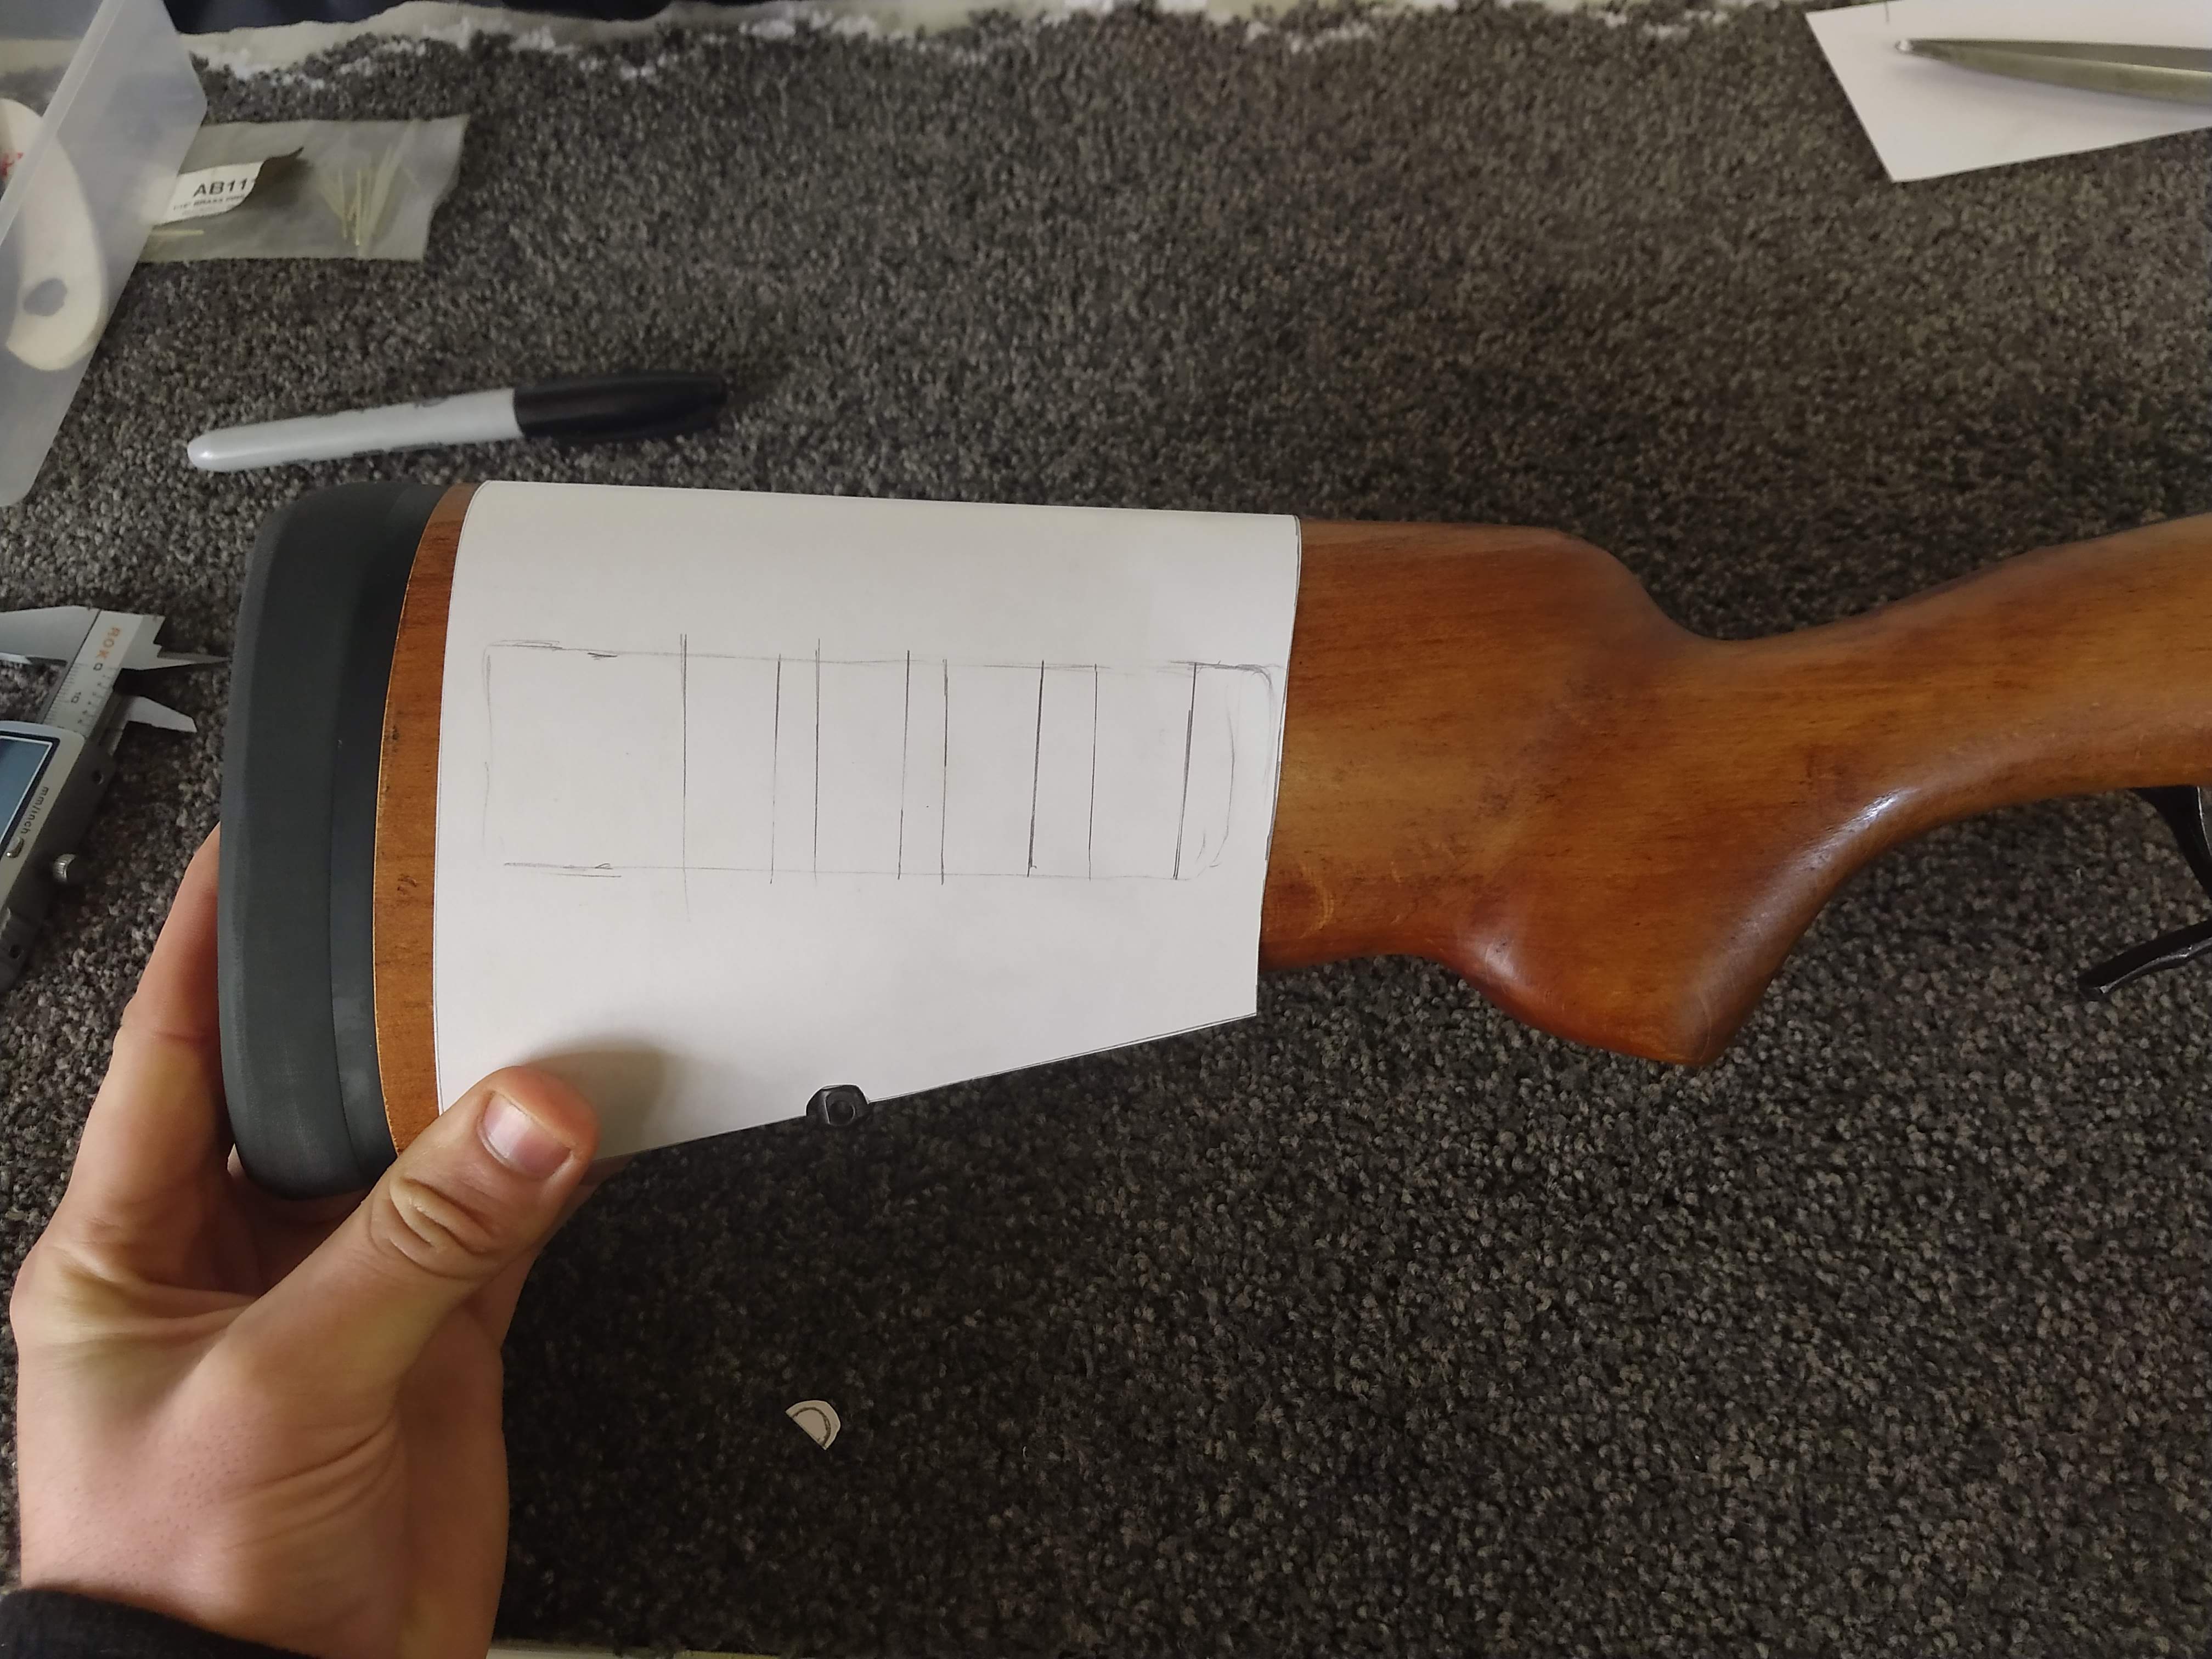
I decided to make a leather buttstock cover and cartridge holder. I am no leather worker, I picked up a bit of the skill making knife sheaths for the knives I was making and selling, but I was never that interested in it and never got very good. Saying that, im pretty happy with how it came out.
I made a quick pattern from paper to get the overall profile and then cut that and made a strip for the cartridges that I soaked in hot water and formed around some cases.
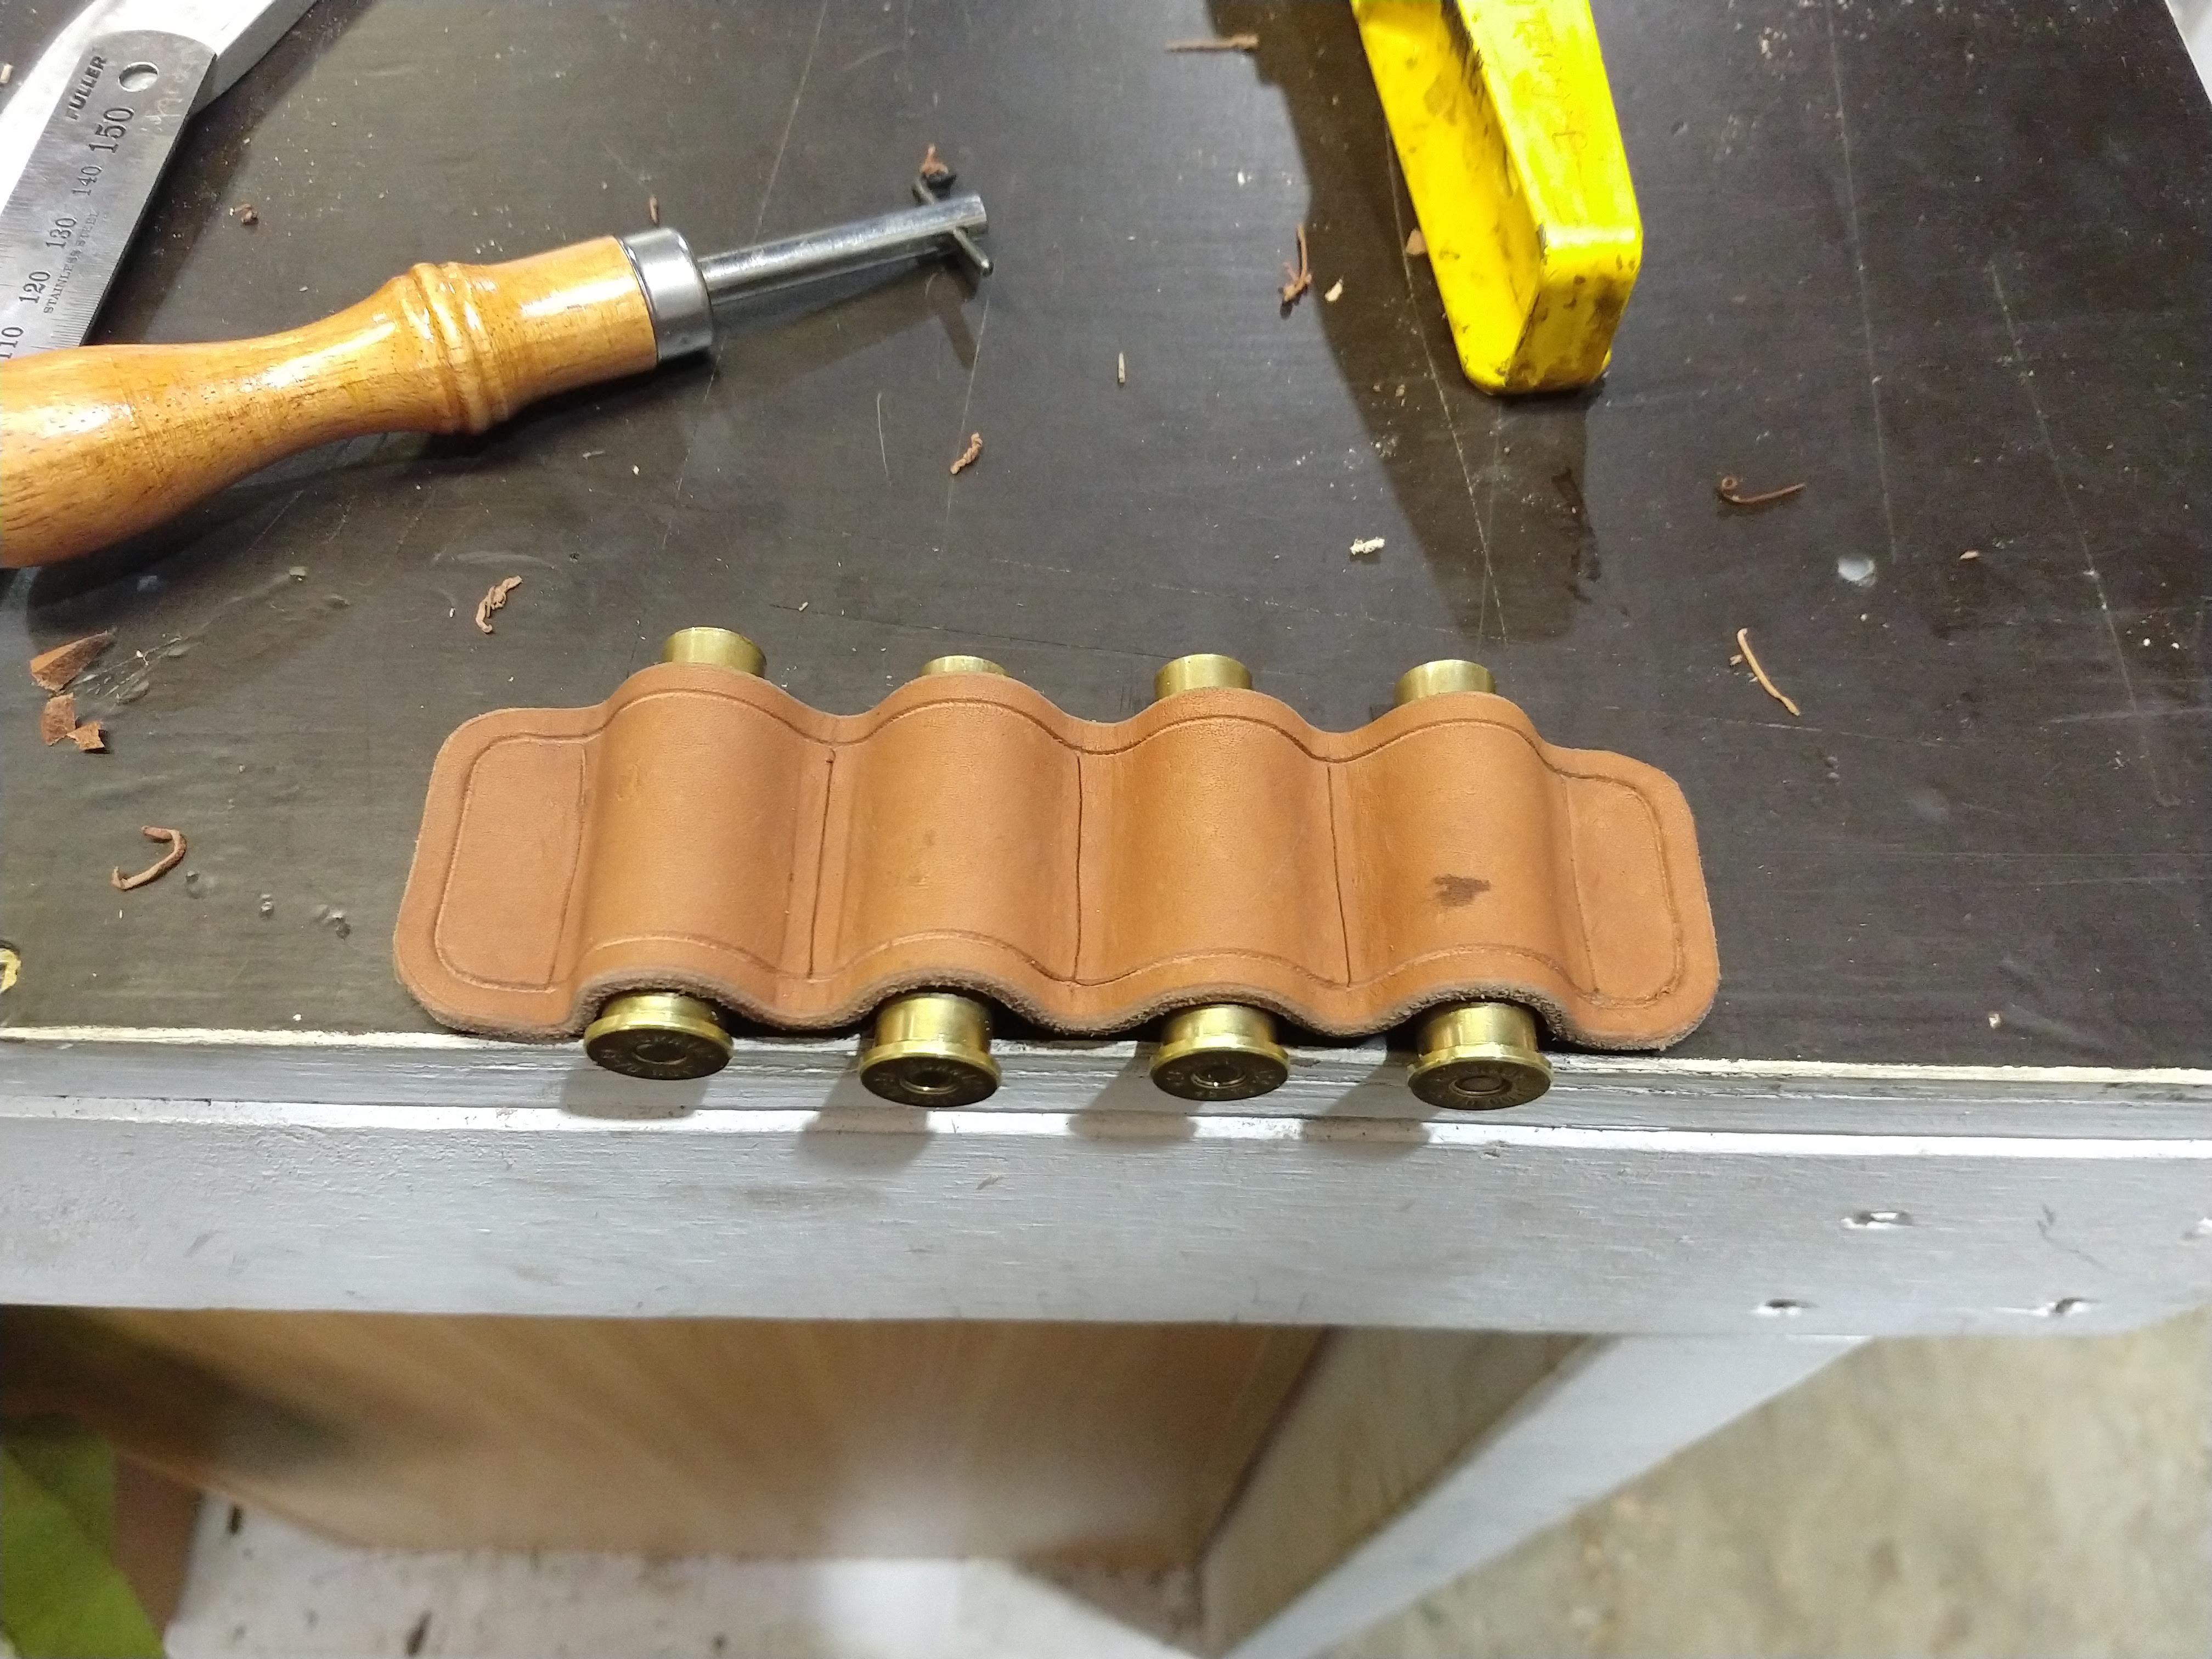
I left this to dry overnight, then glued and stitched it to the body.
After that, I added some edge black and soaked the whole thing in neatsfoot oil.
I then attached it to the rifle using a baseball stitch. easy to get off, just cut the stitching, but a pain to put back on, so I added a reasonable amount of stock wax underneath the leather to hopefully delay the need to remove it.
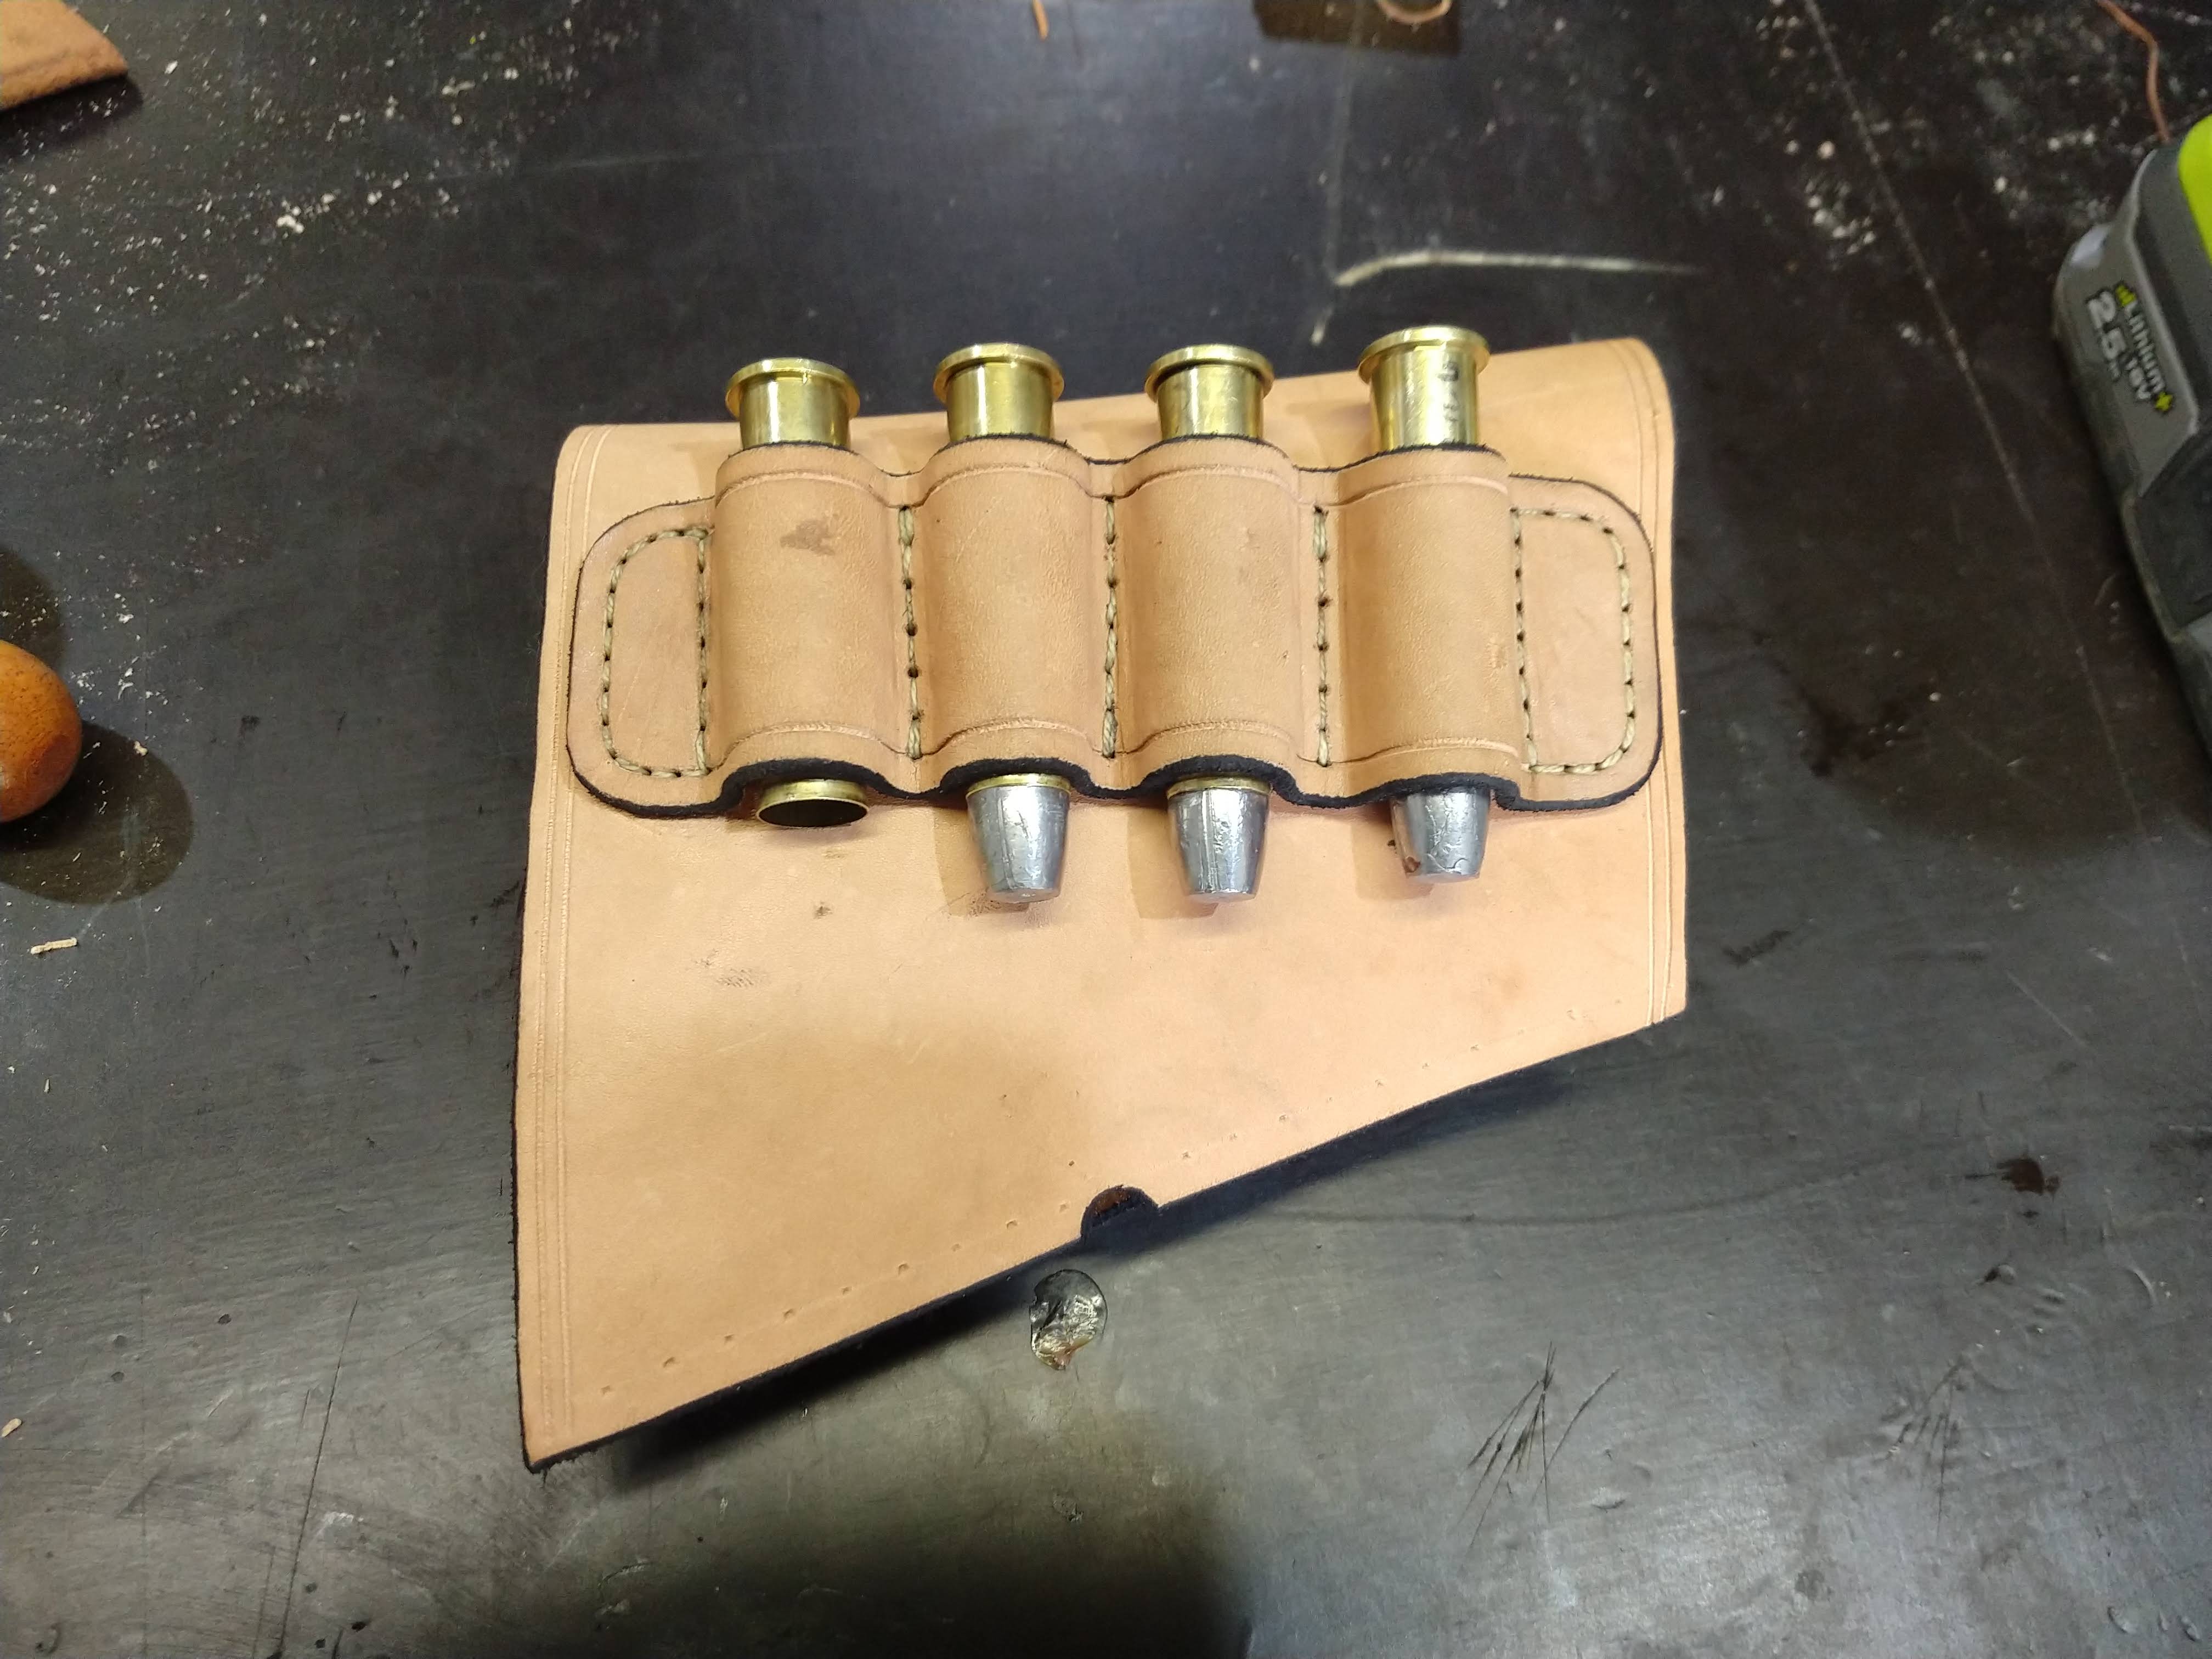
And this is the final product. Bang on 3kg with 4 cartridges. Hopefully it shoots well enough to hit something within 80m.
Thanks for looking.
-
29-10-2021, 11:16 PM #58Member
- Join Date
- Apr 2015
- Location
- Geraldine
- Posts
- 25,791
ok...range report is still missing...time for an update LOL
if I havent said it before...that is a plurry neat job you have done.......
-
30-10-2021, 05:16 AM #59Member
- Join Date
- Nov 2014
- Location
- Central Otago
- Posts
- 2,364
It will be a thumper to shoot!
-
27-12-2021, 10:52 AM #60Member
- Join Date
- Dec 2015
- Location
- Papakura, Auckland
- Posts
- 605
I had a chance to put 3 rounds through this a few weeks ago. I did not have a chronograph and it was only 3 rounds as I was not expecting to have an opportunity to shoot it given the location.
The loads were a combination of 410gr projectiles I purchased from ShooterNZ here on the forum and 450gr projectiles that I am making myself.
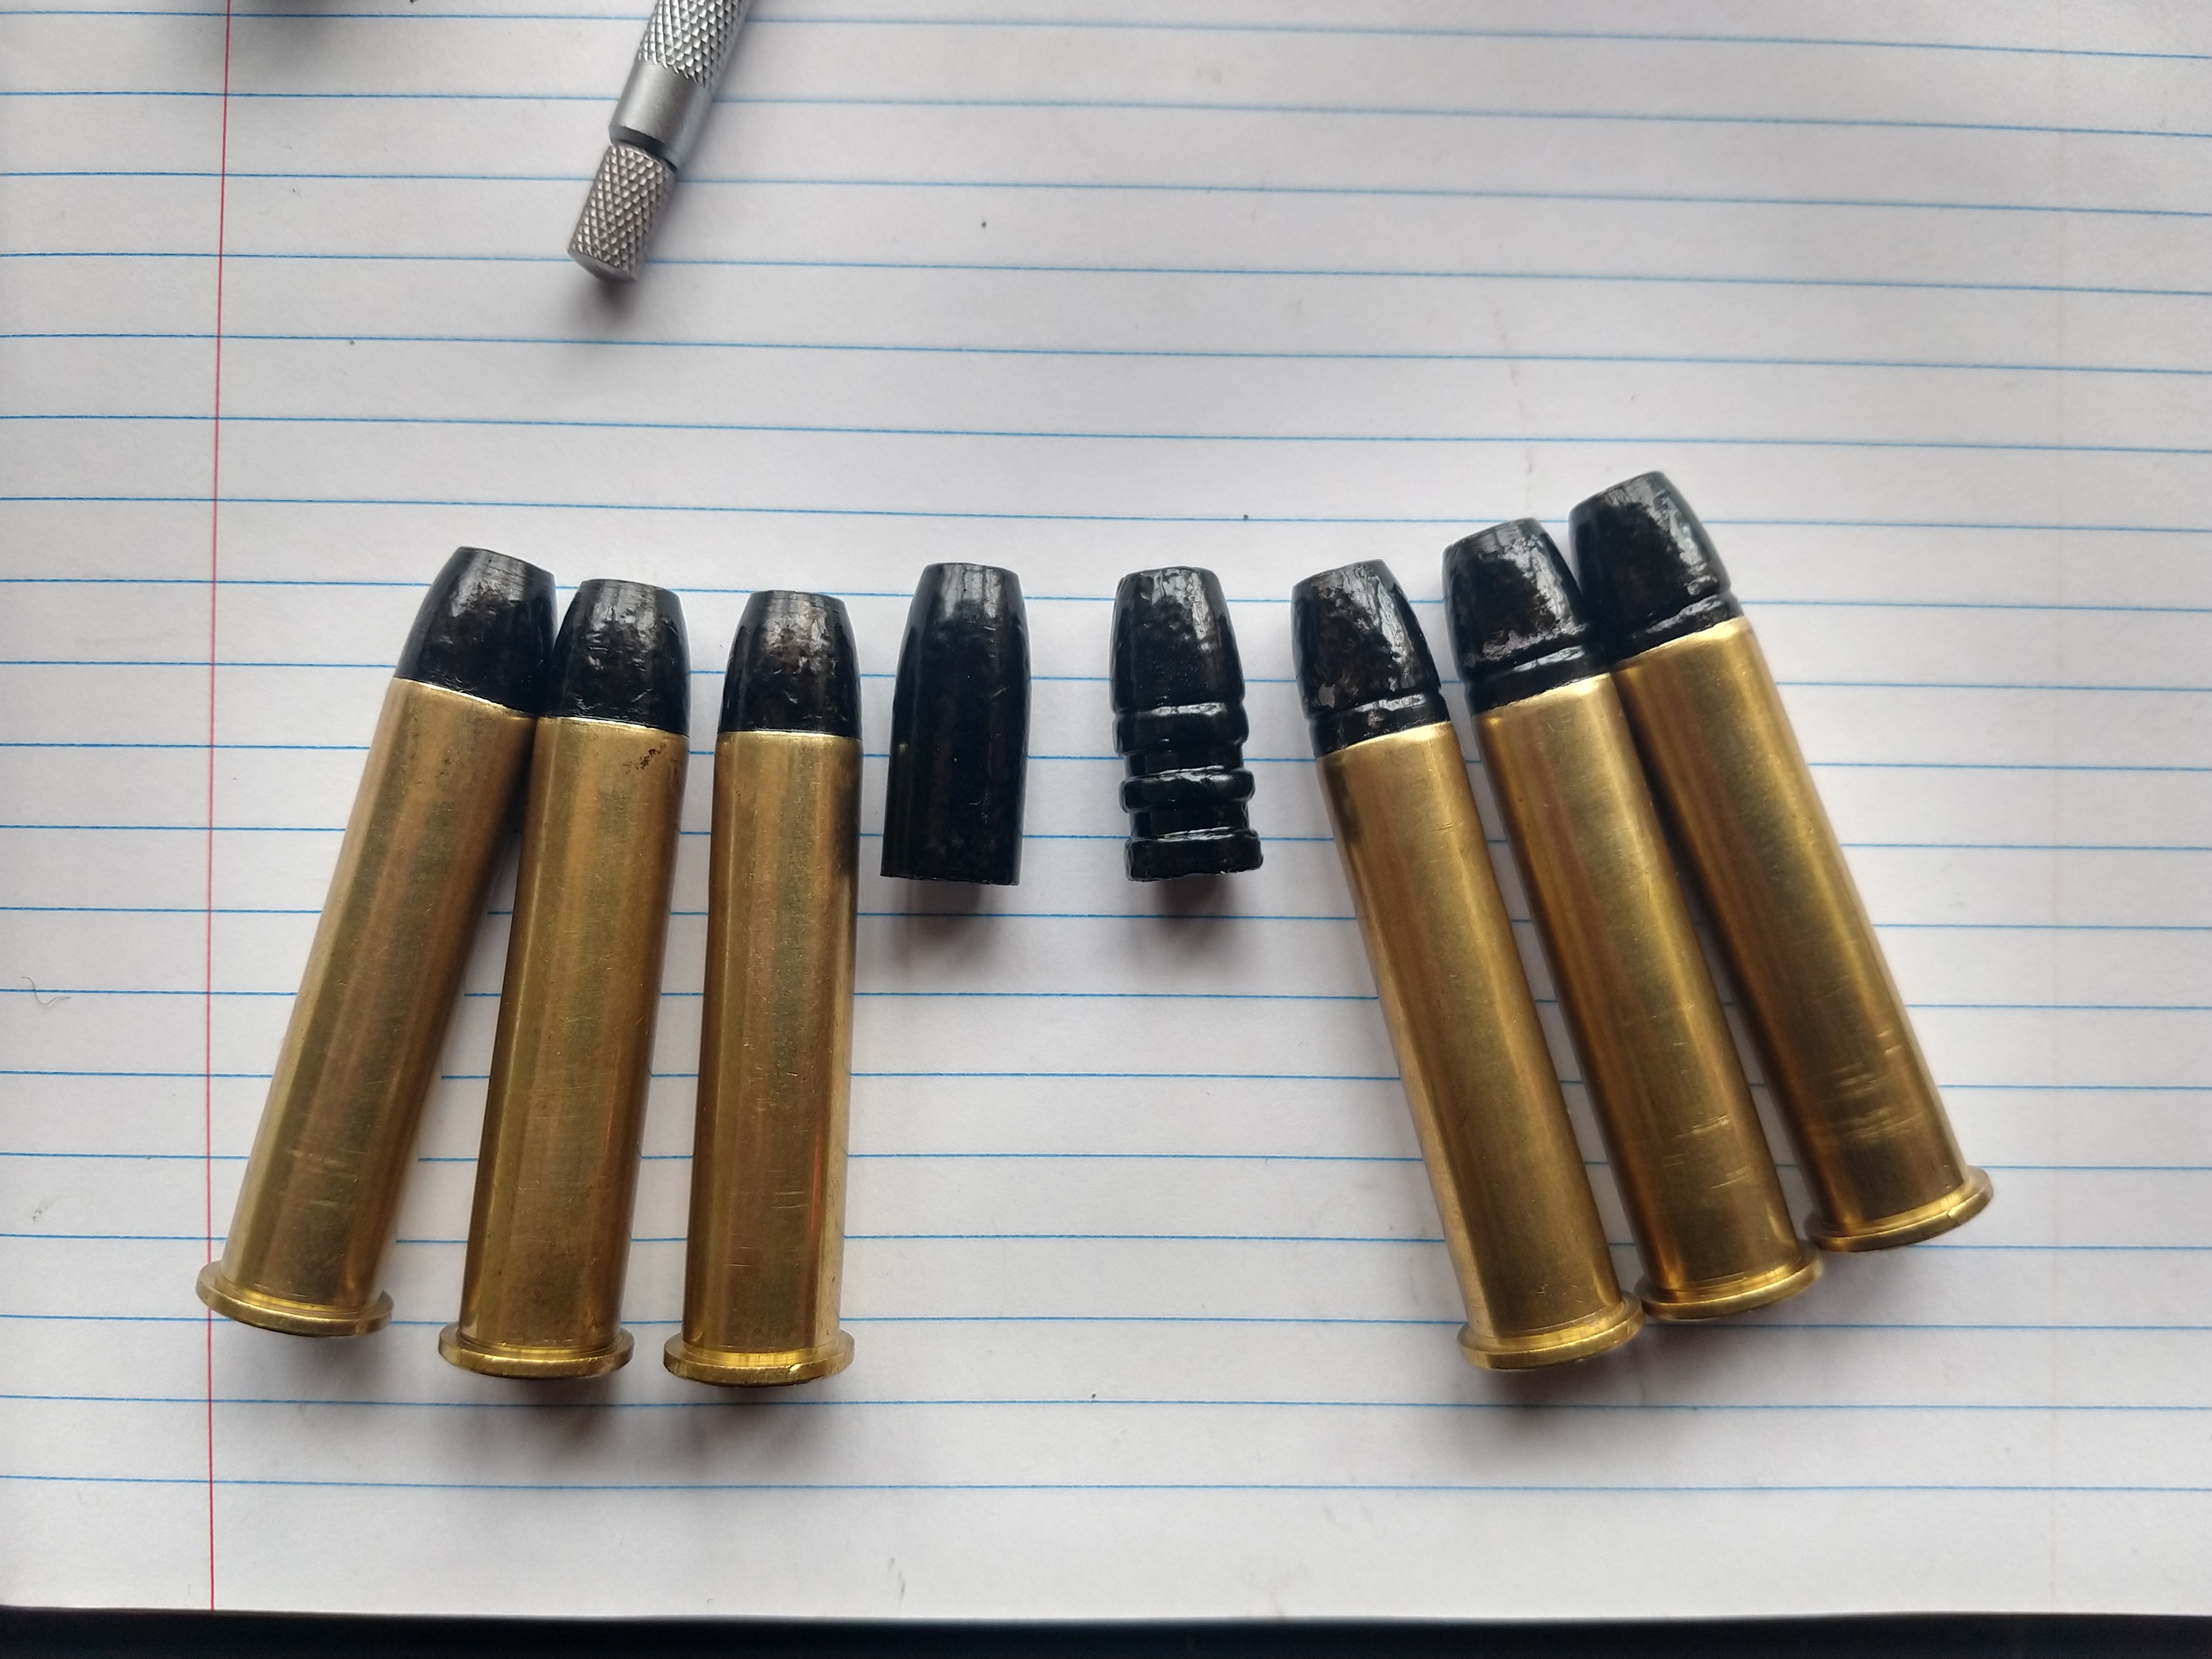
The load for both was 15-16gr of ADI AP100 with about 0.8gr Dacron filler. I have been learning all about case mouth flaring and expander mandrels, as to this point all my loading has been for boat tail jacketed projectiles, so a bit of a learning curve to deal with cast bullets well. Quickload estimates this load to be right on 1000fps.
Recoil was stout but not obnoxious. I would liken it to my lightweight and short 308 hunting rifle shooting hot loads. With full house 45-70 rounds I think it would be extremely unpleasant to un-shootable. It is only 3kg after all.
To my surprise, my efforts seemed to pay off in drawing the projectile path and barrel/barrel block in CAD to work out exactly how high my front sight and rear sight needed to be. It was shooting approx 2.5" high at 25m and good windage, which is close to what it should be to give a zero of about 80m and then around 3.5" - 4" drop at 100m.
I have been playing around with making a mold for casting my own 450gr projectiles. It took a few goes to get one that would fill out and eject the bullet properly. It is not a split mold and is along the lines of paper patch bullet molds since it does not need lube grooves as I am powder coating. I need to remake the sprue plate and make a decent handle for it, but I managed to cast enough for testing.
I have 20rds loaded up ready for some proper testing once I find somewhere to shoot. I lost access to my last spot about 6 months ago as the property was sold


 Reply With Quote
Similar Threads
-
New Baikal 121 Single Shot out
By Scout in forum Firearms, Optics and AccessoriesReplies: 15Last Post: 28-11-2020, 12:35 PM
Tags for this Thread
 Posting Permissions
- You may not post new threads
- You may not post replies
- You may not post attachments
- You may not edit your posts
Welcome to NZ Hunting and Shooting Forums! We see you're new here, or arn't logged in. Create an account, and Login for full access including our FREE BUY and SELL section Register NOW!!
All times are GMT +13. The time now is 12:04 PM.

Bookmarks