Great idea.
Printable View
Great idea.
Primo- has anyone else finished theirs?
@ANTSMAN @Klhari @rupert @burtonator
Did any of you proceed with an annealer ? Did you manage to get a 48V power supply?
I am having a hell of a wait for my one, and I have a mate wanting me to put one together for him.
If anyone got one straight away I would be keen to know where from?
Still waiting for my parts too.
Nope, been waiting 4weeks now.
Just got my 48v power supply today. Ordered on the 22nd of April from AliExpress.
There is light at the end of the tunnel!
I ordered mine on the 15 March, and it has supposedly left China and in transit to NZ but that was on the 22 March. I have a funny feeling it aint turning up any time soon. @Sonicjoe did you order the one listed by MGNZ? or another shop ?
Same one listed.Quote:
Originally Posted by johnd
Ive had 3 of my 11 packages arrive so far, including the 48v power supply. Mine was the same one MGNZ listed
Thanks guys I will try them.
What’s every one going to make their boxes from or use To put the bits into?
Still waiting on the second lot of Arduino boards to arrive from china to get out to those still waiting. The boat from China is slooooooow at the moment.
14 NZHS members are building annealers - keen to see what everyone comes up with!
It really depends on the idiot :P I know some complete idiots that would probably electrocute themselves or burn their house down.
It definitely requires some practical skills to build it. Making the box, making a case holder and dropping mechanism if you go that far, wiring the electrics etc.
IMO a practical Kiwi who tinkers in their garage, services their car, does work on the house should be sweet - it's definitely not an off-the-shelf product.
The programming can be setup for any oddball case. The 2 variables are anneal time and case height within the work coil - both of these are dialed in by the user using Tempilaq.
Quote:
Originally Posted by ckp
What is the internal diameter of the new coil we need to make? Same as the one that comes with the induction board but just a smaller tube?
@Mick Hunter the diameter is a lot smaller .... more like a broom handle (28 mm )Quote:
Originally Posted by Mick Hunter
Some info here for the coil i wound for my setup:
https://www.dropbox.com/s/1ccgn1x5fq...20use.pdf?dl=1
I have a couple of blank PCB's left if you're keen to build one? I could also build one up if needed.
Quote:
Originally Posted by Mauser308
Here is my annealer using MGNZ's shield design. I have mounted it all in an ACM case I designed.
The blue LED you see when the annealer is running is taken directly from the ZVS board to give a visual clue that the board is working ( or more correctly.... hasnt stopped working should the solid state relay fail closed ...letting the device run constantly ) Which was an issue with my first device.
MGNZ reprogrammed the mode switch for me so I can run the drop gate on demand function ( arduino codeing is still above my intellect )
There have been several variations to what I now have .... starting with an old PC case then onto a wooden box and settling on the ACM paneling
The arduino shield was the real game changer for me and allows for a host of very available and low cost features, the servo making for a very simple drop case mechanism, an area of design I had struggled with.
https://youtu.be/DHoOlHEuPuY
Very nice.
Haven’t started building mine yet. Still waiting on the temp sensor and the water pump but fear the water pump at least is never arriving so may have to look locally or have another go at aliexpress.
Nice box, is that Ali angle it all screws into to hold it together?
Nice work JohnD!
@Mick Hunter yep its 3mm thich Ali angle. I threaded all the holes to make it easier to bolt up.
Lets see some other creations!!
I have moved all the induction annealer build documentation, parts list etc. to a more permanent website as my dropbox links keep getting broken.
https://www.mgnz-makes.com/
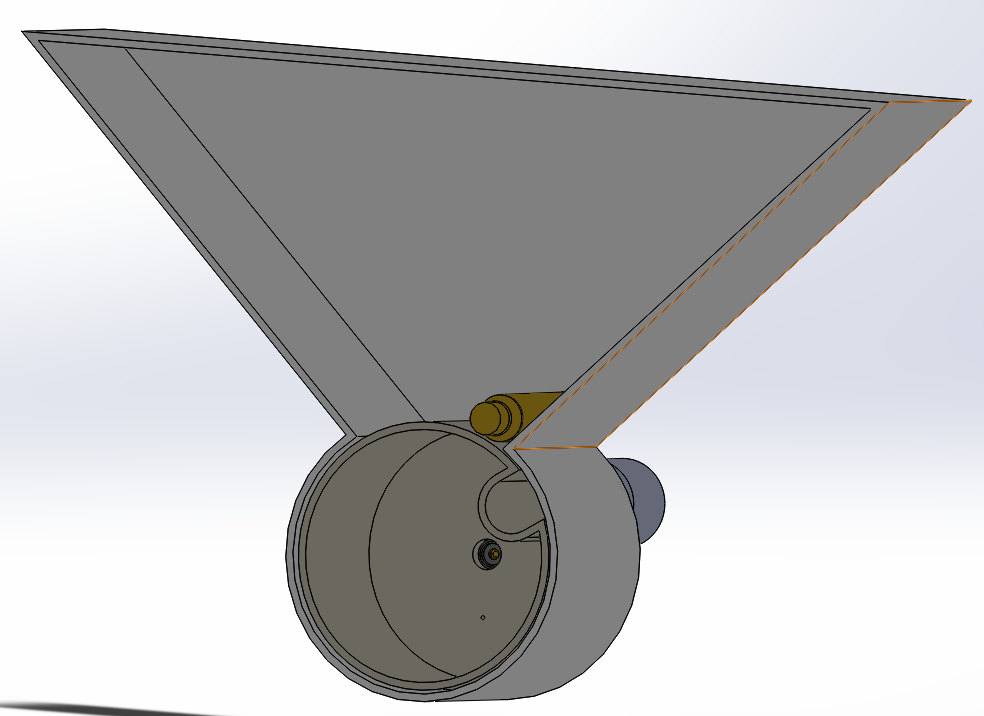
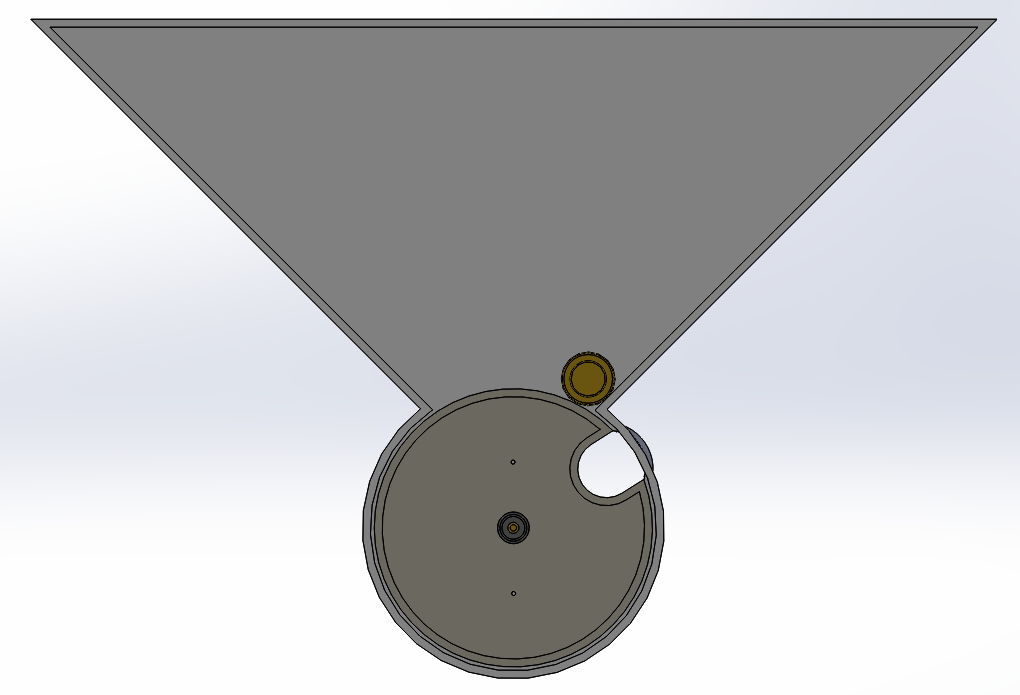
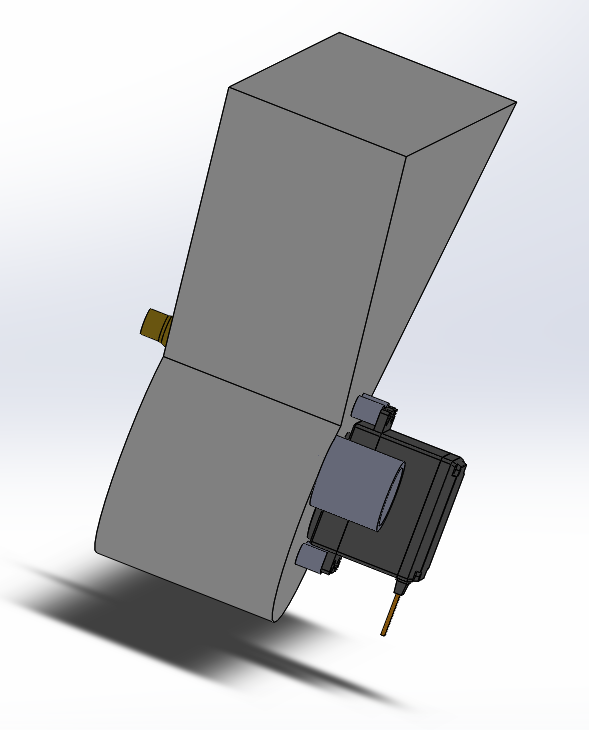
Quick update on this project. I'm starting to work on an automatic case feeder design add-on for the annealer. The plan is to 3D print the parts and provide the CAD for others. The feeding mechanism is going to be driven by a single servo connected to the arduino and synchronised with the free-run mode in the software. The case will be picked from the hopper and then dropped down a tube into the annealing coil.
This is the start of the CAD:
Attachment 149924
Attachment 149925
Attachment 149926
Nice. I look forward to seeing how this develops.
Good thinking @MGNZ
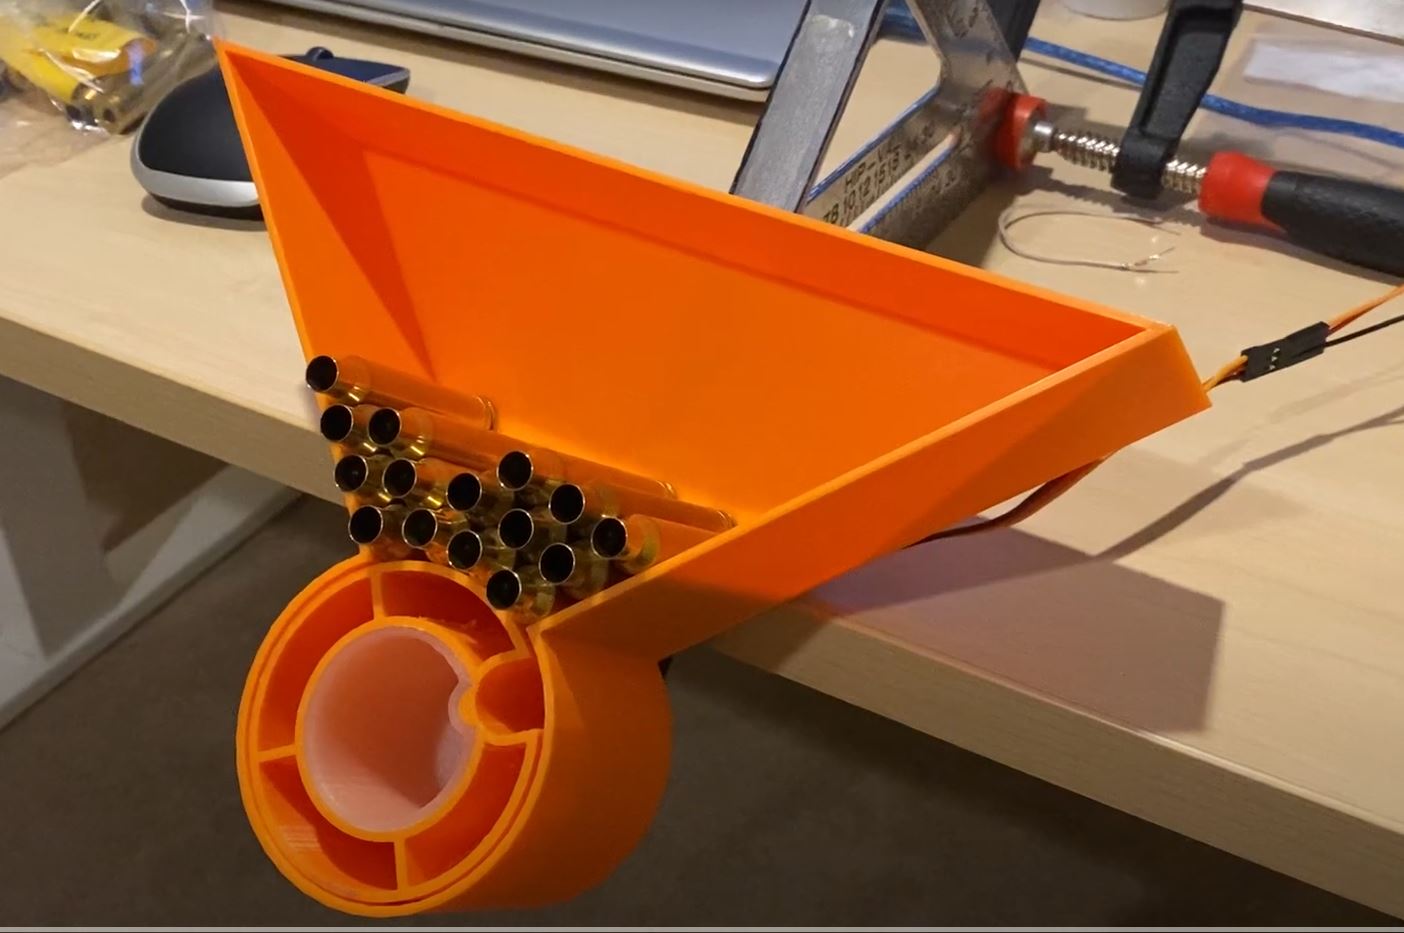
Still have a few feed bugs to work out, but not bad for a first run.
https://youtu.be/BujviMWKw0o
Attachment 150486
Much better feed reliability with 260 cases.
https://youtu.be/NZUAKkAxfk4
Clicked "like" but was thinking we need an "excellent" option instead.
Nice work.
Maybe the edges of the case slot need to be taperd outward a bit?Quote:
Originally Posted by MGNZ
Yeah, was thinking the same thing. Or widening the slot a bit to accept slightly skewed cases. The orange outer wheel is removable without tools to allow for different case size versions to be swapped out.Quote:
Originally Posted by 300CALMAN
Also noticed that 4 of the 300WM cases will bind across the top of the wheel - whereas the 260 doesn't. May also be contributing to the problem.
Slowing the servo sweep might also help a bit too.
Question for those that have done their annealers.
What wall thickness copper pipe did you use for your coils? I bought some 1/8 copper tube that has a 30 thou wall thickness and the pump won’t pump through the coil. It pumps fine through everything else.
Have just ordered some other 1/8 tube with a 14 thou wall thickness from a hobby shop which will give me more volume / less restriction through the coil.
Anyone remember what you used?
@Mick Hunter I used 1/8 (3.2mm) with a wall thickness of .03 thou (.76mm).
Works good, maybe your pump isnt up to that? Can you blow through it? you can probably get it to gravity feed too. I have made 4 coils with this dia pump works on all of them.
https://www.aliexpress.com/item/4000...1c674c4dtYpyNP
Watch you dont flatten the thinner wall tubing, try getting it warm when you start bending it.
Thanks John, Yes I can blow through it. The tubing I have ordered i think will present more problems as it is only 300mm so I can see a join coming with wont be easy.
Will keep looking for some longer thinner tube
Those copper tube water cooled contraptions are sooo last year :yaeh am not durnk:
https://youtu.be/YbcZFDYERic
I will have some 750"F templaq turning up next week for those guys that wanted it.
Ideally 4 people would be grate then I havent lost any money!
So far I have @Mick Hunter @Morepork @kristopher
Anyone else $25 plus postage? first person to reply on here can be the 4th.
I'll go with it thanks John. Please let me know the payment details. Cheers
Finally have the automatic case feeder up and running. It really speeds up throughput!
Video below of Greg's annealer in operation from Wombat ordnance.
https://youtu.be/GqYSRLfobHQ
That a pretty nice setup you've got running there. Well done.Quote:
Originally Posted by MGNZ
:thumbsup:
Right. Finally got my copper from aliexpress and got round to making the coil. Still not convinces its working properly as the water is only dribbling back into the resivour.
I have wired the temp sensor in, where do in need to put the sensor part of that? What are we temp sensing?
What current are you getting out of your induction boards? Mine is running about 8 amps and the initial testing is taking about 7.5 seconds to anneal a 708 case with the colour change just down past the bottom of shoulder
So after a few cases have been run through, is the coil hot? If it is then the water cooling isnt working, If iys still cool to the touch its probably doing its job.
After 5 cases or so without cooling it would be hot to touch.
I want to know how hot the capacitor bank is getting ( the black plastic bits ( 6 of them usually)) So I use a hot glue gun run between the two banks of 3.
If the capacitors get to hot that will kill the board. Your 8 amps sounds about right. I get 6 to 7.5 on .308 cases, but your case mouth will be a wee bit further from the coil than mine hence the slightly longer time in your case Pun intended:pacman:
Hi John,what coils did you use there?