

 41Likes
 LinkBack URL
 About LinkBacks
I understand, but think its more likely that a semi-custom high production maker like BR have a better idea and experience of "proper Rockwell" than small scale custom producers.Originally Posted by von tempsky fan

Welcome guest, is this your first visit? Create Account now to join.
Welcome to the NZ Hunting and Shooting Forums.
Search Forums


User Tag List
+ Reply to Thread
Results 31 to 36 of 36
-
05-06-2020, 05:49 PM #31Member

- Join Date
- Dec 2011
- Location
- NI
- Posts
- 11,977
-
-
05-06-2020, 06:17 PM #32Rob

- Join Date
- Apr 2012
- Location
- Te Puke
- Posts
- 908
Dulo are legendary in bushcraft circles for edge retention, handmade in Bulgaria and their sheaths are next level quality. Check them out.
Tahr likes this.
-
05-06-2020, 07:47 PM #33Purveyor of Fine Cutlery

- Join Date
- Dec 2017
- Location
- Auckland
- Posts
- 702
I doubt many can compete with the BRK warranty or would even want to! Originally Posted by Tahr
Tahr likes this.Regards
Terry
https://www.knives4africa.co.nz/
Custom knife dealer
Authorised Nitecore Torch Retailer
NZ Distributor of Nano-Oil
-
07-06-2020, 10:28 AM #34Member
- Join Date
- Aug 2014
- Location
- Auckland
- Posts
- 681
For a warranty to take the cake check out ESEE, accidentally cut your knife in half with a bandsaw, no problem, send it back and they will replace it...
For me, I kind of like 01, sure it may be old skool and it’s certainly not a super steel, it’s going to patina the second you cut a tomato in half, but it takes the best edge of anything I’ve seen, it doesn’t chip like a super steel will, it does not require a diamond to keep it going (although I do use diamonds-nothing faster), a strop will work just fine and it does not cost an arm and a leg to buy.
-
07-06-2020, 10:59 AM #35Member
- Join Date
- Dec 2011
- Location
- NI
- Posts
- 11,977
I agree that for ordinary hunting use O1 and 1095 are pretty goody steels that don't cost a fortune. I use 1095. But O1 is no where as tough as 3V which is the best all round of the so called super steel. 3V is about 3 times as tough as O1 and its edge will last twice as long. But you pay for it. Originally Posted by Shelley
-
22-06-2020, 12:13 AM #36Member

- Join Date
- May 2012
- Location
- Porirua
- Posts
- 974
Sharpening a D2 knife blade: follow-up
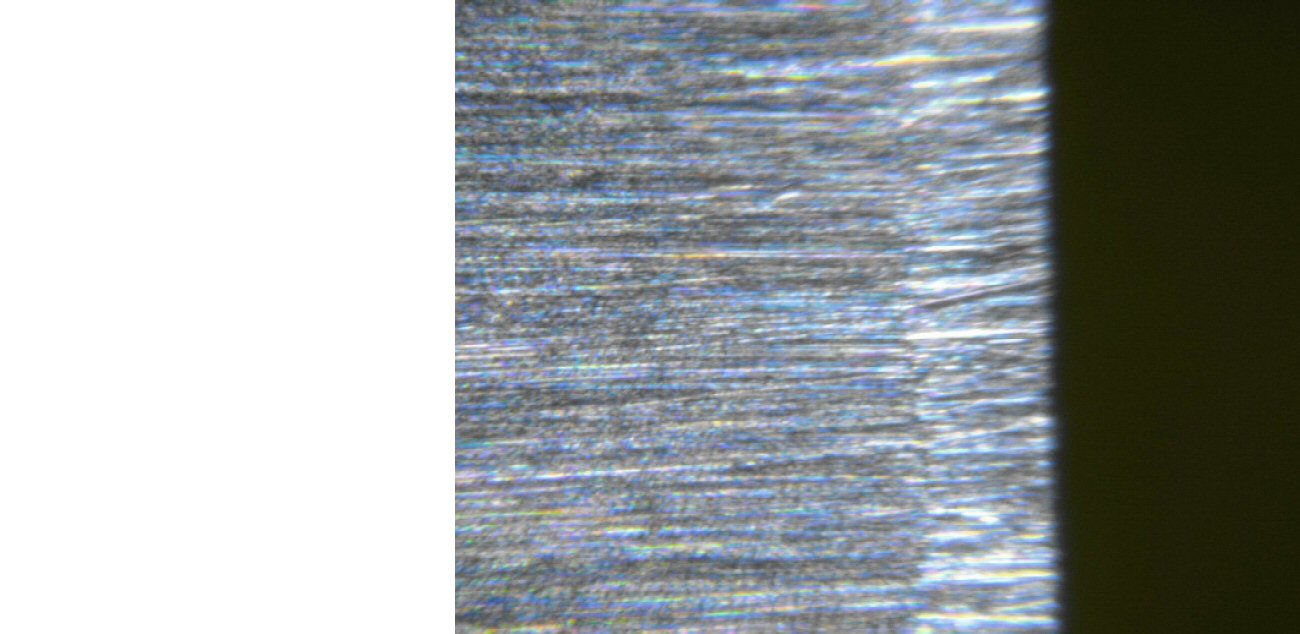
As promised earlier, I have continued experimenting with refining the blade edge of the re-handled Spyderco Junction, using the finer grade Venev diamond stones, followed by leather strops loaded with Jende 1 micron and one-quarter micron diamond emulsions. More photographs were taken of the edge along the way to track what was happening at a microscopic level. To the un-aided eye there was no visible change the edge simply maintained a mirror finish appearance thoughout. Down at these abrasive sizes, the images arent quite as revealing as earlier either, because the limit of the budget optics used had been reached, but there were still a few changes to see as sharpening progressed.
Below are the images where the light source is at right-angles to the blade and reflects off the edge of the apex. This shows the expected reduction in the width of the reflection as the edge continues to be refined, though the flaring off the apex doesnt really allow the true thinness achieved to be represented accurately in a photo. As previously, with the light lining up along the direction that the abrasives were applied, there is almost no visible sign of the scratch pattern. The small reflective patches that can be seen instead may be localised galling or perhaps some manifestation of the microstructures in the steel.
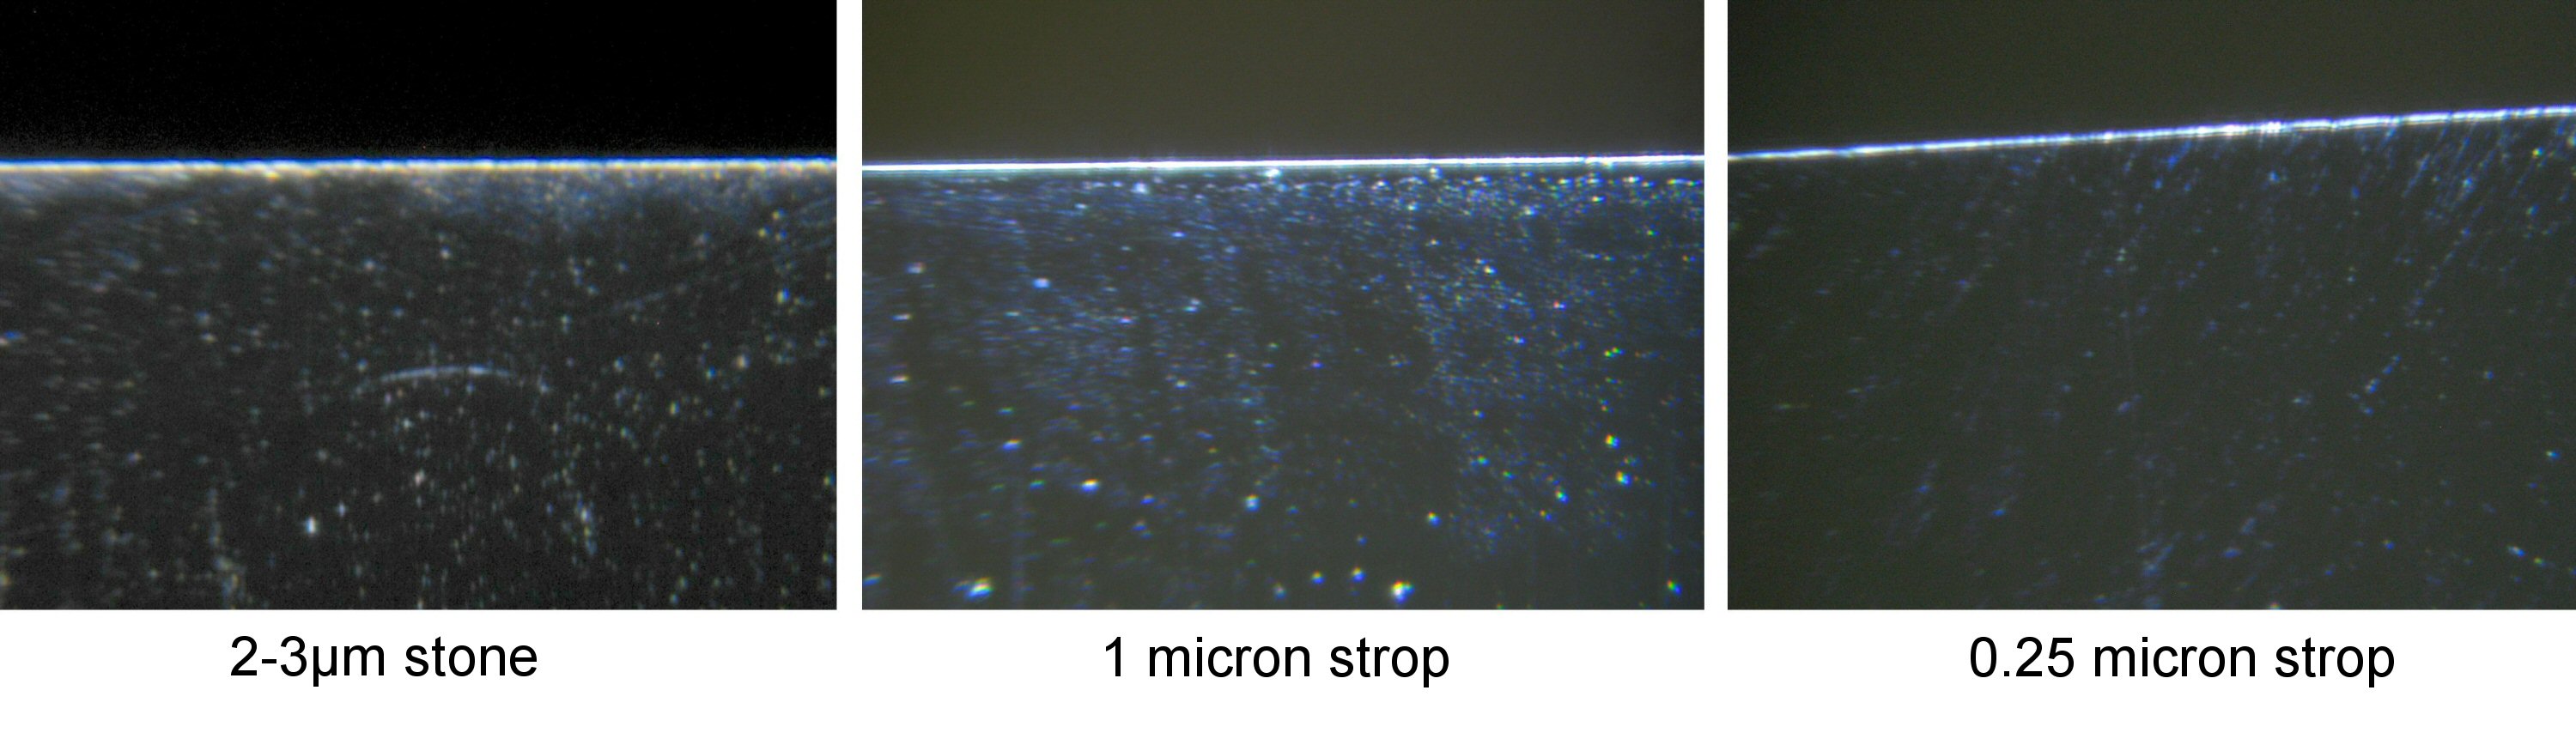
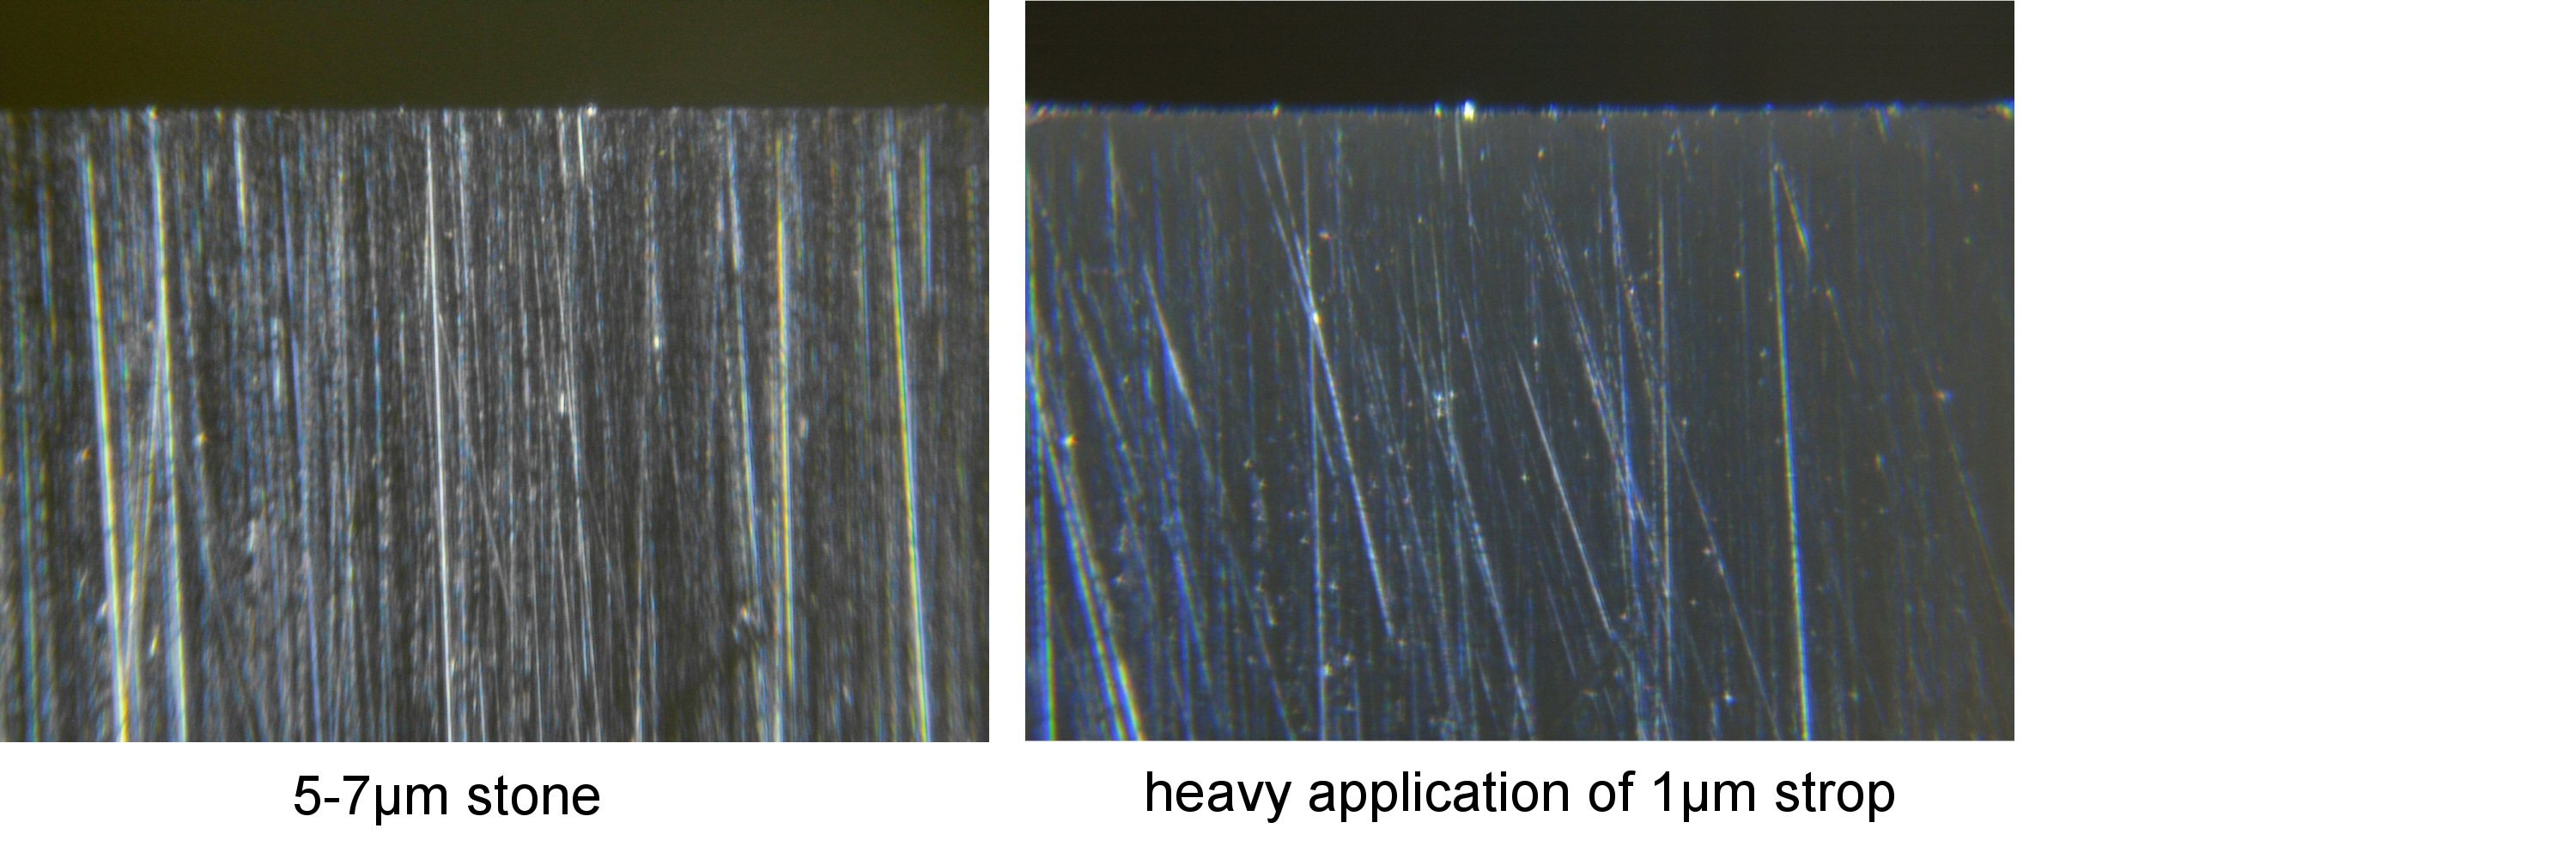
Below are a couple of images of the same part of the blade edge with the illumination angled instead at right-angles to that pictured above and so maximise the appearance of the scratch pattern. On the left is the appearance following a 5-7µm stone, and on the right is after a few passes of the 2-3µm stone followed by a fairly lengthy application of a strop loaded with the 1µm diameter abrasive emulsion while I tried to remove the scratch pattern. Some of the deeper scratches on the left can be identified as still present in the image on the right, though the strop has gone a long way to removing the scratches from the earlier abrasives. It became clear to me that continued use of the strop would ultimately erase them all.
While this might improve the visual finish across the full depth of the edge as seen through a microscope, it was apparent that the stropping, though initially helping to achieve a keener edge, was then going on to cause a degradation.
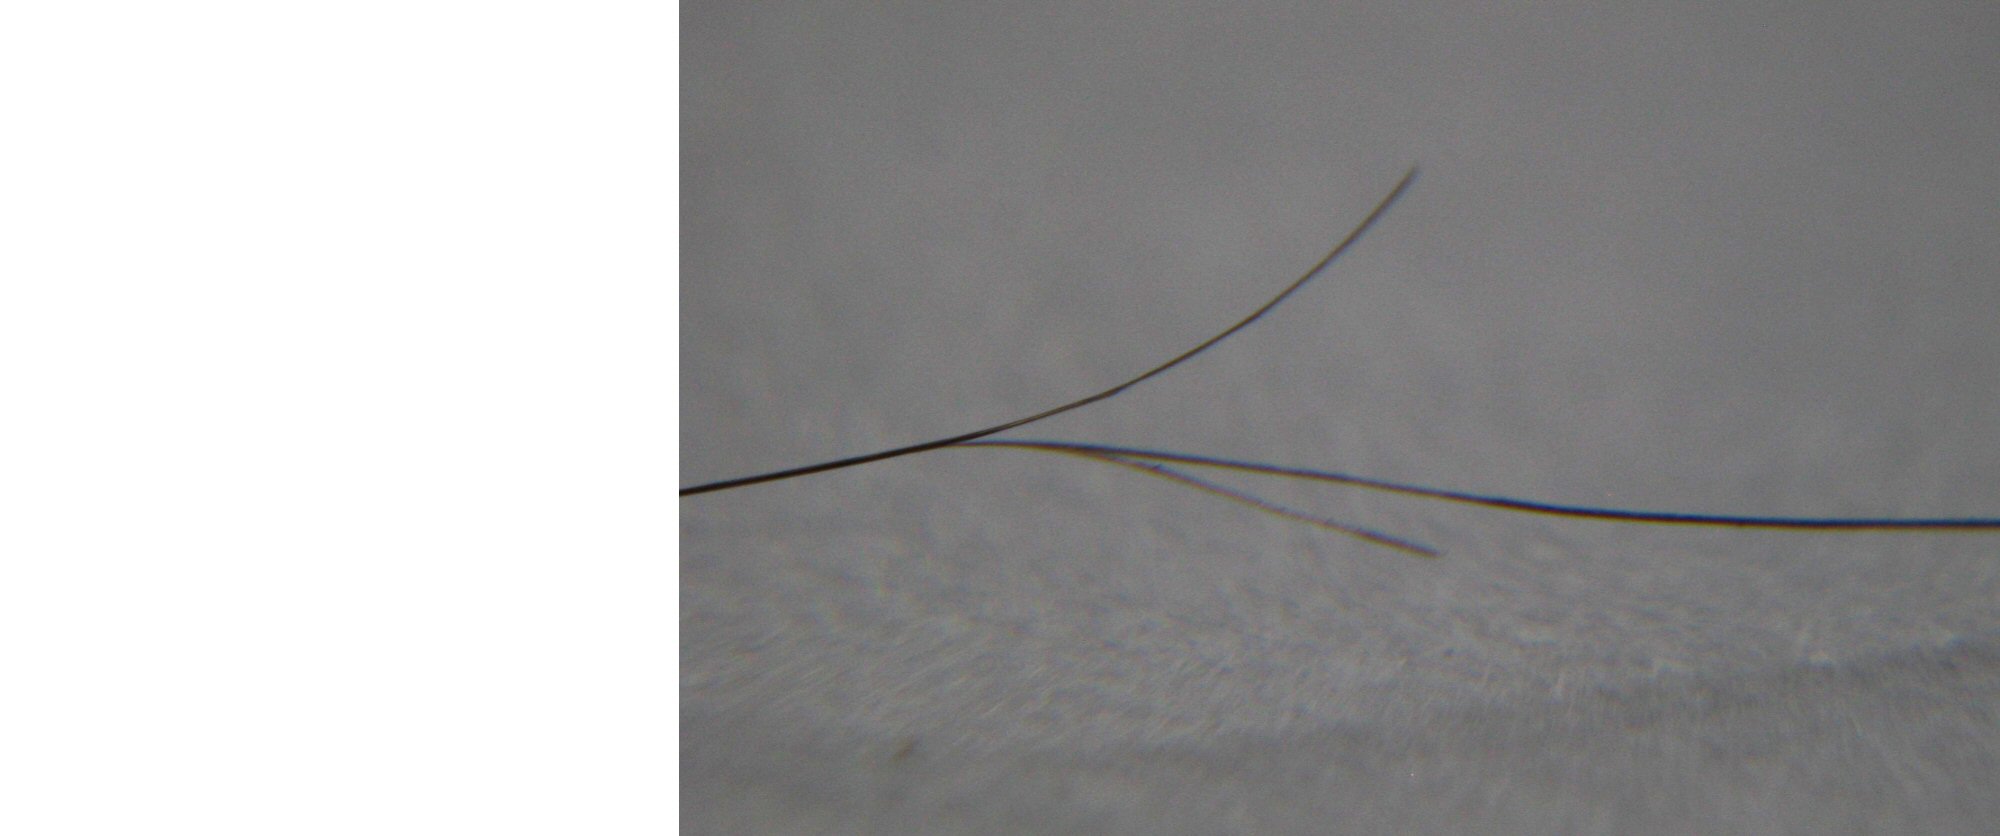
I used a favourite of blade enthusiasts to gauge the condition of the edge - whittling hair - and for the purposes of scientific inquiry sacrificed quite a number of my few remaining non-greying hairs from my head to assess the condition of the edge at various stages along the way. The hair was all quite thin, averaging 0.045mm in diameter.
The keenest edge following the Venev stones appeared to be achieved with maybe ten strokes of the leather-on-aluminium strops per side with the 1µm abrasive followed with the same using the 0.25µm abrasive. With this edge I could easily pare down both sides of a hair.
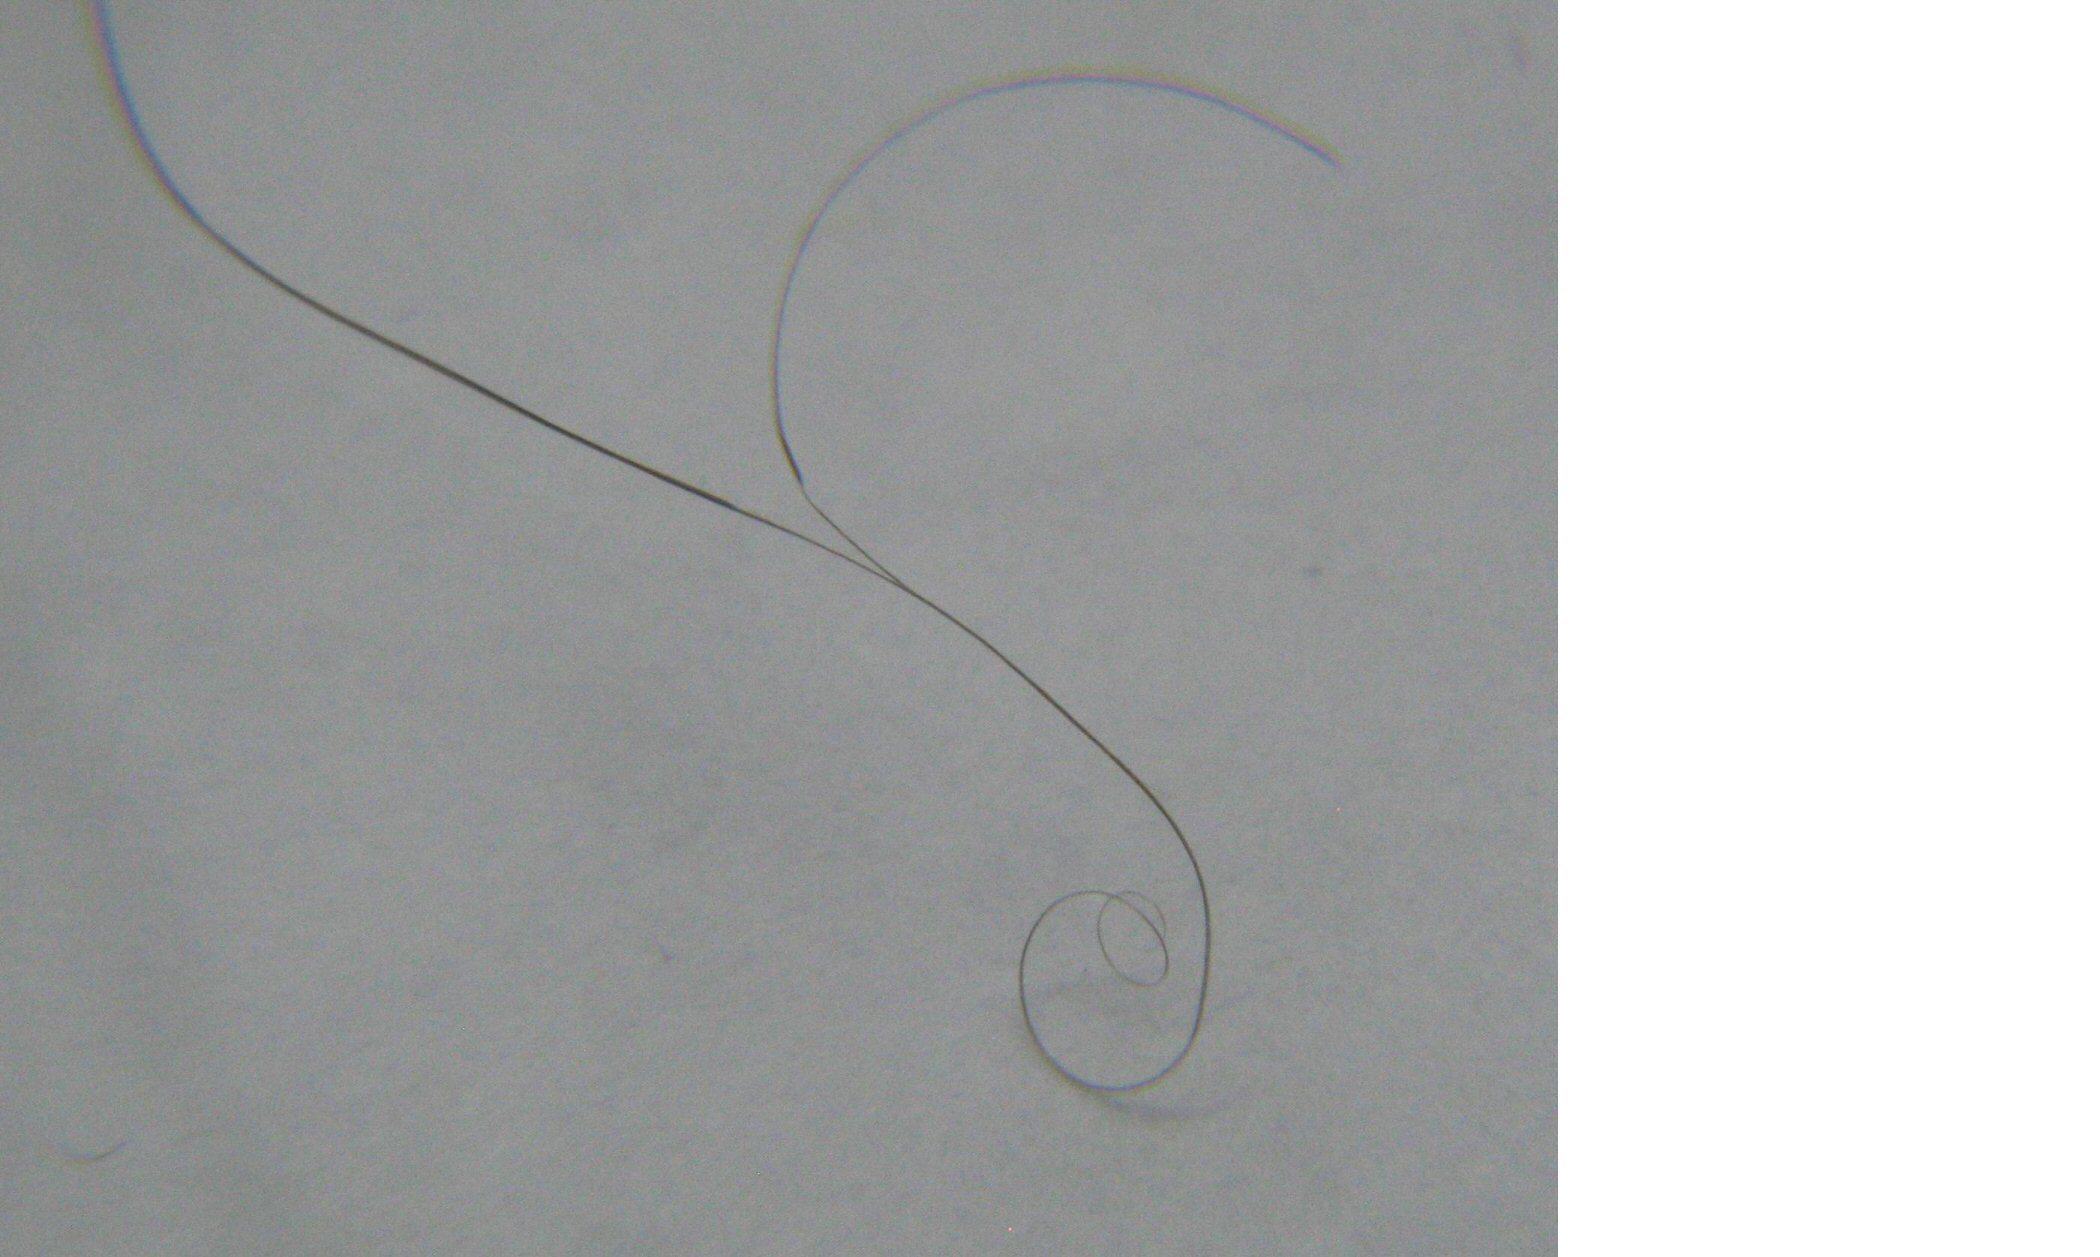
I also tried other more ambitious whittling for example stripped the sides off a hair before splitting the remaining thickness down the middle. All fun and games. It was useful though in confirming that continued application of the strops quite quickly degrades the edge finish so that whittling is no longer possible. A bit of reading online found that this was to be expected: the leather often has enough give to round off the extremity of the edge and form a convex bevel. I confirmed this on a couple of occasions by going back to the stones, still set at the original 15° on the jig, and repeating the whole process with further testing. The fresh scratch patterns would not initially reach out to the apex because of the rounding-off at the edge. I wouldnt say I had to then re-profile the edge to get the stones to contact the full width of the bevel again, but a bit of work was necessary with the finer stones to restore the original V-shape followed by the limited stropping to get back to a hair-whittling edge. The situation was improved by using the emulsion on pine (wood) strops rather than leather. The convexing still occurred but was delayed. At a microscopic level perhaps there is still compression in the timber fibres as there was in the leather. Applied force obviously has a bearing too, light strokes preferred to optimise the keenness of the edge.
Now for something completely different. Here is another photographed example of what can happen from not being consistent with the applied angle between two sharpening stones on a sharpening jig. My apologies for the edge of the blade appearing fuzzy the depth of focus of the optics being used for these images is tiny. To get some idea of scale, the 1mm apex on the blade being sharpened is about as wide as this text block.
In this case a 2-3 micron diamond stone has been used over the top of a scratch pattern from a 5-7µm stone. This time the difference in stone thickness was the wrong way around, and the finer grit stone has not actually contacted the last 0.1mm right at the edge. This remains finished with the preceding grit size and is visibly courser in appearance as a result. Regardless of what these photos look like down at a microscopic level, both appear to the un-aided eye as a mirror finish. A microscope, even a NZ$10 one, is a very useful aid to knife sharpening. Without one there is no visual clue that application of the finer stone has not improved the keenness of the edge since it hasnt actually made contact with it.quentin likes this.


 Reply With Quote
Similar Threads
-
Knife Sharpening
By Paua Pete in forum HuntingReplies: 7Last Post: 11-01-2020, 09:36 PM -
EXCHANGE A BLADE KNIFE
By bigbear in forum Gear and EquipmentReplies: 9Last Post: 16-03-2019, 05:09 PM -
making a knife and a sheath, part 5 - attaching the handle to the blade
By Shelley in forum Gear and EquipmentReplies: 2Last Post: 18-07-2015, 08:23 PM -
Old school replacement blade knife
By ChrisF in forum Gear and EquipmentReplies: 2Last Post: 17-06-2015, 11:27 AM
Tags for this Thread
 Posting Permissions
- You may not post new threads
- You may not post replies
- You may not post attachments
- You may not edit your posts
Welcome to NZ Hunting and Shooting Forums! We see you're new here, or arn't logged in. Create an account, and Login for full access including our FREE BUY and SELL section Register NOW!!
All times are GMT +13. The time now is 07:11 AM.

Bookmarks