

 105Likes
 LinkBack URL
 About LinkBacks
That sounds like a muzzle loader from the 1800s with extra steps.Originally Posted by Micky Duck

Welcome guest, is this your first visit? Create Account now to join.
Welcome to the NZ Hunting and Shooting Forums.
Search Forums


User Tag List
+ Reply to Thread
Results 16 to 30 of 77
Hybrid View
-
25-05-2021, 05:26 PM #1Member

- Join Date
- Feb 2017
- Location
- Jafa land
- Posts
- 5,535
rossi.45 likes this.
-
25-05-2021, 05:39 PM #2Member

- Join Date
- Apr 2015
- Location
- Geraldine
- Posts
- 25,556
yes but no...you still use ammunition like normal...but for ejection rather than weaken area around rim I left it pretty much intact...drop wee rod (guts of double ended automotive screwdriver) down bore and it hits inside of case and pops empty out......well known trick for shotgun with dodgy extraction....
-
25-05-2021, 06:30 PM #3Member
- Join Date
- Apr 2015
- Location
- Geraldine
- Posts
- 25,556
-
25-05-2021, 06:39 PM #4Member

- Join Date
- Dec 2015
- Location
- Papakura, Auckland
- Posts
- 601
So it turns out the barrels are soldered in. I was trying to heat up the barrel shank to break the threads/press fit free and noticed the smell of solder flux and then with a bit more heat, had little balls of solder appearing in the back join. So I kept heating it up and tapping with a wooden mallet and eventually it slid off nice and easy. I had to remove the sling mount (which was also soldered) to get the barrel adapter off.
Its all low temp solder, maybe very low silver solder.
-
25-05-2021, 11:41 PM #5Member

- Join Date
- Dec 2014
- Location
- NZISTAN
- Posts
- 5,291
Wow! So contour the chamber area of the other barrel, cut the extractor and head space. Originally Posted by SixtyTen
A simple but quite clever attachment method.
I have a Baikal under over rifle, wounder if it's done the same way?
-
25-05-2021, 06:41 PM #6Member
- Join Date
- Apr 2015
- Location
- Geraldine
- Posts
- 25,556
holy smoke,that makes it piece of piss then..... good work.
-
25-05-2021, 07:44 PM #7Member
- Join Date
- Apr 2015
- Location
- Geraldine
- Posts
- 25,556
Rifle - ADI World Class Powders and Ammunition
these are good load info...its the bottom tier...the lower pressure loads for trapdoor type rifles...I FIGURE shotgun action must be here somewhere....maybe into the lower end of next tier...you will see if compare the trail boss loads to smokeless,the pressure is LOWER with smokeless...SixtyTen likes this.
-
26-05-2021, 04:37 PM #8Member
- Join Date
- Apr 2015
- Location
- Geraldine
- Posts
- 25,556
30/06 or 45/70 ???? always dreamt of one of them for a bush rifle......
-
01-06-2021, 10:41 PM #9Member
- Join Date
- Dec 2015
- Location
- Papakura, Auckland
- Posts
- 601
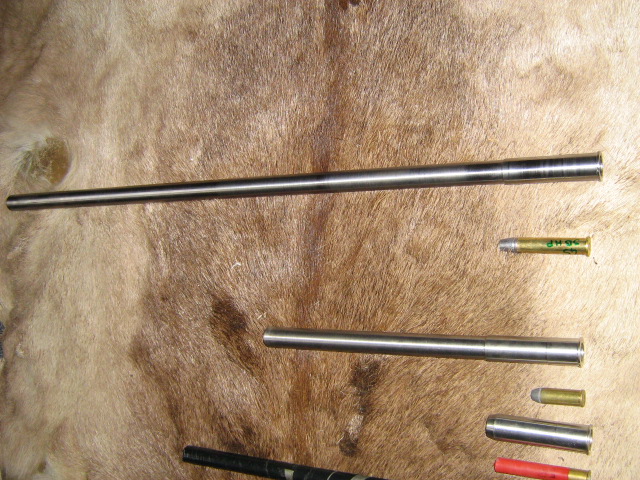
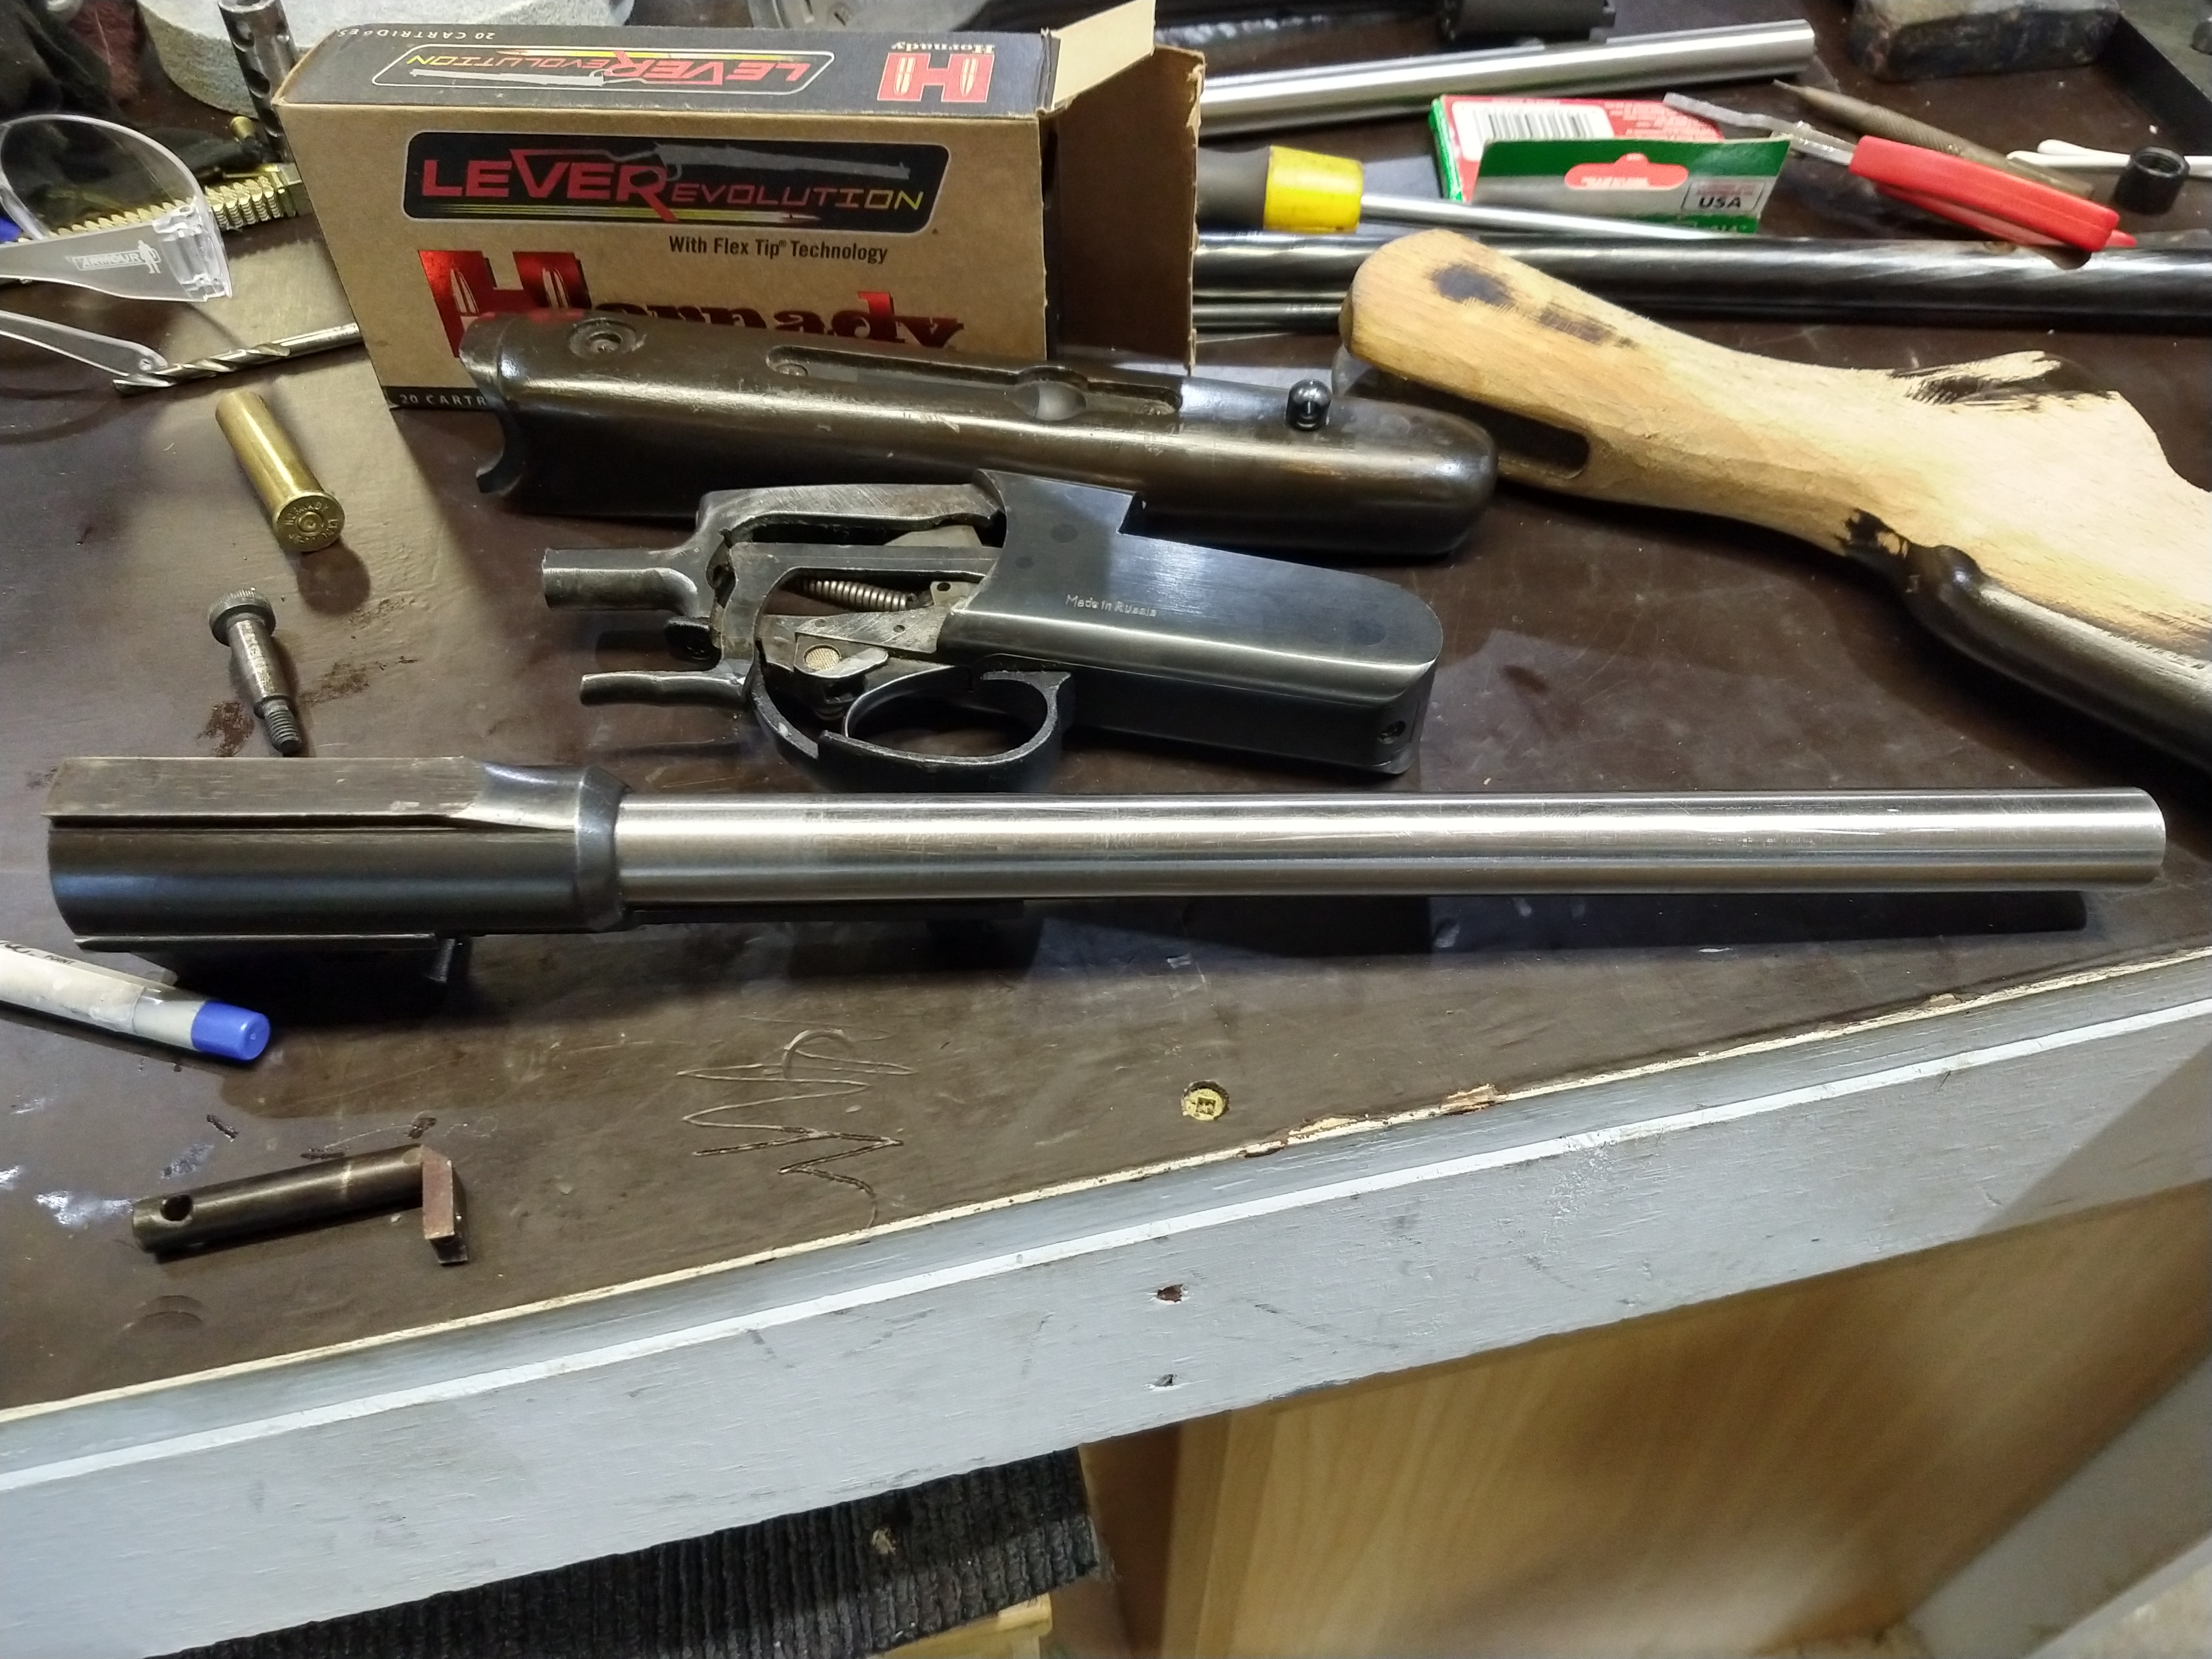
First off, sorry if the images are huge, I am trying to post from my phone and can't work out how to resize them.
I have been working on putting a new barrel on this rifle
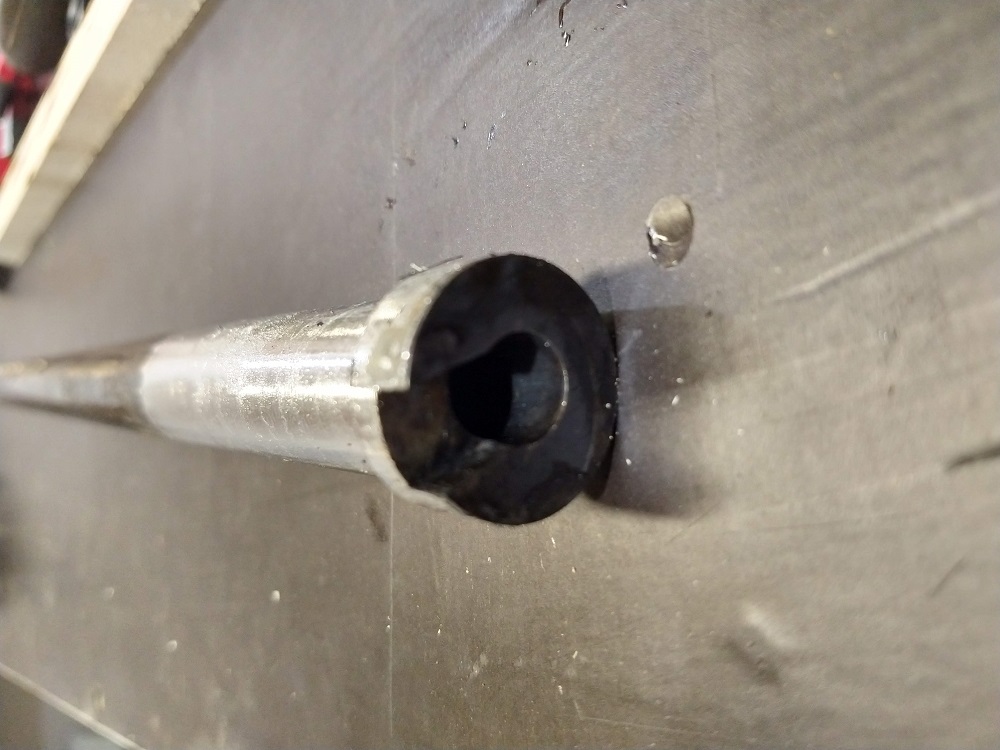
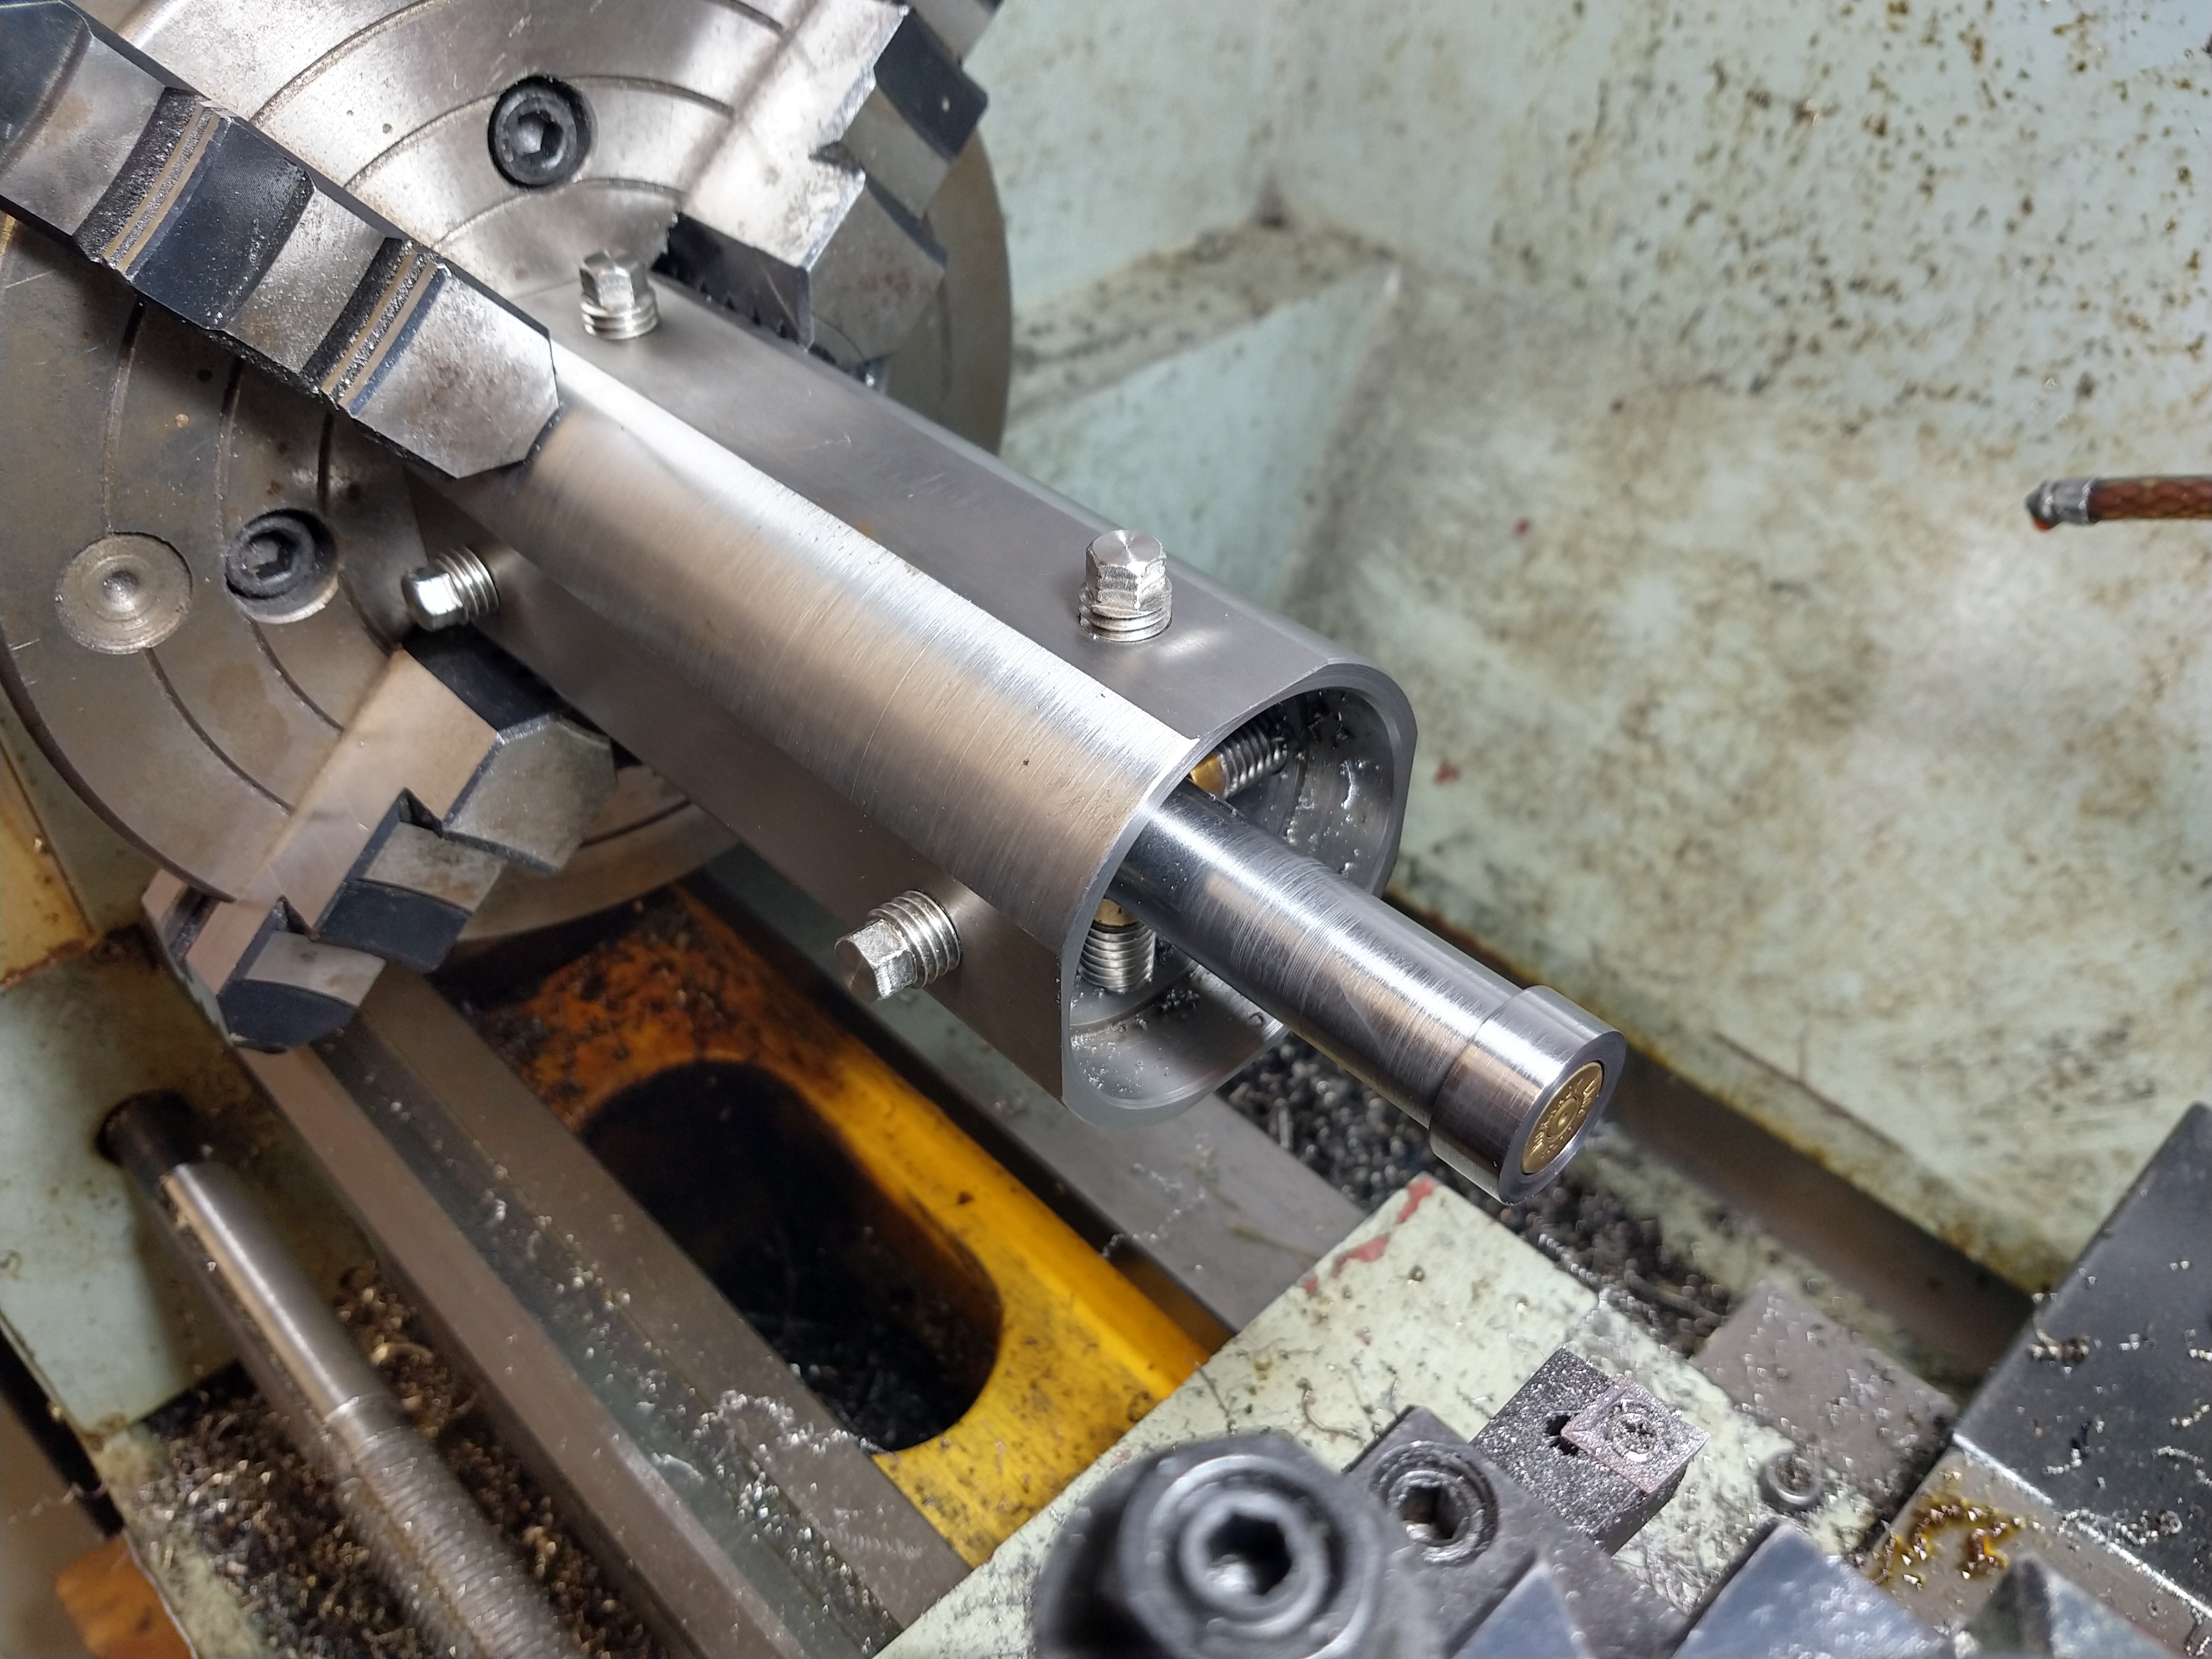
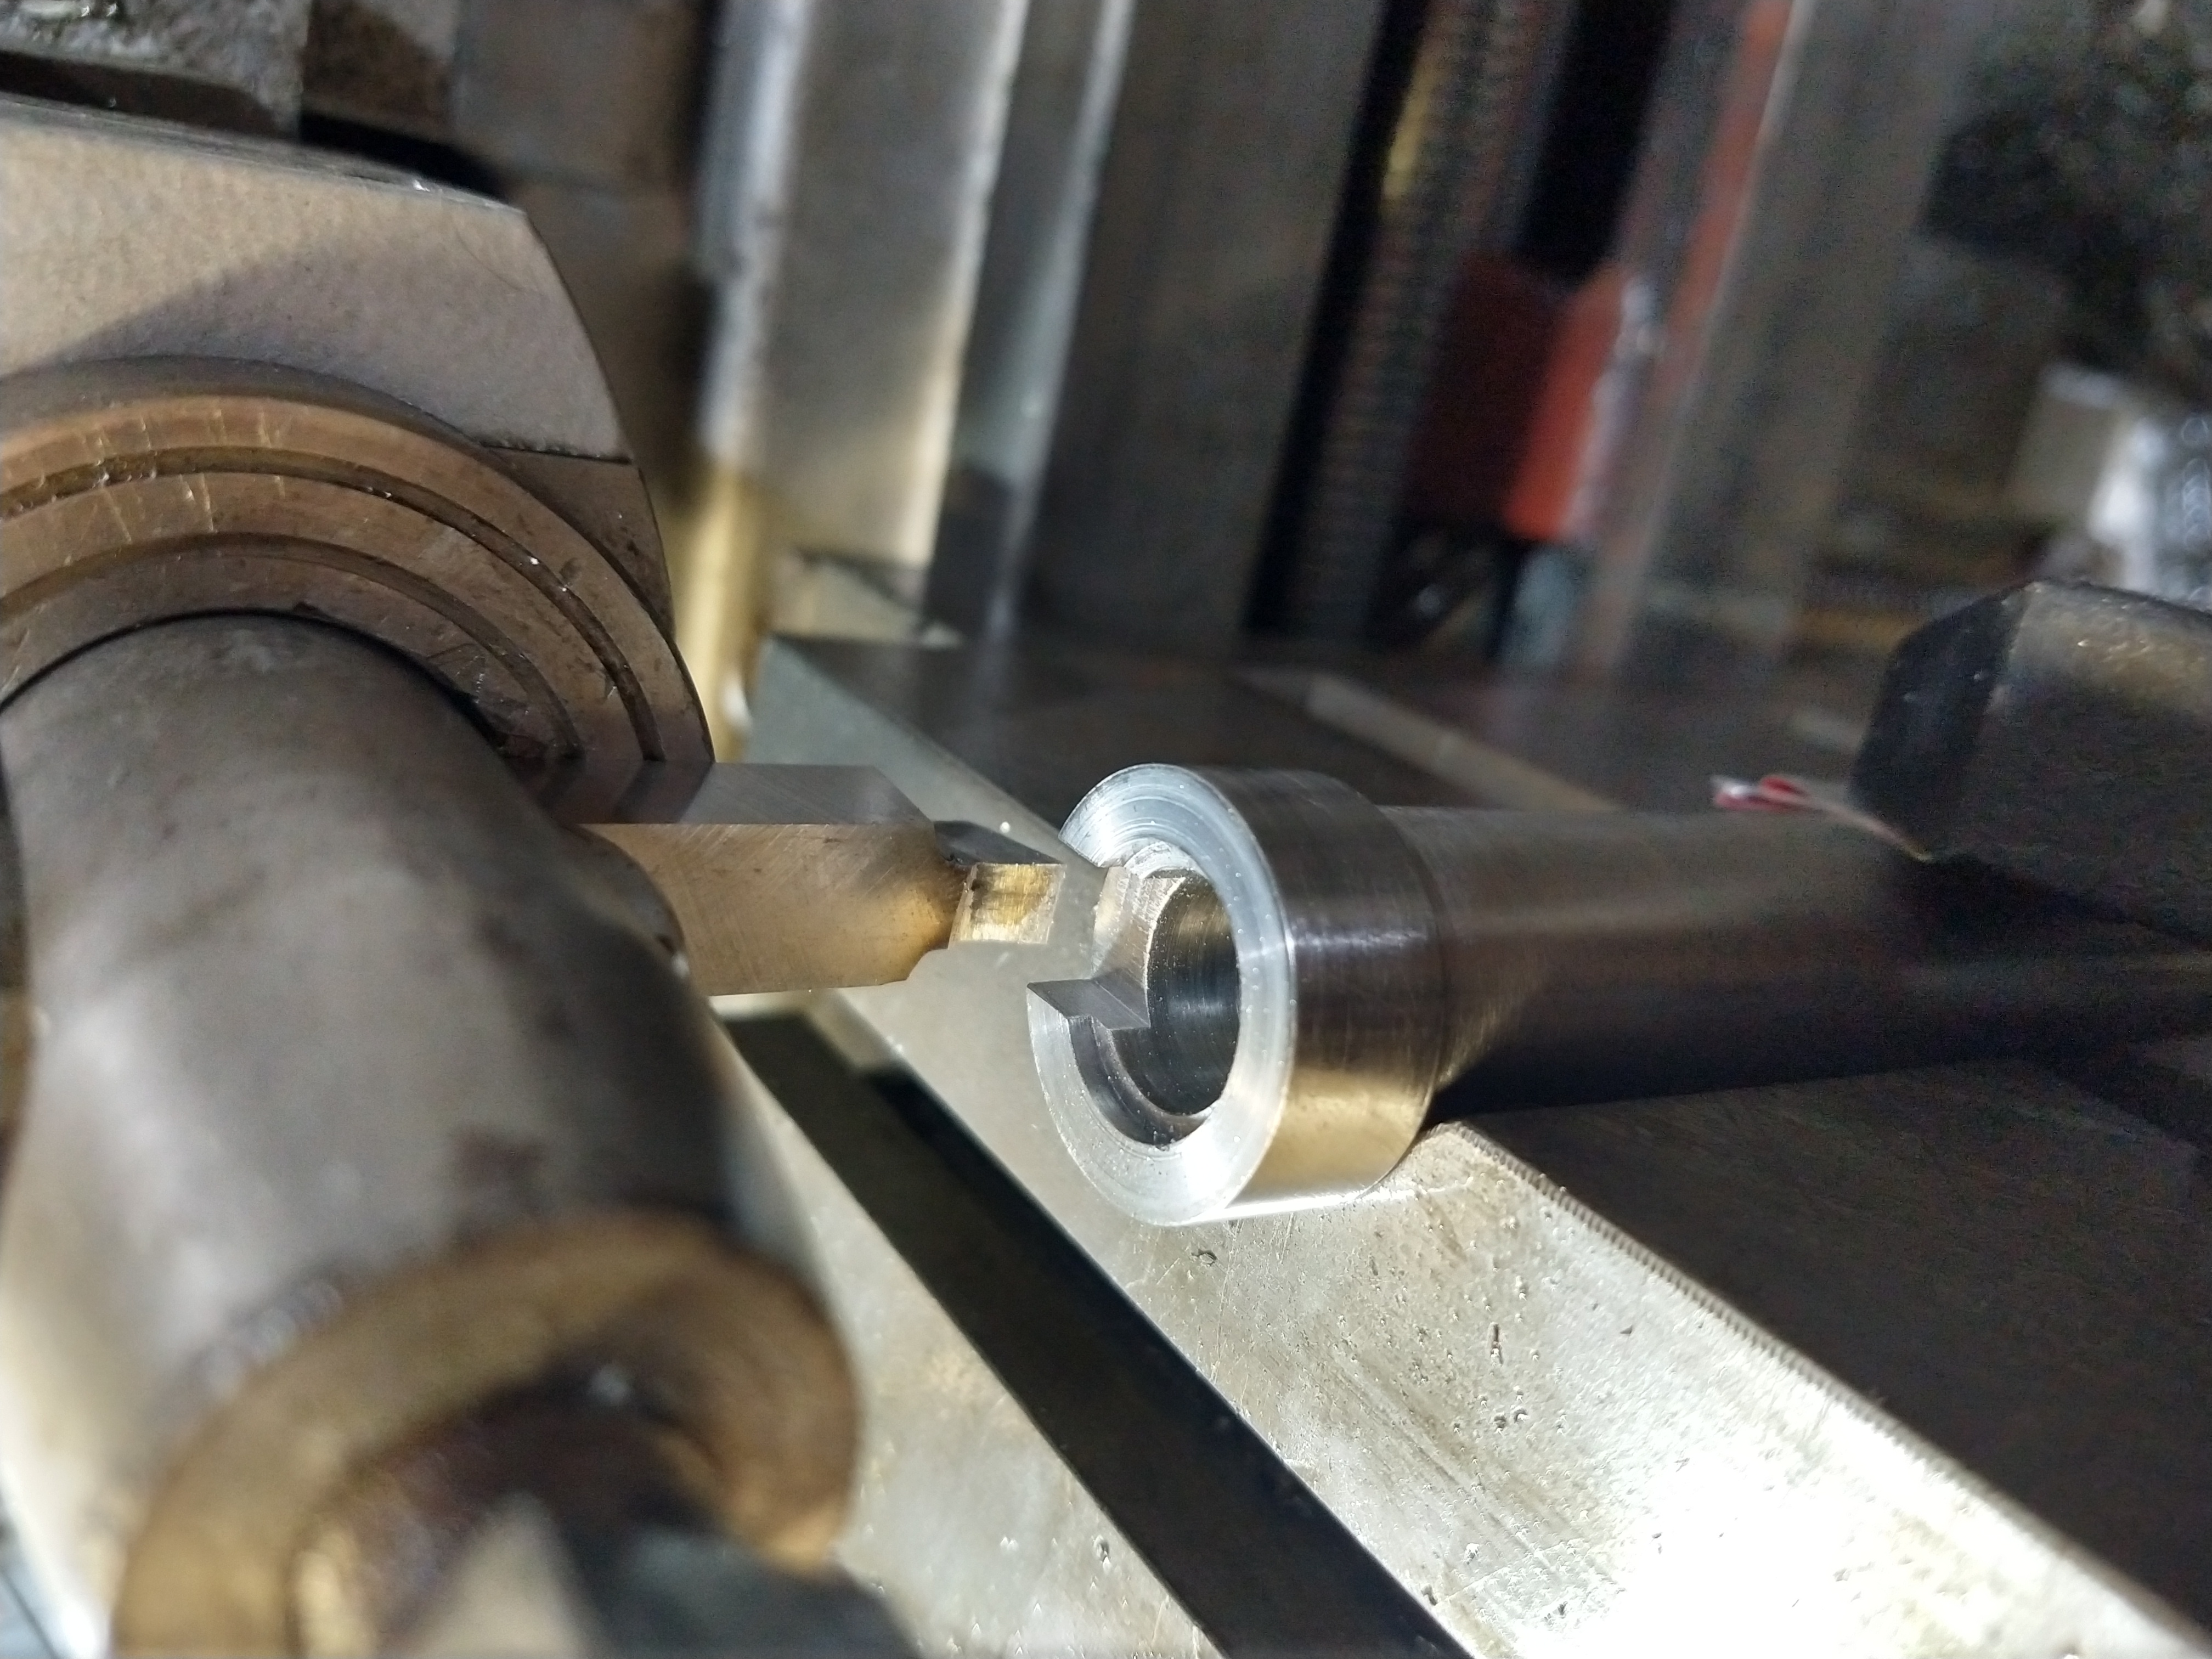
Once I had the old barrel out, I started by cleaning up the barrel adaptor. It was full of solder and was pretty rough machining underneath that. I also wanted to make the hole a little bigger so I could keep the barrel a bit larger. I bored it out from 19 to 20mm and cleaned up the other faces.
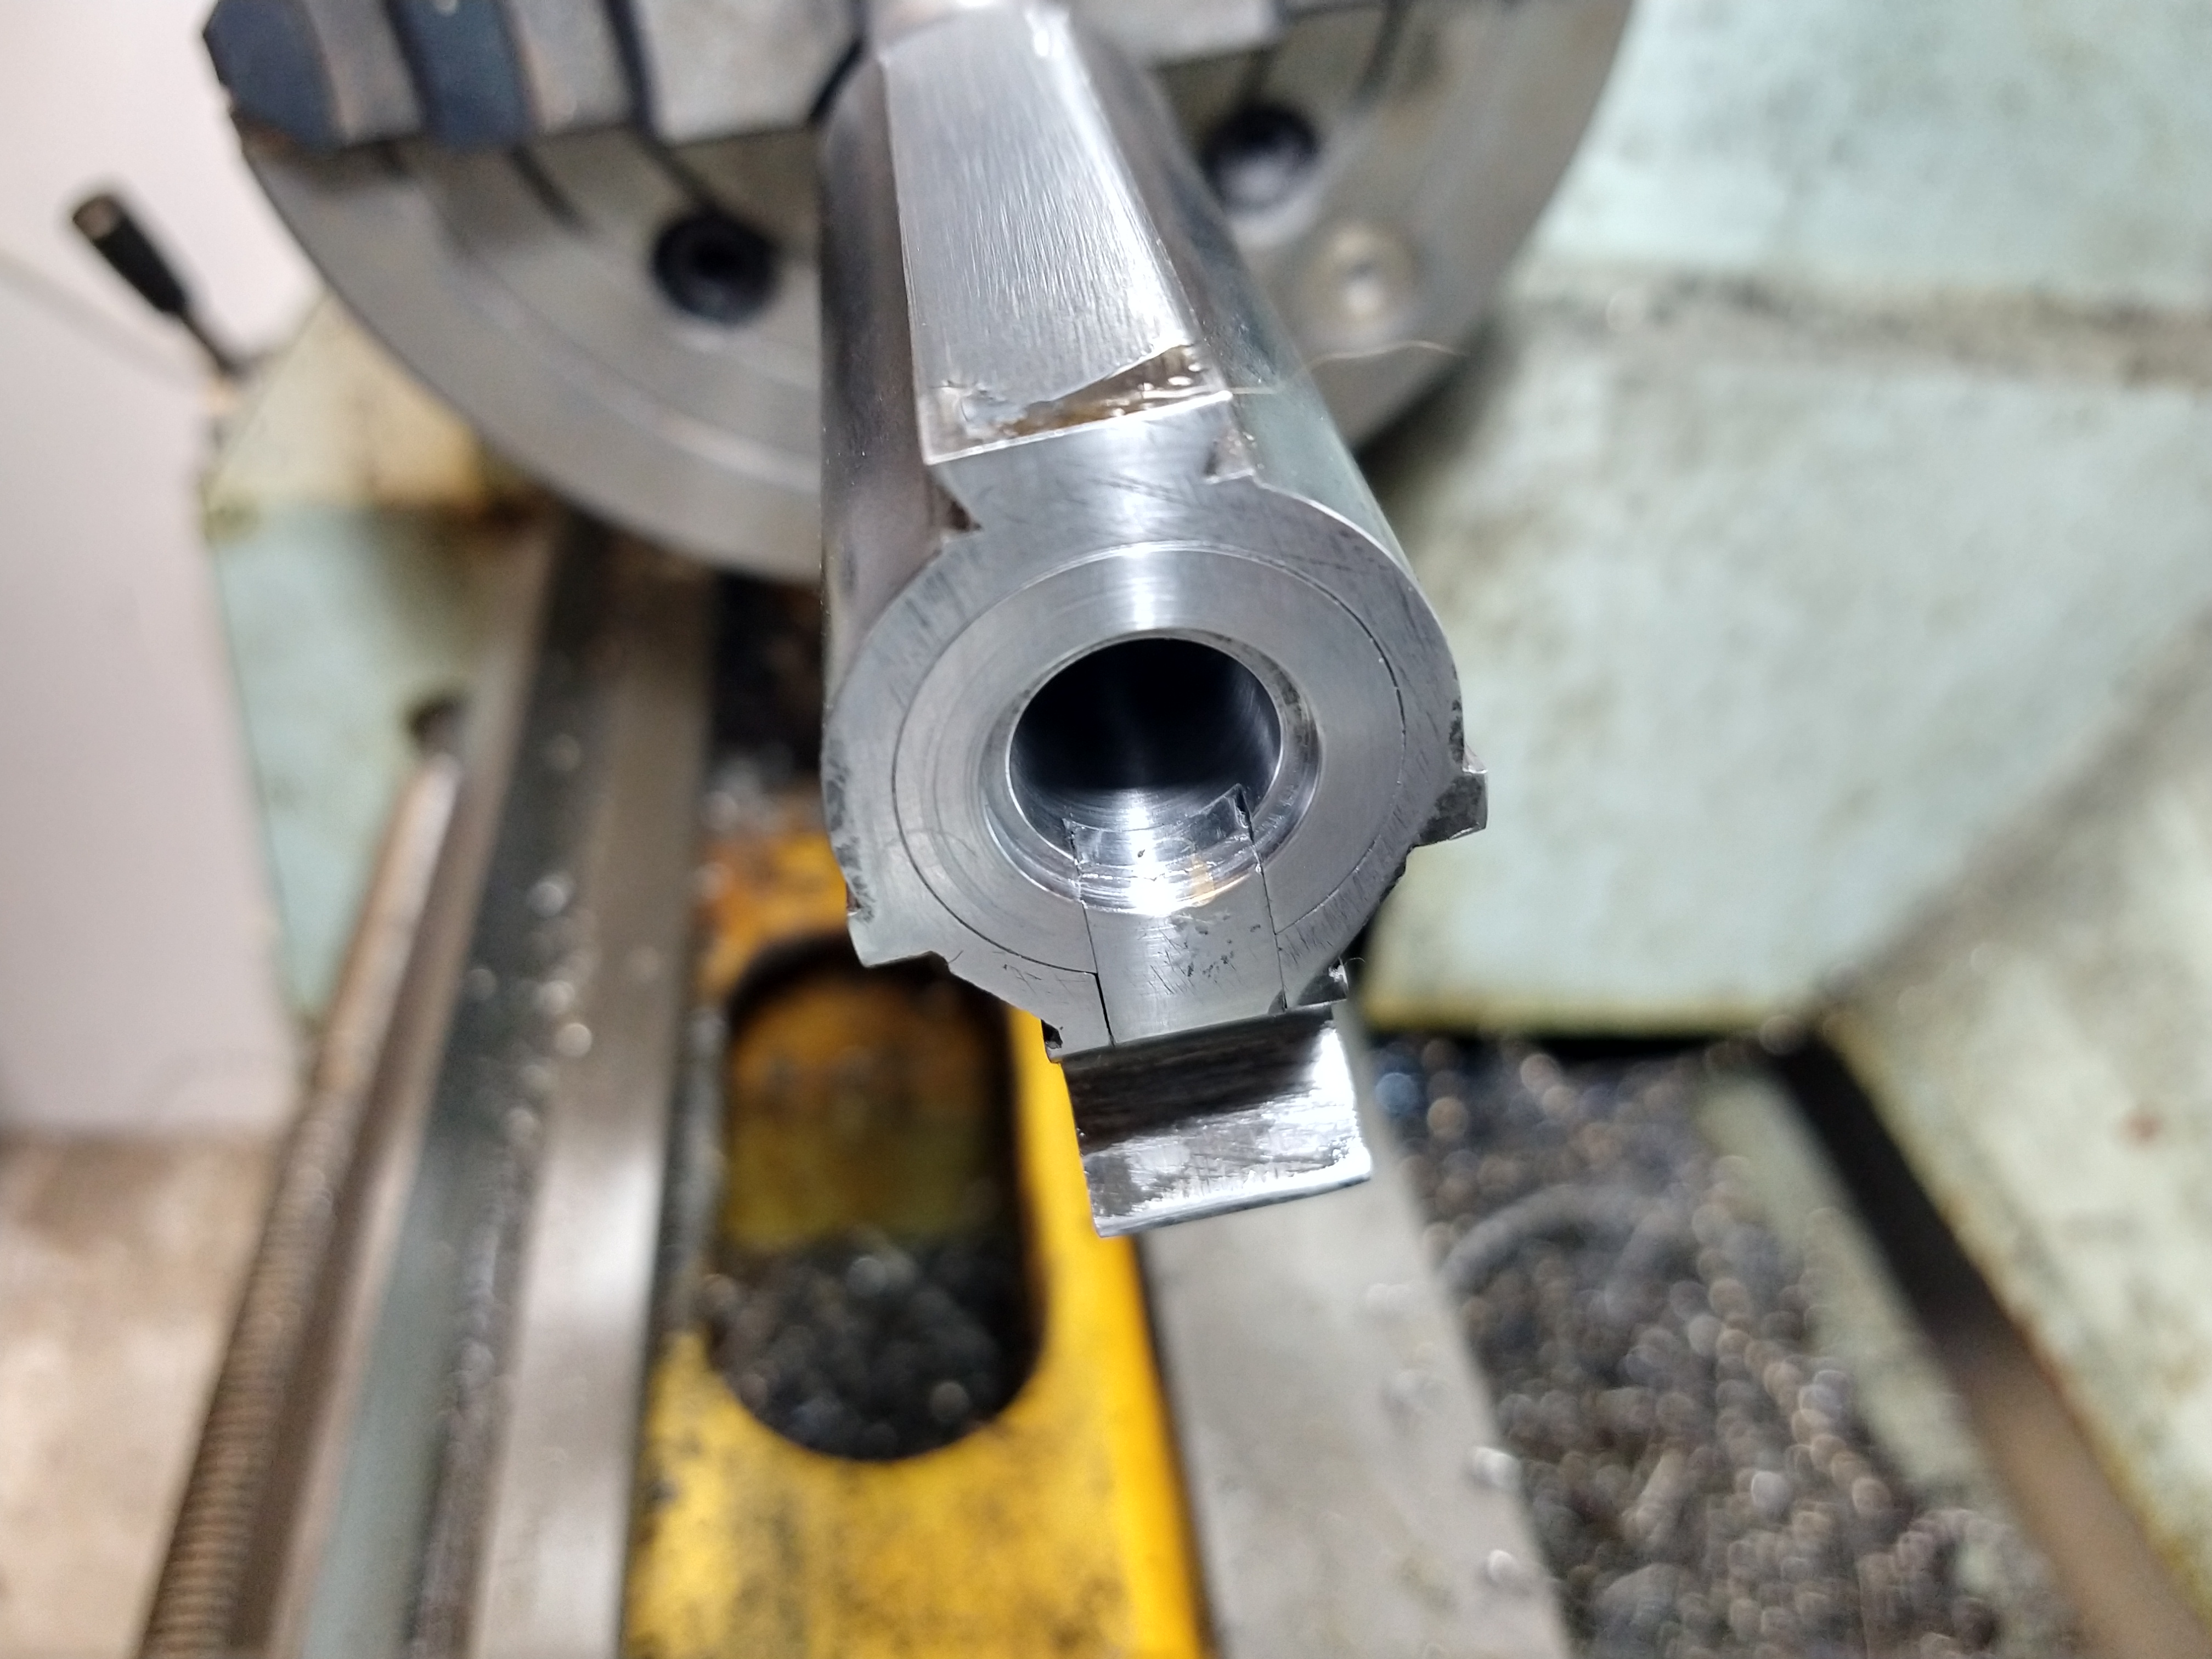
I then cut the barrel blank to 360mm and got to removing a whole lot of metal. This is slow going on a lathe like mine, with a depth of cut at about 1mm max and each pass taking about 8min, going from 38mm to 20mm took a while.
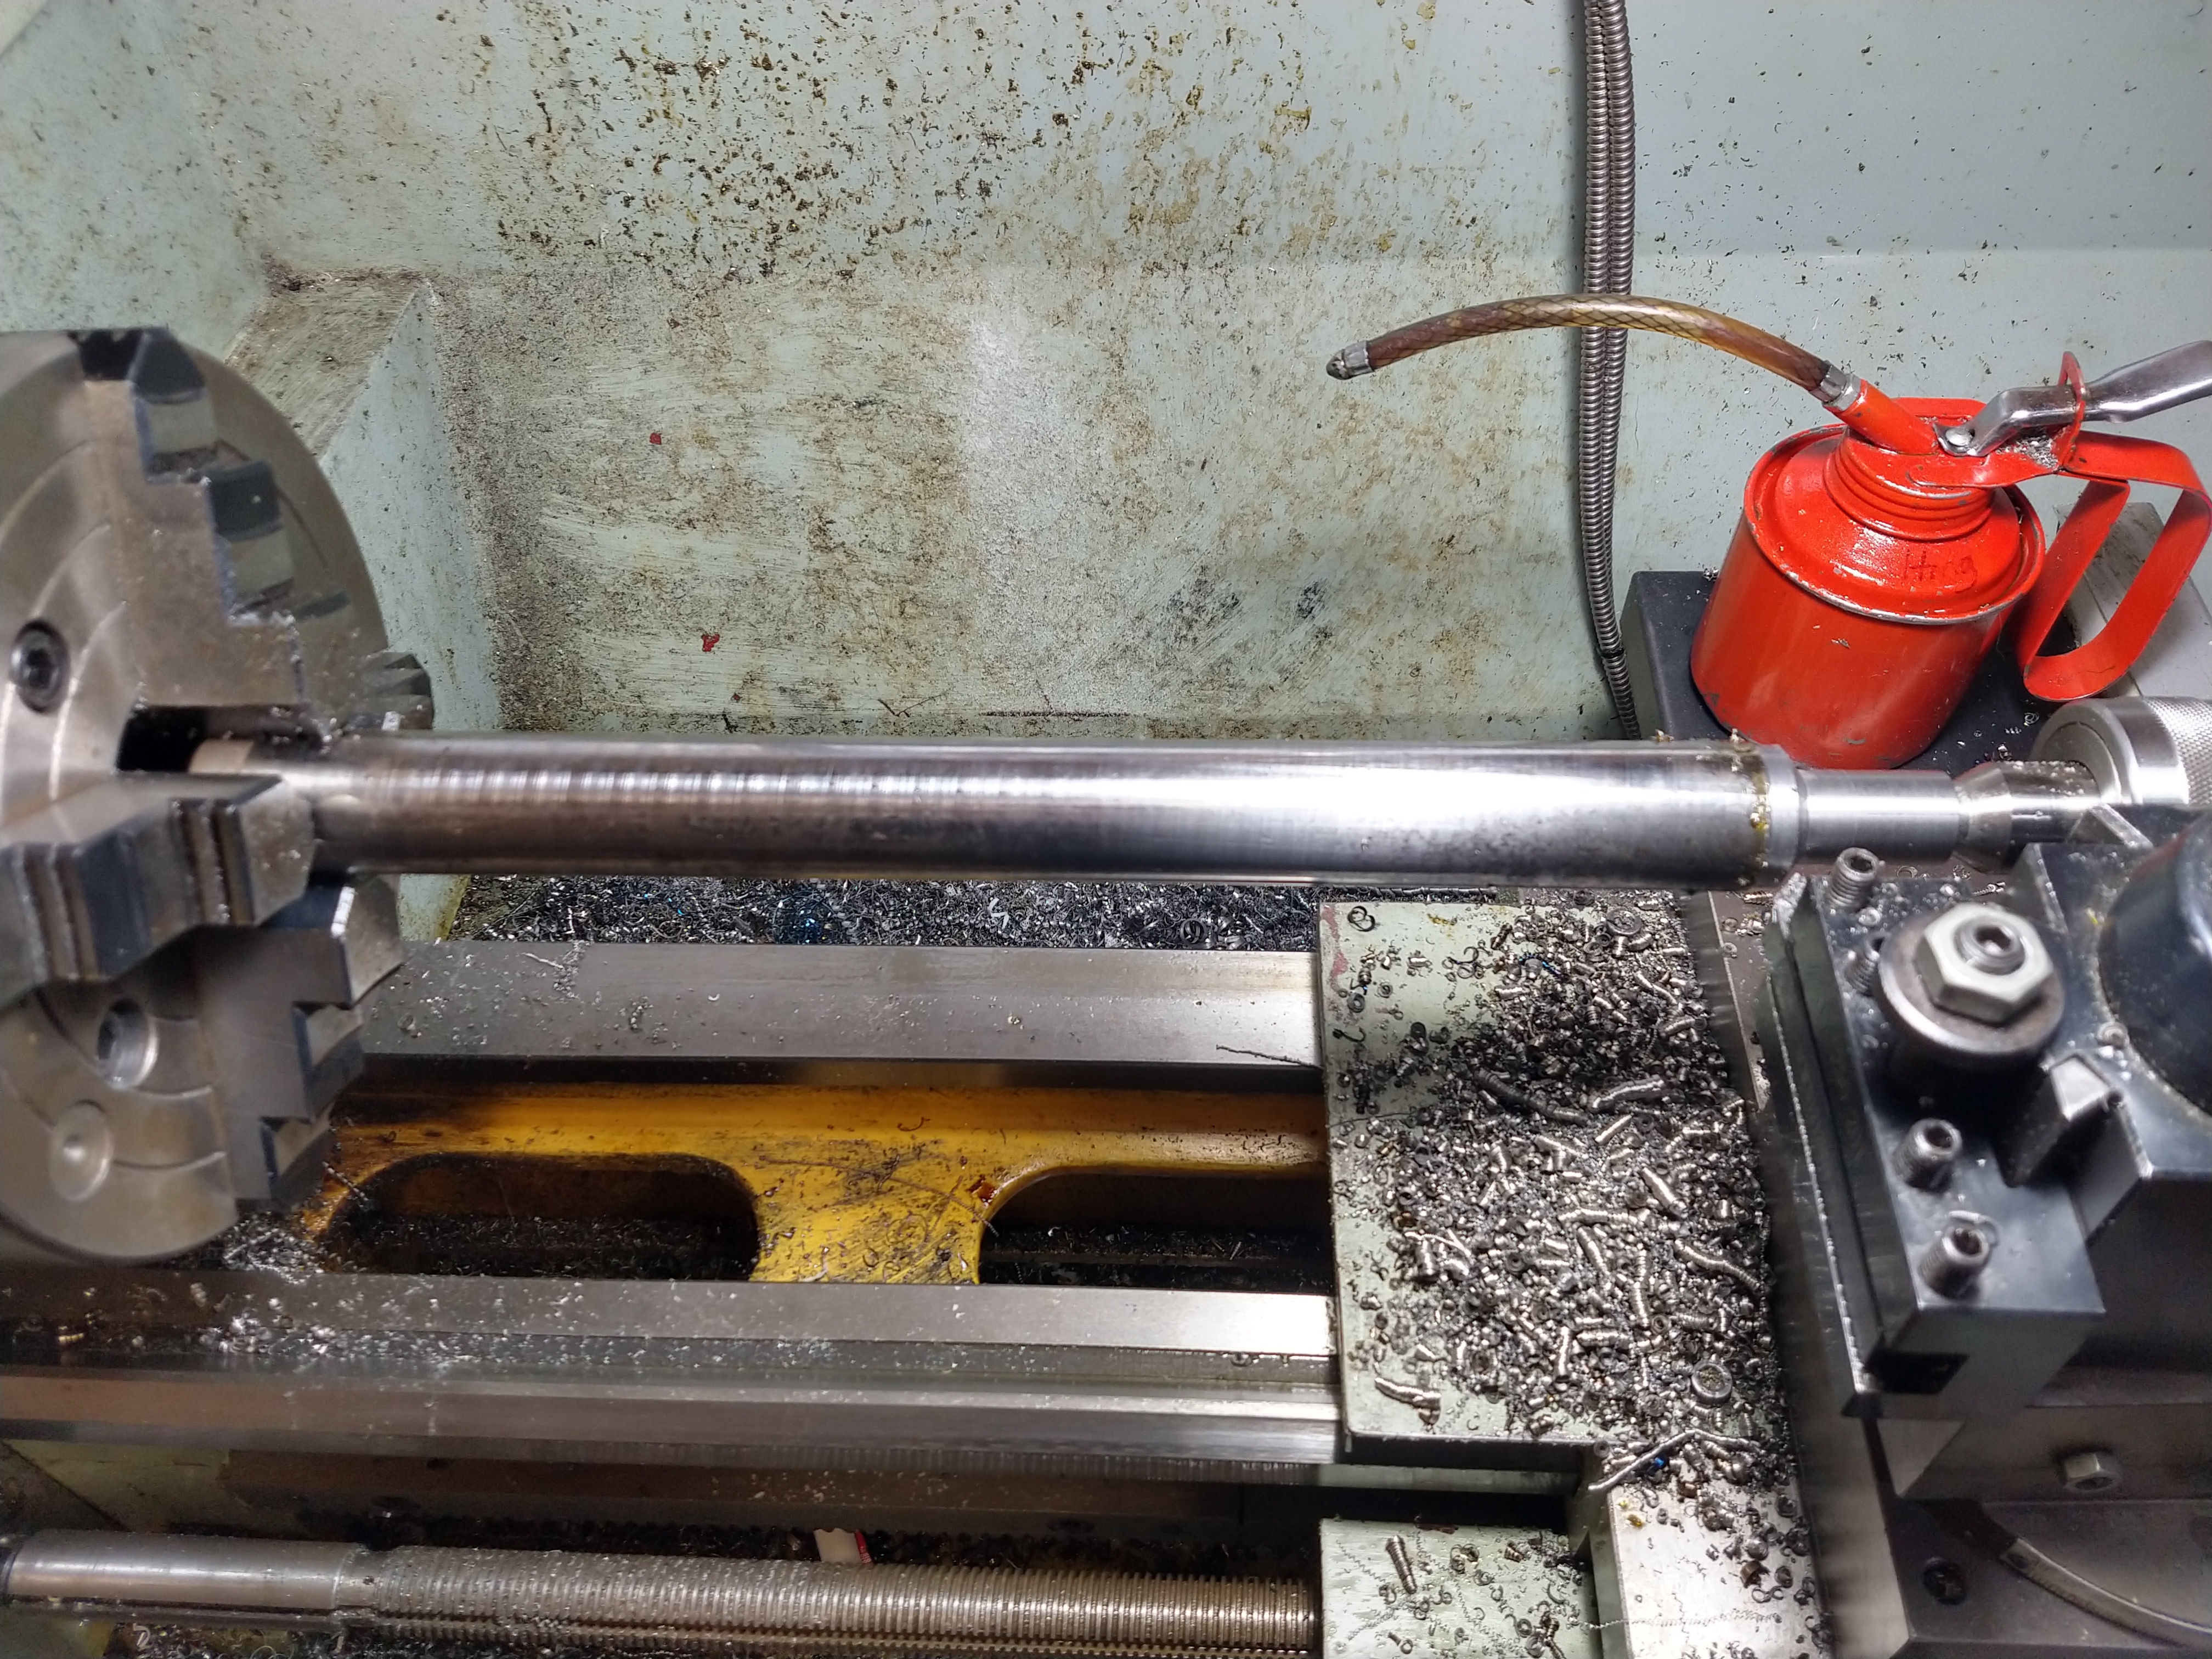
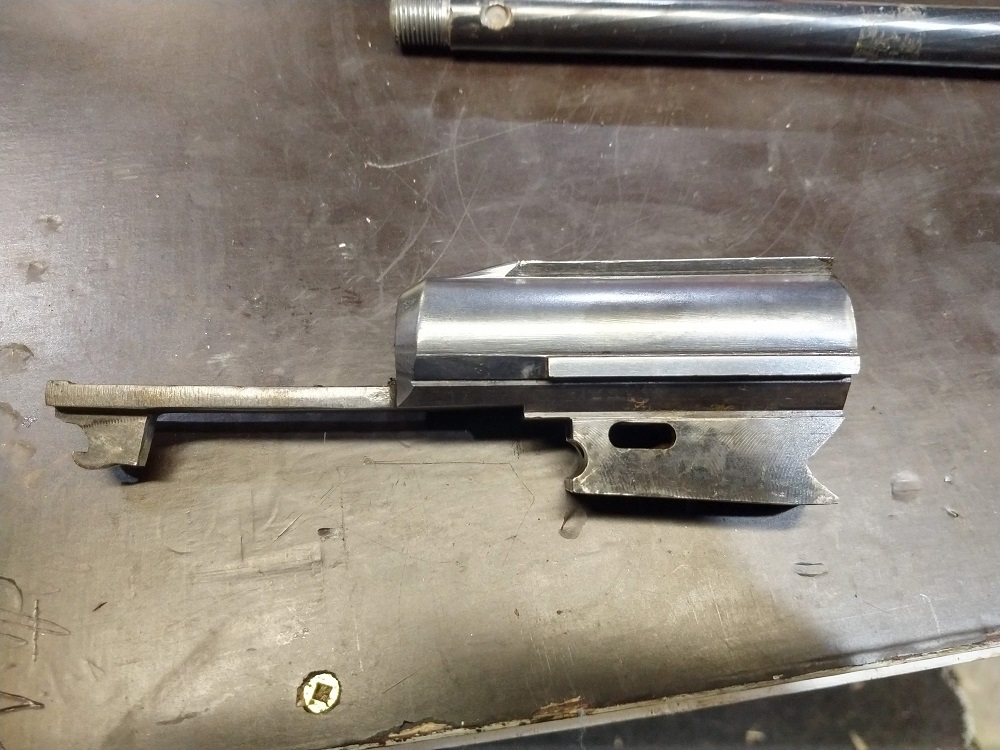
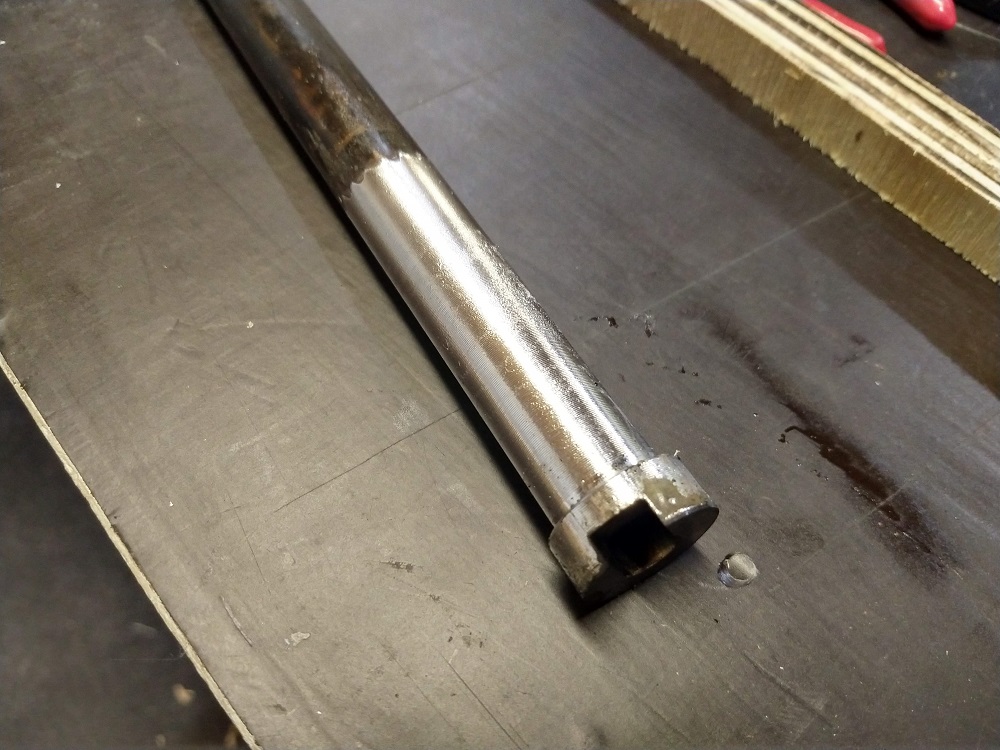
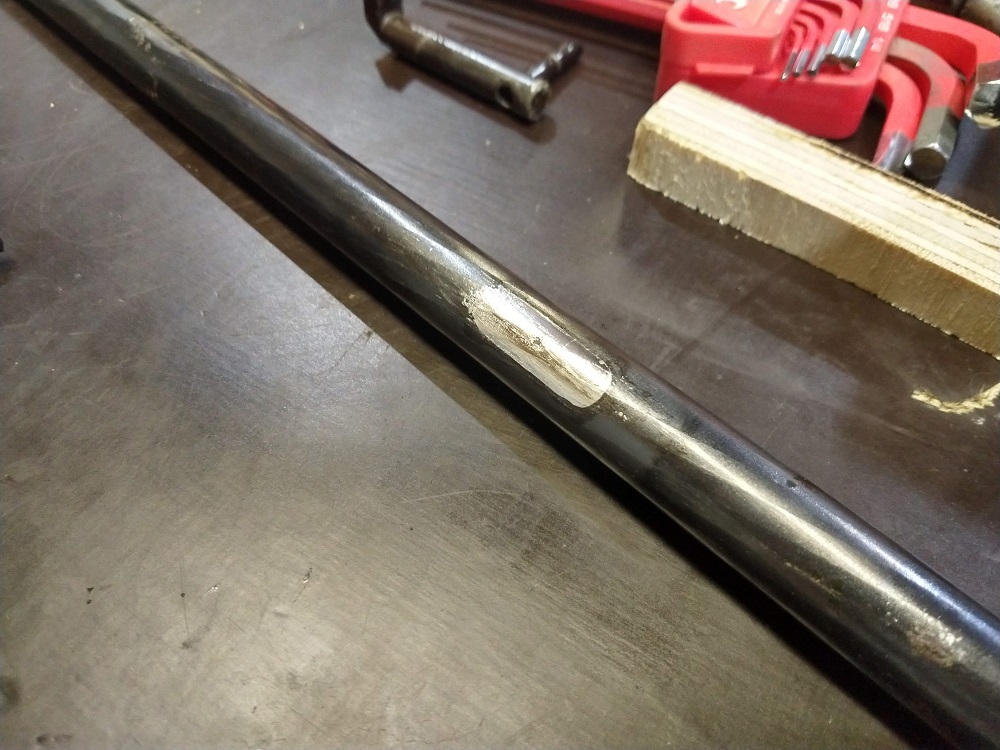
Once I had the barrel mostly profiled, I turned it around and mounted it in my action truing jig, which I have actually used way more for working on short barrels. I decided to tighten up the headspace a little, as it was a little deep for my liking. I then turned the shoulder thickness down to match the barrel adaptor.
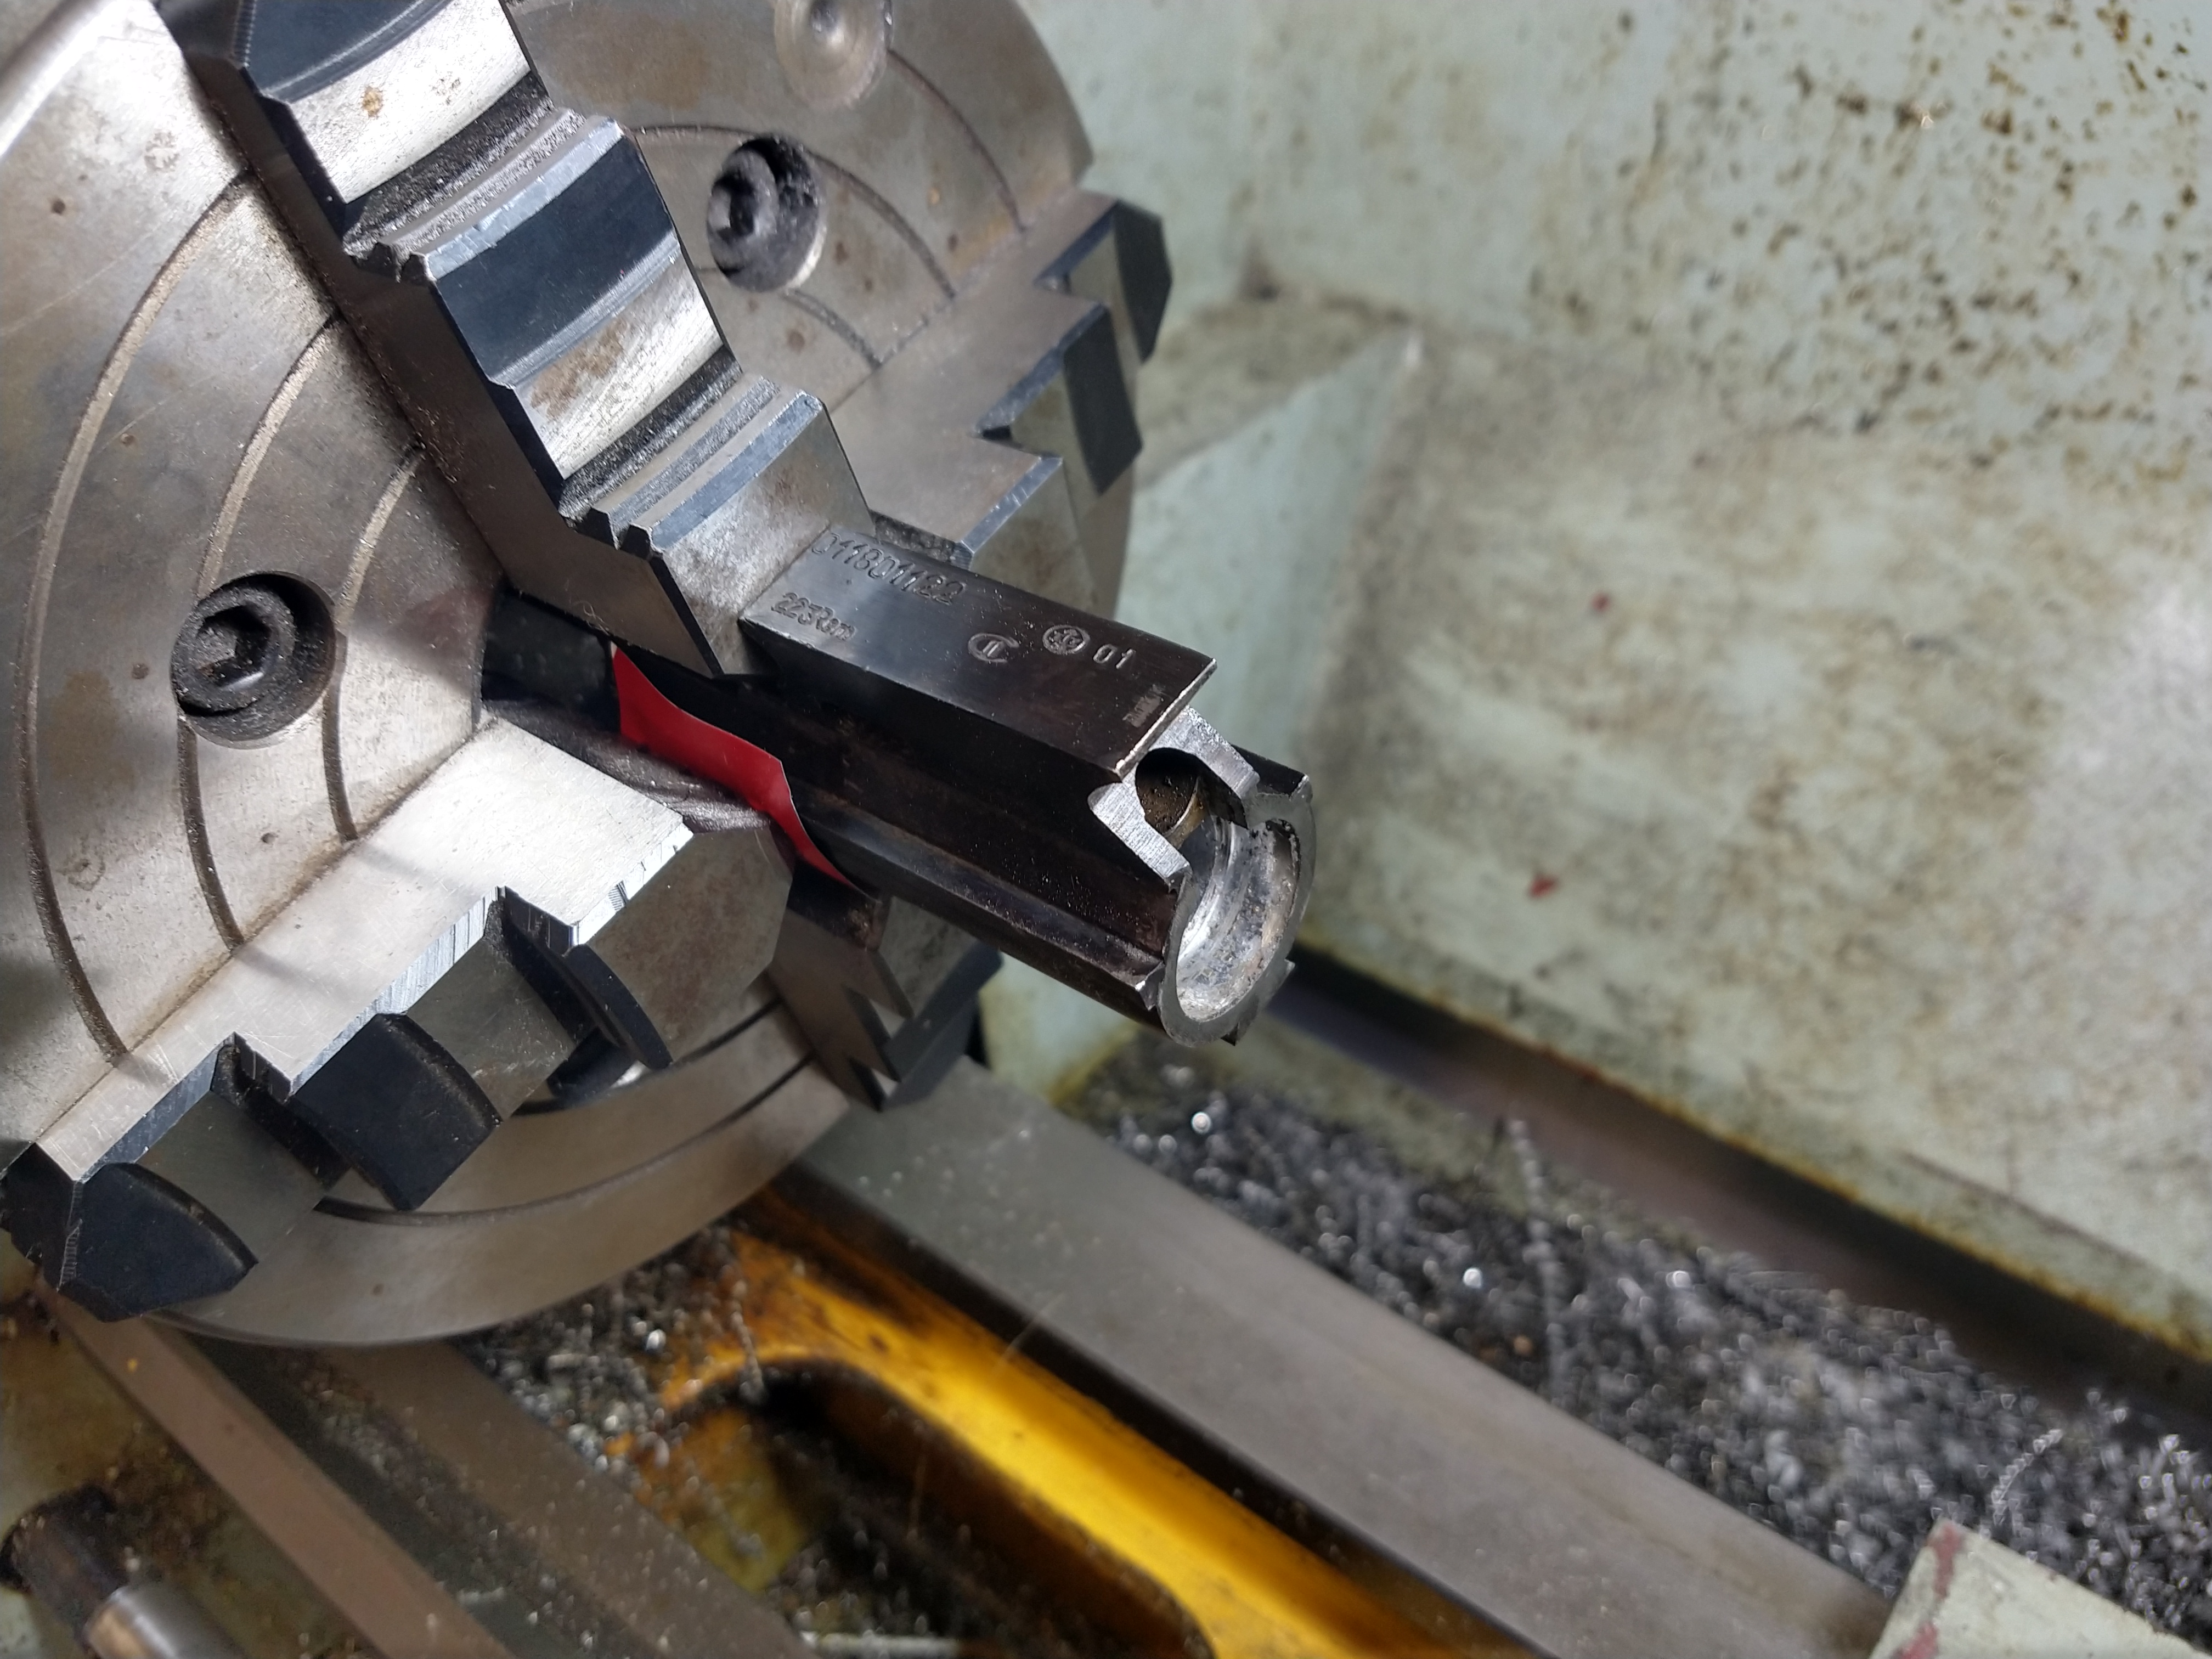
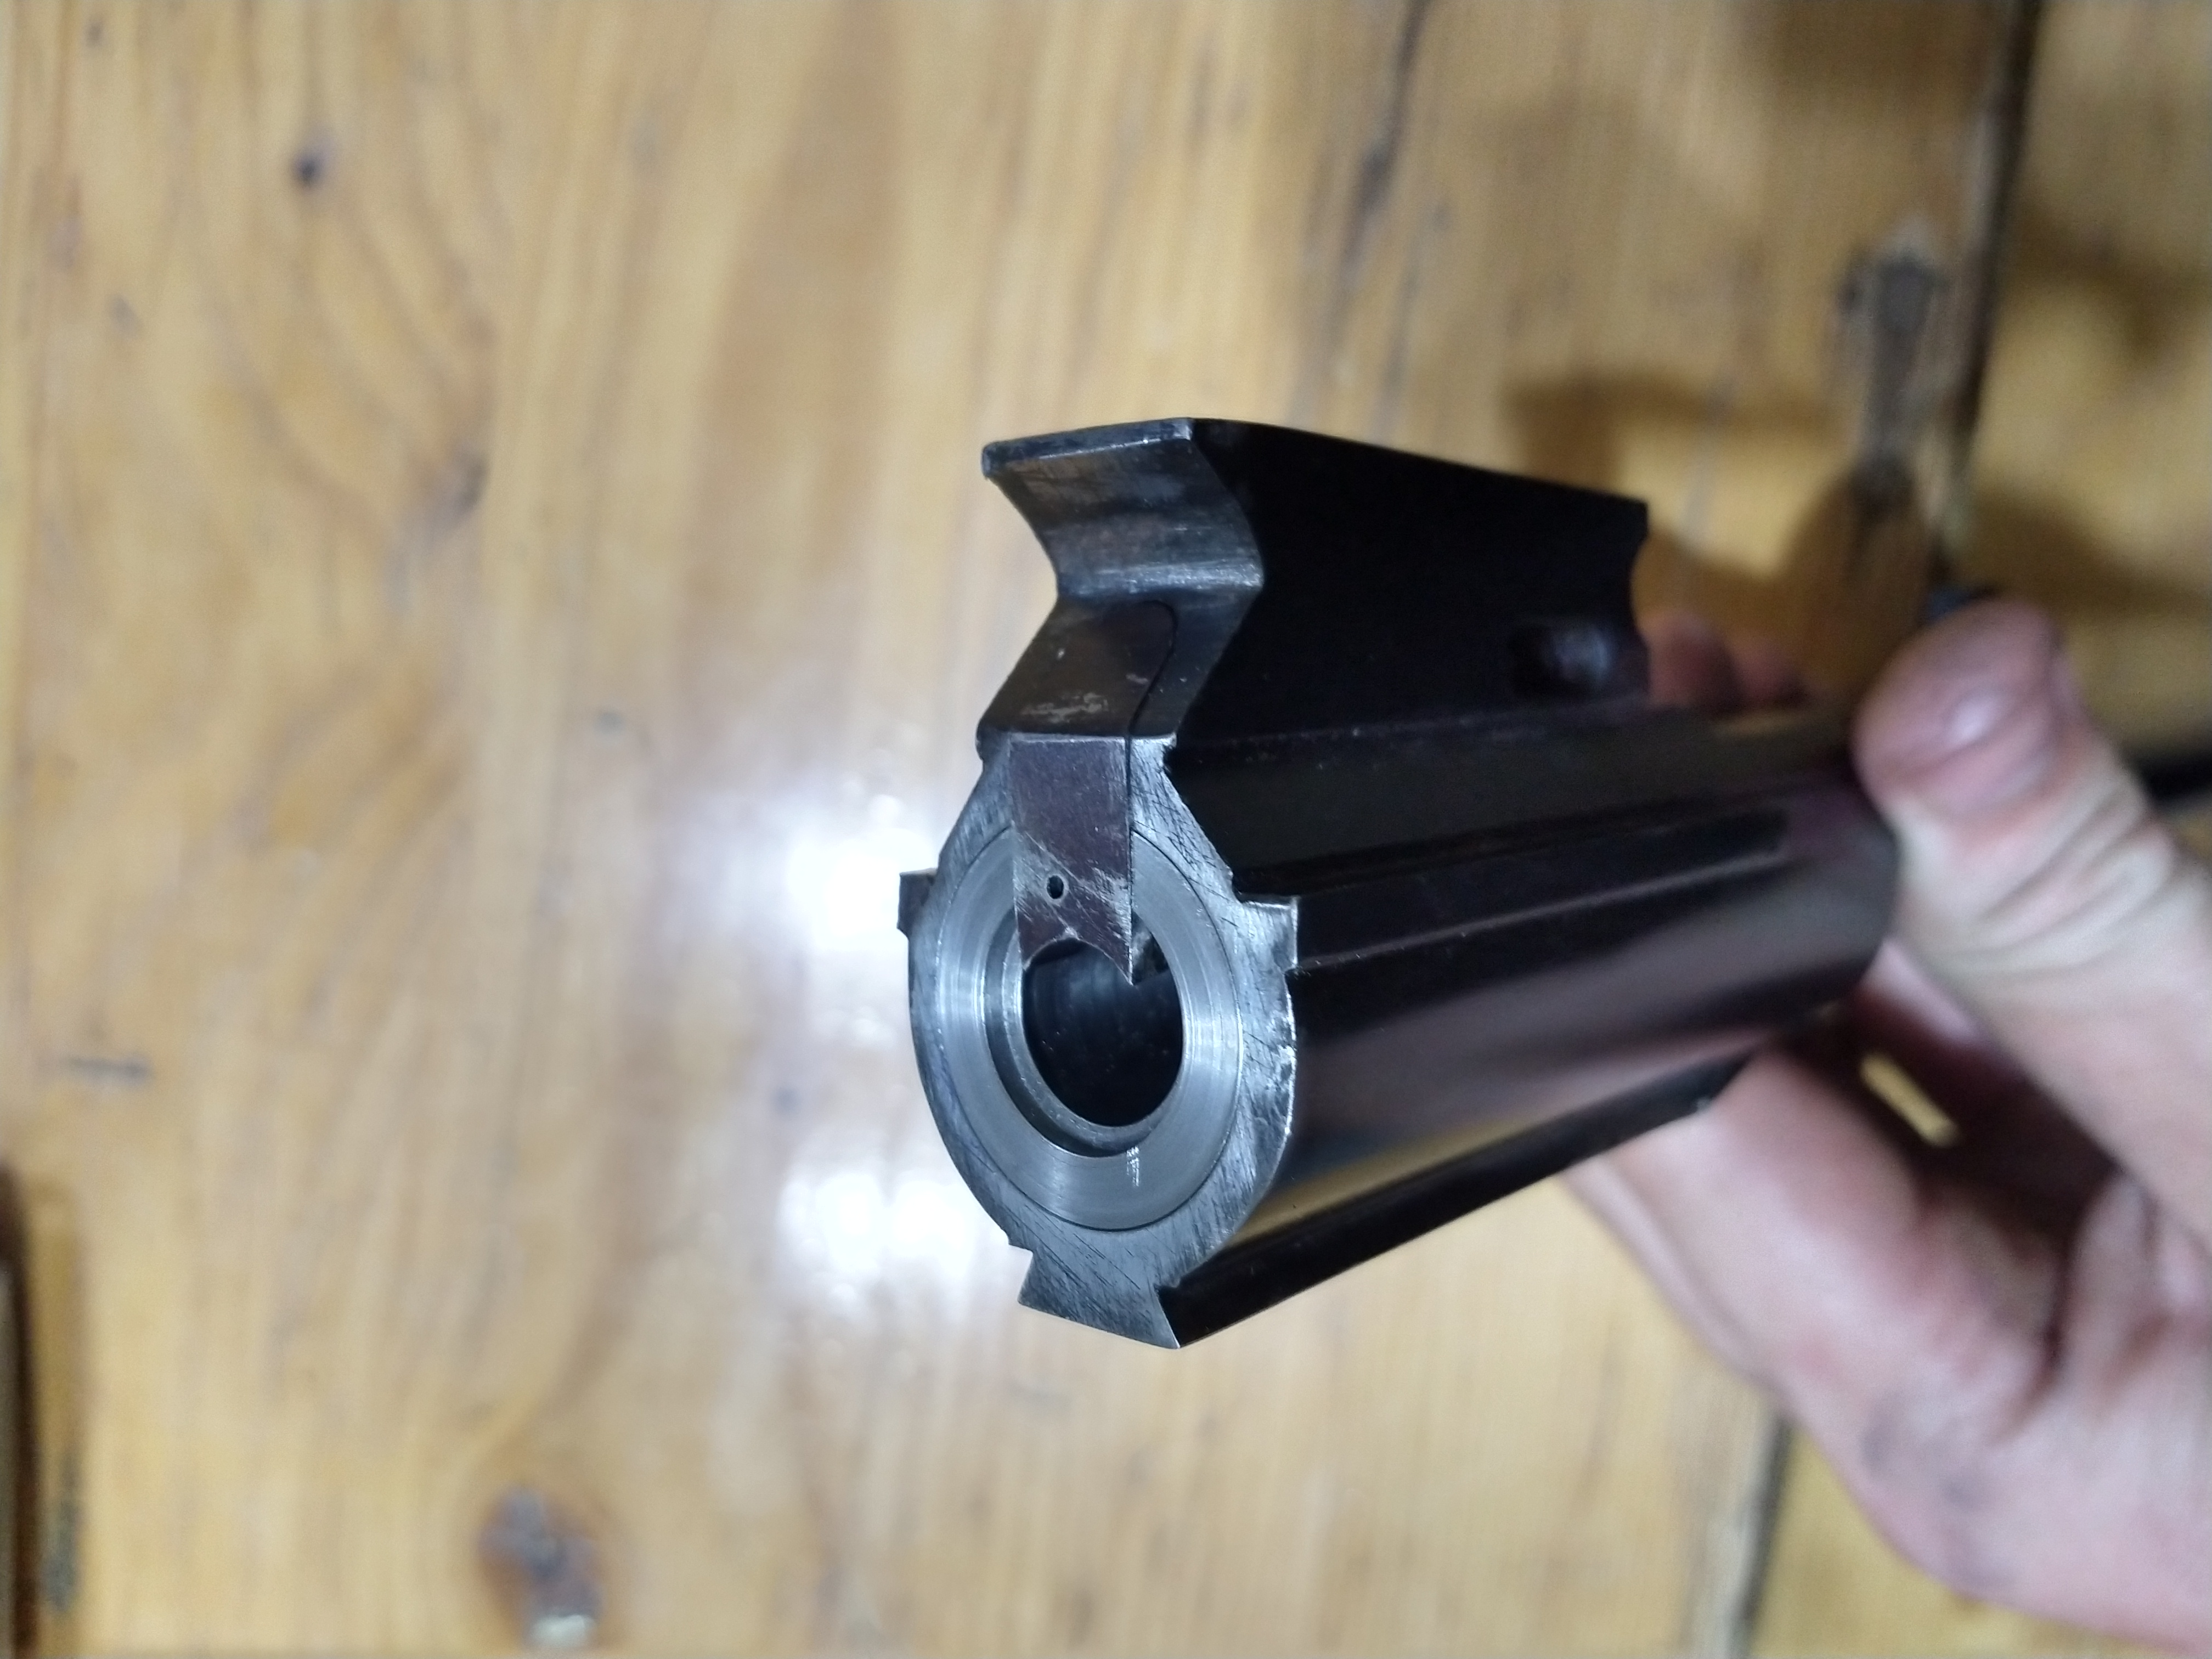
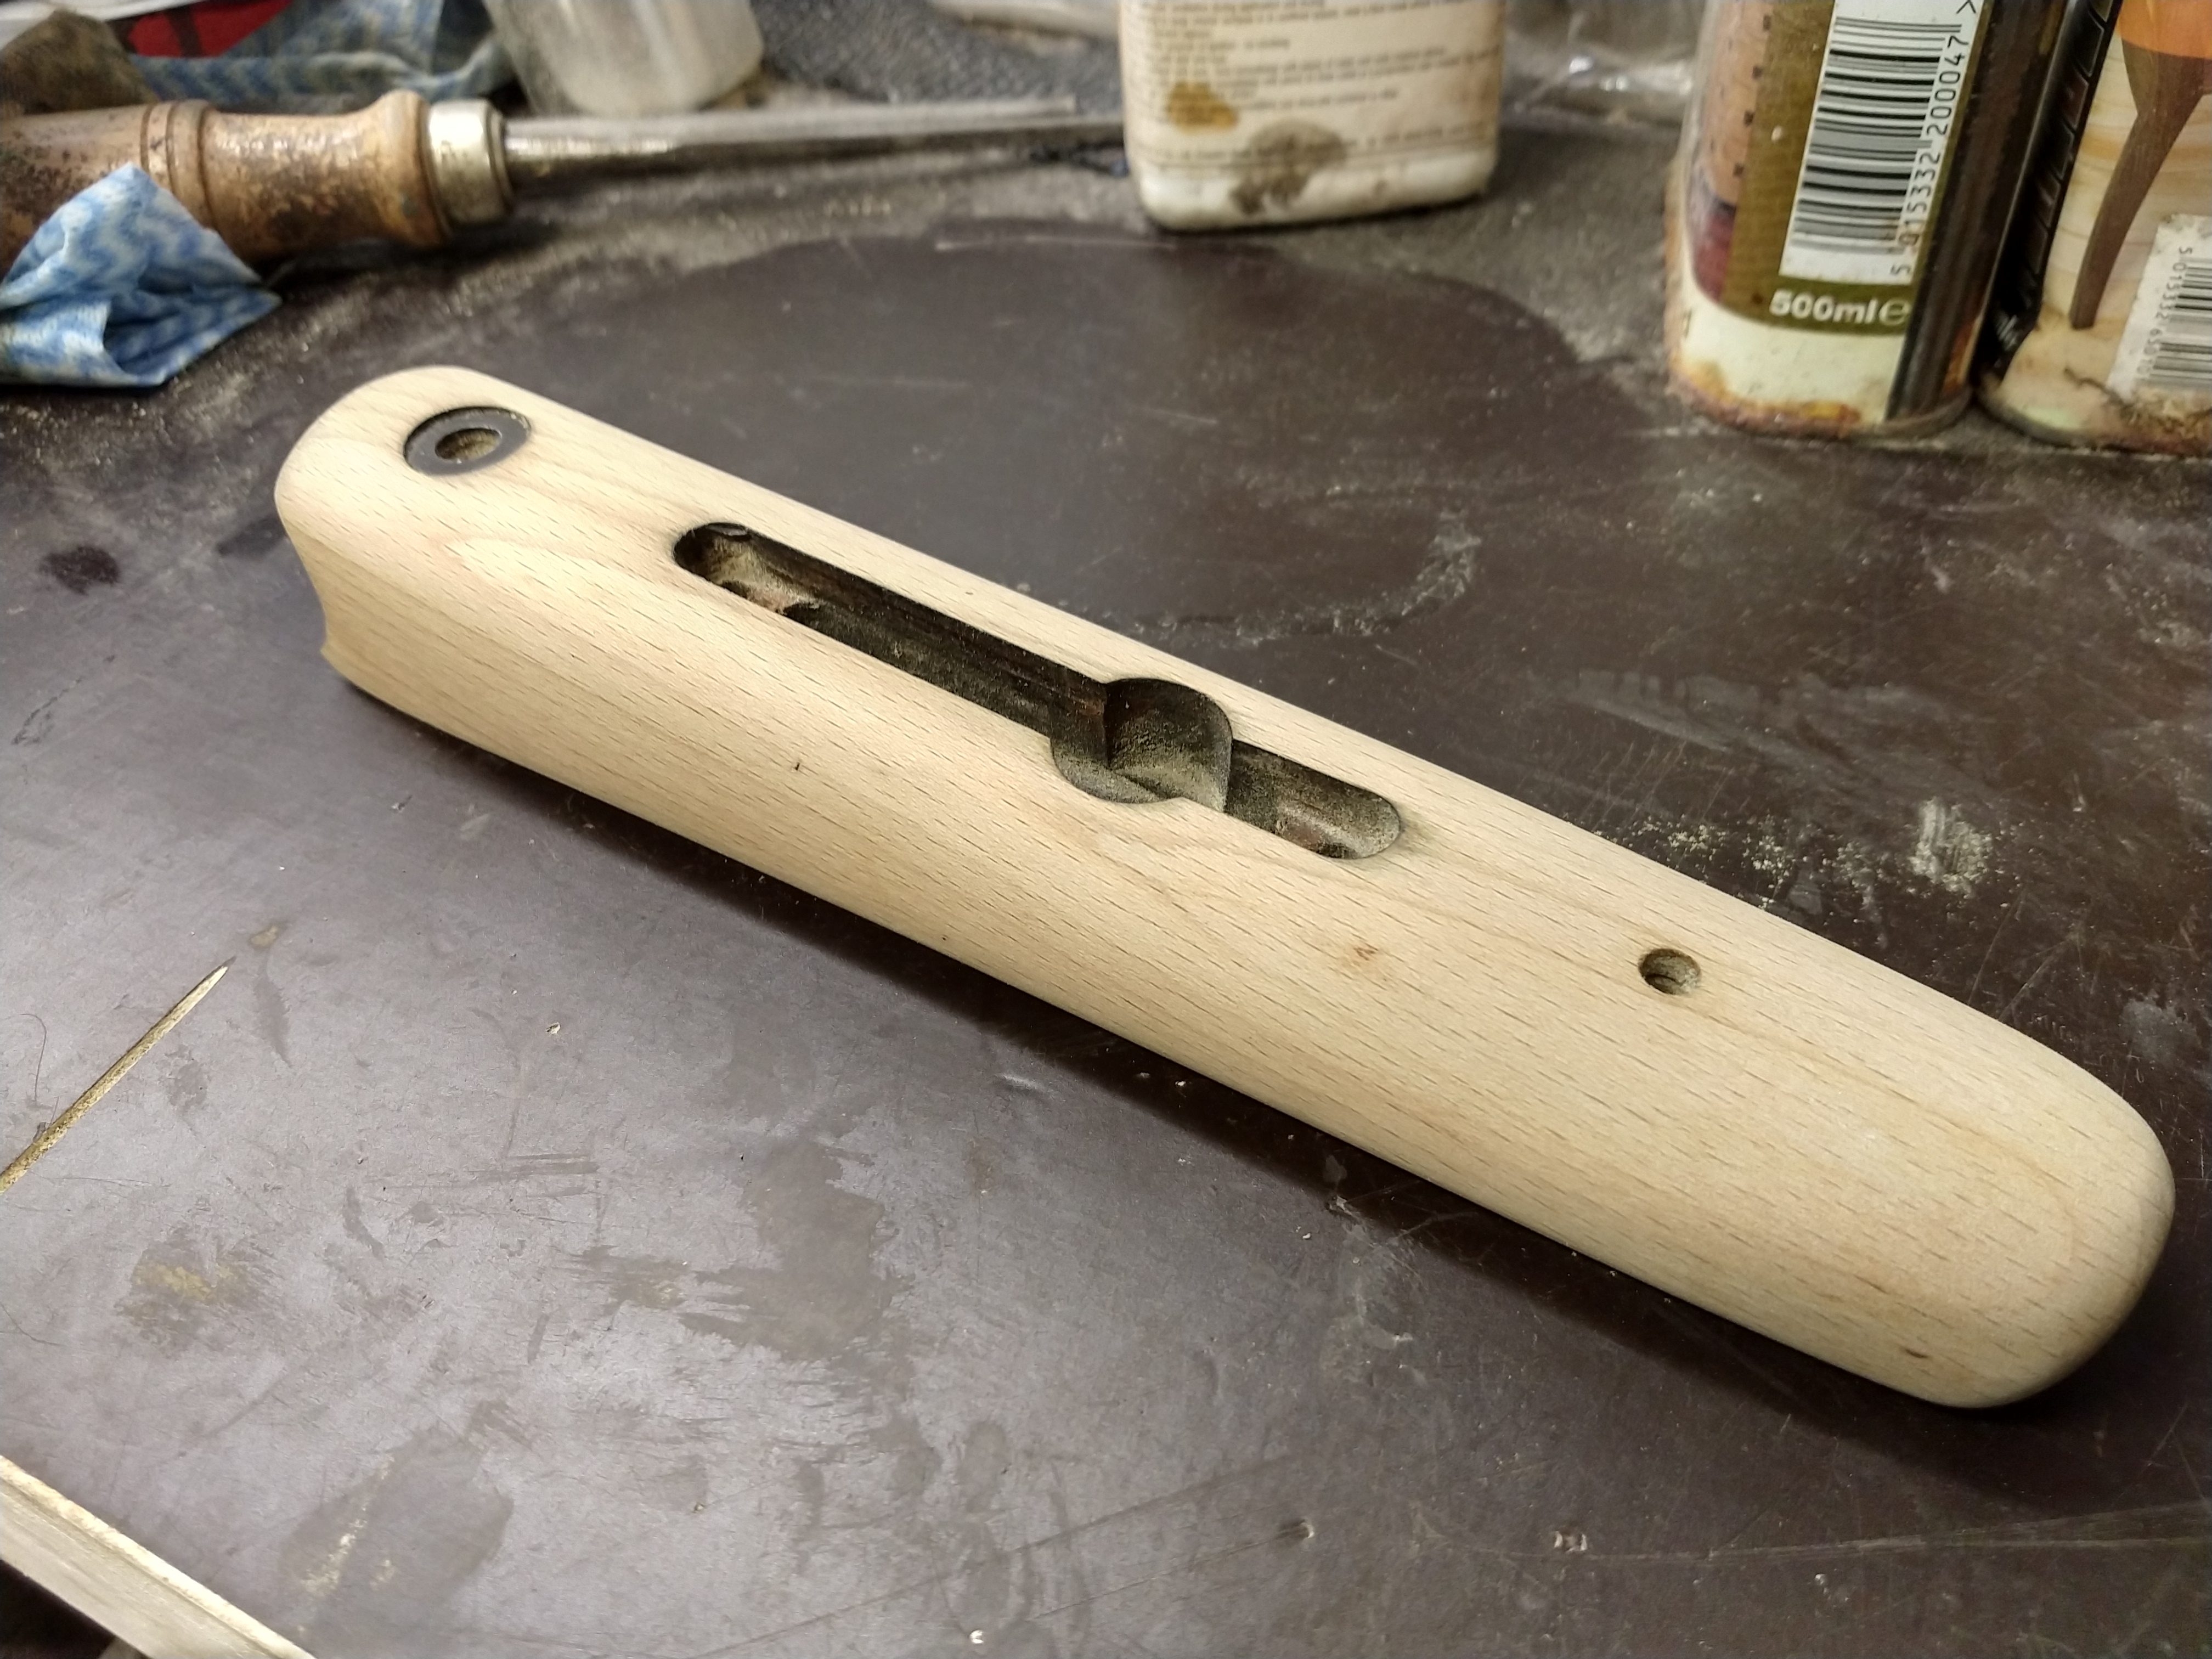
The next job was to cut the slot for the extractor. I was not sure how to do this, as I could not get the barrel into my mill for this job. I considered fixing the barrel to the cross slide of the lathe, with the cutter in the spindle, a technique brilliantly shown by Homebrew.357 in his rolling block thread. Then I realised I could clamp it to the v slot on the side of my little shaper machine. I ground a couple of cutters to cut the slot, and had at it. I left a very small amount of material for hand fitting with a file.
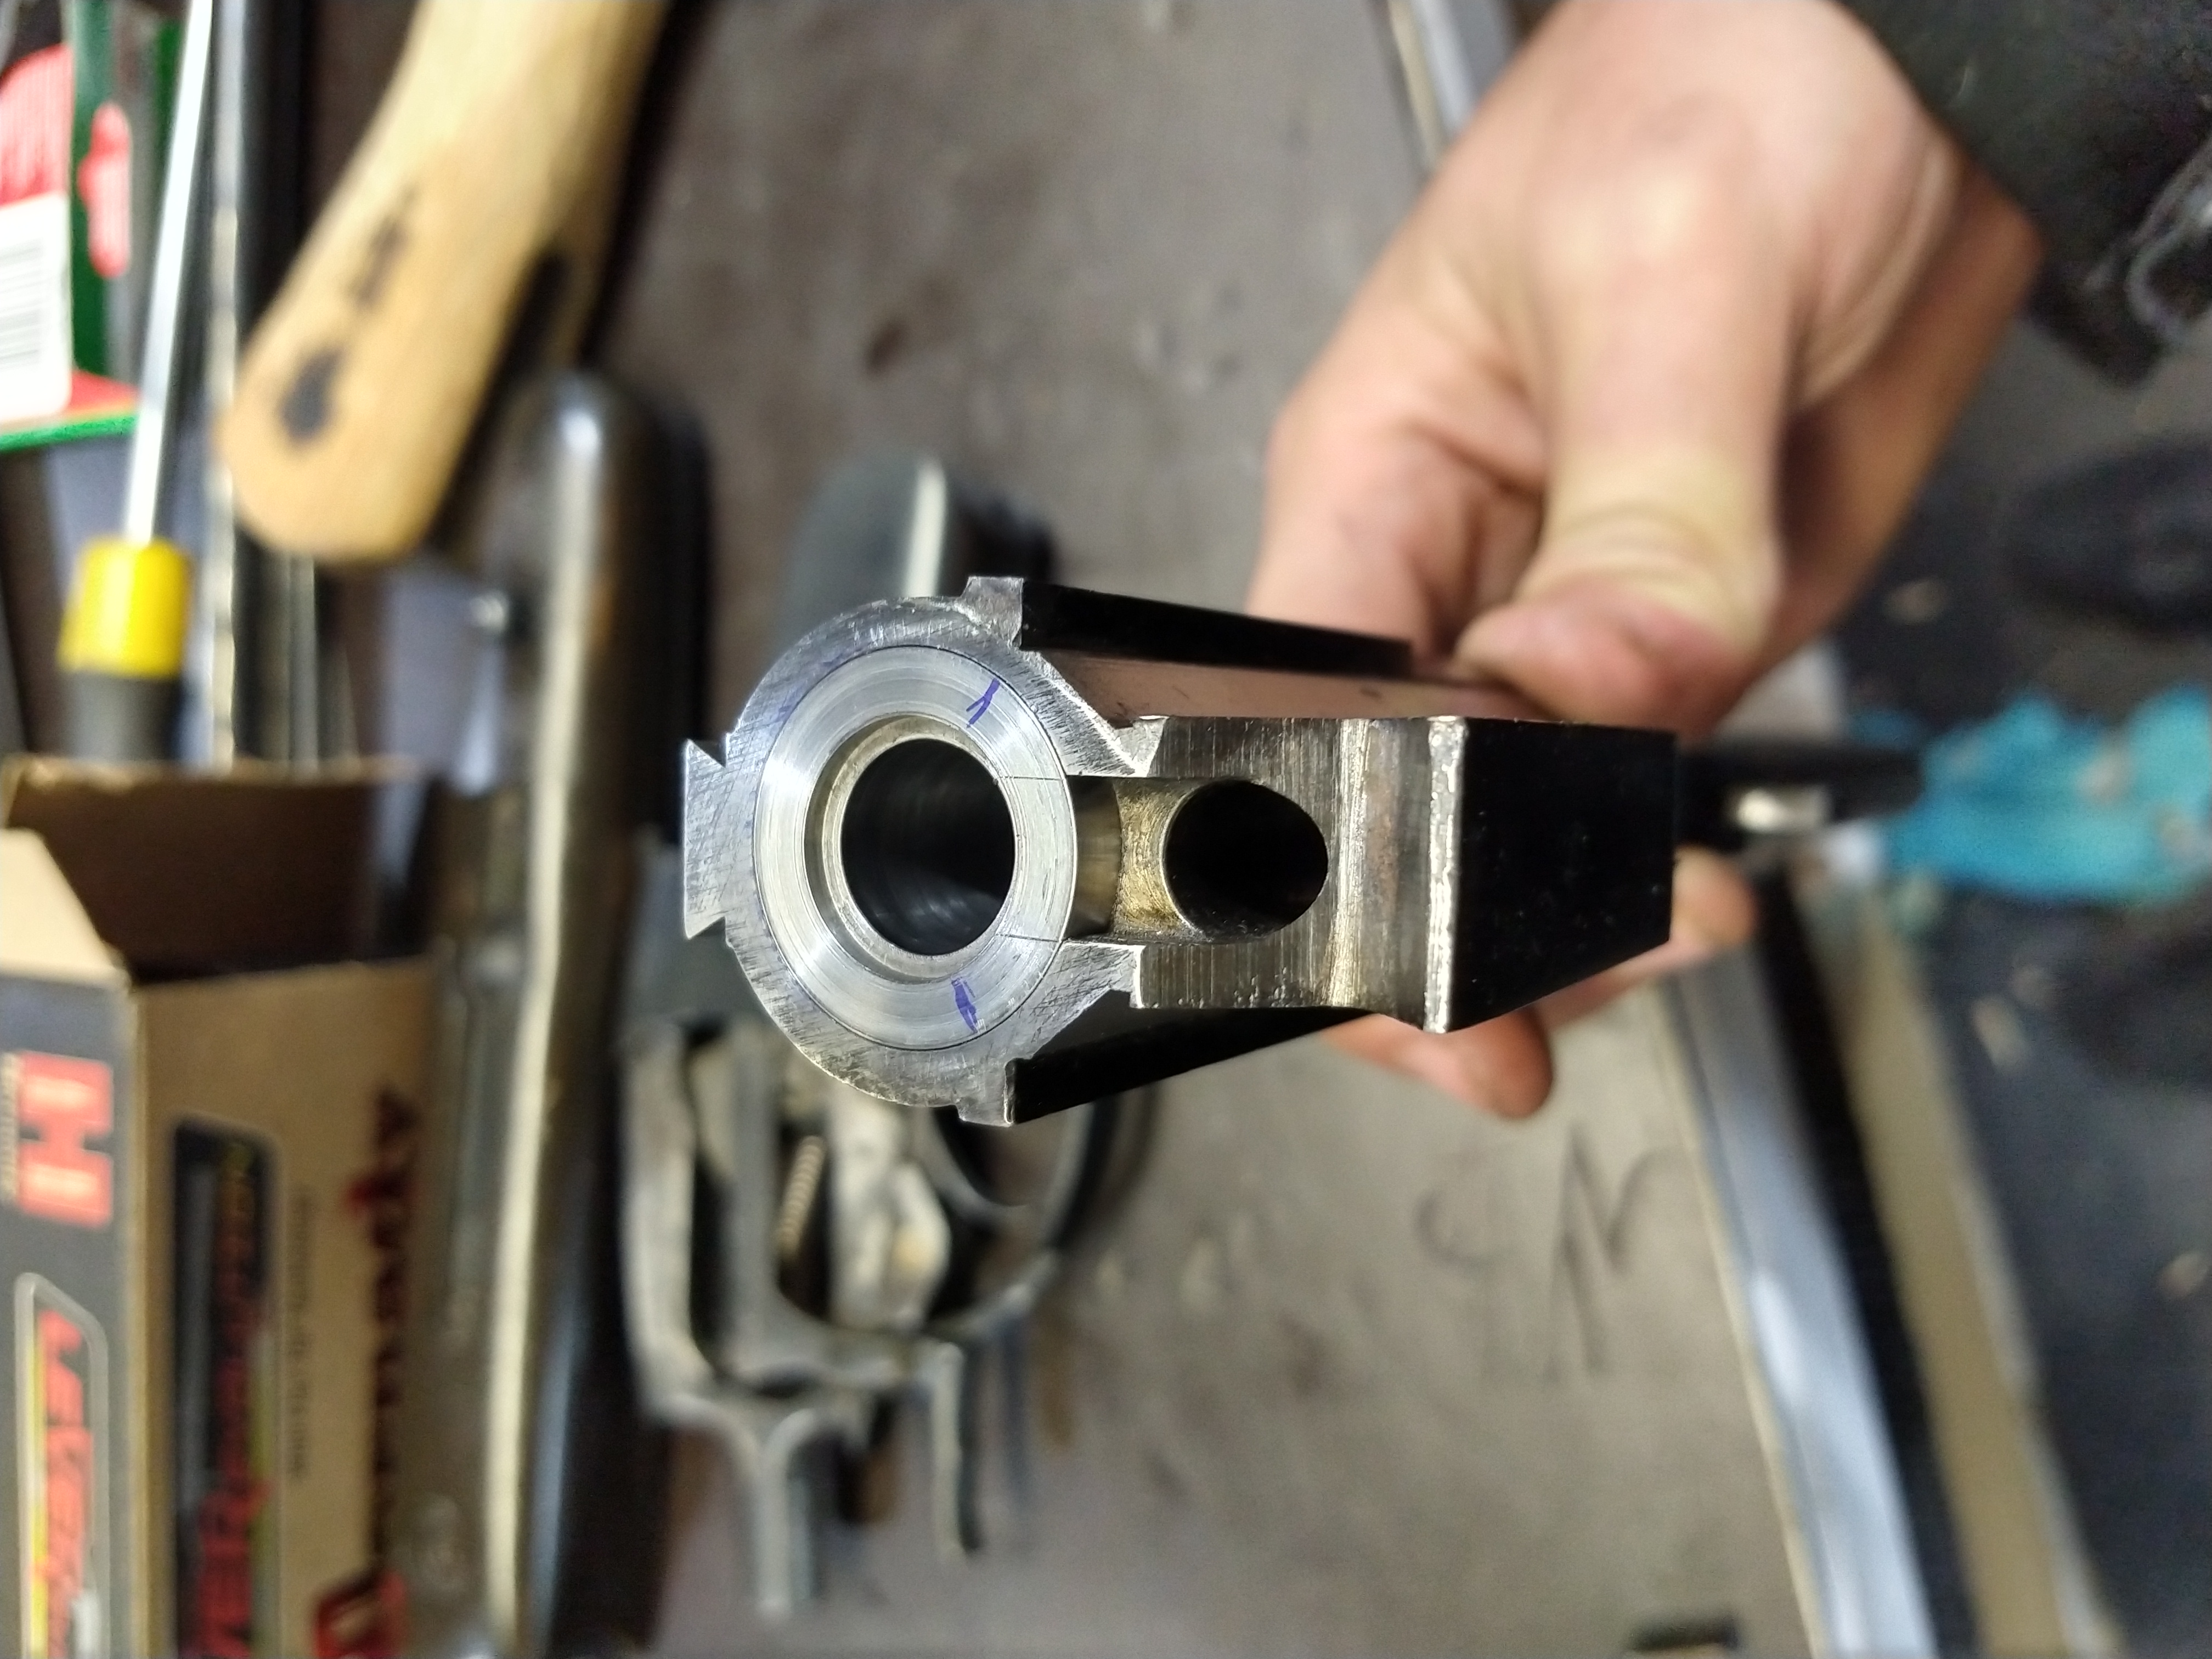

A little more hand fitting and it will be perfect.
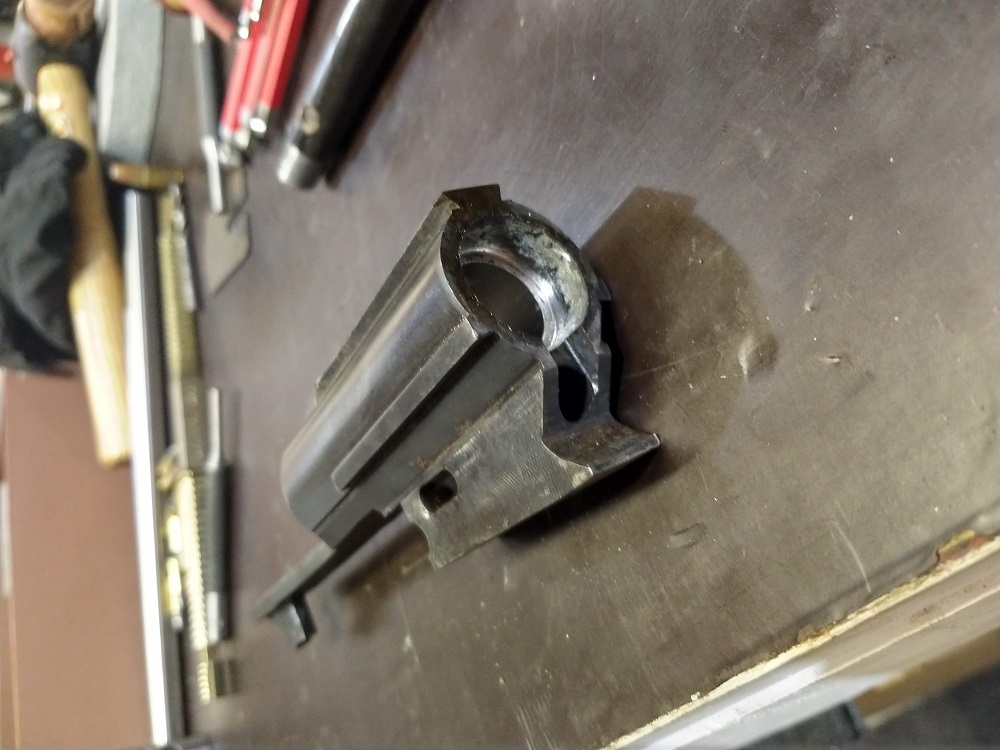
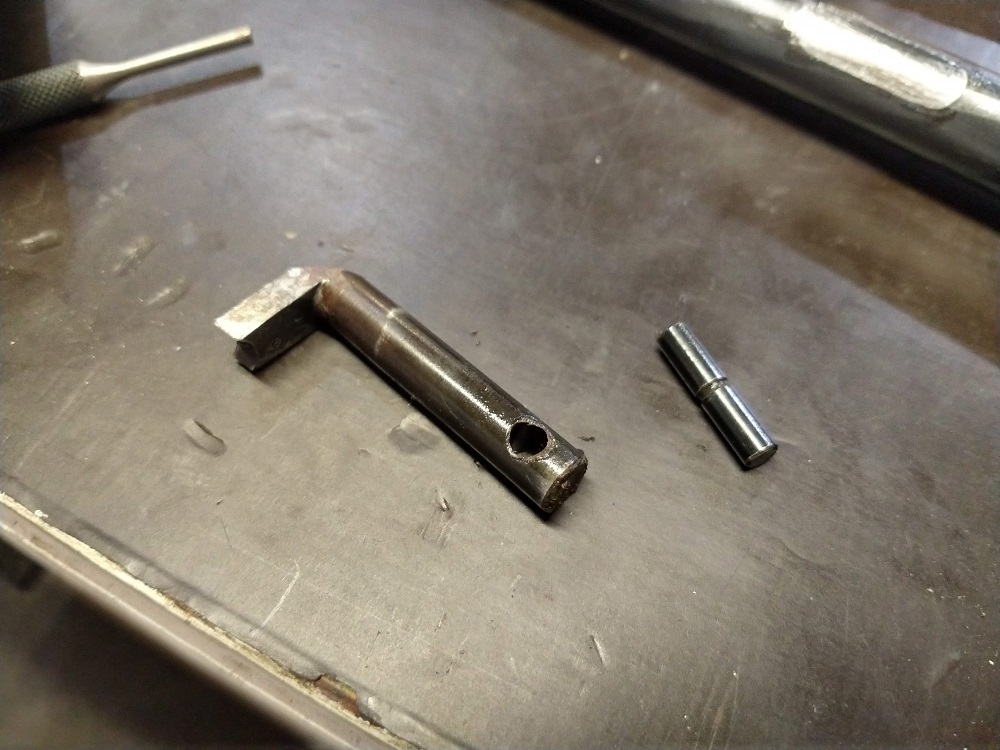
Now I have to machine the extractor to match the chamber and rim. I'm thinking of assembling it all temporarily and fixing the extractor in place with a tiny shim behind it, then doing it in the lathe. That way I can dial the chamber in and match each face perfectly. Any other method would involve a lot of guesswork.
Im tossing up whether to put open sights on this rifle, or a low profile red dot. I will likely put a scope on for working up a load, but I want this to be handy and easy to pack down, so the scope will likely not stay.
-
02-06-2021, 08:01 AM #10Mushroom juice ! Hic !

- Join Date
- Jun 2012
- Location
- Above the Hutt
- Posts
- 6,872
Awesome work
 SixtyTen likes this.Viva la Howa ! R.I.P. Toby | Black rifles matter... | #illegitimate_ute
-
02-06-2021, 10:43 PM #11Member
- Join Date
- Apr 2015
- Location
- Geraldine
- Posts
- 25,556
holy smoke that is great work........ really makes a bloke think.......look forward to seeing how it shoots.... might have to pull finger and sort some decent sights for mine LOL.
-
05-06-2021, 07:46 PM #12Member
- Join Date
- Dec 2015
- Location
- Papakura, Auckland
- Posts
- 601
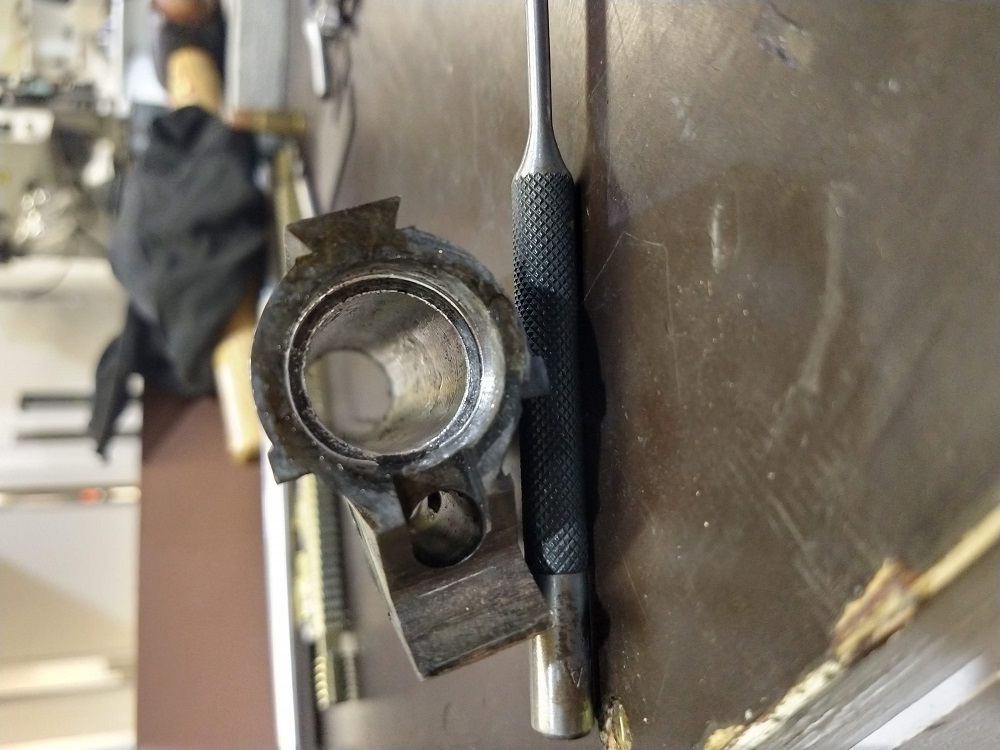
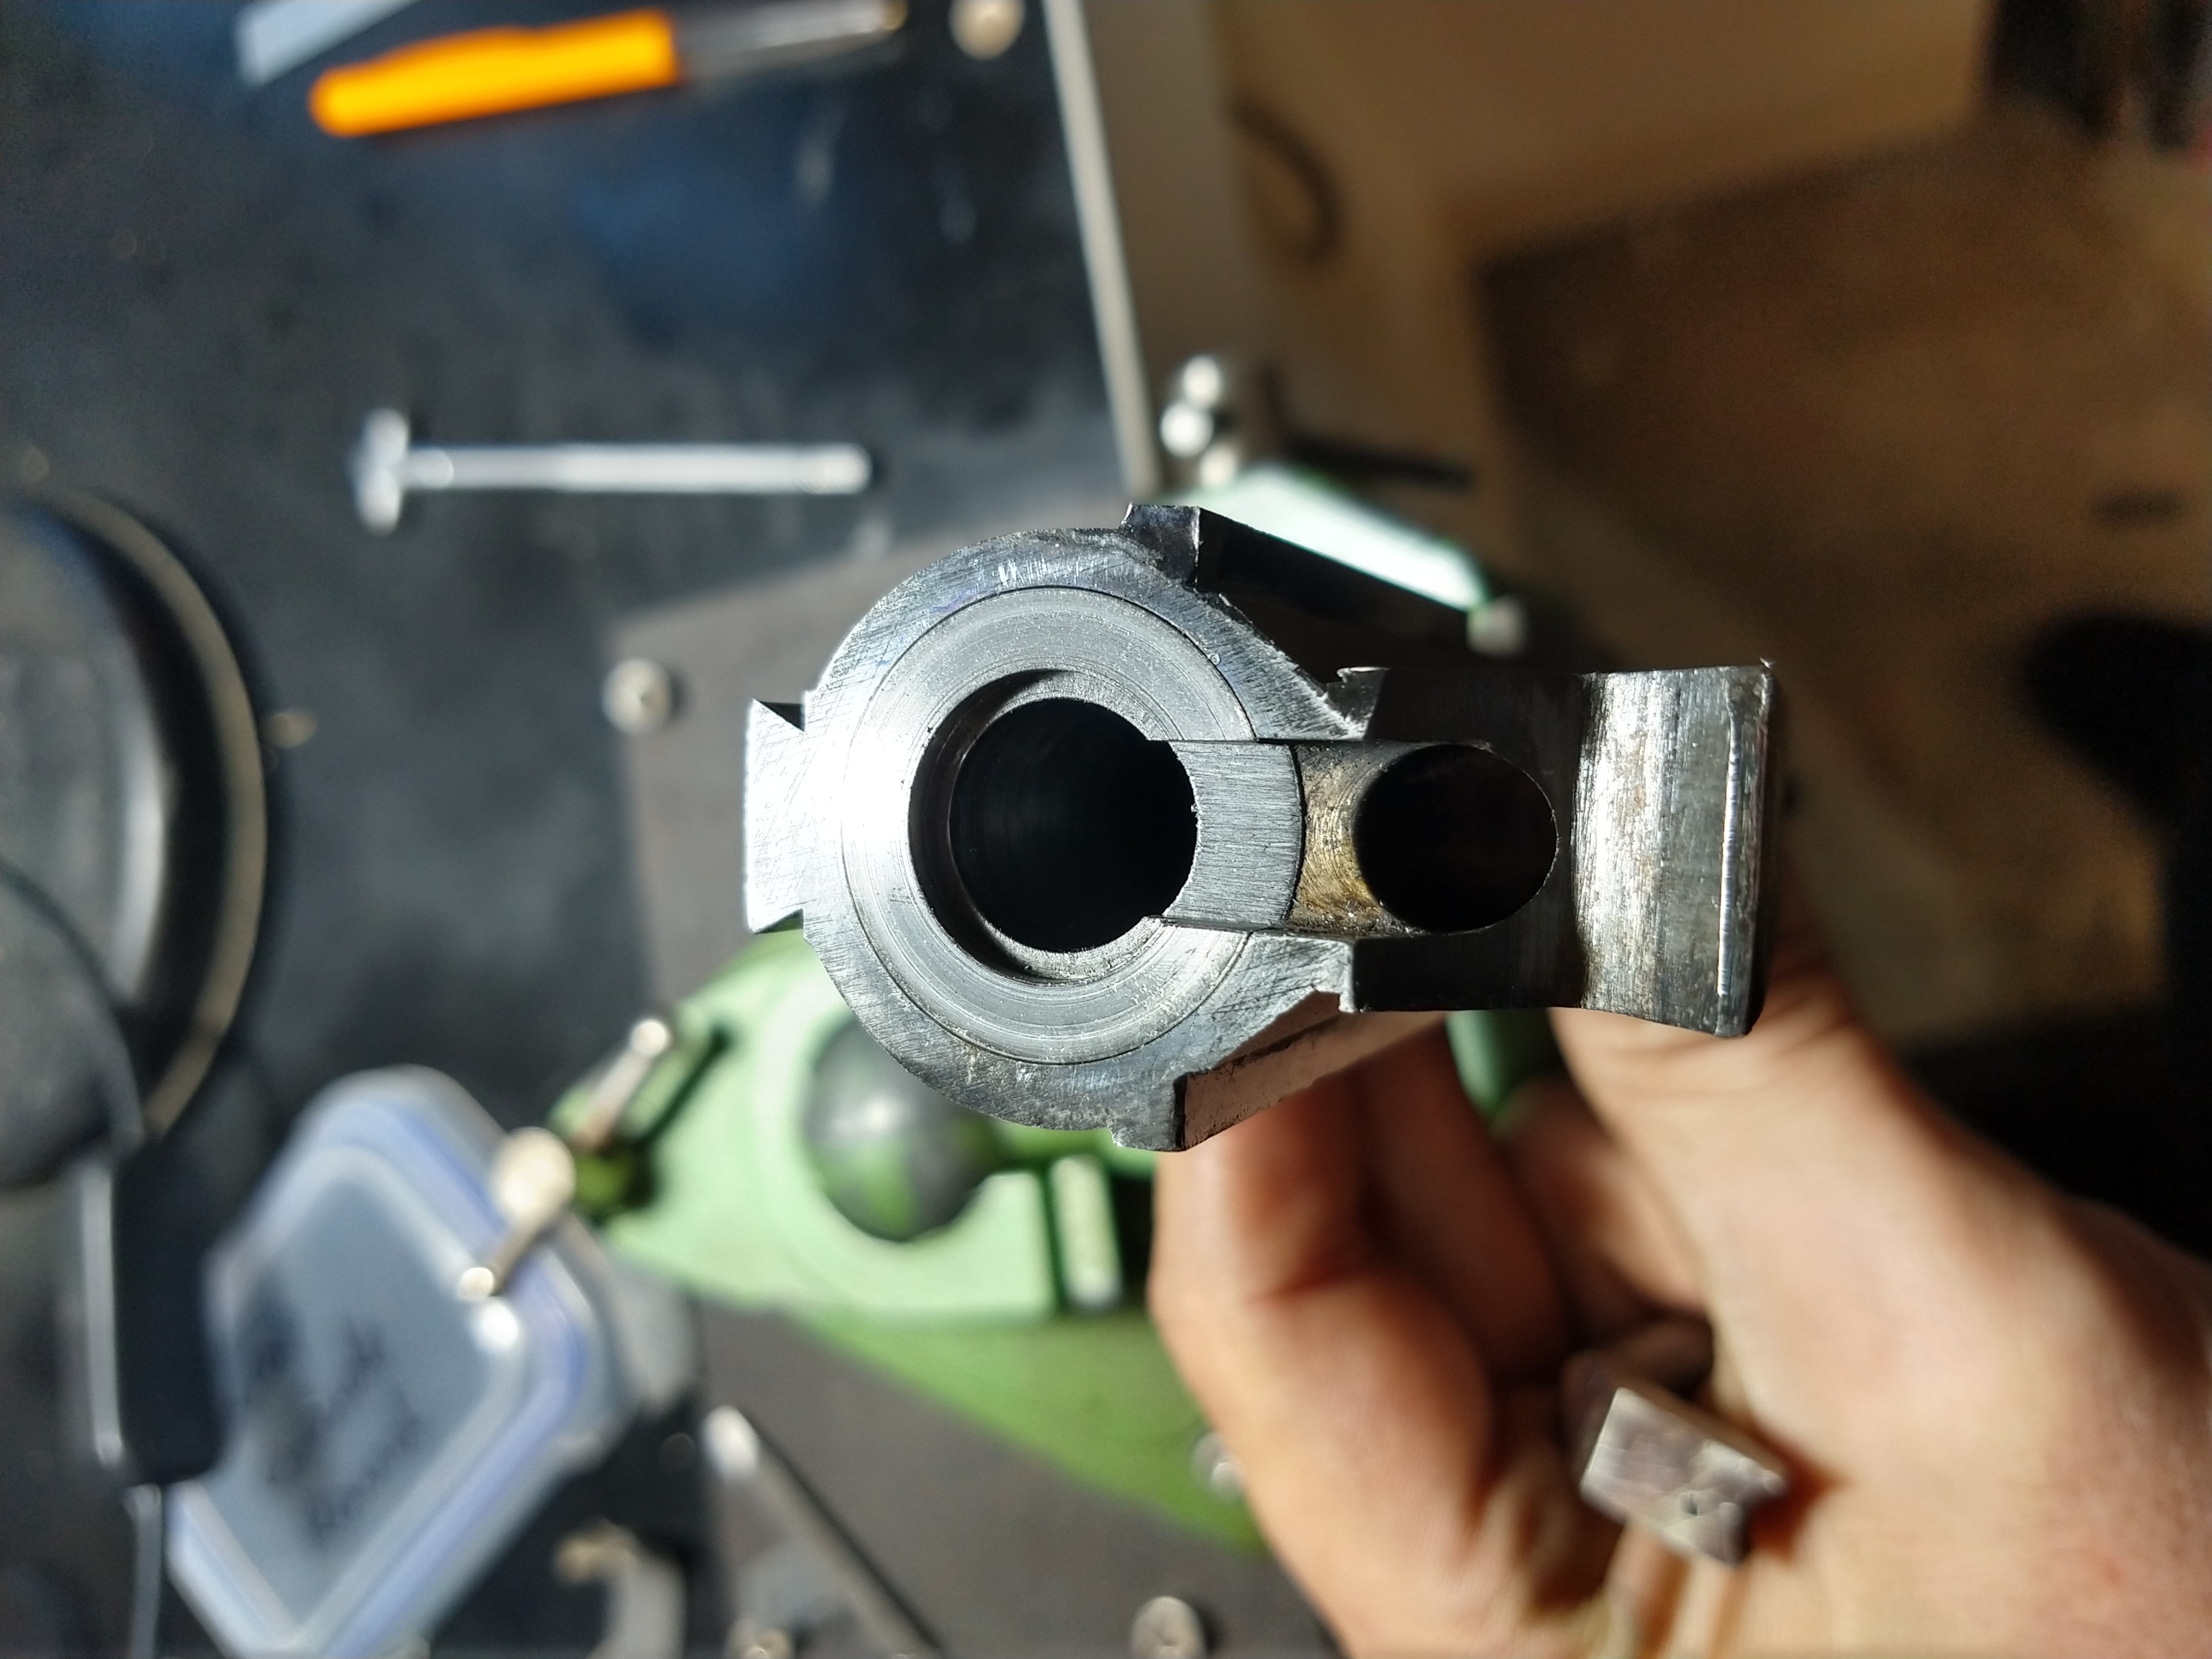
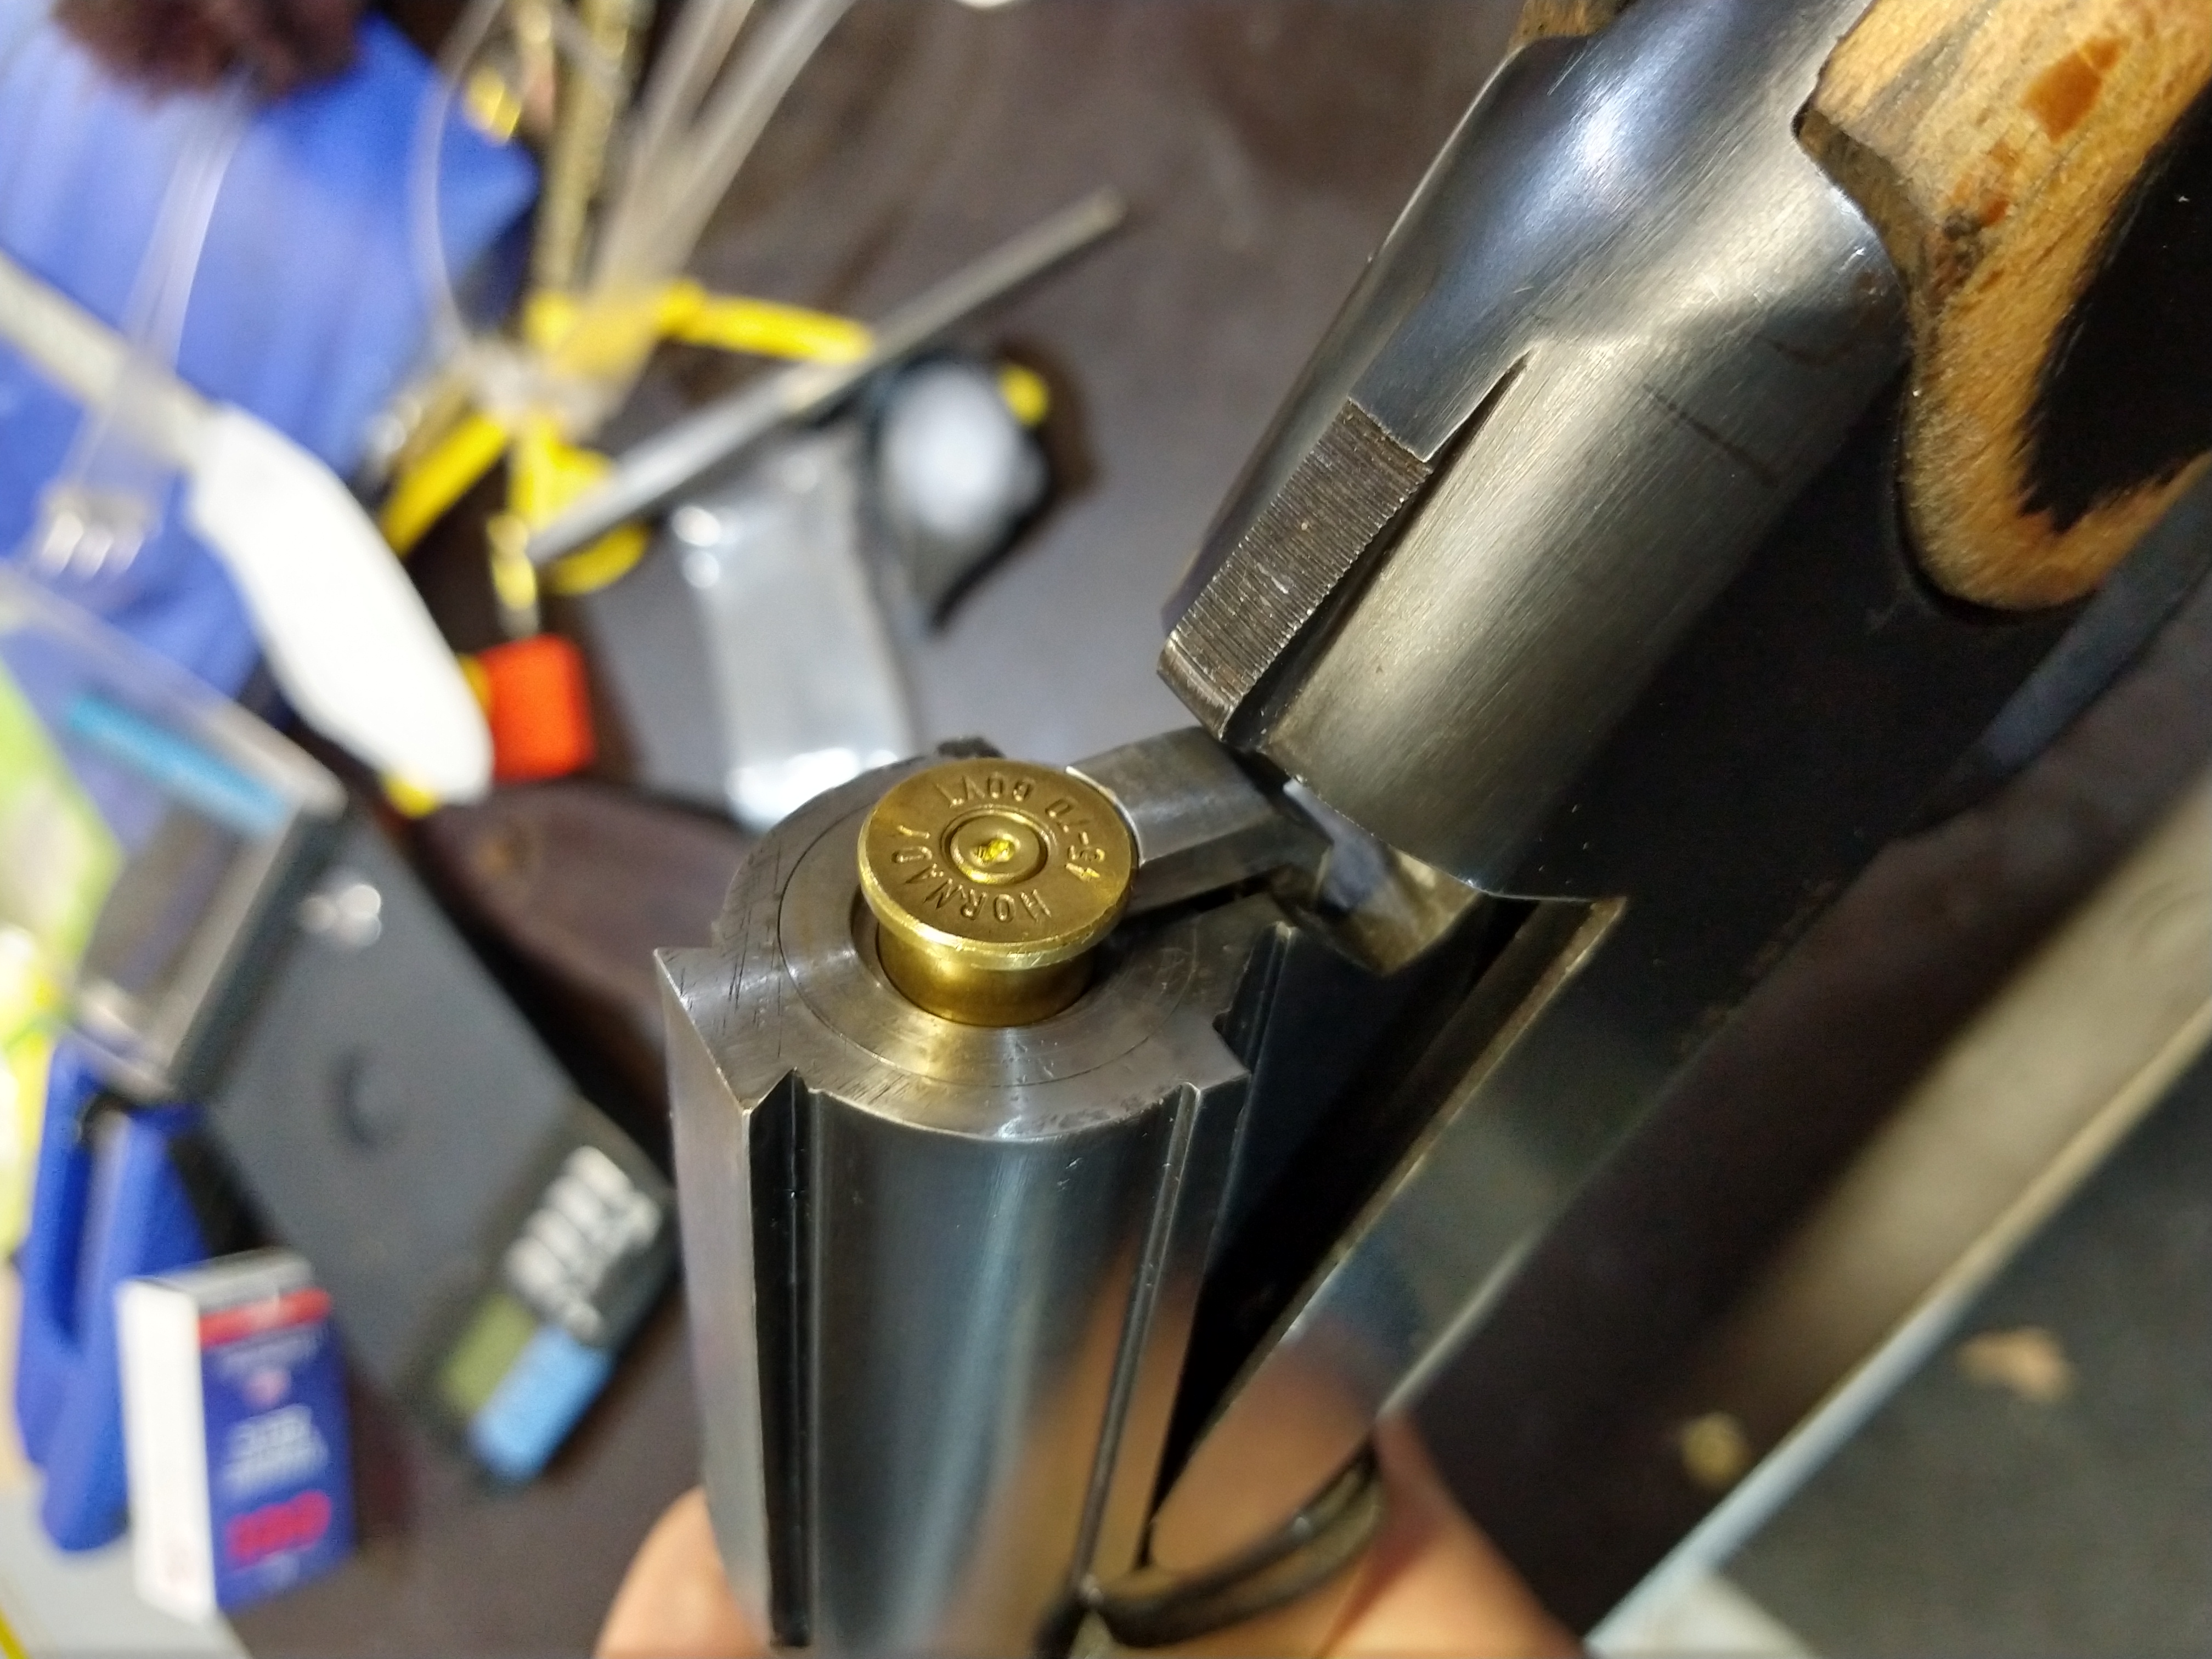
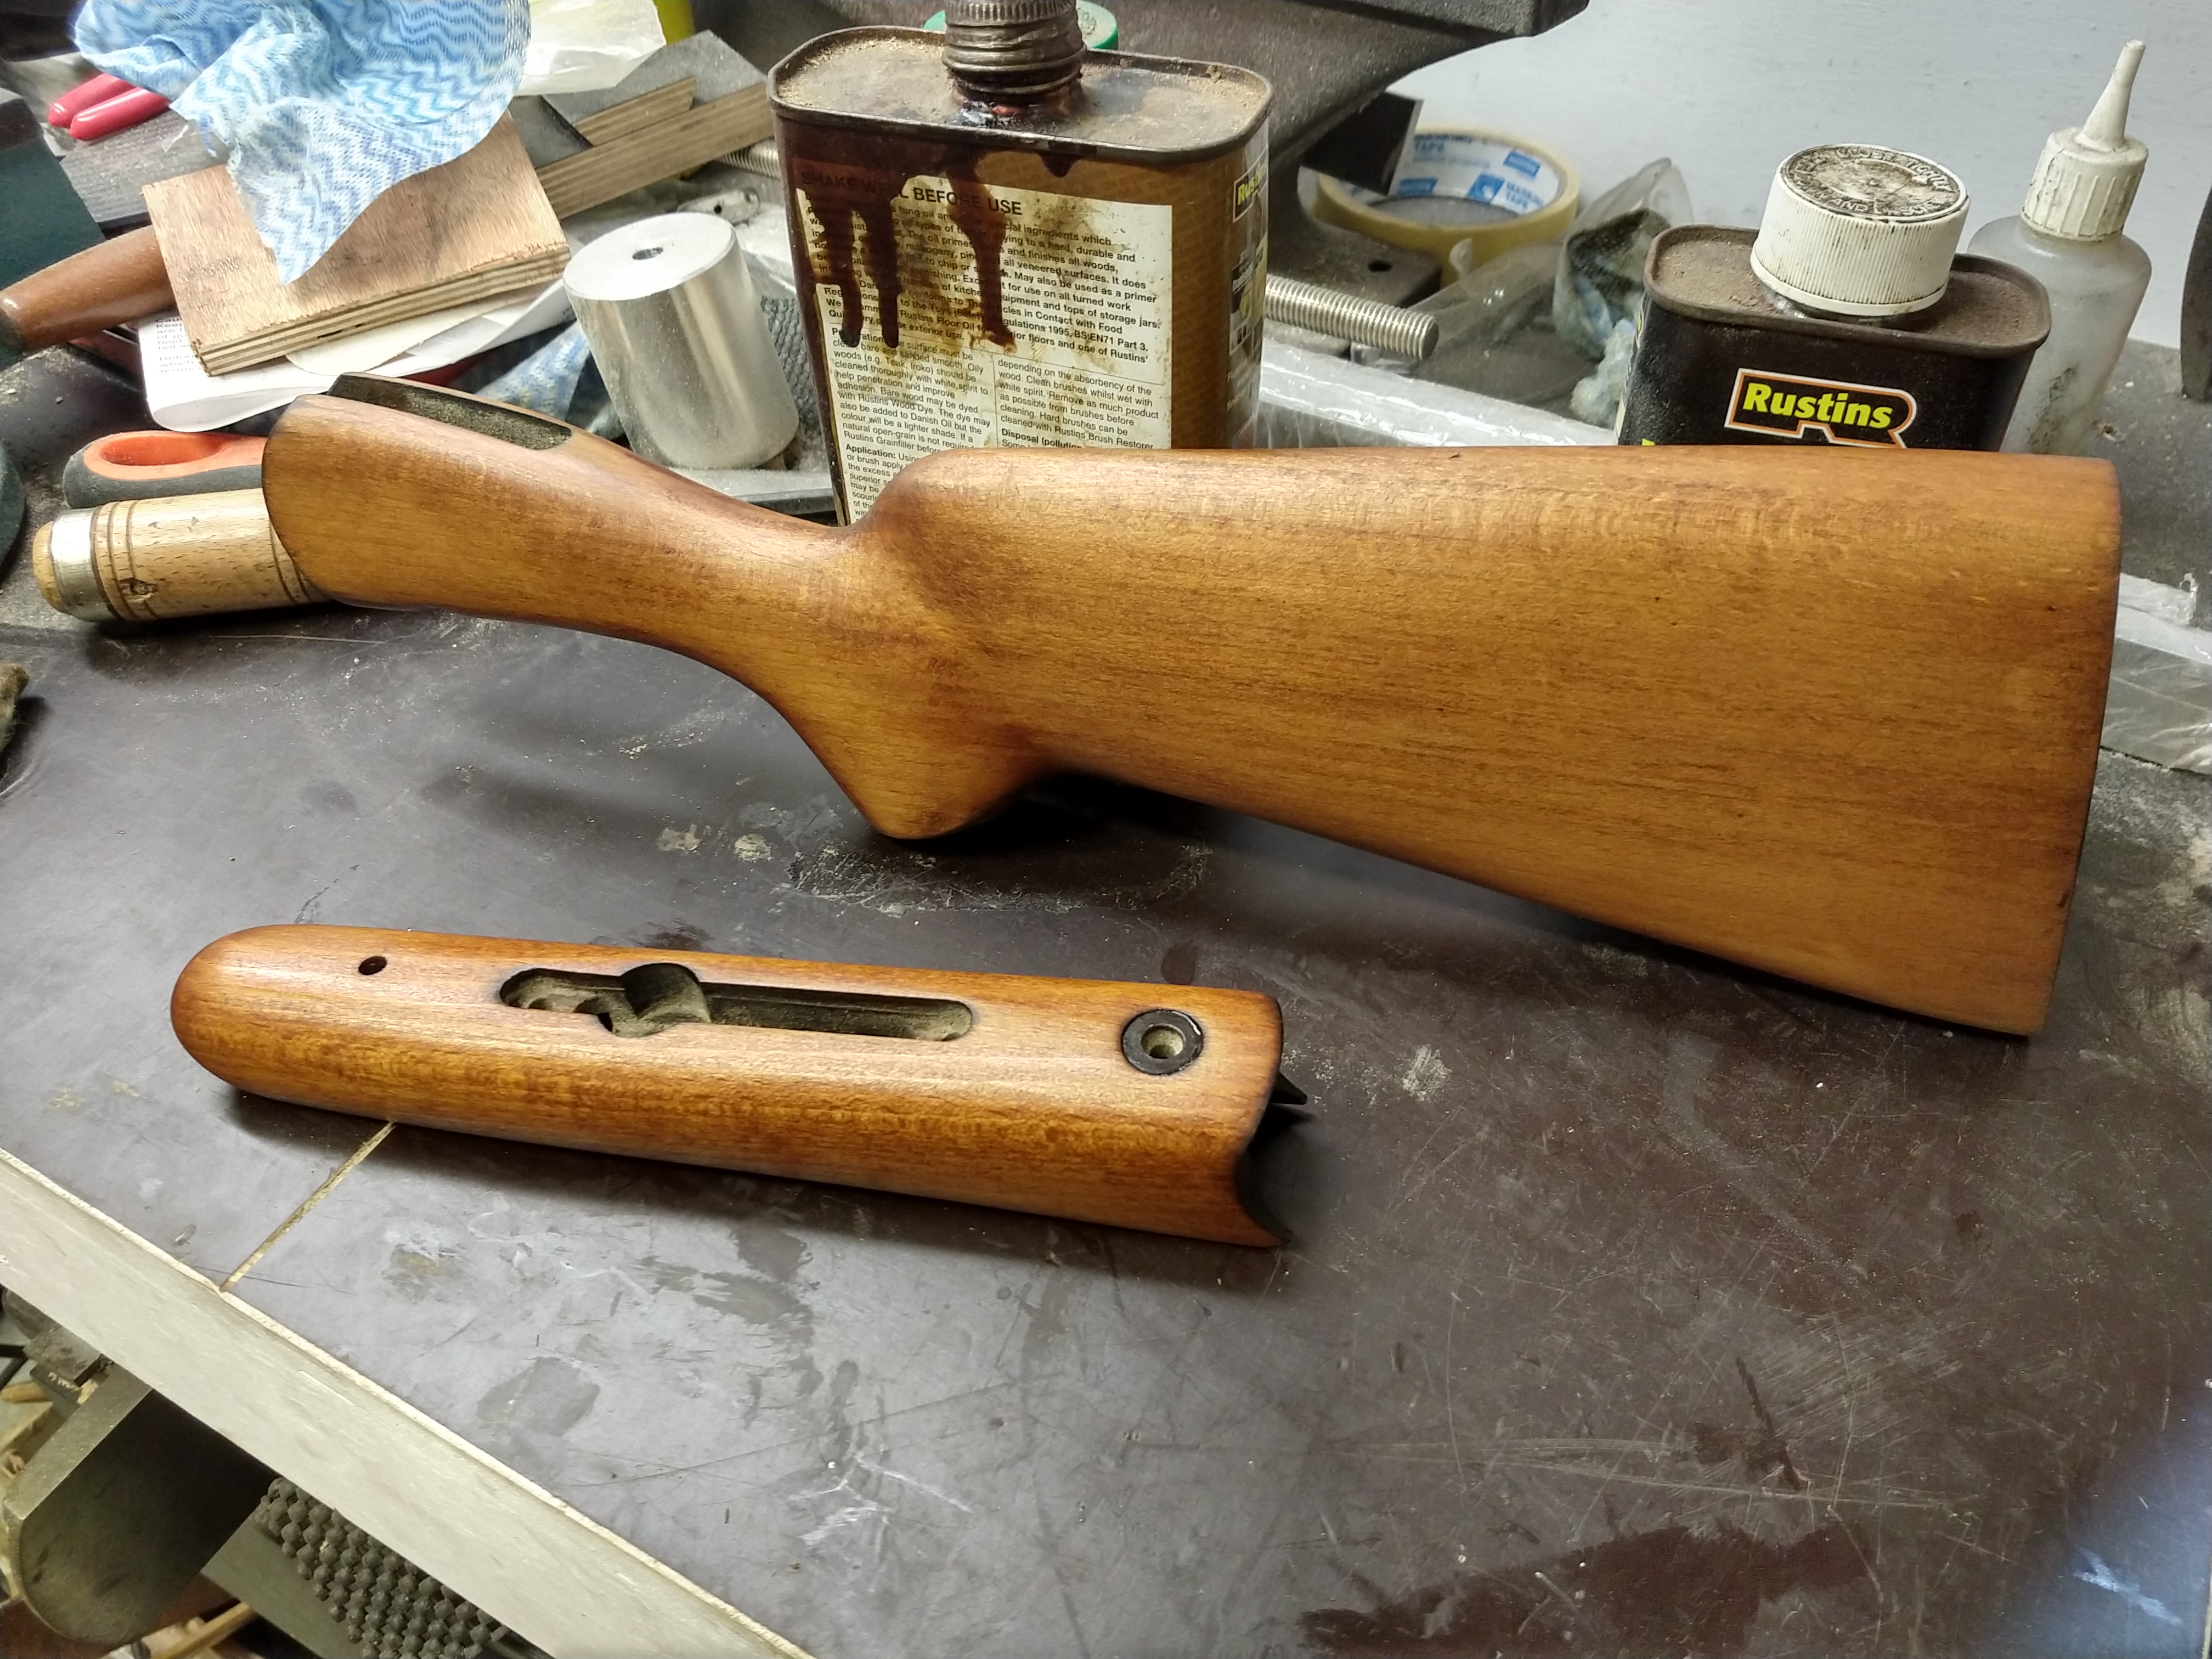
I managed to cut the extractor for the rim by supergluing it to the barrel and taking gentle cuts. Came out quite nice I think. It doesn't fling the cases at your face like it did when it was a 223, rather a nice easy extraction.
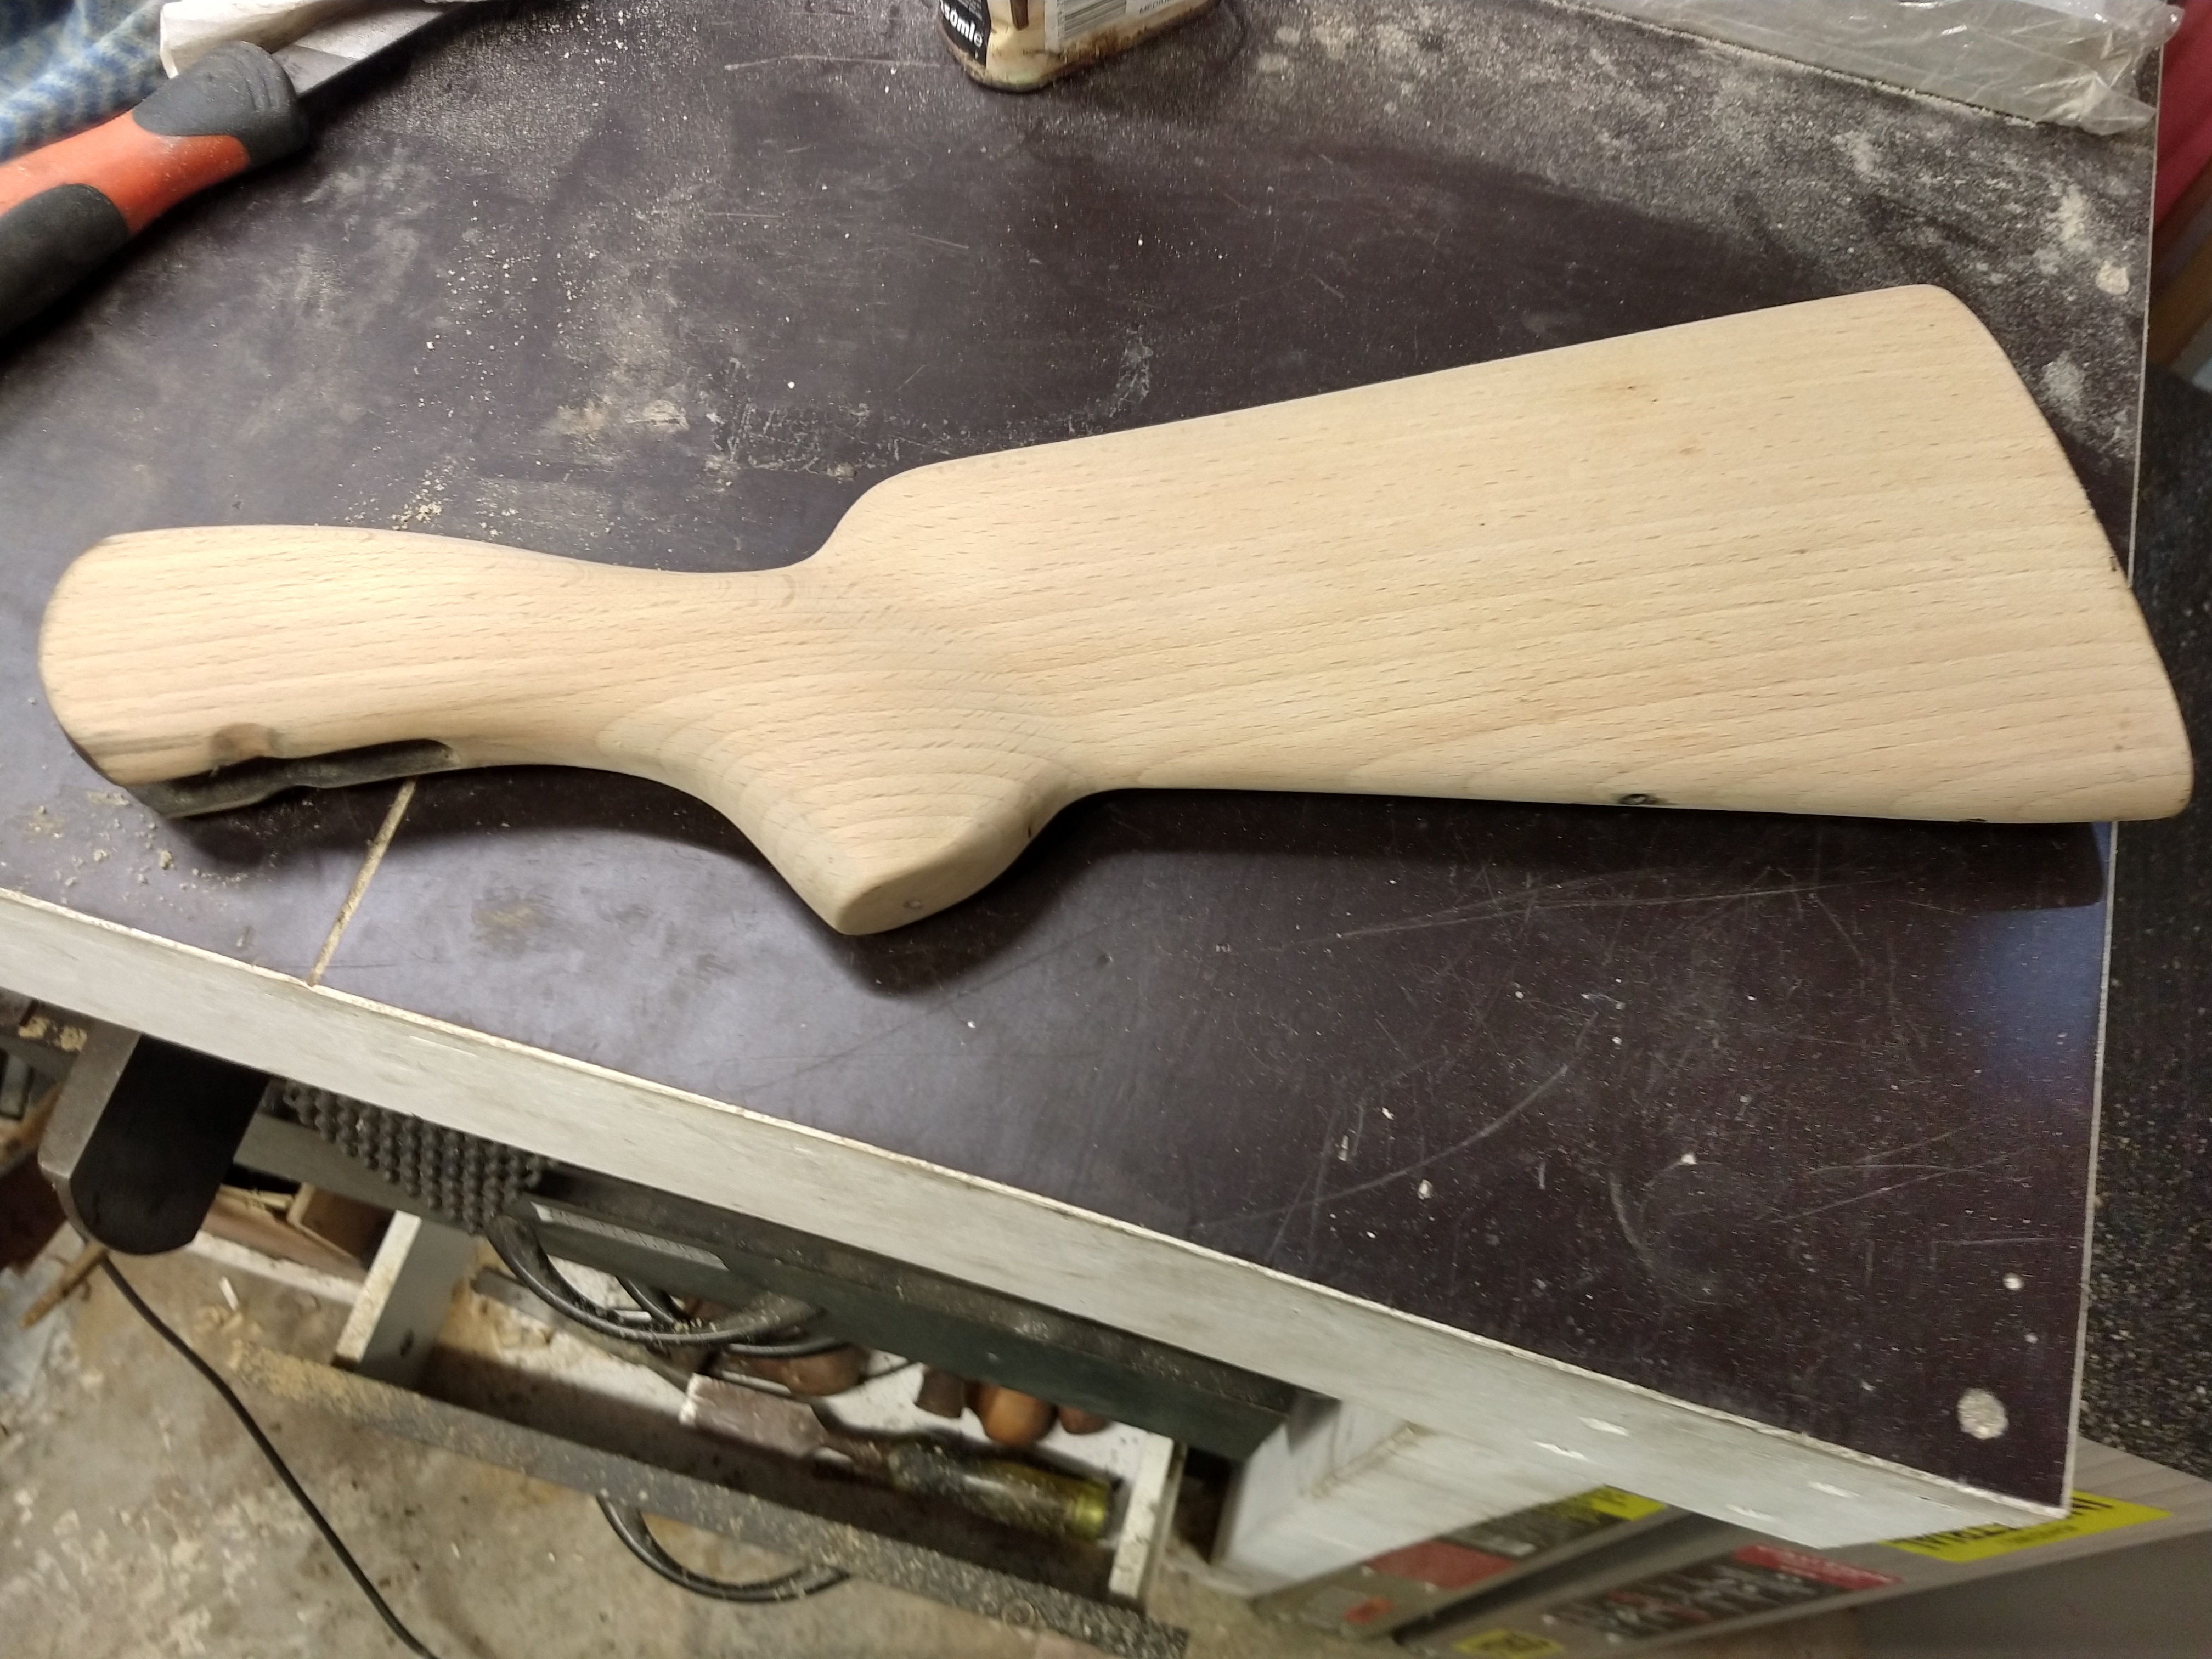
I have also been working on "de-russia-ing" the stock a bit. I have brought the wood down flush with the action and added some shape to the wrist area.
I then sanded what seemed to be fence paint off and rubbed it down to 220g.
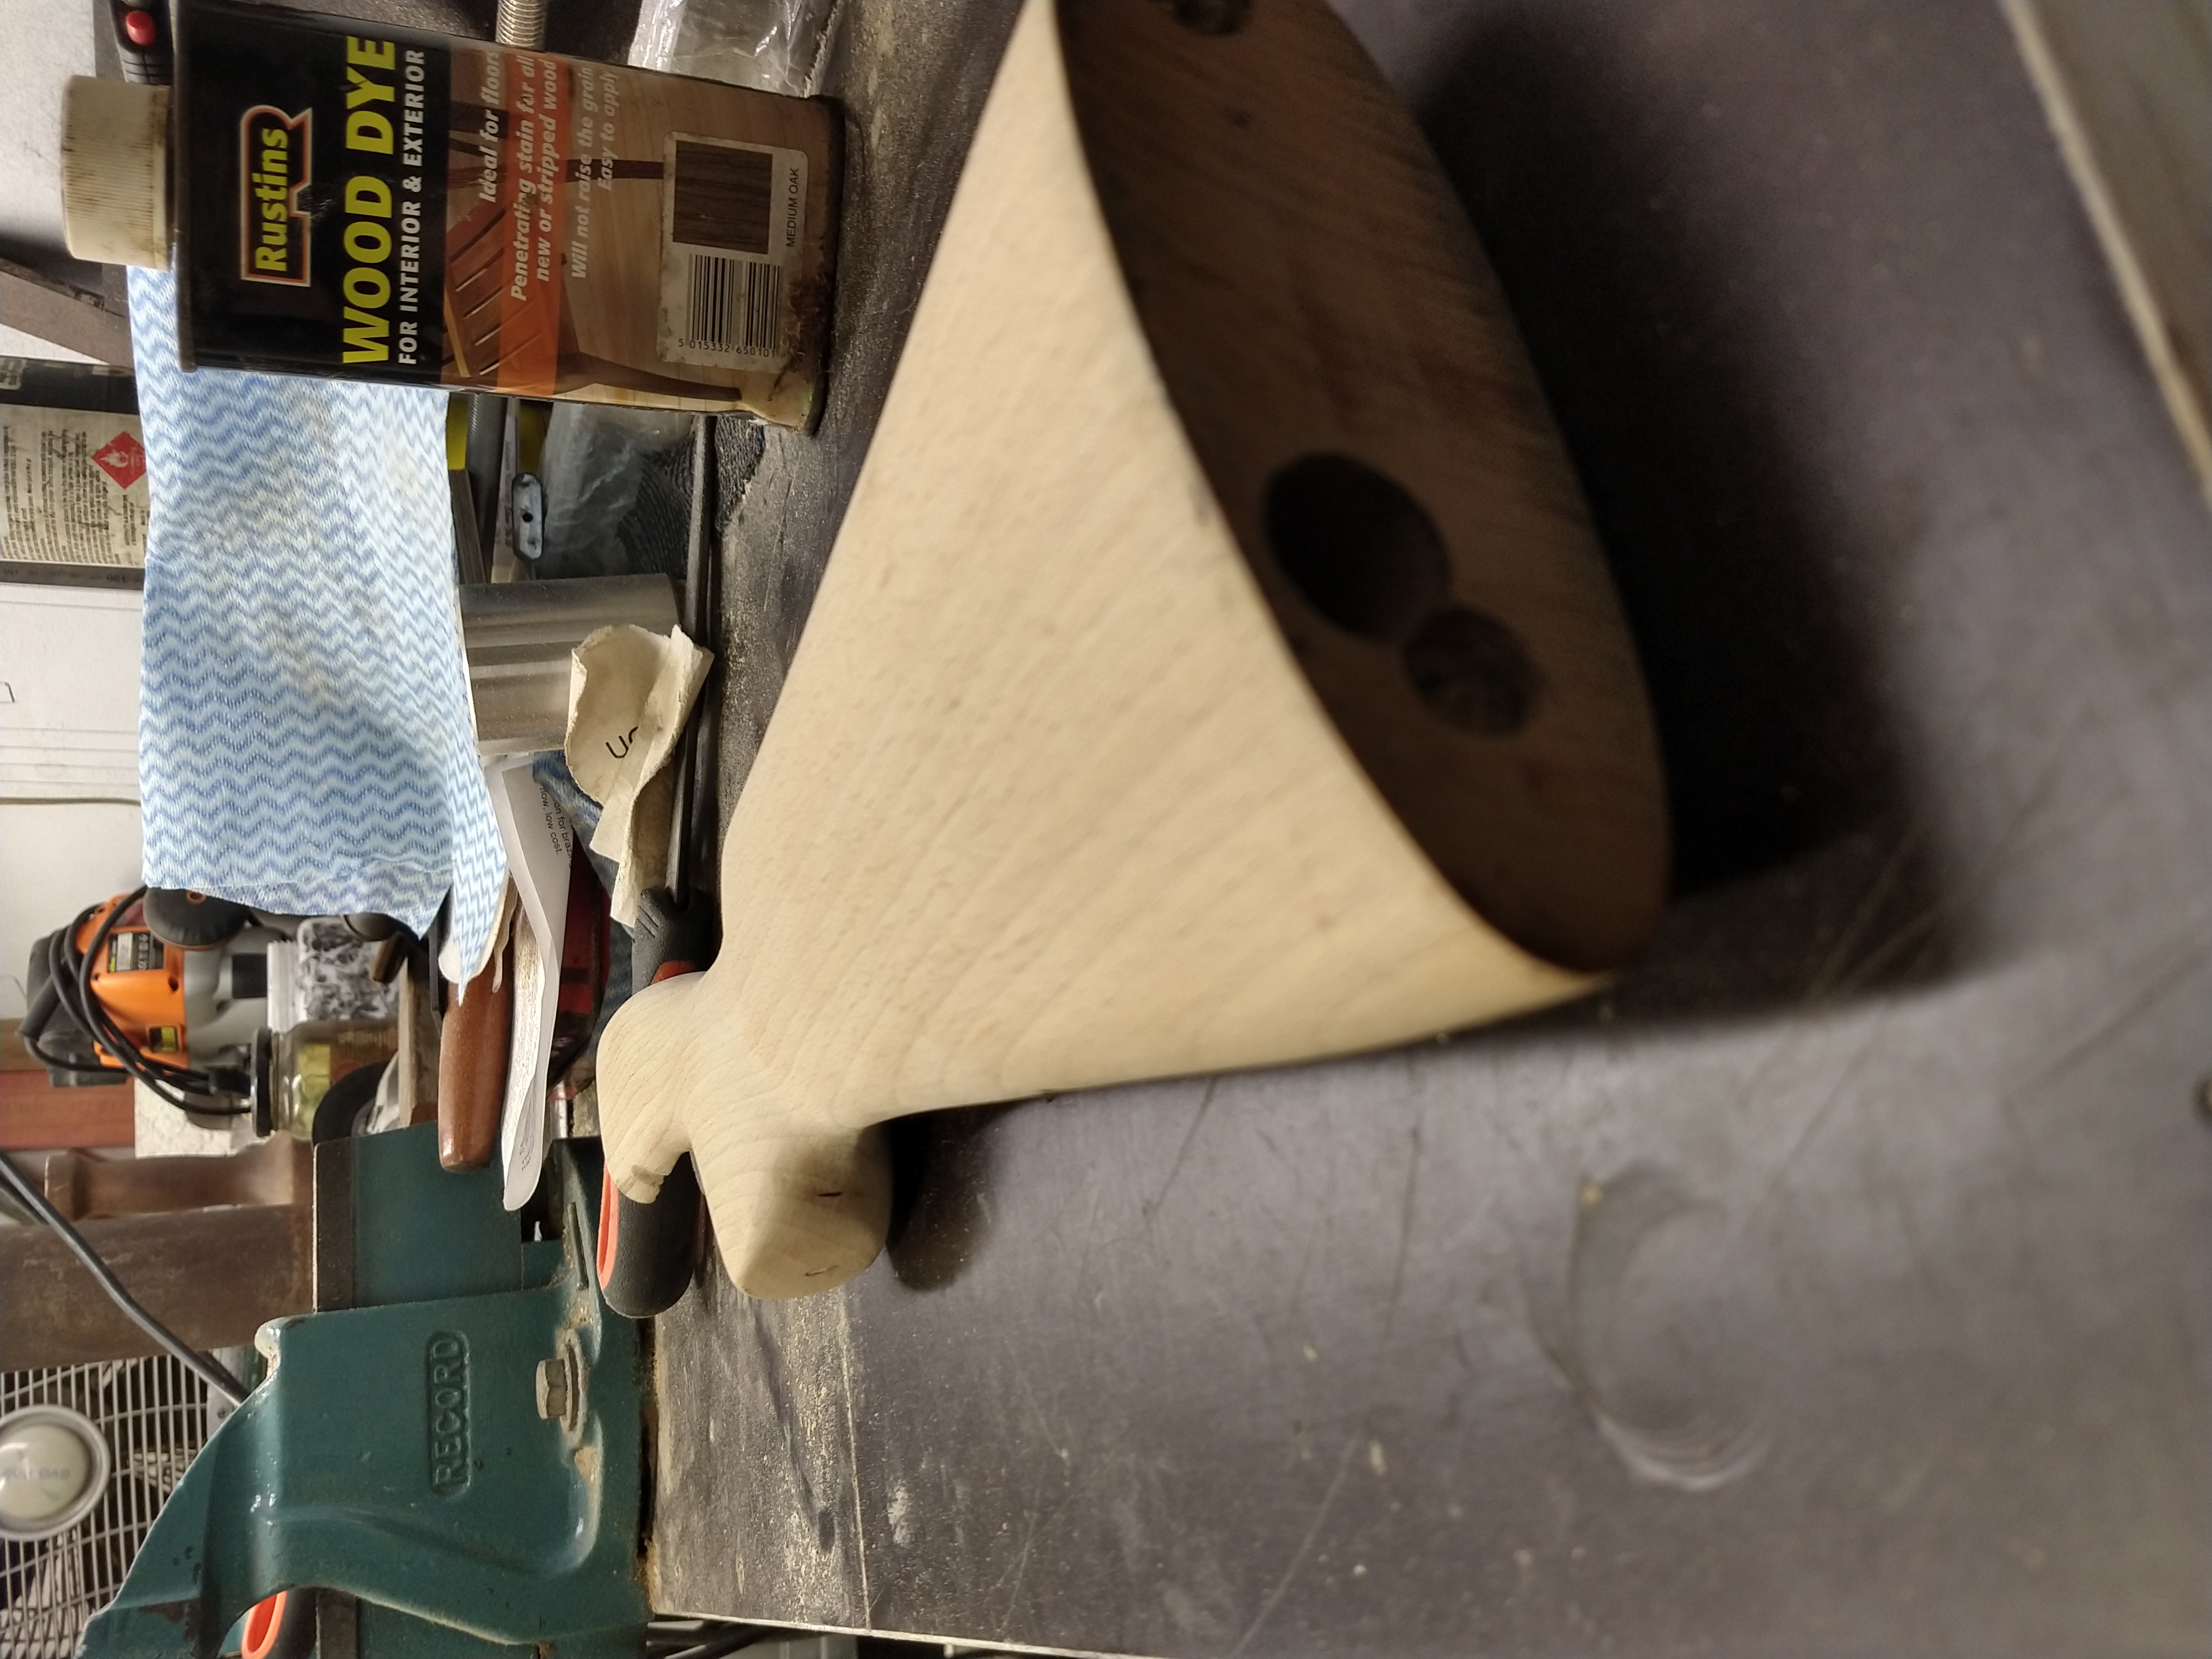
I stained it with a rimu color stain and now am in the process of selling the stock up with Danish oil. This takes a long while.
I'm not going all out with this finish, as I have many other projects on the go and can't sink too many hours into it. Plus I don't want to feel as bad when it inevitably gets dinged and scratched being carted around.
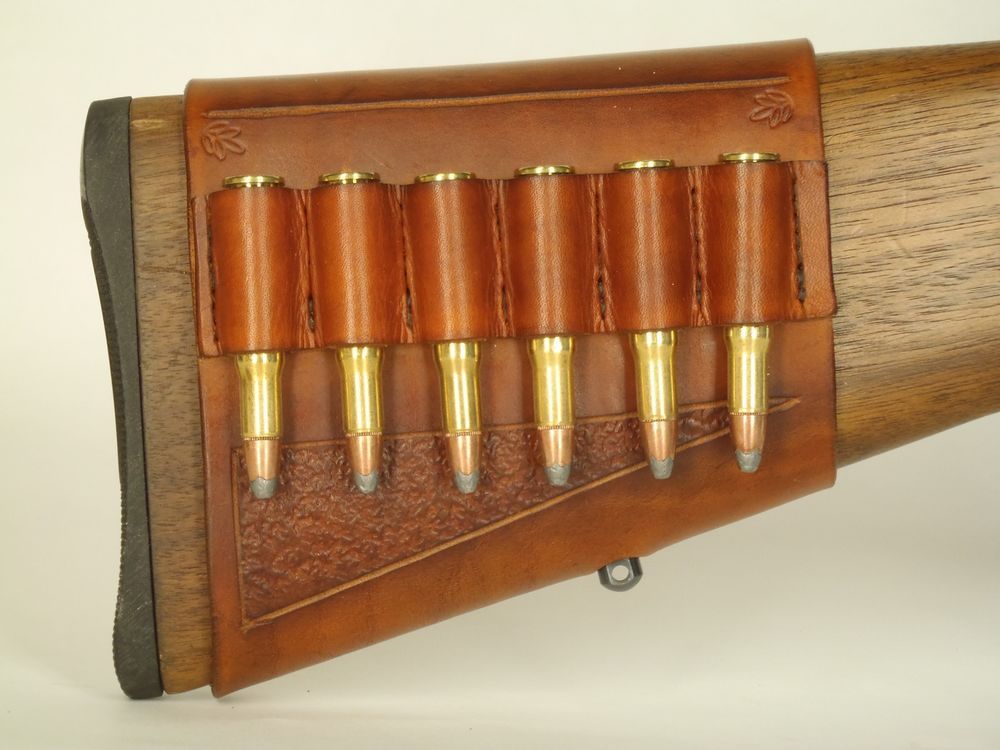
I am thinking about making a leather buttstock wrap that holds 5 or 6 cartridges. I have a bunch of leftover leather and all the gear from my knifemaking days. Has anyone done this themselves or have any design tips? Anyone know a neater way to hold them in place than lacing them on?
 Moa Hunter likes this.
-
06-06-2021, 01:45 PM #13Member

- Join Date
- Jan 2017
- Location
- Chch
- Posts
- 655
Funny that you're doing this project.... this has been on my mind

In terms of avoiding lacing, if you don't mind making it a tight fit, check if a sewn-to-fit mocked up cartridge holder will slip over the pistol grip on the stock from the front - either entirely over the action or with the stock off. Sling swivel can be used to retain the holder from slipping forwards if it's well reinforced. Hardened/waxed leather will be less prone to relaxing and getting loose over time/repeated wetting, but do test runs first, waxed leather doesn't behave the same way as unwaxed. Originally Posted by SixtyTen
SixtyTen likes this.
-
06-06-2021, 03:21 PM #14Member
- Join Date
- Dec 2015
- Location
- Papakura, Auckland
- Posts
- 601
After a bit of research, I think I will probably just stitch it in place using a baseball stitch. The pistol grip will stop it from sliding over from the front, but good idea, something I hadn't thought of. I will likely be using the sling swivel as an anchor. Originally Posted by canross
-
05-06-2021, 08:21 PM #15Member
- Join Date
- Apr 2015
- Location
- Geraldine
- Posts
- 25,556
45/70 you wont be needing 5-6 cartridges LOL.
get in habit of carrying round loose in left hand when game is being approached...reloading is quite quick that way,quick being relative.you could go all NDN and use brass tacks....but that might look.........wait for it.........tacky BOOM BOOM BOOM LOL


 Reply With Quote
Similar Threads
-
New Baikal 121 Single Shot out
By Scout in forum Firearms, Optics and AccessoriesReplies: 15Last Post: 28-11-2020, 12:35 PM
Tags for this Thread
 Posting Permissions
- You may not post new threads
- You may not post replies
- You may not post attachments
- You may not edit your posts
Welcome to NZ Hunting and Shooting Forums! We see you're new here, or arn't logged in. Create an account, and Login for full access including our FREE BUY and SELL section Register NOW!!
All times are GMT +13. The time now is 08:09 PM.

Bookmarks